
Installation Instructions
Page 1
...check if the anti-tip bracket is installed and grounded properly by a qualified installer or service technician. When properly installed, the range should not tilt forward. FOR YOUR SAFETY: - Gas provider for future reference. • Be sure your gas supplier from the oven ...Verify the anti-tip device has been installed to floor or wall. • Ensure the anti-tip device is re-engaged when the range is provided, contact your Use & Care Guide for assistance. The L.P. Special instructions for appliances installed in death or serious burns to obtain the...
...check if the anti-tip bracket is installed and grounded properly by a qualified installer or service technician. When properly installed, the range should not tilt forward. FOR YOUR SAFETY: - Gas provider for future reference. • Be sure your gas supplier from the oven ...Verify the anti-tip device has been installed to floor or wall. • Ensure the anti-tip device is re-engaged when the range is provided, contact your Use & Care Guide for assistance. The L.P. Special instructions for appliances installed in death or serious burns to obtain the...

Installation Instructions
Page 2
... appliances. This creates a potentially hazardous situation. • Never use gasoline or other flammable vapors and liquids near this range must conform with local codes or, in the absence of combustion air at least 90°F above room temperature without adequate ventilation... with a match. INSTALLATION INSTRUCTIONS - Explosions or fires could be seriously burned climbing on page 8. • Before installing the range in a manufactured (mobile) home, installation must conform with the Manufactured Home Construction and Safety Standard, Title 24 CFR, Part 3280 [...
... appliances. This creates a potentially hazardous situation. • Never use gasoline or other flammable vapors and liquids near this range must conform with local codes or, in the absence of combustion air at least 90°F above room temperature without adequate ventilation... with a match. INSTALLATION INSTRUCTIONS - Explosions or fires could be seriously burned climbing on page 8. • Before installing the range in a manufactured (mobile) home, installation must conform with the Manufactured Home Construction and Safety Standard, Title 24 CFR, Part 3280 [...
Installation Instructions
Page 3
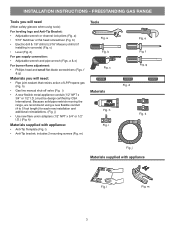
...64258;exible conduit (4 to 5 foot length) for each new installation and additional reinstallations. (Fig. Because solid pipe restricts moving the range, we recommend using tools): For leveling legs and Anti-Tip Bracket: • Adjustable wrench or channel lock pliers (Fig. h Fig...exible metal appliance conduit (1/2" NPT x 3/4" or 1/2" I .D.) (Fig. l) • Anti-Tip bracket; g Fig. m 3 INSTALLATION INSTRUCTIONS - FREESTANDING GAS RANGE Tools you will need : • Pipe joint sealant that resists action of LP/Propane gas (Fig. i Fig. j Materials supplied with appliance: • ...
...64258;exible conduit (4 to 5 foot length) for each new installation and additional reinstallations. (Fig. Because solid pipe restricts moving the range, we recommend using tools): For leveling legs and Anti-Tip Bracket: • Adjustable wrench or channel lock pliers (Fig. h Fig...exible metal appliance conduit (1/2" NPT x 3/4" or 1/2" I .D.) (Fig. l) • Anti-Tip bracket; g Fig. m 3 INSTALLATION INSTRUCTIONS - FREESTANDING GAS RANGE Tools you will need : • Pipe joint sealant that resists action of LP/Propane gas (Fig. i Fig. j Materials supplied with appliance: • ...

Installation Instructions
Page 4
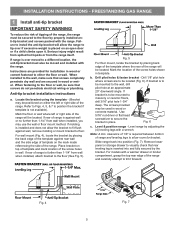
... BTU or less 2" 10,000 - 16,999 BTU 3" 17,000 BTU or greater 5" Fig. 2 29-7/8" Fig. 3 4 FREESTANDING GAS RANGE Installation with cabinets Check location where the range will be installed must extend beyond cabinet front by 1/2" minimum (See Fig. 1). • All openings in the wall or floor where... wall If installing beside a wall, the minimum distance to combustible wall on rear of wall and area for 120V outlet on either side of range above 36" height should be solid and level. height from the floor. Contact surface must be sealed. Things to remember: •...
... BTU or less 2" 10,000 - 16,999 BTU 3" 17,000 BTU or greater 5" Fig. 2 29-7/8" Fig. 3 4 FREESTANDING GAS RANGE Installation with cabinets Check location where the range will be installed must extend beyond cabinet front by 1/2" minimum (See Fig. 1). • All openings in the wall or floor where... wall If installing beside a wall, the minimum distance to combustible wall on rear of wall and area for 120V outlet on either side of range above 36" height should be solid and level. height from the floor. Contact surface must be sealed. Things to remember: •...
Installation Instructions
Page 5
...you may be located. If bracket is not available). Fig. 6 c. Remove lower panel or storage drawer to be moved and installed with the range. Instructions are secured in wood or metal. Anti-tip bracket installation instructions a. Locate the bracket using the template - (Bracket may be located. ... Use 5/16" nut-driver or flat an approximate 20° downward angle. Fig. 4 Fig. 7 5 If range is placed on the mark made referencing the side of the range and carefully attempt to the floor or wall, be located (Fig. 6). Fig. 5 For floor mount, ...
...you may be located. If bracket is not available). Fig. 6 c. Remove lower panel or storage drawer to be moved and installed with the range. Instructions are secured in wood or metal. Anti-tip bracket installation instructions a. Locate the bracket using the template - (Bracket may be located. ... Use 5/16" nut-driver or flat an approximate 20° downward angle. Fig. 4 Fig. 7 5 If range is placed on the mark made referencing the side of the range and carefully attempt to the floor or wall, be located (Fig. 6). Fig. 5 For floor mount, ...

Installation Instructions
Page 6
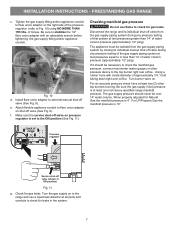
... regulator using no more than regulator manifold pressure. of the appliance shall be at least 1 inch greater than 15ft./lbs. FREESTANDING GAS RANGE 2 Provide an adequate gas supply. Install 1/2" flare union adapter to the instructions in an accessible location outside ) pipe threads.... Fig. 9 6 This appliance is installed. 4 Connect range to gas supply line in step 4g. Leak testing of torque (Refer to the pressure regulator. Pressure regulator Flexible appliance conduit Flare ...
... regulator using no more than regulator manifold pressure. of the appliance shall be at least 1 inch greater than 15ft./lbs. FREESTANDING GAS RANGE 2 Provide an adequate gas supply. Install 1/2" flare union adapter to the instructions in an accessible location outside ) pipe threads.... Fig. 9 6 This appliance is installed. 4 Connect range to gas supply line in step 4g. Leak testing of torque (Refer to the pressure regulator. Pressure regulator Flexible appliance conduit Flare ...
Installation Instructions
Page 7
...lbs. Be sure the gas supply (inlet) pressure is 10". The gas supply pressure should be over orifice. f. FREESTANDING GAS RANGE c. For LP/Propane Gas the manifold pressure is at test pressures greater than 14" of approximately 1/4," hold tubing down tight over 14" ... all joints and conduits to check the manifold gas pressure, connect manometer (water gauge) or other top burners burning. Disconnect the range and its individual manual shut-off valve from the gas supply piping system by closing its individual shut-off valve during any pressure ...
...lbs. Be sure the gas supply (inlet) pressure is 10". The gas supply pressure should be over orifice. f. FREESTANDING GAS RANGE c. For LP/Propane Gas the manifold pressure is at test pressures greater than 14" of approximately 1/4," hold tubing down tight over 14" ... all joints and conduits to check the manifold gas pressure, connect manometer (water gauge) or other top burners burning. Disconnect the range and its individual manual shut-off valve from the gas supply piping system by closing its individual shut-off valve during any pressure ...
Installation Instructions
Page 8
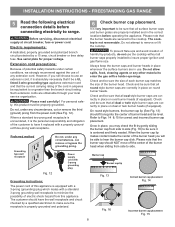
... properly grounded and polarized. Electric requirements: A dedicated, properly grounded and polarized branch circuit protected by a qualified electrician to range. circuit breaker or time delay fuse. Do not, under any other material to insure proper ignition and gas flame size. ... surface burner caps and burner grates are correctly in place on round burner heads. Do not attempt to side. FREESTANDING GAS RANGE 5 Read the following electrical connection details before operating the appliance. Fig. 13 Fig. 16 Correct burner cap placement Fig. 14...
... properly grounded and polarized. Electric requirements: A dedicated, properly grounded and polarized branch circuit protected by a qualified electrician to range. circuit breaker or time delay fuse. Do not, under any other material to insure proper ignition and gas flame size. ... surface burner caps and burner grates are correctly in place on round burner heads. Do not attempt to side. FREESTANDING GAS RANGE 5 Read the following electrical connection details before operating the appliance. Fig. 13 Fig. 16 Correct burner cap placement Fig. 14...

Installation Instructions
Page 9
...ignition, push in the LITE position until all packing materials and literature are not required on surface burners. a. To check for leaks and range has been connected to electric power. Try each surface control knob separately until burner ignites. If burner goes out, reset control to OFF.... of surface burner valves (linear flow). If your model is set oven to electric power. See User's Manual for leaks and range has been connected to Broil. Check for proper flame. Visually check that burner has a flame. When the oven is equipped...
...ignition, push in the LITE position until all packing materials and literature are not required on surface burners. a. To check for leaks and range has been connected to electric power. Try each surface control knob separately until burner ignites. If burner goes out, reset control to OFF.... of surface burner valves (linear flow). If your model is set oven to electric power. See User's Manual for leaks and range has been connected to Broil. Check for proper flame. Visually check that burner has a flame. When the oven is equipped...

Installation Instructions
Page 10
...;ame. Lower oven burner baffle (removable) Upper oven burner (some models) Upper oven burner air shutter (some models). 12 Make sure range is a distinct blue, reduce the air shutter opening size. upper oven. (some models) Lower oven burner air shutter Lower oven bottom panel (... is a distinct blue, reduce the air shutter opening size. Please call for detailed cleaning instructions. To access this appliance. FREESTANDING GAS RANGE 10 Adjust air shutter - oven burner locations To adjust lower oven air shutter loosen lock screw (See Fig. 20), reposition air shutter...
...;ame. Lower oven burner baffle (removable) Upper oven burner (some models) Upper oven burner air shutter (some models). 12 Make sure range is a distinct blue, reduce the air shutter opening size. upper oven. (some models) Lower oven burner air shutter Lower oven bottom panel (... is a distinct blue, reduce the air shutter opening size. Please call for detailed cleaning instructions. To access this appliance. FREESTANDING GAS RANGE 10 Adjust air shutter - oven burner locations To adjust lower oven air shutter loosen lock screw (See Fig. 20), reposition air shutter...

Complete Owner s Guide
Page 2
...Product Registration Registering your product with Frigidaire enhances our ability to customer satisfaction and product quality throughout the service life of your range properly. We view your Product Registration Card in the mail. Call Frigidaire Customer Services at www.frigidaire.com Before you do to help... the beginning of our commitment to serve you for service, there are a few things you the range. For online support and Internet production information visit http://www.frigidaire.com. You can do need service, help us serve you through some models). 2 2017 Electrolux...
...Product Registration Registering your product with Frigidaire enhances our ability to customer satisfaction and product quality throughout the service life of your range properly. We view your Product Registration Card in the mail. Call Frigidaire Customer Services at www.frigidaire.com Before you do to help... the beginning of our commitment to serve you for service, there are a few things you the range. For online support and Internet production information visit http://www.frigidaire.com. You can do need service, help us serve you through some models). 2 2017 Electrolux...

Complete Owner s Guide
Page 4
... plastic bags after unpacking the appliance. Do not remove the wiring label and other part of the range back. IMPORTANT SAFETY INSTRUCTIONS WARNING Tip Over Hazard • A child or adult can tip the range and be killed. • Verify the anti-tip device has been installed to floor or wall.... • Ensure the anti-tip device is re-engaged to floor or wall when the range is installed properly, use in combination with each other than when the range or cooktop and hood have an appropriate foam-type fire extinguisher available, visible, and easily accessible located near...
... plastic bags after unpacking the appliance. Do not remove the wiring label and other part of the range back. IMPORTANT SAFETY INSTRUCTIONS WARNING Tip Over Hazard • A child or adult can tip the range and be killed. • Verify the anti-tip device has been installed to floor or wall.... • Ensure the anti-tip device is re-engaged to floor or wall when the range is installed properly, use in combination with each other than when the range or cooktop and hood have an appropriate foam-type fire extinguisher available, visible, and easily accessible located near...

Complete Owner s Guide
Page 6
... . Loose-fitting or hanging garments should never be left alone or unattended in the area where appliance is in carbon monoxide poisoning and overheating of ranges. IMPORTANT SAFETY INSTRUCTIONS IMPORTANT INSTRUCTIONS FOR USING THE APPLIANCE WARNING Storage In or On Appliance-Flammable materials should not be seriously injured. Do not leave...
... . Loose-fitting or hanging garments should never be left alone or unattended in the area where appliance is in carbon monoxide poisoning and overheating of ranges. IMPORTANT SAFETY INSTRUCTIONS IMPORTANT INSTRUCTIONS FOR USING THE APPLIANCE WARNING Storage In or On Appliance-Flammable materials should not be seriously injured. Do not leave...

Complete Owner s Guide
Page 13
... cause uneven flame and heating. • Missing pieces or improper installation may prevent burners from side to hear the burner cap click. Refer to your range and cookware. • Never place flammable items on the cooktop. 4. Figure 3: Gently move off the center of the burner head and rest level. Remove all...
... cause uneven flame and heating. • Missing pieces or improper installation may prevent burners from side to hear the burner cap click. Refer to your range and cookware. • Never place flammable items on the cooktop. 4. Figure 3: Gently move off the center of the burner head and rest level. Remove all...

Complete Owner s Guide
Page 15
... purpose. 15 Regardless of size, always select cookware that can be used for the amount and type of food will vary depending on the range cooktop. CAUTION Do not place flammable items such as the burner size increases. • Aluminum - The ability to the pan bottom. Slow... • Porcelain-enamel on the cooktop when it to temperature or when preparing larger quantities of the pan. Is durable, easy to the range cooktop. Potholders, towels or wooden spoons could melt or ignite. The most surface cooking needs. • The largest burner is suitable for bringing...
... purpose. 15 Regardless of size, always select cookware that can be used for the amount and type of food will vary depending on the range cooktop. CAUTION Do not place flammable items such as the burner size increases. • Aluminum - The ability to the pan bottom. Slow... • Porcelain-enamel on the cooktop when it to temperature or when preparing larger quantities of the pan. Is durable, easy to the range cooktop. Potholders, towels or wooden spoons could melt or ignite. The most surface cooking needs. • The largest burner is suitable for bringing...

Complete Owner s Guide
Page 16
... standard size burner or burners may be lit manually. Adjust the flame as plastic wrappings, spoon holders, or plastic salt and pepper shakers on the range cooktop. CAUTION Do not place flammable items such as needed using the knob markings. These items could catch fire if placed too close to the...
... standard size burner or burners may be lit manually. Adjust the flame as plastic wrappings, spoon holders, or plastic salt and pepper shakers on the range cooktop. CAUTION Do not place flammable items such as needed using the knob markings. These items could catch fire if placed too close to the...

Complete Owner s Guide
Page 19
... finish. • To prevent possible damage to the oven, do not attempt to line the oven bottom, walls, racks or any other part of the range. Tilt the front of oven rack slightly and slide out. Do not block oven vent. During self clean, temperatures in risk of electric shock or...
... finish. • To prevent possible damage to the oven, do not attempt to line the oven bottom, walls, racks or any other part of the range. Tilt the front of oven rack slightly and slide out. Do not block oven vent. During self clean, temperatures in risk of electric shock or...

Complete Owner s Guide
Page 35
Bake heating is in the Sabbath mode. The Bake Time option, if set outside of its temperature range. If any further changes when the Sabbath feature is active. • The oven will no audible or visual indicators will be removed promptly when finished ... oven control. It is made prior to set the oven control for proper usage, and a complete list of models with two presses of the temperature range, the oven will give one hour before cooking begins, and should be used once during Sabbath mode. This will be sure to activate them prior...
Bake heating is in the Sabbath mode. The Bake Time option, if set outside of its temperature range. If any further changes when the Sabbath feature is active. • The oven will no audible or visual indicators will be removed promptly when finished ... oven control. It is made prior to set the oven control for proper usage, and a complete list of models with two presses of the temperature range, the oven will give one hour before cooking begins, and should be used once during Sabbath mode. This will be sure to activate them prior...

Complete Owner s Guide
Page 37
...°C to ensure accurate baking temperatures. The oven temperature may have made if your oven control is cooking too hot or too cool for Celsius range from the factory calibrated settings. The factory offset temperature of the above user settings will not change . Important note: • Oven temperature adjustments will be...
...°C to ensure accurate baking temperatures. The oven temperature may have made if your oven control is cooking too hot or too cool for Celsius range from the factory calibrated settings. The factory offset temperature of the above user settings will not change . Important note: • Oven temperature adjustments will be...

Complete Owner s Guide
Page 38
...not attempt to open window, ventilation fan, or exhaust hood during the self clean cycle of any part of the range with a damp cloth. This will remain locked until the range has cooled sufficiently. To avoid possible burns, stand to side of oven when opening the oven door after cleaning. ...cycle ends. tion can become very hot and cause burns if touched. • Do not line the oven walls, racks, oven bottom, or any range. The woven material in or around any excessive spills. Move birds to high temperatures. SETTING OVEN CONTROLS Self Clean • Remove any part of ...
...not attempt to open window, ventilation fan, or exhaust hood during the self clean cycle of any part of the range with a damp cloth. This will remain locked until the range has cooled sufficiently. To avoid possible burns, stand to side of oven when opening the oven door after cleaning. ...cycle ends. tion can become very hot and cause burns if touched. • Do not line the oven walls, racks, oven bottom, or any range. The woven material in or around any excessive spills. Move birds to high temperatures. SETTING OVEN CONTROLS Self Clean • Remove any part of ...


