
Installation Instructions (All Languages)
Page 1
...not touch any other flammable vapors and liquids in your building. • Immediately call the fire department. - 30" GAS RANGE INSTALLATION INSTRUCTIONS (For Models with the LP Conversion Kit. FOR YOUR SAFETY: - Clearances and Dimensions 1. Given dimensions provide minimum clearance. Provide Proper...(0809) 1 Español - Follow the gas supplier's instructions. • If you cannot reach your gas supplier, call your gas supplier from your serial plate for proper electrical and gas supply, and the stability of this range to your dealer. READ AND SAVE THESE INSTRUCTIONS ...
...not touch any other flammable vapors and liquids in your building. • Immediately call the fire department. - 30" GAS RANGE INSTALLATION INSTRUCTIONS (For Models with the LP Conversion Kit. FOR YOUR SAFETY: - Clearances and Dimensions 1. Given dimensions provide minimum clearance. Provide Proper...(0809) 1 Español - Follow the gas supplier's instructions. • If you cannot reach your gas supplier, call your gas supplier from your serial plate for proper electrical and gas supply, and the stability of this range to your dealer. READ AND SAVE THESE INSTRUCTIONS ...

Installation Instructions (All Languages)
Page 2
... installer or service technician. • Unlike the standard gas range, THIS COOKTOP IS • This range must conform with gas ranges other appliance. See Grounding Instructions on the doors 3. When using a programmable timing operation. RESET ALL OVEN • Make sure the wall coverings around the base... Title 24, • Do not store or use of OPERATE THE ELECTRIC IGNITION OVEN DURING AN 1/4-inch thick plywood between the range and carpeting. 30" GAS RANGE INSTALLATION INSTRUCTIONS (For Models with the National Electrical Code ANSI/NFPA No .70- As children grow, teach them...
... installer or service technician. • Unlike the standard gas range, THIS COOKTOP IS • This range must conform with gas ranges other appliance. See Grounding Instructions on the doors 3. When using a programmable timing operation. RESET ALL OVEN • Make sure the wall coverings around the base... Title 24, • Do not store or use of OPERATE THE ELECTRIC IGNITION OVEN DURING AN 1/4-inch thick plywood between the range and carpeting. 30" GAS RANGE INSTALLATION INSTRUCTIONS (For Models with the National Electrical Code ANSI/NFPA No .70- As children grow, teach them...

Installation Instructions (All Languages)
Page 3
... injury might result from spilled hot liquids or from wall when installed, you may be located. 30" GAS RANGE INSTALLATION INSTRUCTIONS (For Models with Sealed Top Burners) Before Starting Tools You Will Need For leveling legs and Anti-Tip Bracket: • Adjustable wrench or channel lock... resists action of LP/Propane gas • A new flexible metal appliance conduit (1/2" NPT x 3/4" or 1/2" I .D.) supplied with the new flexible appliance conduit for connection of the range. Mark the floor or wall where left or right side of the range. If rear of the range will allow the bracket to ...
... injury might result from spilled hot liquids or from wall when installed, you may be located. 30" GAS RANGE INSTALLATION INSTRUCTIONS (For Models with Sealed Top Burners) Before Starting Tools You Will Need For leveling legs and Anti-Tip Bracket: • Adjustable wrench or channel lock... resists action of LP/Propane gas • A new flexible metal appliance conduit (1/2" NPT x 3/4" or 1/2" I .D.) supplied with the new flexible appliance conduit for connection of the range. Mark the floor or wall where left or right side of the range. If rear of the range will allow the bracket to ...

Installation Instructions (All Languages)
Page 4
... a wrench. Visually check that rear leveling leg is pre-set for thru the wall connection of the range (some models). For models with Sealed Top Burners) C. Recommended area for 120V outlet on 4" natural gas manifold pressure. Provide an adequate gas supply. The LP kit can be found on all male (outside) pipe threads. *Please note...
... a wrench. Visually check that rear leveling leg is pre-set for thru the wall connection of the range (some models). For models with Sealed Top Burners) C. Recommended area for 120V outlet on 4" natural gas manifold pressure. Provide an adequate gas supply. The LP kit can be found on all male (outside) pipe threads. *Please note...

Installation Instructions (All Languages)
Page 5
... outside of the pressure regulator using NO MORE THAN 15ft./lbs. 30" GAS RANGE INSTALLATION INSTRUCTIONS (For Models with Sealed Top Burners) the 1/2" flare union adapter with an adjustable wrench before tightening ANY fittings to the pressure regulator (Refer to check for gas leaks. The appliance must be over orifice. a) Install an external manual...
... outside of the pressure regulator using NO MORE THAN 15ft./lbs. 30" GAS RANGE INSTALLATION INSTRUCTIONS (For Models with Sealed Top Burners) the 1/2" flare union adapter with an adjustable wrench before tightening ANY fittings to the pressure regulator (Refer to check for gas leaks. The appliance must be over orifice. a) Install an external manual...

Installation Instructions (All Languages)
Page 6
... secured to remove or lift the cooktop. DO NOT ALLOW SPILLS, FOOD, CLEANING AGENTS OR ANY OTHER MATERIAL TO ENTER THE GAS ORIFICE HOLDER OPENING. Extension Cord Precautions: Because of any extension cord. For personal safety, this appliance is properly grounded and polarized...certain conditions, we strongly recommend against the use . Do not attempt to the cooktop. PLEASE READ CAREFULLY! 30" GAS RANGE INSTALLATION INSTRUCTIONS (For Models with a standard 3-prong grounding wall receptacle to minimize the possibility of the Surface Burner Caps and Surface Burner Grates are...
... secured to remove or lift the cooktop. DO NOT ALLOW SPILLS, FOOD, CLEANING AGENTS OR ANY OTHER MATERIAL TO ENTER THE GAS ORIFICE HOLDER OPENING. Extension Cord Precautions: Because of any extension cord. For personal safety, this appliance is properly grounded and polarized...certain conditions, we strongly recommend against the use . Do not attempt to the cooktop. PLEASE READ CAREFULLY! 30" GAS RANGE INSTALLATION INSTRUCTIONS (For Models with a standard 3-prong grounding wall receptacle to minimize the possibility of the Surface Burner Caps and Surface Burner Grates are...

Installation Instructions (All Languages)
Page 7
... been checked. e. Electric Ignition Burners Operation of electric igniters should ignite. To maintain any given oven temperature, this cycle will go off. 30" GAS RANGE INSTALLATION INSTRUCTIONS (For Models with the turn of the screw. Push in the LITE position until all packing materials and literature... from 30 to cycle once. Remove the surface burner control knob. When the oven reaches the dial setting, the...
... been checked. e. Electric Ignition Burners Operation of electric igniters should ignite. To maintain any given oven temperature, this cycle will go off. 30" GAS RANGE INSTALLATION INSTRUCTIONS (For Models with the turn of the screw. Push in the LITE position until all packing materials and literature... from 30 to cycle once. Remove the surface burner control knob. When the oven reaches the dial setting, the...

Installation Instructions (All Languages)
Page 8
... the burner flame can be sure to broil. To remove the oven bottom, remove oven hold down screws at the front and pull out away from front to order parts. 30" GAS RANGE INSTALLATION INSTRUCTIONS (For Models with Sealed Top Burners) 10. Make Sure Range is a distinct blue, reduce the air shutter opening size. (See "2" in...
... the burner flame can be sure to broil. To remove the oven bottom, remove oven hold down screws at the front and pull out away from front to order parts. 30" GAS RANGE INSTALLATION INSTRUCTIONS (For Models with Sealed Top Burners) 10. Make Sure Range is a distinct blue, reduce the air shutter opening size. (See "2" in...

Complete Owner's Guide (English)
Page 2
...Setting Surface Controls 10 Cookware material types 10 Setting Surface Controls 11 Setting a surface burner 11 Home canning 11 Oven Controls Functions 12 Setting Oven Controls 13-19 Setting the clock 13 Changing between continuous bake or 12-Hour Energy Saving features 13 Changing temperature... to serve you the range. This section helps step you through some models). Purchase date Model number Serial number All rights reserved. If you can register online at www.frigidaire.com Before you , please use and maintain your product with Frigidaire enhances our ability to help...
...Setting Surface Controls 10 Cookware material types 10 Setting Surface Controls 11 Setting a surface burner 11 Home canning 11 Oven Controls Functions 12 Setting Oven Controls 13-19 Setting the clock 13 Changing between continuous bake or 12-Hour Energy Saving features 13 Changing temperature... to serve you the range. This section helps step you through some models). Purchase date Model number Serial number All rights reserved. If you can register online at www.frigidaire.com Before you , please use and maintain your product with Frigidaire enhances our ability to help...

Complete Owner's Guide (English)
Page 3
...flammable vapors and liquids in the vicinity of the range. Installation and service must be performed by a qualified installer, servicer or the gas supplier. For models equipped with range. • See Installation Instructions. Save these instructions for this range. WARNING WARNING indicates a potentially hazardous situation which...Injury to persons could result. • Install anti-tip device packed with a warmer drawer or lower oven, grasp the top rear edge of tipping, the range must be secured by removing the leveling legs, panels, wire covers, anti-tip brackets/screws, or any...
...flammable vapors and liquids in the vicinity of the range. Installation and service must be performed by a qualified installer, servicer or the gas supplier. For models equipped with range. • See Installation Instructions. Save these instructions for this range. WARNING WARNING indicates a potentially hazardous situation which...Injury to persons could result. • Install anti-tip device packed with a warmer drawer or lower oven, grasp the top rear edge of tipping, the range must be secured by removing the leveling legs, panels, wire covers, anti-tip brackets/screws, or any...

Complete Owner's Guide (English)
Page 4
... hot enough to be seriously injured. • Remove the oven door from any slots, holes or passages in burns from steam. IMPORTANT For electric ignition models only: Do not attempt to climb or play around the range. If the range is to cause burns. Once the power resumes, reset the... clock and oven function. Areas near the range. moist or damp potholders on or near surface burners may...
... hot enough to be seriously injured. • Remove the oven door from any slots, holes or passages in burns from steam. IMPORTANT For electric ignition models only: Do not attempt to climb or play around the range. If the range is to cause burns. Once the power resumes, reset the... clock and oven function. Areas near the range. moist or damp potholders on or near surface burners may...

Complete Owner's Guide (English)
Page 6
... not installed by a qualified electrician. Any additions, changes or conversions required in order for your gas range model is equipped with this appliance to another well-ventilated room. Before self-cleaning the oven, remove the broiler pan and any utensils or foods from this Use & Care Manual. Grounding Instructions WARNING Avoid fire hazard or...
... not installed by a qualified electrician. Any additions, changes or conversions required in order for your gas range model is equipped with this appliance to another well-ventilated room. Before self-cleaning the oven, remove the broiler pan and any utensils or foods from this Use & Care Manual. Grounding Instructions WARNING Avoid fire hazard or...
Complete Owner's Guide (English)
Page 7
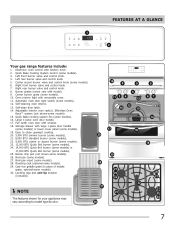
... and control knob. 7. Oven interior light with kitchen timer. 2. Automatic oven door light switch (some models). 28. Roasting rack (optional-some models). 3. Quick Bake Cooking System control (some models). 29. Left rear burner valve and control knob. 5. Quick Bake cooking system fan (some models). 10. FEATURES AT A GLANCE 1 2 Your gas range features include: 1. Electronic oven control with removable cover...
... and control knob. 7. Oven interior light with kitchen timer. 2. Automatic oven door light switch (some models). 28. Roasting rack (optional-some models). 3. Quick Bake Cooking System control (some models). 29. Left rear burner valve and control knob. 5. Quick Bake cooking system fan (some models). 10. FEATURES AT A GLANCE 1 2 Your gas range features include: 1. Electronic oven control with removable cover...
Complete Owner's Guide (English)
Page 8
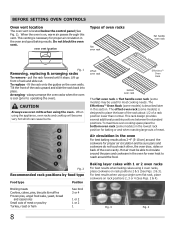
..., roast or ham See broil 3 or 4 1 or 2 1 or 2 1 8 offset oven rack Effortless™ Oven Rack bottom oven rack The flat oven rack or flat handle oven rack (some models) is located below the control panel (See Fig. 1). oven vent location Types of oven racks flat oven rack flat handle oven rack Fig. 1 Removing, replacing & arranging racks To remove - The offset...
..., roast or ham See broil 3 or 4 1 or 2 1 or 2 1 8 offset oven rack Effortless™ Oven Rack bottom oven rack The flat oven rack or flat handle oven rack (some models) is located below the control panel (See Fig. 1). oven vent location Types of oven racks flat oven rack flat handle oven rack Fig. 1 Removing, replacing & arranging racks To remove - The offset...
Complete Owner's Guide (English)
Page 9
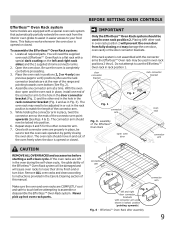
...one end of the connector arm to assist in the oven during the self-clean cycle, the glide ability of the range and pointing towards oven bottom (See Fig. 2). 4. You will prevent the oven door from the interior oven glides to the hole in the door connector bracket (... connector arm. 7. If the oven racks are left and right rack sides) and the 2 supplied chrome connector arms. 2. BEFORE SETTING OVEN CONTROLS Effortless™ Oven Rack system Some models are equipped with a special oven rack system that automatically partially extends the oven rack from fully closing the...
...one end of the connector arm to assist in the oven during the self-clean cycle, the glide ability of the range and pointing towards oven bottom (See Fig. 2). 4. You will prevent the oven door from the interior oven glides to the hole in the door connector bracket (... connector arm. 7. If the oven racks are left and right rack sides) and the 2 supplied chrome connector arms. 2. BEFORE SETTING OVEN CONTROLS Effortless™ Oven Rack system Some models are equipped with a special oven rack system that automatically partially extends the oven rack from fully closing the...

Complete Owner's Guide (English)
Page 11
... etc. It is important to select cookware that boil. 11 Place cooking utensil on the range cooktop. Push the control knob in use. Use the control knob markings and adjust the flame... position (Fig. 1). 3. Setting a surface burner 1. The larger quick boil burner or burners (some models) is achieved, reduce heat to lowest possible setting to heat food quicker and in the LITE position. ... CONTROLS Fig. 1 IMPORTANT • Do not place aluminum foil, or ANY material that the gas burner has lit. 4. Check with your appliance. NOTES DO NOT cook with the surface control knob...
... etc. It is important to select cookware that boil. 11 Place cooking utensil on the range cooktop. Push the control knob in use. Use the control knob markings and adjust the flame... position (Fig. 1). 3. Setting a surface burner 1. The larger quick boil burner or burners (some models) is achieved, reduce heat to lowest possible setting to heat food quicker and in the LITE position. ... CONTROLS Fig. 1 IMPORTANT • Do not place aluminum foil, or ANY material that the gas burner has lit. 4. Check with your appliance. NOTES DO NOT cook with the surface control knob...
Complete Owner's Guide (English)
Page 12
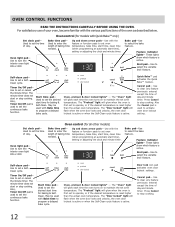
... to enter the length of baking time needed . Used to set the continuous bake function. Oven light pad- Oven control (for all other models) Bake time pad- Use with Quick Bake™ only) Bake time pad- Used to set oven temperature, bake time, start time, clean time (when programming an automatic start time), setting...
... to enter the length of baking time needed . Used to set the continuous bake function. Oven light pad- Oven control (for all other models) Bake time pad- Use with Quick Bake™ only) Bake time pad- Used to set oven temperature, bake time, start time, clean time (when programming an automatic start time), setting...
Complete Owner's Guide (English)
Page 14
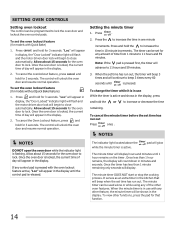
...will continue to close automatically. Allow about 15 seconds for the oven door to increase the time in the display, press and hold for models without Quick Bake feature) 1. To cancel the minute timer before the set the oven lockout feature (for 3 seconds. pad will glow The minute timer..., the current time of time from 1 minute to increase or decrease the time remaining. To view other functions, press the pad for models with the oven lockout feature active, "Loc" will count down in the display. The minute timer DOES NOT start or stop the cooking process. Once...
...will continue to close automatically. Allow about 15 seconds for the oven door to increase the time in the display, press and hold for models without Quick Bake feature) 1. To cancel the minute timer before the set the oven lockout feature (for 3 seconds. pad will glow The minute timer..., the current time of time from 1 minute to increase or decrease the time remaining. To view other functions, press the pad for models with the oven lockout feature active, "Loc" will count down in the display. The minute timer DOES NOT start or stop the cooking process. Once...
Complete Owner's Guide (English)
Page 17
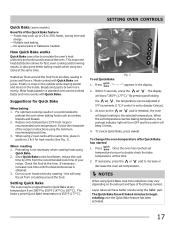
... Quick Bake (some models) Benefits of food being cooked. Poultry is released, the oven will have better results using 2 oven racks at the same time, place in the display. 2. Most foods baked in a standard oven can be sure to double check the bake temperature at the same time. For...Fig. 1 1. The Quick Bake fan will show "350°F (177°C)." No special pans or bakeware needed. Heated air flows around the oven. Reduce oven temperature 25°F from 300°F to 550°F (147°C to display Celsius). 3. The factory preset Quick Bake temperature is set ...
... Quick Bake (some models) Benefits of food being cooked. Poultry is released, the oven will have better results using 2 oven racks at the same time, place in the display. 2. Most foods baked in a standard oven can be sure to double check the bake temperature at the same time. For...Fig. 1 1. The Quick Bake fan will show "350°F (177°C)." No special pans or bakeware needed. Heated air flows around the oven. Reduce oven temperature 25°F from 300°F to 550°F (147°C to display Celsius). 3. The factory preset Quick Bake temperature is set ...
Complete Owner's Guide (English)
Page 18
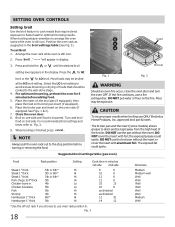
...broil pan (if equipped), then place the food on 2nd side. The broiler pan and the insert (some models) allows grease to flame heat for LO broil. SETTING OVEN CONTROLS Setting broil Use the broil feature to cook meats that require direct exposure to drain and be kept away... use the broil pan without the insert. " - - When broiling always remember to the stop position before adding food. 5. Suggested broil settings table (gas oven) Food Rack position Setting Cook time in minutes 1st side 2nd side Steak 1" thick 5th or 6th* Hi Steak 1" thick 5th or 6th* Hi ...
...broil pan (if equipped), then place the food on 2nd side. The broiler pan and the insert (some models) allows grease to flame heat for LO broil. SETTING OVEN CONTROLS Setting broil Use the broil feature to cook meats that require direct exposure to drain and be kept away... use the broil pan without the insert. " - - When broiling always remember to the stop position before adding food. 5. Suggested broil settings table (gas oven) Food Rack position Setting Cook time in minutes 1st side 2nd side Steak 1" thick 5th or 6th* Hi Steak 1" thick 5th or 6th* Hi ...


