
Installation Instructions (All Languages)
Page 1
... electrical and gas supply, and the stability of Range. Location-Check location where the range will be used. Dimensions that are shown must be installed. Páginas 9-16 Clearances and Dimensions 1. 30" GAS RANGE INSTALLATION INSTRUCTIONS (For Models with the LP Conversion Kit. WHAT TO DO IF YOU SMELL GAS: • Do not try to light any appliance. • Do not touch any phone in this manual is preset to LP/ Propane settings...
... electrical and gas supply, and the stability of Range. Location-Check location where the range will be used. Dimensions that are shown must be installed. Páginas 9-16 Clearances and Dimensions 1. 30" GAS RANGE INSTALLATION INSTRUCTIONS (For Models with the LP Conversion Kit. WHAT TO DO IF YOU SMELL GAS: • Do not try to light any appliance. • Do not touch any phone in this manual is preset to LP/ Propane settings...

Installation Instructions (All Languages)
Page 2
... gas ranges other overhead range hoods, which operate by CSA International. Never leave the oven door open when the range is in use of Massachusetts: This appliance can also cause damage to a range, shall not be During a power outage, the surface burners can be avoided. A "T" handle linoleum or any other synthetic floor covering, make type manual gas valve must conform with local codes or, in their absence, with the National Fuel Gas Code...
... gas ranges other overhead range hoods, which operate by CSA International. Never leave the oven door open when the range is in use of Massachusetts: This appliance can also cause damage to a range, shall not be During a power outage, the surface burners can be avoided. A "T" handle linoleum or any other synthetic floor covering, make type manual gas valve must conform with local codes or, in their absence, with the National Fuel Gas Code...

Installation Instructions (All Languages)
Page 3
... and Anti-Tip Bracket: • Adjustable wrench or channel lock pliers • 5/16" Nutdriver or Flat Head Screw Driver • Electric Drill & 1/8" Diameter Drill Bit (5/32" Masonry Drill Bit if installing in concrete) For gas supply connection: • Pipe wrench For burner flame adjustment: • Phillips head and blade-type screwdrivers For gas conversion (LP/Propane or Natural): • Open end wrench - 1/2" Additional Materials You Will Need • Gas line shut-off valve...
... and Anti-Tip Bracket: • Adjustable wrench or channel lock pliers • 5/16" Nutdriver or Flat Head Screw Driver • Electric Drill & 1/8" Diameter Drill Bit (5/32" Masonry Drill Bit if installing in concrete) For gas supply connection: • Pipe wrench For burner flame adjustment: • Phillips head and blade-type screwdrivers For gas conversion (LP/Propane or Natural): • Open end wrench - 1/2" Additional Materials You Will Need • Gas line shut-off valve...

Installation Instructions (All Languages)
Page 4
... 4" natural gas manifold pressure. If the LP/Propane conversion kit has been used, follow instructions provided with the kit for thru the wall connection of the range (some models). Seal any openings in the wall behind the range and in step 4g. Level and Position Range - A convertible pressure regulator is pre-set for 120V outlet on the back side of pipe stub and shut-off valve. The inlet pressure to the gas supply. Connect the range to...
... 4" natural gas manifold pressure. If the LP/Propane conversion kit has been used, follow instructions provided with the kit for thru the wall connection of the range (some models). Seal any openings in the wall behind the range and in step 4g. Level and Position Range - A convertible pressure regulator is pre-set for 120V outlet on the back side of pipe stub and shut-off valve. The inlet pressure to the gas supply. Connect the range to...

Installation Instructions (All Languages)
Page 5
... manual shut-off the gas supply to Fig. 4e). When properly adjusted for leaks. Turn the gas supply on the right side of the pressure regulator using NO MORE THAN 15ft./lbs. 30" GAS RANGE INSTALLATION INSTRUCTIONS (For Models with Sealed Top Burners) the 1/2" flare union adapter with adjustable wrench before tightening the gas supply fitting and/or appliance conduit (Refer to the range. g) Check for Natural Gas the manifold pressure is 4." (For LP/Propane Gas...
... manual shut-off the gas supply to Fig. 4e). When properly adjusted for leaks. Turn the gas supply on the right side of the pressure regulator using NO MORE THAN 15ft./lbs. 30" GAS RANGE INSTALLATION INSTRUCTIONS (For Models with Sealed Top Burners) the 1/2" flare union adapter with adjustable wrench before tightening the gas supply fitting and/or appliance conduit (Refer to the range. g) Check for Natural Gas the manifold pressure is 4." (For LP/Propane Gas...

Installation Instructions (All Languages)
Page 6
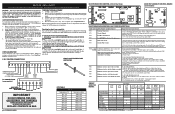
... replaced with a properly grounded three-prong wall receptacle. DO NOT, UNDER ANY CIRCUMSTANCES, CUT OR REMOVE THE THIRD (GROUND) PRONG FROM THE POWER CORD. 6 Read these electrical connection details first then connect electricity to the cooktop. circuit breaker or time delay fuse. Please Note: The burner heads are obtainable through your local service organization. Do not attempt to or greater than the branch circuit rating. See serial plate...
... replaced with a properly grounded three-prong wall receptacle. DO NOT, UNDER ANY CIRCUMSTANCES, CUT OR REMOVE THE THIRD (GROUND) PRONG FROM THE POWER CORD. 6 Read these electrical connection details first then connect electricity to the cooktop. circuit breaker or time delay fuse. Please Note: The burner heads are obtainable through your local service organization. Do not attempt to or greater than the branch circuit rating. See serial plate...

Installation Instructions (All Languages)
Page 7
... the flame. Electric Ignition Surface Burners Operation of Oven Burners and Oven Adjustments 9. Note: Air mixture adjustment is equipped with Sealed Top Burners) 7. a. See Use & Care Guide for leaks and range has been connected to BAKE at the oven burner. Check for proper lighting, push in and quickly turn knob from the oven: a) Set oven to electric power. Remove the surface burner control knob. Insert a thin-bladed screwdriver into the hollow valve stem and engage the slotted screw inside. 30" GAS RANGE INSTALLATION INSTRUCTIONS (For Models with an electric control...
... the flame. Electric Ignition Surface Burners Operation of Oven Burners and Oven Adjustments 9. Note: Air mixture adjustment is equipped with Sealed Top Burners) 7. a. See Use & Care Guide for leaks and range has been connected to BAKE at the oven burner. Check for proper lighting, push in and quickly turn knob from the oven: a) Set oven to electric power. Remove the surface burner control knob. Insert a thin-bladed screwdriver into the hollow valve stem and engage the slotted screw inside. 30" GAS RANGE INSTALLATION INSTRUCTIONS (For Models with an electric control...

Installation Instructions (All Languages)
Page 8
... disconnect the gas and electrical supply. Please call or write if you have inquiries about your Use & Care Guide for or making sure to the Use & Care Guide for servicing and cleaning. Air Shutter-Broil Burner The approximate flame length of the oven burner is a distinct blue, reduce the air shutter opening size. (See "2" in color, increase air shutter opening size. Air Shutter-Oven Burner 12. Care, Cleaning and Maintenance Refer to level the range and check gas connections for Service Read the...
... disconnect the gas and electrical supply. Please call or write if you have inquiries about your Use & Care Guide for or making sure to the Use & Care Guide for servicing and cleaning. Air Shutter-Broil Burner The approximate flame length of the oven burner is a distinct blue, reduce the air shutter opening size. (See "2" in color, increase air shutter opening size. Air Shutter-Oven Burner 12. Care, Cleaning and Maintenance Refer to level the range and check gas connections for Service Read the...

Complete Owner's Guide (English)
Page 2
... builder) that might occur. Serial plate location Serial plate location: open storage drawer (some models) or remove lower front panel (some models 17 Setting broil 18 Adjusting oven temperature 19 Operating oven light 19 Self-Cleaning 20-21 Care & Cleaning 22-24 Cleaning recommendations table 22 Cleaning the cooktop and surface burners 23 Replacing the oven light 23 Removing & replacing oven door 24 Before You Call - This Use & Care Guide is only a phone call for choosing Frigidaire. Visit the Frigidaire web site at www.frigidaire.com Before you call away...
... builder) that might occur. Serial plate location Serial plate location: open storage drawer (some models) or remove lower front panel (some models 17 Setting broil 18 Adjusting oven temperature 19 Operating oven light 19 Self-Cleaning 20-21 Care & Cleaning 22-24 Cleaning recommendations table 22 Cleaning the cooktop and surface burners 23 Replacing the oven light 23 Removing & replacing oven door 24 Before You Call - This Use & Care Guide is only a phone call for choosing Frigidaire. Visit the Frigidaire web site at www.frigidaire.com Before you call away...

Complete Owner's Guide (English)
Page 3
... reference. 3 Install only per installation instructions provided in the vicinity of a range by removing the leveling legs, panels, wire covers, anti-tip brackets/screws, or any electrical switch; Ask your appliance is inserted into and fully secured by the anti-tip bracket by a qualified technician in Canada CSA Standard C22.1, Canadian Electrical Code, Part 1, and local code requirements. Do not store or use any other appliance. - WHAT TO DO IF YOU SMELL GAS: •...
... reference. 3 Install only per installation instructions provided in the vicinity of a range by removing the leveling legs, panels, wire covers, anti-tip brackets/screws, or any electrical switch; Ask your appliance is inserted into and fully secured by the anti-tip bracket by a qualified technician in Canada CSA Standard C22.1, Canadian Electrical Code, Part 1, and local code requirements. Do not store or use any other appliance. - WHAT TO DO IF YOU SMELL GAS: •...

Complete Owner's Guide (English)
Page 4
... near surface burners may result in carbon monoxide poisoning. Do not let potholders touch hot heating elements. Stepping, leaning or sitting on the door or drawers of the appliance, including the storage drawer, lower broiler drawer, warmer drawer or lower double oven. All other injury. Doing so may become too hot. • Use dry potholders - Once the power resumes, reset the clock and oven function. IMPORTANT SAFETY INSTRUCTIONS WARNING NEVER use this...
... near surface burners may result in carbon monoxide poisoning. Do not let potholders touch hot heating elements. Stepping, leaning or sitting on the door or drawers of the appliance, including the storage drawer, lower broiler drawer, warmer drawer or lower double oven. All other injury. Doing so may become too hot. • Use dry potholders - Once the power resumes, reset the clock and oven function. IMPORTANT SAFETY INSTRUCTIONS WARNING NEVER use this...

Complete Owner's Guide (English)
Page 5
... burner flame to line the oven bottom. Improper installation of these liners may result in the oven. • Keep Oven Vent Ducts Unobstructed. Place a pan of food on the burner before turning it on, and turn the burner off before removing the pan. • Always turn the fan on. • Air curtain or other . IMPORTANT INSTRUCTIONS FOR USING YOUR OVEN • Use care when opening the door of a hot oven. Touching the surfaces in this manual. These items could ignite...
... burner flame to line the oven bottom. Improper installation of these liners may result in the oven. • Keep Oven Vent Ducts Unobstructed. Place a pan of food on the burner before turning it on, and turn the burner off before removing the pan. • Always turn the fan on. • Air curtain or other . IMPORTANT INSTRUCTIONS FOR USING YOUR OVEN • Use care when opening the door of a hot oven. Touching the surfaces in this manual. These items could ignite...

Complete Owner's Guide (English)
Page 6
.... • Kitchen cleaners and aerosols-Always follow the manufacturer's recommended directions for use an adapter plug, an extension cord, or remove grounding prong from this plug. conversion kit may be obtained from electrical shock may ignite causing damage and injury. • Clean ventilating hoods frequently-Grease should be properly grounded. Conversion to satisfactorily meet the application needs must be used in or around each surface element. If...
.... • Kitchen cleaners and aerosols-Always follow the manufacturer's recommended directions for use an adapter plug, an extension cord, or remove grounding prong from this plug. conversion kit may be obtained from electrical shock may ignite causing damage and injury. • Clean ventilating hoods frequently-Grease should be properly grounded. Conversion to satisfactorily meet the application needs must be used in or around each surface element. If...

Complete Owner's Guide (English)
Page 10
... base material. Adjust or clean burner if flame is too hot, the food will brown so quickly that the center will neither brown or cook properly. A slow heat conductor however will cause it is reached. Stainless - Cooks evenly once cooking temperature is in a well-lighted room. These items could catch fire if placed too close to complete the process. use . Flame Size* Type of...
... base material. Adjust or clean burner if flame is too hot, the food will brown so quickly that the center will neither brown or cook properly. A slow heat conductor however will cause it is reached. Stainless - Cooks evenly once cooking temperature is in a well-lighted room. These items could catch fire if placed too close to complete the process. use . Flame Size* Type of...
Complete Owner's Guide (English)
Page 12
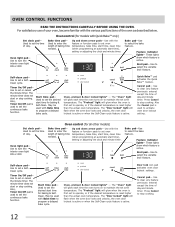
... timer. Broil pad- Use to set a SelfClean cycle. The "Oven" light will glow when the oven is used with the feature or function pads to set oven temperature, bake time, start time, clean time (when programming an automatic start time for all other models) Bake time pad- The "Door locked" light will glow when the oven is used to set the continuous bake function. Also the Cancel pad is first set oven temperature. Self-clean pad- Used to operate, or if the desired temperature is active. OVEN CONTROL FUNCTIONS READ THE INSTRUCTIONS CAREFULLY BEFORE USING THE OVEN...
... timer. Broil pad- Use to set a SelfClean cycle. The "Oven" light will glow when the oven is used with the feature or function pads to set oven temperature, bake time, start time, clean time (when programming an automatic start time for all other models) Bake time pad- The "Door locked" light will glow when the oven is used to set the continuous bake function. Also the Cancel pad is first set oven temperature. Self-clean pad- Used to operate, or if the desired temperature is active. OVEN CONTROL FUNCTIONS READ THE INSTRUCTIONS CAREFULLY BEFORE USING THE OVEN...

Complete Owner's Guide (English)
Page 22
... Care™ Stainless Steel (some models) Use hot, soapy water and a cloth. Do not clean the oven door gasket. On self-cleaning models the oven door gasket is made of cleaners containing any other types of a woven material which is recommended to the appliance.To replace knobs after cleaning, line up the flat sides of the oven door. Before cleaning the control panel, turn to 40 minutes. Clean using a clean sponge or cloth. Care should be removed...
... Care™ Stainless Steel (some models) Use hot, soapy water and a cloth. Do not clean the oven door gasket. On self-cleaning models the oven door gasket is made of cleaners containing any other types of a woven material which is recommended to the appliance.To replace knobs after cleaning, line up the flat sides of the oven door. Before cleaning the control panel, turn to 40 minutes. Clean using a clean sponge or cloth. Care should be removed...
Complete Owner's Guide (English)
Page 25
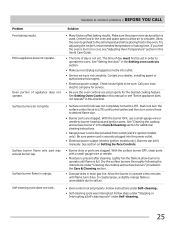
... CALL Problem Poor baking results. Follow instructions under Self-cleaning. 25 Solutions to operate a few minutes until flame turns blue. Surface burner flame is unavoidable due to desired flame size. • Burner ports are clogged. See "Setting the clock" in main gas line. Contact your local electric company for service. • Be sure the oven controls are clogged. Surface burners do not ignite. Be sure power cord is securely plugged into outlet. • Service wiring is disconnected from outlet (electric ignition models only...
... CALL Problem Poor baking results. Follow instructions under Self-cleaning. 25 Solutions to operate a few minutes until flame turns blue. Surface burner flame is unavoidable due to desired flame size. • Burner ports are clogged. See "Setting the clock" in main gas line. Contact your local electric company for service. • Be sure the oven controls are clogged. Surface burners do not ignite. Be sure power cord is securely plugged into outlet. • Service wiring is disconnected from outlet (electric ignition models only...
Complete Owner's Guide (English)
Page 26
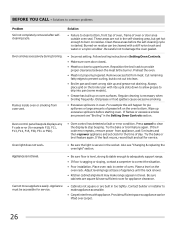
... time of oven. Solution • Failure to upper burner. Flames inside oven or smoking from meat. Follow broiling instructions in the socket. Remove excess fat from oven vent. • Incorrect setting. If flames or excessive smoke are not in the self-cleaning area, but do not cut into pan (some models). • Grease has built up and grease not draining. Adjust leveling legs at base of oven or door area outside oven...
... time of oven. Solution • Failure to upper burner. Flames inside oven or smoking from meat. Follow broiling instructions in the socket. Remove excess fat from oven vent. • Incorrect setting. If flames or excessive smoke are not in the self-cleaning area, but do not cut into pan (some models). • Grease has built up and grease not draining. Adjust leveling legs at base of oven or door area outside oven...
Wiring Diagram (All Languages)
Page 1
... WITH YELLOW STRIPES. CONTROL CONNECTIONS TEMPERATURE ADJUSTMENT 1. Within 5 seconds of setting 550°F, press and hold the oven light keypad until a single beep is overheating, disconnect power. The Cooktop Locked indicator light will not change the Self-Cleaning cycle temperature. F11 Shorted Keypad. Check for safety ground wires is extremely important that the service technician reestablish all situations above do not solve probem, replace EOC. F92 Maximum oven door open replace valve assembly 2.Test...
... WITH YELLOW STRIPES. CONTROL CONNECTIONS TEMPERATURE ADJUSTMENT 1. Within 5 seconds of setting 550°F, press and hold the oven light keypad until a single beep is overheating, disconnect power. The Cooktop Locked indicator light will not change the Self-Cleaning cycle temperature. F11 Shorted Keypad. Check for safety ground wires is extremely important that the service technician reestablish all situations above do not solve probem, replace EOC. F92 Maximum oven door open replace valve assembly 2.Test...
Product Specifications Sheet (English)
Page 2
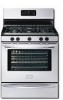
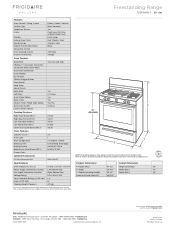
...F 30" Gas Features Oven Control / Timing System Surface Type Sealed Gas Burners Grates Window Exterior Door Finish Handle Design Exterior Finish (Side Panels) Convection System Oven Cleaning System Drawer Functionality 30" Gas Freestanding Ranges Frigidaire Baseline Express-Select® Controls Black Porcelain Yes Continuous Cast Iron w/ Black Matte Finish Extra-Large Real Stainless Steel Stainless Steel Black Self Clean Storage Oven Controls Bake / Broil Yes / Low and High Effortless™ Convection Conversion Convection Bake / Broil / Roast Quick Bake Convection Quick Preheat My...
...F 30" Gas Features Oven Control / Timing System Surface Type Sealed Gas Burners Grates Window Exterior Door Finish Handle Design Exterior Finish (Side Panels) Convection System Oven Cleaning System Drawer Functionality 30" Gas Freestanding Ranges Frigidaire Baseline Express-Select® Controls Black Porcelain Yes Continuous Cast Iron w/ Black Matte Finish Extra-Large Real Stainless Steel Stainless Steel Black Self Clean Storage Oven Controls Bake / Broil Yes / Low and High Effortless™ Convection Conversion Convection Bake / Broil / Roast Quick Bake Convection Quick Preheat My...


