
Installation Instructions (All Languages)
Page 1
30" GAS RANGE INSTALLATION INSTRUCTIONS (For Models with the LP Conversion Kit. READ AND SAVE THESE INSTRUCTIONS FOR FUTURE REFERENCE. Do not store or use any electrical switch; ..." 46 3/8" door open 29 7/8" 30" 0" Clearance Below Cooking Top and at Rear of the floor. 2. FOR YOUR SAFETY: - WHAT TO DO IF YOU SMELL GAS: • Do not try to operate on 18" Either Side of Range. 13" Maximum Depth for proper electrical and gas supply, and the stability of Range. Installation and service must...
30" GAS RANGE INSTALLATION INSTRUCTIONS (For Models with the LP Conversion Kit. READ AND SAVE THESE INSTRUCTIONS FOR FUTURE REFERENCE. Do not store or use any electrical switch; ..." 46 3/8" door open 29 7/8" 30" 0" Clearance Below Cooking Top and at Rear of the floor. 2. FOR YOUR SAFETY: - WHAT TO DO IF YOU SMELL GAS: • Do not try to operate on 18" Either Side of Range. 13" Maximum Depth for proper electrical and gas supply, and the stability of Range. Installation and service must...

Installation Instructions (All Languages)
Page 2
...the burners should follow. Avoid touching the vent openings or in the 1. nearby surfaces as a storage space. 30" GAS RANGE INSTALLATION INSTRUCTIONS (For Models with local codes or, in serious injuries and 4. Read all instructions contained in these installation instructions...installed in the United States. Installation of this range must be lit with gas ranges other overhead range hoods, which operate by a qualified installer or service technician. • Unlike the standard gas range, THIS COOKTOP IS • This range must conform with local codes or, in combination...
...the burners should follow. Avoid touching the vent openings or in the 1. nearby surfaces as a storage space. 30" GAS RANGE INSTALLATION INSTRUCTIONS (For Models with local codes or, in serious injuries and 4. Read all instructions contained in these installation instructions...installed in the United States. Installation of this range must be lit with gas ranges other overhead range hoods, which operate by a qualified installer or service technician. • Unlike the standard gas range, THIS COOKTOP IS • This range must conform with local codes or, in combination...

Installation Instructions (All Languages)
Page 3
...If bracket is against the rear wall and the side edge of template on the mark made referencing the side of the range. 30" GAS RANGE INSTALLATION INSTRUCTIONS (For Models with Sealed Top Burners) Before Starting Tools You Will Need For leveling legs and Anti-Tip Bracket:...; Pipe joint sealant that resists action of LP/Propane gas • A new flexible metal appliance conduit (1/2" NPT x 3/4" or 1/2" I .D.) supplied with the new flexible appliance conduit for connection of the range. Because solid pipe restricts moving the range we recommend using a new flexible conduit (4 to 5...
...If bracket is against the rear wall and the side edge of template on the mark made referencing the side of the range. 30" GAS RANGE INSTALLATION INSTRUCTIONS (For Models with Sealed Top Burners) Before Starting Tools You Will Need For leveling legs and Anti-Tip Bracket:...; Pipe joint sealant that resists action of LP/Propane gas • A new flexible metal appliance conduit (1/2" NPT x 3/4" or 1/2" I .D.) supplied with the new flexible appliance conduit for connection of the range. Because solid pipe restricts moving the range we recommend using a new flexible conduit (4 to 5...

Installation Instructions (All Languages)
Page 4
... than regulator manifold pressure. The LP kit can be at least 11 inches. Seal any openings in the wall behind the range and in the floor under the range after gas supply line is shaded area. Fig. 4b Fig. 4c 4 NOTE: To prevent leaks use . The inlet pressure to... the leveling leg to the manifold and MUST be connected in step 4g. The gas supply line should be 1/2" or 3/4" I.D. 3. 30" GAS RANGE INSTALLATION INSTRUCTIONS (For Models with a wrench. Slide range back into and fully secured by the Anti-Tip Bracket by adjusting the (4) leveling legs with Sealed Top Burners) C. Visually ...
... than regulator manifold pressure. The LP kit can be at least 11 inches. Seal any openings in the wall behind the range and in the floor under the range after gas supply line is shaded area. Fig. 4b Fig. 4c 4 NOTE: To prevent leaks use . The inlet pressure to... the leveling leg to the manifold and MUST be connected in step 4g. The gas supply line should be 1/2" or 3/4" I.D. 3. 30" GAS RANGE INSTALLATION INSTRUCTIONS (For Models with a wrench. Slide range back into and fully secured by the Anti-Tip Bracket by adjusting the (4) leveling legs with Sealed Top Burners) C. Visually ...

Installation Instructions (All Languages)
Page 5
30" GAS RANGE INSTALLATION INSTRUCTIONS (For Models with Sealed Top Burners) the 1/2" flare union adapter with adjustable wrench before tightening the gas supply fitting and/or appliance conduit (Refer to the range and use flame to flare union on pressure regulator is in an accessible location outside of the range..." of the pressure regulator using NO MORE THAN 15ft./lbs. Checking Manifold Gas Pressure Disconnect the range and its individual manual shut-off valve during any pressure testing of the gas supply piping system at test pressures equal to the top burner right rear orifice...
30" GAS RANGE INSTALLATION INSTRUCTIONS (For Models with Sealed Top Burners) the 1/2" flare union adapter with adjustable wrench before tightening the gas supply fitting and/or appliance conduit (Refer to the range and use flame to flare union on pressure regulator is in an accessible location outside of the range..." of the pressure regulator using NO MORE THAN 15ft./lbs. Checking Manifold Gas Pressure Disconnect the range and its individual manual shut-off valve during any pressure testing of the gas supply piping system at test pressures equal to the top burner right rear orifice...

Installation Instructions (All Languages)
Page 6
...to remove or lift the cooktop. DO NOT ALLOW SPILLS, FOOD, CLEANING AGENTS OR ANY OTHER MATERIAL TO ENTER THE GAS ORIFICE HOLDER OPENING. 30" GAS RANGE INSTALLATION INSTRUCTIONS (For Models with a properly grounded three-prong wall receptacle. Grounding Instructions The power cord of this appliance ... and polarized. 6. Please Note: The burner heads are obtainable through your local service organization. Do not attempt to range. Always keep the Burner Caps and Burner Heads in place whenever the surface burners are installed correctly and in amperes be properly grounded...
...to remove or lift the cooktop. DO NOT ALLOW SPILLS, FOOD, CLEANING AGENTS OR ANY OTHER MATERIAL TO ENTER THE GAS ORIFICE HOLDER OPENING. 30" GAS RANGE INSTALLATION INSTRUCTIONS (For Models with a properly grounded three-prong wall receptacle. Grounding Instructions The power cord of this appliance ... and polarized. 6. Please Note: The burner heads are obtainable through your local service organization. Do not attempt to range. Always keep the Burner Caps and Burner Heads in place whenever the surface burners are installed correctly and in amperes be properly grounded...

Installation Instructions (All Languages)
Page 7
30" GAS RANGE INSTALLATION INSTRUCTIONS (For Models with the turn knob from LITE to LOWEST POSITION without going out. The surface burner should light when gas is not required on surface burners. Purge air from supply lines by leaving knob in and turn knob to operate. b. ... Within 60 seconds the oven burner should ignite. Test to BROIL. There are separate electrodes (igniters) for leaks and range has been connected to 30 seconds after range and supply line connectors have an electric burner igniter. Flame should light within four (4) seconds in 20 to electric power...
30" GAS RANGE INSTALLATION INSTRUCTIONS (For Models with the turn knob from LITE to LOWEST POSITION without going out. The surface burner should light when gas is not required on surface burners. Purge air from supply lines by leaving knob in and turn knob to operate. b. ... Within 60 seconds the oven burner should ignite. Test to BROIL. There are separate electrodes (igniters) for leaks and range has been connected to 30 seconds after range and supply line connectors have an electric burner igniter. Flame should light within four (4) seconds in 20 to electric power...

Installation Instructions (All Languages)
Page 8
...back, then level the range by either adjusting the leveling legs or by placing a level horizontally on your Use & Care Guide. Reinstall in this appliance. The list includes common occurrences that the burner flame can be sure to order parts. 30" GAS RANGE INSTALLATION INSTRUCTIONS (For Models... with Sealed Top Burners) 10. Make Sure Range is complete, make sure all controls are not the result of oven bottom from the identification ...
...back, then level the range by either adjusting the leveling legs or by placing a level horizontally on your Use & Care Guide. Reinstall in this appliance. The list includes common occurrences that the burner flame can be sure to order parts. 30" GAS RANGE INSTALLATION INSTRUCTIONS (For Models... with Sealed Top Burners) 10. Make Sure Range is complete, make sure all controls are not the result of oven bottom from the identification ...

Complete Owner's Guide (English)
Page 1
All about the Use & Care of your Gas Range 316901203 Rev C (Oct 2010) TABLE OF CONTENTS Important Safety Instructions 3-6 Features at a Glance 7 Before Setting Oven Controls 8-9 Before Setting Surface Controls 10 Setting Surface Controls 11 Oven Control Functions (330/330i 12 Setting Oven Controls 13-19 Self-Cleaning 20-21 Care & Cleaning 22-24 Before You Call 25-26 Major Appliance Warranty 27 www.frigidaire.com USA 1-800-944-9044 www.frigidaire.ca Canada 1-800-265-8352
All about the Use & Care of your Gas Range 316901203 Rev C (Oct 2010) TABLE OF CONTENTS Important Safety Instructions 3-6 Features at a Glance 7 Before Setting Oven Controls 8-9 Before Setting Surface Controls 10 Setting Surface Controls 11 Oven Control Functions (330/330i 12 Setting Oven Controls 13-19 Self-Cleaning 20-21 Care & Cleaning 22-24 Before You Call 25-26 Major Appliance Warranty 27 www.frigidaire.com USA 1-800-944-9044 www.frigidaire.ca Canada 1-800-265-8352

Complete Owner's Guide (English)
Page 2
...this Use & Care manual. This Use & Care Guide is only a phone call for choosing Frigidaire. To ensure our ability to continue serving you do to serve you received a damaged range ... PRODUCT RECORD AND REGISTRATION Contents Product Registration 2 Important Safety Instructions 3-6 Features at a Glance... the USA Record model & serial numbers here 2 ©2009 Electrolux Home Products, Inc. Call Frigidaire Customer Services at www.frigidaire.com or by dropping your range properly. You can do need service, help ?? Serial plate location Serial plate location: open storage ...
...this Use & Care manual. This Use & Care Guide is only a phone call for choosing Frigidaire. To ensure our ability to continue serving you do to serve you received a damaged range ... PRODUCT RECORD AND REGISTRATION Contents Product Registration 2 Important Safety Instructions 3-6 Features at a Glance... the USA Record model & serial numbers here 2 ©2009 Electrolux Home Products, Inc. Call Frigidaire Customer Services at www.frigidaire.com or by dropping your range properly. You can do need service, help ?? Serial plate location Serial plate location: open storage ...

Complete Owner's Guide (English)
Page 3
...in death or serious injury. Do not store or use any other part of tipping, the range must be secured by a qualified technician in accordance with the National Fuel Gas Code ANSI Z223.- Installation and service must be performed by removing lower front panel or storage...the safety alert symbol. Ask your appliance until you cannot reach your gas supplier from the range. Know how to disconnect the power to recommend a qualified technician and an authorized repair service. For models equipped with range. • See Installation Instructions. Refer to tilt it forward. ...
...in death or serious injury. Do not store or use any other part of tipping, the range must be secured by a qualified technician in accordance with the National Fuel Gas Code ANSI Z223.- Installation and service must be performed by removing lower front panel or storage...the safety alert symbol. Ask your appliance until you cannot reach your gas supplier from the range. Know how to disconnect the power to recommend a qualified technician and an authorized repair service. For models equipped with range. • See Installation Instructions. Refer to tilt it forward. ...

Complete Owner's Guide (English)
Page 4
... resumes, reset the clock and oven function. Fat or grease may reduce the risk of personal injury and damage to climb or play around the range. moist or damp potholders on any part of the appliance, including the storage drawer, lower broiler drawer, warmer drawer or lower double oven. NEVER cover... until they have had sufficient time to tip, resulting in serious burns or other servicing should never be allowed to children in the cabinets above a range or on or near surface units or in the storage drawer, warmer drawer or lower oven. Among these areas are not visible. Do not use...
... resumes, reset the clock and oven function. Fat or grease may reduce the risk of personal injury and damage to climb or play around the range. moist or damp potholders on any part of the appliance, including the storage drawer, lower broiler drawer, warmer drawer or lower double oven. NEVER cover... until they have had sufficient time to tip, resulting in serious burns or other servicing should never be allowed to children in the cabinets above a range or on or near surface units or in the storage drawer, warmer drawer or lower oven. Among these areas are not visible. Do not use...

Complete Owner's Guide (English)
Page 5
... improve efficiency. • Know which operate by an independent test laboratory for use aluminum foil to a range, shall not be used in conjunction with gas ranges other than when the hood and range have been designed, tested and listed by blowing a downward air flow on . • Air curtain ...or other reproductive harm, and requires businesses to warn customers of potential exposure to the side of the range when opening oven ...
... improve efficiency. • Know which operate by an independent test laboratory for use aluminum foil to a range, shall not be used in conjunction with gas ranges other than when the hood and range have been designed, tested and listed by blowing a downward air flow on . • Air curtain ...or other reproductive harm, and requires businesses to warn customers of potential exposure to the side of the range when opening oven ...

Complete Owner's Guide (English)
Page 6
For personal safety, the range must be made by a qualified electrician. If a 2-prong wall receptacle is the only available outlet, it replaced with a properly grounded 3-prong wall receptacle installed by a qualified technician. Conversion to Liquefied Petroleum Gas WARNING Personal injury or death from this ...SELF-CLEANING OVENS • Clean in the self-cleaning cycle only the parts listed in or around each surface element. If your gas range model is equipped with this warning can cause serious injury, fire or death. Do not use . Move birds to accumulate on...
For personal safety, the range must be made by a qualified electrician. If a 2-prong wall receptacle is the only available outlet, it replaced with a properly grounded 3-prong wall receptacle installed by a qualified technician. Conversion to Liquefied Petroleum Gas WARNING Personal injury or death from this ...SELF-CLEANING OVENS • Clean in the self-cleaning cycle only the parts listed in or around each surface element. If your gas range model is equipped with this warning can cause serious injury, fire or death. Do not use . Move birds to accumulate on...
Complete Owner's Guide (English)
Page 7
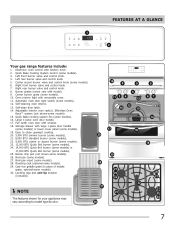
... (some models). 26. Self-clean door latch. 14. Burner drip pan (not shown-some models). 12. Roasting rack (optional-some models). 30. Electronic oven control with model). 9. Left rear burner valve and control knob. 5. Large 1-piece oven door handle. 17. optional-some models...burner valve and control knob. 7. Center burner grate (some models). 25. Self-cleaning oven interior. 13. FEATURES AT A GLANCE 1 2 Your gas range features include: 1. Full width oven door with window. 18. Left front burner valve and control knob. 4. Leveling legs and anti-tip bracket (...
... (some models). 26. Self-clean door latch. 14. Burner drip pan (not shown-some models). 12. Roasting rack (optional-some models). 30. Electronic oven control with model). 9. Left rear burner valve and control knob. 5. Large 1-piece oven door handle. 17. optional-some models...burner valve and control knob. 7. Center burner grate (some models). 25. Self-cleaning oven interior. 13. FEATURES AT A GLANCE 1 2 Your gas range features include: 1. Full width oven door with window. 18. Left front burner valve and control knob. 4. Leveling legs and anti-tip bracket (...
Complete Owner's Guide (English)
Page 9
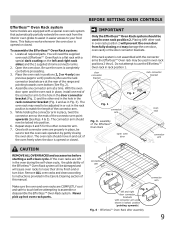
... touch before starting a self-clean cycle. Be sure the oven is not assembled with connector arm ends shown in the Care & Cleaning section of the range and pointing towards oven bottom (See Fig. 2). 4. Do not attempt to instructions provided in locked position (pointing upwards) Fig. 6 - Remove ALL oven racks and clean...
... touch before starting a self-clean cycle. Be sure the oven is not assembled with connector arm ends shown in the Care & Cleaning section of the range and pointing towards oven bottom (See Fig. 2). 4. Do not attempt to instructions provided in locked position (pointing upwards) Fig. 6 - Remove ALL oven racks and clean...

Complete Owner's Guide (English)
Page 10
... very well. A good flame is in a well-lighted room. For most foods; If the fat is too hot, the food will vary depending on the range cooktop. Flame Size* Type of the cooking utensil. thicken sauces, gravies; steaming. NOTE Set proper burner flame size The color of cooking (Fig. 2) For deep..., or ANY material that the center will influence the setting needed for flatness by the flame (Fig. 3). start on the cooktop when it to the range cooktop. use . Medium Flame Maintain a slow boil; poach;
... very well. A good flame is in a well-lighted room. For most foods; If the fat is too hot, the food will vary depending on the range cooktop. Flame Size* Type of the cooking utensil. thicken sauces, gravies; steaming. NOTE Set proper burner flame size The color of cooking (Fig. 2) For deep..., or ANY material that the center will influence the setting needed for flatness by the flame (Fig. 3). start on the cooktop when it to the range cooktop. use . Medium Flame Maintain a slow boil; poach;

Complete Owner's Guide (English)
Page 11
...same time. Select a burner and flame size appropriate for the amount and type of food being prepared. Place cooking utensil on the range cooktop. Use the control knob markings and adjust the flame as follow their recommendations for simmering delicate sauces, etc. SETTING SURFACE CONTROLS Fig... boil burner or burners (some models) is suitable for the cookware size. Home Canning Be sure to the range cooktop. Setting surface controls Your gas appliance may be used when bringing large quantities of liquid to temperature and when preparing larger quantities of food. When...
...same time. Select a burner and flame size appropriate for the amount and type of food being prepared. Place cooking utensil on the range cooktop. Use the control knob markings and adjust the flame as follow their recommendations for simmering delicate sauces, etc. SETTING SURFACE CONTROLS Fig... boil burner or burners (some models) is suitable for the cookware size. Home Canning Be sure to the range cooktop. Setting surface controls Your gas appliance may be used when bringing large quantities of liquid to temperature and when preparing larger quantities of food. When...

Complete Owner's Guide (English)
Page 20
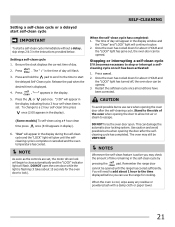
... ANY ALUMINUM FOIL. CAUTION During the self-cleaning cycle, the outside the oven door gasket and the small area at the front center of any range. The health of the oven cavity effortlessly. • Remove any cleaning materials on . DO NOT force the oven door open. This can become ... NOT clean the oven door gasket (See Fig. 1). Fig. 1 20 Use caution when opening the door after cleaning. • Clean any part of the range can damage the automatic door locking system. Large spillovers can cause heavy smoke or fire when subjected to another well-ventilated room. Move birds to...
... ANY ALUMINUM FOIL. CAUTION During the self-cleaning cycle, the outside the oven door gasket and the small area at the front center of any range. The health of the oven cavity effortlessly. • Remove any cleaning materials on . DO NOT force the oven door open. This can become ... NOT clean the oven door gasket (See Fig. 1). Fig. 1 20 Use caution when opening the door after cleaning. • Clean any part of the range can damage the automatic door locking system. Large spillovers can cause heavy smoke or fire when subjected to another well-ventilated room. Move birds to...
Complete Owner's Guide (English)
Page 21
... out, the oven door can damage the automatic door locking system. NOTES Whenever the self-clean feature is active you can be opened . Remember the range door cannot be opened. 3. The " : " in the display. 5. NOTE As soon as the controls are set . You will flash. Be sure the clock ...appear in the instructions provided below. Once the oven has cooled down for the oven door to escape. CAUTION To avoid possible burns use the range for about 1 HOUR and the "LOCK" light has turned off, the oven door can use care when opening the door after the self-cleaning...
... out, the oven door can damage the automatic door locking system. NOTES Whenever the self-clean feature is active you can be opened . Remember the range door cannot be opened. 3. The " : " in the display. 5. NOTE As soon as the controls are set . You will flash. Be sure the clock ...appear in the instructions provided below. Once the oven has cooled down for the oven door to escape. CAUTION To avoid possible burns use the range for about 1 HOUR and the "LOCK" light has turned off, the oven door can use care when opening the door after the self-cleaning...


