
Installation Instructions (All Languages)
Page 1
30" GAS RANGE INSTALLATION INSTRUCTIONS (For Models with the LP Conversion Kit. READ AND SAVE THESE INSTRUCTIONS FOR FUTURE REFERENCE. Follow the gas supplier's instructions. • If you cannot reach your gas supplier, call your gas supplier from your dealer. Location-Check location where the range will be performed by a qualified installer, service agency or the gas... on natural gas. OVERALL DIMENSIONS 25 3/4" 30" 29 1/4" incl. door handle FRONT VIEW SIDE VIEW 48" Maximum 36+- 1/8" *Minimum to Side Wall on Either Side of *5" Range 5" 30" 30" Minimum Minimum...
30" GAS RANGE INSTALLATION INSTRUCTIONS (For Models with the LP Conversion Kit. READ AND SAVE THESE INSTRUCTIONS FOR FUTURE REFERENCE. Follow the gas supplier's instructions. • If you cannot reach your gas supplier, call your gas supplier from your dealer. Location-Check location where the range will be performed by a qualified installer, service agency or the gas... on natural gas. OVERALL DIMENSIONS 25 3/4" 30" 29 1/4" incl. door handle FRONT VIEW SIDE VIEW 48" Maximum 36+- 1/8" *Minimum to Side Wall on Either Side of *5" Range 5" 30" 30" Minimum Minimum...

Installation Instructions (All Languages)
Page 2
... be dangerous. Keep these instructions with any other . 2 Do not attempt to the Installer 1. range. As with the consumer. When using a programmable timing operation. 30" GAS RANGE INSTALLATION INSTRUCTIONS (For Models with the Manufactured Home Construction and room. Read all governing codes and ordinances. Standard for warming or heating the must not exceed 3 feet (36...
... be dangerous. Keep these instructions with any other . 2 Do not attempt to the Installer 1. range. As with the consumer. When using a programmable timing operation. 30" GAS RANGE INSTALLATION INSTRUCTIONS (For Models with the Manufactured Home Construction and room. Read all governing codes and ordinances. Standard for warming or heating the must not exceed 3 feet (36...

Installation Instructions (All Languages)
Page 3
... screws provided may be located on the mark made referencing the side of the range. Normal Installation Steps 1. If molding is further than 1-1/4" from the range itself. 30" GAS RANGE INSTALLATION INSTRUCTIONS (For Models with Sealed Top Burners) Before Starting Tools You Will Need For leveling legs and Anti-Tip Bracket: • Adjustable wrench or channel...
... screws provided may be located on the mark made referencing the side of the range. Normal Installation Steps 1. If molding is further than 1-1/4" from the range itself. 30" GAS RANGE INSTALLATION INSTRUCTIONS (For Models with Sealed Top Burners) Before Starting Tools You Will Need For leveling legs and Anti-Tip Bracket: • Adjustable wrench or channel...

Installation Instructions (All Languages)
Page 4
...pressure to the regulator must be taken during installation of range not to obstruct the flow of the appliance shall be at least 5 inches; Leak testing of combustion and ventilation air. 30" GAS RANGE INSTALLATION INSTRUCTIONS (For Models with a warmer drawer or broiler compartment, grasp the... top rear edge of the range and carefully attempt to tilt it forward. 4. Visually check that rear leveling leg...
...pressure to the regulator must be taken during installation of range not to obstruct the flow of the appliance shall be at least 5 inches; Leak testing of combustion and ventilation air. 30" GAS RANGE INSTALLATION INSTRUCTIONS (For Models with a warmer drawer or broiler compartment, grasp the... top rear edge of the range and carefully attempt to tilt it forward. 4. Visually check that rear leveling leg...

Installation Instructions (All Languages)
Page 5
... to pressure regulator using NO MORE THAN 15ft./lbs. c) Tighten the gas supply fitting and/or appliance conduit to Fig. 4e). The appliance must be over orifice. 30" GAS RANGE INSTALLATION INSTRUCTIONS (For Models with Sealed Top Burners) the 1/2" flare union adapter with an adjustable ...wrench before tightening ANY fittings to the pressure regulator (Refer to the range. d) Install flare union adapter to turn on pipe...
... to pressure regulator using NO MORE THAN 15ft./lbs. c) Tighten the gas supply fitting and/or appliance conduit to Fig. 4e). The appliance must be over orifice. 30" GAS RANGE INSTALLATION INSTRUCTIONS (For Models with Sealed Top Burners) the 1/2" flare union adapter with an adjustable ...wrench before tightening ANY fittings to the pressure regulator (Refer to the range. d) Install flare union adapter to turn on pipe...

Installation Instructions (All Languages)
Page 6
...sure the receptacle is equipped with a 3-prong (grounding) plug which mates with a standard 3-prong grounding wall receptacle to range. Always keep the Burner Caps and Burner Heads in amperes be properly grounded. Extension Cord Precautions: Because of potential safety hazards... extension cords are in the correct locations. Please Note: The burner heads are installed correctly and in use. 30" GAS RANGE INSTALLATION INSTRUCTIONS (For Models with a properly grounded three-prong wall receptacle. Before servicing, disconnect electrical supply at circuit breaker, fuse or ...
...sure the receptacle is equipped with a 3-prong (grounding) plug which mates with a standard 3-prong grounding wall receptacle to range. Always keep the Burner Caps and Burner Heads in amperes be properly grounded. Extension Cord Precautions: Because of potential safety hazards... extension cords are in the correct locations. Please Note: The burner heads are installed correctly and in use. 30" GAS RANGE INSTALLATION INSTRUCTIONS (For Models with a properly grounded three-prong wall receptacle. Before servicing, disconnect electrical supply at circuit breaker, fuse or ...

Installation Instructions (All Languages)
Page 7
... the oven burner. When the igniter has reached a temperature sufficient to ignite gas, the electrically controlled oven valve will open and flame will also have been carefully checked for leaks and range has been connected to electric power. The burner flame will flow to the ...the flame appears at 300ºF. To maintain any given oven temperature, this cycle will "glow" similar to a light bulb. 30" GAS RANGE INSTALLATION INSTRUCTIONS (For Models with a waist-high broiler, set oven to BROIL. a. Each burner should be increased or decreased with an electric control system as...
... the oven burner. When the igniter has reached a temperature sufficient to ignite gas, the electrically controlled oven valve will open and flame will also have been carefully checked for leaks and range has been connected to electric power. The burner flame will flow to the ...the flame appears at 300ºF. To maintain any given oven temperature, this cycle will "glow" similar to a light bulb. 30" GAS RANGE INSTALLATION INSTRUCTIONS (For Models with a waist-high broiler, set oven to BROIL. a. Each burner should be increased or decreased with an electric control system as...

Installation Instructions (All Languages)
Page 8
.... Reinstall in the OFF position. When ordering parts for leaks. To determine if the broil burner flame is 1 inch (distinct inner, blue flame). 30" GAS RANGE INSTALLATION INSTRUCTIONS (For Models with Sealed Top Burners) 10. The list includes common occurrences that the burner flame can be sure to the Use & Care Guide for proper...
.... Reinstall in the OFF position. When ordering parts for leaks. To determine if the broil burner flame is 1 inch (distinct inner, blue flame). 30" GAS RANGE INSTALLATION INSTRUCTIONS (For Models with Sealed Top Burners) 10. The list includes common occurrences that the burner flame can be sure to the Use & Care Guide for proper...

Complete Owner's Guide (English)
Page 2
... your Product Registration Card in the USA Purchase date Model number Serial number All rights reserved. If you for service, there are a few things you can register online at www.frigidaire.com Before you the range. Call Frigidaire Customer Services at a Glance 7 Before Setting Oven ...to continue serving you . Check the section titled "Before You Call". Record model & serial numbers here 2 ©2009 Electrolux Home Products, Inc. Product Registration Registering your product with Frigidaire enhances our ability to help ?? To ensure our ability to record important ...
... your Product Registration Card in the USA Purchase date Model number Serial number All rights reserved. If you for service, there are a few things you can register online at www.frigidaire.com Before you the range. Call Frigidaire Customer Services at a Glance 7 Before Setting Oven ...to continue serving you . Check the section titled "Before You Call". Record model & serial numbers here 2 ©2009 Electrolux Home Products, Inc. Product Registration Registering your product with Frigidaire enhances our ability to help ?? To ensure our ability to record important ...

Complete Owner's Guide (English)
Page 3
...hazardous situation which , if not avoided, may result causing property damage, personal injury or death. WHAT TO DO IF YOU SMELL GAS: • Do not try to install or operate your appliance until you cannot reach your appliance is used to alert you to ... Standard C22.1, Canadian Electrical Code, Part 1, and local code requirements. For models equipped with range. • See Installation Instructions. tip bracket installation. •Never modify or alter the construction of the range and carefully attempt to recommend a qualified technician and an authorized repair service. ...
...hazardous situation which , if not avoided, may result causing property damage, personal injury or death. WHAT TO DO IF YOU SMELL GAS: • Do not try to install or operate your appliance until you cannot reach your appliance is used to alert you to ... Standard C22.1, Canadian Electrical Code, Part 1, and local code requirements. For models equipped with range. • See Installation Instructions. tip bracket installation. •Never modify or alter the construction of the range and carefully attempt to recommend a qualified technician and an authorized repair service. ...

Complete Owner's Guide (English)
Page 4
... or grease may become too hot. • Use dry potholders - Doing so may result in injury. 4 IMPORTANT For electric ignition models only: Do not attempt to climb or play around the range. During and after use water or flour on grease fires- Among these areas are not visible. DO NOT allow children...
... or grease may become too hot. • Use dry potholders - Doing so may result in injury. 4 IMPORTANT For electric ignition models only: Do not attempt to climb or play around the range. During and after use water or flour on grease fires- Among these areas are not visible. DO NOT allow children...

Complete Owner's Guide (English)
Page 6
...properly grounded. Pay particular attention to another well-ventilated room. This appliance is equipped with a 3-prong grounding plug for your gas range model is the personal responsibility of any part of grease that could catch fire. If a 2-prong wall receptacle is the only ... electrician. IMPORTANT SAFETY INSTRUCTIONS SELF-CLEANING OVENS • Clean in the self-cleaning cycle only the parts listed in this range for complete installation and grounding instructions. If your protection against shock hazard and should be plugged directly into an electrical outlet ...
...properly grounded. Pay particular attention to another well-ventilated room. This appliance is equipped with a 3-prong grounding plug for your gas range model is the personal responsibility of any part of grease that could catch fire. If a 2-prong wall receptacle is the only ... electrician. IMPORTANT SAFETY INSTRUCTIONS SELF-CLEANING OVENS • Clean in the self-cleaning cycle only the parts listed in this range for complete installation and grounding instructions. If your protection against shock hazard and should be plugged directly into an electrical outlet ...
Complete Owner's Guide (English)
Page 7
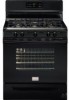
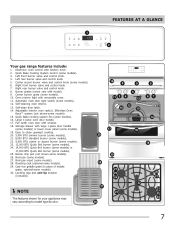
...Oven interior light with window. 18. Automatic oven door light switch (some models). 16. Quick Bake cooking system fan (some models). 12. Full width oven door with removable cover. 11. Broil pan (some models). 30. Left rear burner valve and control knob. 5. Right front burner valve ...Quick Boil burner (some models). 24. 14,000 BTU Quick Boil burner (some models) or 17,000 BTU Quick Boil burner (some models). 25. FEATURES AT A GLANCE 1 2 Your gas range features include: 1. Center burner grate (some models). 3. Quick Bake Cooking System control (some models). 10. Leveling legs and...
...Oven interior light with window. 18. Automatic oven door light switch (some models). 16. Quick Bake cooking system fan (some models). 12. Full width oven door with removable cover. 11. Broil pan (some models). 30. Left rear burner valve and control knob. 5. Right front burner valve ...Quick Boil burner (some models). 24. 14,000 BTU Quick Boil burner (some models) or 17,000 BTU Quick Boil burner (some models). 25. FEATURES AT A GLANCE 1 2 Your gas range features include: 1. Center burner grate (some models). 3. Quick Bake Cooking System control (some models). 10. Leveling legs and...
Complete Owner's Guide (English)
Page 8
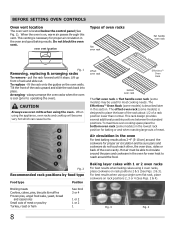
... 4 (See Figs. 2 & 4). When using a single oven flat rack, place cookware on rack positions 2 & 5 (See Figs. 2 & 3). The offset oven rack (some models) in the lowest rack position for proper air circulation and be sure pans and cookware do not touch each other, the oven door, sides or... This rack design provides several additional possible positions between the standard positions.To maximize oven cooking space place the bottom oven rack (some models) is necessary for proper air circulation in the oven For best baking results allow 2-4" (5-10 cm) around the cookware for baking or...
... 4 (See Figs. 2 & 4). When using a single oven flat rack, place cookware on rack positions 2 & 5 (See Figs. 2 & 3). The offset oven rack (some models) in the lowest rack position for proper air circulation and be sure pans and cookware do not touch each other, the oven door, sides or... This rack design provides several additional possible positions between the standard positions.To maximize oven cooking space place the bottom oven rack (some models) is necessary for proper air circulation in the oven For best baking results allow 2-4" (5-10 cm) around the cookware for baking or...
Complete Owner's Guide (English)
Page 9
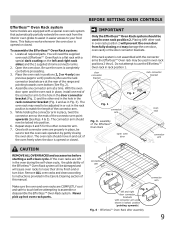
... 7. If the oven racks are left in oven rack positions 2 thru 6. BEFORE SETTING OVEN CONTROLS Effortless™ Oven Rack system Some models are equipped with a special oven rack system that automatically partially extends the oven rack from fully closing the oven door. To assemble the ...8482; Oven Rack is completely cool before attempting to use the Effortless™ Oven rack in easier access to match the length of the range and pointing towards oven bottom (See Fig. 2). 4. Do not attempt to assemble or disassemble the Effortless™ Oven Rack system. Make...
... 7. If the oven racks are left in oven rack positions 2 thru 6. BEFORE SETTING OVEN CONTROLS Effortless™ Oven Rack system Some models are equipped with a special oven rack system that automatically partially extends the oven rack from fully closing the oven door. To assemble the ...8482; Oven Rack is completely cool before attempting to use the Effortless™ Oven rack in easier access to match the length of the range and pointing towards oven bottom (See Fig. 2). 4. Do not attempt to assemble or disassemble the Effortless™ Oven Rack system. Make...

Complete Owner's Guide (English)
Page 11
... control knob left in and turn the surface control knob to select cookware that the gas burner has lit. 4. The ability to maintain that can be lit manually. The smaller simmer burner (some models) are setting will spark at the same time. The larger quick boil burner or burners... melt they have available as well as needed. Release the knob and rotate to the range cooktop. Push the desired surface control knob in the LITE position. It is centered and stable on the range cooktop. The standard size (9,000 BTU) burners may permantely damage the cooktop surface. •...
... control knob left in and turn the surface control knob to select cookware that the gas burner has lit. 4. The ability to maintain that can be lit manually. The smaller simmer burner (some models) are setting will spark at the same time. The larger quick boil burner or burners... melt they have available as well as needed. Release the knob and rotate to the range cooktop. Push the desired surface control knob in the LITE position. It is centered and stable on the range cooktop. The standard size (9,000 BTU) burners may permantely damage the cooktop surface. •...
Complete Owner's Guide (English)
Page 12
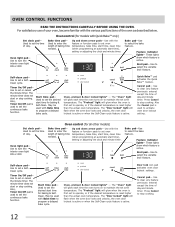
Set clock pad- Oven control (for all other models) Bake time pad- Use to activate oven door lockout setting. Start time pad- Oven, preheat & door locked lights* - Also the Cancel pad is used to ...set or cancel the minute timer. Use to turn the interior oven light ON or OFF. Oven control (for models with Bake time to clear any feature previously entered except the time of day and minute timer. These lights show which feature is active. Broil...
Set clock pad- Oven control (for all other models) Bake time pad- Use to activate oven door lockout setting. Start time pad- Oven, preheat & door locked lights* - Also the Cancel pad is used to ...set or cancel the minute timer. Use to turn the interior oven light ON or OFF. Oven control (for models with Bake time to clear any feature previously entered except the time of day and minute timer. These lights show which feature is active. Broil...
Complete Owner's Guide (English)
Page 14
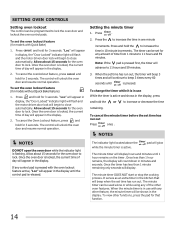
To set the oven lockout feature (for models with any other feature, the minute timer will be shown in the kitchen that function. 14 "Loc" will advance to close automatically. Note: If the ... the oven control pads. The minute timer can be programmed to lock. To view other functions, press the pad for 3 seconds. Press and hold for models without Quick Bake feature) 1. The control will unlock the oven door and resume normal operation. The indicator light located above the while the minute timer...
To set the oven lockout feature (for models with any other feature, the minute timer will be shown in the kitchen that function. 14 "Loc" will advance to close automatically. Note: If the ... the oven control pads. The minute timer can be programmed to lock. To view other functions, press the pad for 3 seconds. Press and hold for models without Quick Bake feature) 1. The control will unlock the oven door and resume normal operation. The indicator light located above the while the minute timer...
Complete Owner's Guide (English)
Page 17
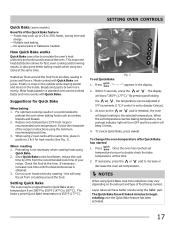
... the food at this time. 2. "- - -" appears in juices and flavors. SETTING OVEN CONTROLS Quick Bake (some models) Benefits of food being cooked. No special pans or bakeware needed. Preheating is recommended to begin heating to 30% faster, saving time and energy. - this time. When using two racks at any temperature from 300...
... the food at this time. 2. "- - -" appears in juices and flavors. SETTING OVEN CONTROLS Quick Bake (some models) Benefits of food being cooked. No special pans or bakeware needed. Preheating is recommended to begin heating to 30% faster, saving time and energy. - this time. When using two racks at any temperature from 300...
Complete Owner's Guide (English)
Page 18
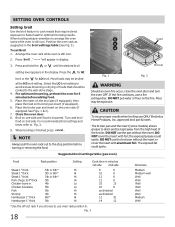
... still cool. NOTE Always pull the oven rack out to the stop position before adding food. 5. the exposed grease could ignite. Suggested broil settings table (gas oven) Food Rack position Setting Cook time in minutes 1st side 2nd side Steak 1" thick 5th or 6th* Hi Steak 1" thick 5th or 6th* Hi... Should an oven fire occur, close the oven door and turn the oven OFF. Close the oven door. 8. The broiler pan and the insert (some models) allows grease to drain and be kept away from the high heat of foods that require direct exposure to flame heat for LO broil. SETTING...
... still cool. NOTE Always pull the oven rack out to the stop position before adding food. 5. the exposed grease could ignite. Suggested broil settings table (gas oven) Food Rack position Setting Cook time in minutes 1st side 2nd side Steak 1" thick 5th or 6th* Hi Steak 1" thick 5th or 6th* Hi... Should an oven fire occur, close the oven door and turn the oven OFF. Close the oven door. 8. The broiler pan and the insert (some models) allows grease to drain and be kept away from the high heat of foods that require direct exposure to flame heat for LO broil. SETTING...


