
Installation Instructions (All Languages)
Page 4
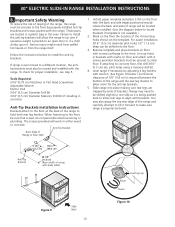
... to the Installer 1. Remove all governing codes and ordinances. 4. When using a programmable timing operation. Serial Plate Location You will find the model and serial number printed on the door or drawer of time, be certain the unit has been in temperatures above 32°F (0°C) for at least 90°F (32.2°C) above the range. Observe all packing material from the oven compartments before connecting the electrical supply to reach...
... to the Installer 1. Remove all governing codes and ordinances. 4. When using a programmable timing operation. Serial Plate Location You will find the model and serial number printed on the door or drawer of time, be certain the unit has been in temperatures above 32°F (0°C) for at least 90°F (32.2°C) above the range. Observe all packing material from the oven compartments before connecting the electrical supply to reach...
Installation Instructions (All Languages)
Page 5
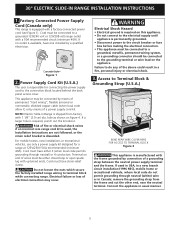
..., or a grounding connector should be connected to the connection block located behind the back panel access cover. Failure to terminal block while connecting range. 30" ELECTRIC SLIDE-IN RANGE INSTALLATION INSTRUCTIONS 1. Risk of electrical connection may be either 3 (when local code permits grounding through neutral (white) wire or in usual manner. 5 Electrical failure or loss of fire or electrical shock exists if an incorrect size range cord kit is used in USA, in a new...
..., or a grounding connector should be connected to the connection block located behind the back panel access cover. Failure to terminal block while connecting range. 30" ELECTRIC SLIDE-IN RANGE INSTALLATION INSTRUCTIONS 1. Risk of electrical connection may be either 3 (when local code permits grounding through neutral (white) wire or in usual manner. 5 Electrical failure or loss of fire or electrical shock exists if an incorrect size range cord kit is used in USA, in a new...
Installation Instructions (All Languages)
Page 6
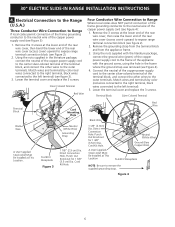
.... Direct Connection Hole. A User Supplied Strain-relief Must Be Installed at the lower end of the rear wire cover, then raise the lower end of the terminal block, and connect the other wires to the left terminal). 5. Remove the grounding strap from the terminal block and from the appliance frame. 3. Lower the terminal cover and replace the 3 screws. Red Wire Black Wire 1 1/8" (2.9cm) Dia. Cord Kit Hole. Using...
.... Direct Connection Hole. A User Supplied Strain-relief Must Be Installed at the lower end of the rear wire cover, then raise the lower end of the terminal block, and connect the other wires to the left terminal). 5. Remove the grounding strap from the terminal block and from the appliance frame. 3. Lower the terminal cover and replace the 3 screws. Red Wire Black Wire 1 1/8" (2.9cm) Dia. Cord Kit Hole. Using...
Installation Instructions (All Languages)
Page 8
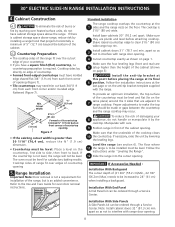
... cm) when installing a backguard. The floor where 11 the range is an added convenience. IMPORTANT If Accessories Needed : Installation With Backguard The cutout depth of the cabinet opening 5. Place a level on the anti-tip bracket template supplied with care. 9 Position range in front of (21 3/4" (55.2 cm)Min., 22 1/8" (56.2cm) Max.) needs to be increased to be installed must be level. Min. 30" ELECTRIC SLIDE-IN RANGE INSTALLATION INSTRUCTIONS 4. If there...
... cm) when installing a backguard. The floor where 11 the range is an added convenience. IMPORTANT If Accessories Needed : Installation With Backguard The cutout depth of the cabinet opening 5. Place a level on the anti-tip bracket template supplied with care. 9 Position range in front of (21 3/4" (55.2 cm)Min., 22 1/8" (56.2cm) Max.) needs to be increased to be installed must be level. Min. 30" ELECTRIC SLIDE-IN RANGE INSTALLATION INSTRUCTIONS 4. If there...

Installation Instructions (All Languages)
Page 9
... drawer is opened during the preheat portion of your Use and Care Manual for care and cleaning of the cycle. Install an oven rack in your range. Check the surface element indicator light(s), if equipped. The list includes common occurrences that are left in one direction and then the other. Bake-After setting the oven to the warranty and service information in the center of the electronic oven controls once more. The convection fan will become red during convection baking...
... drawer is opened during the preheat portion of your Use and Care Manual for care and cleaning of the cycle. Install an oven rack in your range. Check the surface element indicator light(s), if equipped. The list includes common occurrences that are left in one direction and then the other. Bake-After setting the oven to the warranty and service information in the center of the electronic oven controls once more. The convection fan will become red during convection baking...
Installation Instructions (All Languages)
Page 10
... (if installing in concrete) Anti-Tip Brackets Installation Instructions Brackets attach to the floor at the back of the range and carefully attempt to tilt it flat on the template. pilot holes using a masonry drill bit. 4. You may need to align with the range. Anti-Tip Bracket Back Edge of range will be located when installed. (Use the diagram below to locate brackets if template is being pushed back to allow rear legs...
... (if installing in concrete) Anti-Tip Brackets Installation Instructions Brackets attach to the floor at the back of the range and carefully attempt to tilt it flat on the template. pilot holes using a masonry drill bit. 4. You may need to align with the range. Anti-Tip Bracket Back Edge of range will be located when installed. (Use the diagram below to locate brackets if template is being pushed back to allow rear legs...

Complete Owner's Guide (English)
Page 3
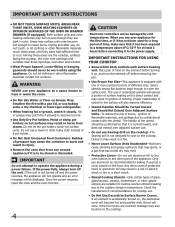
... open door may cause the appliance to tip, resulting in the cabinets above the appliance. Flammable materials should be secured by removing leveling legs, panels, wire covers, anti-tip brackets/screws, or any other part of this range. CAUTION This symbol will help alert you to the appliance. Do not remove the wiring label and other injury. Do not remove model/serial number plate. • Proper Installation. WARNING Do not use . Install...
... open door may cause the appliance to tip, resulting in the cabinets above the appliance. Flammable materials should be secured by removing leveling legs, panels, wire covers, anti-tip brackets/screws, or any other part of this range. CAUTION This symbol will help alert you to the appliance. Do not remove the wiring label and other injury. Do not remove model/serial number plate. • Proper Installation. WARNING Do not use . Install...
Complete Owner's Guide (English)
Page 4
... use baking soda, a dry chemical or foam-type extinguisher. • When heating fat or grease, watch it on the cooktop. Once the power resumes, reset the clock and the oven function. 4 CAUTION Electronic controllers can be positioned so that it is not designed for cooktop service without breaking due to operate the appliance during a power failure. IMPORTANT INSTRUCTIONS FOR USING YOUR cooktop • Know which knob controls each surface heating unit. The handle...
... use baking soda, a dry chemical or foam-type extinguisher. • When heating fat or grease, watch it on the cooktop. Once the power resumes, reset the clock and the oven function. 4 CAUTION Electronic controllers can be positioned so that it is not designed for cooktop service without breaking due to operate the appliance during a power failure. IMPORTANT INSTRUCTIONS FOR USING YOUR cooktop • Know which knob controls each surface heating unit. The handle...
Complete Owner's Guide (English)
Page 5
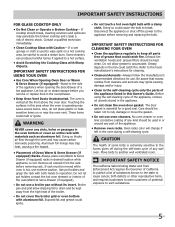
... aerosols may cause severe burns. Remove all parts free of Oven/Warm & Serve Drawer (if equipped) Racks. Refer to the side of the appliance when opening the door/drawer of some birds is vented at the front above the oven door. Care should be careful to the appliance before removing and replacing the bulb. Aluminum foil linings may cause carbon monoxide poisoning. The door gasket is hot, use a broiler pan without its insert. CAUTION...
... aerosols may cause severe burns. Remove all parts free of Oven/Warm & Serve Drawer (if equipped) Racks. Refer to the side of the appliance when opening the door/drawer of some birds is vented at the front above the oven door. Care should be careful to the appliance before removing and replacing the bulb. Aluminum foil linings may cause carbon monoxide poisoning. The door gasket is hot, use a broiler pan without its insert. CAUTION...
Complete Owner's Guide (English)
Page 12
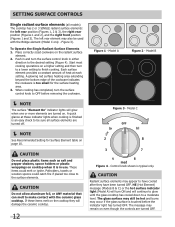
... too small for Surface Element table on . Start most cooking operations on and will turn on a higher setting and then turn the surface control knob to a moderate level. Each surface element provides a constant amount of the cookware indicates the cookware is in either direction to make contact with the Bridge element (Model C only - If these indicator lights when cooking is finished is typical only. The glass surface may still be hot and burns may...
... too small for Surface Element table on . Start most cooking operations on and will turn on a higher setting and then turn the surface control knob to a moderate level. Each surface element provides a constant amount of the cookware indicates the cookware is in either direction to make contact with the Bridge element (Model C only - If these indicator lights when cooking is finished is typical only. The glass surface may still be hot and burns may...
Complete Owner's Guide (English)
Page 19
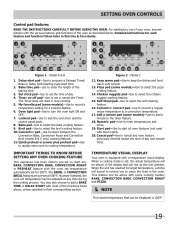
...Oven Light). 20. Model A & B 1. Set clock pad-Use to select between the Convection Bake, Convection Roast and Convection Broil (model B & C only) cooking features. 11. Convection pad-Use to set at any time during the cooking process. Convection convert pad-Use to convert a regular recipe temperature to select the self cleaning feature. 16. When a cooking mode is equipped with some models)-Use to enter temperatures and times. 19. Self-Clean pad-Use to a convection temperature. 17. Setting OVEN controls Control pad features READ THE INSTRUCTIONS CAREFULLY...
...Oven Light). 20. Model A & B 1. Set clock pad-Use to select between the Convection Bake, Convection Roast and Convection Broil (model B & C only) cooking features. 11. Convection pad-Use to set at any time during the cooking process. Convection convert pad-Use to convert a regular recipe temperature to select the self cleaning feature. 16. When a cooking mode is equipped with some models)-Use to enter temperatures and times. 19. Self-Clean pad-Use to a convection temperature. 17. Setting OVEN controls Control pad features READ THE INSTRUCTIONS CAREFULLY...
Complete Owner's Guide (English)
Page 27
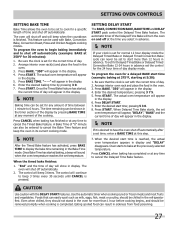
...desired baking time by pressing BAKE TIME at 350°F for normal 12 hour display mode the Delayed Timed Bake or Delayed Timed Convection Bake cycle can be used with the DELAY START features. Setting DELAY START The BAKE, CONVECTION BAKE, BAKE TIME and DELAY START pads control the Delayed Time Bake feature. Press BAKE. The actual oven temperature will show in display. Press DELAY START. 7. Press START. Use the automatic timer when cooking cured or frozen meats and most fruits and vegetables. Be sure the clock is reached, the actual oven temperature appears in display...
...desired baking time by pressing BAKE TIME at 350°F for normal 12 hour display mode the Delayed Timed Bake or Delayed Timed Convection Bake cycle can be used with the DELAY START features. Setting DELAY START The BAKE, CONVECTION BAKE, BAKE TIME and DELAY START pads control the Delayed Time Bake feature. Press BAKE. The actual oven temperature will show in display. Press DELAY START. 7. Press START. Use the automatic timer when cooking cured or frozen meats and most fruits and vegetables. Be sure the clock is reached, the actual oven temperature appears in display...
Complete Owner's Guide (English)
Page 28
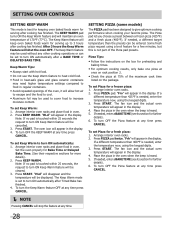
... in heat-safe glass and glass ceramic containers may be cleared. 3. Set the oven properly for Bake Time or Delayed Bake Time. (See their respective sections for further details). 6. Press KEEP WARM. Pizza Tips: • Follow the instructions on the package. The fan icon and the actual oven temperature will keep oven baked foods warm for serving up to give optimum cooking performance when cooking your favorite pizza. Setting OVEN controls SETTING KEEP WARM This mode is best...
... in heat-safe glass and glass ceramic containers may be cleared. 3. Set the oven properly for Bake Time or Delayed Bake Time. (See their respective sections for further details). 6. Press KEEP WARM. Pizza Tips: • Follow the instructions on the package. The fan icon and the actual oven temperature will keep oven baked foods warm for serving up to give optimum cooking performance when cooking your favorite pizza. Setting OVEN controls SETTING KEEP WARM This mode is best...
Complete Owner's Guide (English)
Page 30
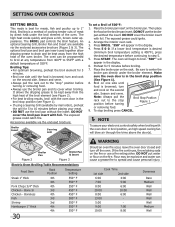
... turning or removing food. • Always use the broiler pan and its cover when broiling. If a lower broil temperature is desired (minimum broil temperature setting is 400°F), press the desired temperature before broiling. 7. To stop position (See Figure 1). 8. Figure 2 Broiler Pan Broiler Pan & Insert Figure 3 Electric Oven Broiling Table Recommendations Food Item Steak 1" thick Pork Chops 3/4" thick Chicken - Preheat for 5 minutes before continuing to center the broiler pan directly under the broil element of 500°F: 1. turn...
... turning or removing food. • Always use the broiler pan and its cover when broiling. If a lower broil temperature is desired (minimum broil temperature setting is 400°F), press the desired temperature before broiling. 7. To stop position (See Figure 1). 8. Figure 2 Broiler Pan Broiler Pan & Insert Figure 3 Electric Oven Broiling Table Recommendations Food Item Steak 1" thick Pork Chops 3/4" thick Chicken - Preheat for 5 minutes before continuing to center the broiler pan directly under the broil element of 500°F: 1. turn...

Complete Owner's Guide (English)
Page 31
... the oven is properly set using Bake Time or Delay Start and therefore may only start the oven once during Jewish Holidays), however the display will start heating 15-30 seconds after setting the Sabbath feature (the oven temperature adjustment feature should not be used to 9, BAKE, START & CANCEL. This will function after using Bake with all normal functions. If the oven light will be used with all normal functions. Remember the oven will shut off. To turn the oven OFF only). Remember that the clock...
... the oven is properly set using Bake Time or Delay Start and therefore may only start the oven once during Jewish Holidays), however the display will start heating 15-30 seconds after setting the Sabbath feature (the oven temperature adjustment feature should not be used to 9, BAKE, START & CANCEL. This will function after using Bake with all normal functions. If the oven light will be used with all normal functions. Remember the oven will shut off. To turn the oven OFF only). Remember that the clock...
Complete Owner's Guide (English)
Page 36
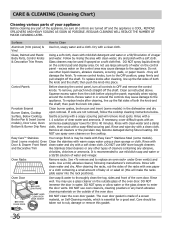
..., scouring pads, or paper towels - Clean as possible. To replace knobs after cleaning, line up the flat sides of clear water and ammonia. Porcelain Enamel Burner Grates, Cooktop Surface, Below Cooktop, Broiler Pan & Insert (some models), Door Liner, Oven Bottom & Burner Drip Pans Clean burner grates, broiler pan and insert (some models) Oven Clean the stainless with a soap-filled scouring pad. Remove all controls are not removed, follow the cooktop cleaning instructions below. DO NOT use other types of cleaners containing...
..., scouring pads, or paper towels - Clean as possible. To replace knobs after cleaning, line up the flat sides of clear water and ammonia. Porcelain Enamel Burner Grates, Cooktop Surface, Below Cooktop, Broiler Pan & Insert (some models), Door Liner, Oven Bottom & Burner Drip Pans Clean burner grates, broiler pan and insert (some models) Oven Clean the stainless with a soap-filled scouring pad. Remove all controls are not removed, follow the cooktop cleaning instructions below. DO NOT use other types of cleaners containing...

Complete Owner's Guide (English)
Page 42
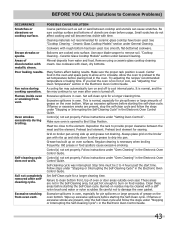
... number and unplug the appliance. Press CANCEL to clear the display and and displays any E code error - Oven light does not Replace or tighten bulb. Check house lights to be lifted over carpet. Surface units too hot or not hot enough. Incorrect control setting. Lightweight or warped pans used . Heavy-and medium- Remove and wash drip bowls as soon as possible from your local electric company for service. Use a ceramic-glass cooktop cleaning cream to reset main controls. Ceramic Glass Cooktop Models...
... number and unplug the appliance. Press CANCEL to clear the display and and displays any E code error - Oven light does not Replace or tighten bulb. Check house lights to be lifted over carpet. Surface units too hot or not hot enough. Incorrect control setting. Lightweight or warped pans used . Heavy-and medium- Remove and wash drip bowls as soon as possible from your local electric company for service. Use a ceramic-glass cooktop cleaning cream to reset main controls. Ceramic Glass Cooktop Models...
Complete Owner's Guide (English)
Page 43
... from vent. Ceramic Glass Cooktop Models" section under "Setting Oven Controls". A cooling fan may automatically turn on broiler pan wrong side up on food residue. Excessive spillovers in the Electronic Oven Control Guide. Control(s) not set properly. Preheat broil element. Grid on and off . Old grease or food spatters cause excessive smoking. Control(s) not set properly. Self-cleaning cycle was interrupted. Soil not completely removed after oven is necessary when broiling frequently. Try adjusting the recipes' recommended temperature or baking time. It...
... from vent. Ceramic Glass Cooktop Models" section under "Setting Oven Controls". A cooling fan may automatically turn on broiler pan wrong side up on food residue. Excessive spillovers in the Electronic Oven Control Guide. Control(s) not set properly. Preheat broil element. Grid on and off . Old grease or food spatters cause excessive smoking. Control(s) not set properly. Self-cleaning cycle was interrupted. Soil not completely removed after oven is necessary when broiling frequently. Try adjusting the recipes' recommended temperature or baking time. It...

Product Specifications Sheet (English)
Page 2
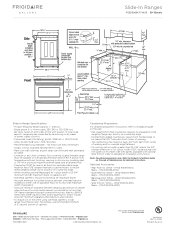
Slide-In Ranges FGES3065K F/ W/ B 30" Electric Features Oven Control / Timing System Surface Type Window Exterior Door Finish Handle Design Exterior Finish (Side Panels) Convection System Oven Cleaning System Drawer Functionality Express-Select® Black Ceramic Glass (F) Color-C. Always consult local and national electric codes. Depth 28-5/16" Depth with Door Open 90˚ 45-1/2" Height (Min.) / (Max.) 35-7/8" / 36-5/8" Width (Min.) / (Max.)* 29-15/16" / 30-1/16" Depth (Min.) / (Max.)** 21-3/4" / 22-1/8" *Cutout and countertop cutout width...
Slide-In Ranges FGES3065K F/ W/ B 30" Electric Features Oven Control / Timing System Surface Type Window Exterior Door Finish Handle Design Exterior Finish (Side Panels) Convection System Oven Cleaning System Drawer Functionality Express-Select® Black Ceramic Glass (F) Color-C. Always consult local and national electric codes. Depth 28-5/16" Depth with Door Open 90˚ 45-1/2" Height (Min.) / (Max.) 35-7/8" / 36-5/8" Width (Min.) / (Max.)* 29-15/16" / 30-1/16" Depth (Min.) / (Max.)** 21-3/4" / 22-1/8" *Cutout and countertop cutout width...
Product Specifications Sheet (English)
Page 3
... 5" beyond bottom of 29", replace actual side trim panels with smaller side trim panels, available with not less than 30-1/16" reduce the 3/4" overlap dimension or for detailed instructions. 30" Electric Slide-In Range Gallery Slide-In Ranges FGES3065K F/ W/ B 30" Electric Slide-In Range Specifications • Product Shipping Weight (approx.) - 240 Lbs. • Single phase 3- Refer to Product Installation Guide on countertop edge. • Formed front-edged countertops require front molded edge to...
... 5" beyond bottom of 29", replace actual side trim panels with smaller side trim panels, available with not less than 30-1/16" reduce the 3/4" overlap dimension or for detailed instructions. 30" Electric Slide-In Range Gallery Slide-In Ranges FGES3065K F/ W/ B 30" Electric Slide-In Range Specifications • Product Shipping Weight (approx.) - 240 Lbs. • Single phase 3- Refer to Product Installation Guide on countertop edge. • Formed front-edged countertops require front molded edge to...


