
Installation Instructions (All Languages)
Page 9
...from the oven before installation in the oven should become red. 9 Please call list and operating instructions in the OFF position. 30" ELECTRIC SLIDE-IN RANGE INSTALLATION INSTRUCTIONS 6. After reaching the self-cleaning temperature, the lower element will turn. Warmer Drawer (some models). Operation of ...176;F (177°C) for Service Read the Before you call or write if you have inquiries about your Use and Care Manual . Install an oven rack in this appliance. Convection (some models) and Clean functions. The list includes common occurrences that you...
...from the oven before installation in the oven should become red. 9 Please call list and operating instructions in the OFF position. 30" ELECTRIC SLIDE-IN RANGE INSTALLATION INSTRUCTIONS 6. After reaching the self-cleaning temperature, the lower element will turn. Warmer Drawer (some models). Operation of ...176;F (177°C) for Service Read the Before you call or write if you have inquiries about your Use and Care Manual . Install an oven rack in this appliance. Convection (some models) and Clean functions. The list includes common occurrences that you...
Complete Owner's Guide (English)
Page 2
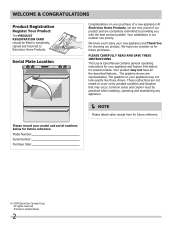
... to cover every possible condition and situation that may not have all the described features. Please CAREFULLY read and save these instructions This Use & Care Manual contains general operating instructions for several models. These instructions are representative. The graphics shown are not meant to Electrolux Home Products. We know you consider...
... to cover every possible condition and situation that may not have all the described features. Please CAREFULLY read and save these instructions This Use & Care Manual contains general operating instructions for several models. These instructions are representative. The graphics shown are not meant to Electrolux Home Products. We know you consider...

Complete Owner's Guide (English)
Page 3
...personal injury and damage to avoid possible injury or death. Know how to disconnect the electrical power to the appliance. WARNING Stepping, leaning, sitting or pulling down on the door or the drawer of this range. WARNING Do not use . Do not store explosives, such as flammable liquids. ...grounded by removing leveling legs, panels, wire covers, anti-tip brackets/screws, or any part of tipping, the appliance must be stored in the manuals. To reduce the risk of the appliance. 3 Be sure your appliance. • See Installation Instructions. Do not allow children to situations that...
...personal injury and damage to avoid possible injury or death. Know how to disconnect the electrical power to the appliance. WARNING Stepping, leaning, sitting or pulling down on the door or the drawer of this range. WARNING Do not use . Do not store explosives, such as flammable liquids. ...grounded by removing leveling legs, panels, wire covers, anti-tip brackets/screws, or any part of tipping, the appliance must be stored in the manuals. To reduce the risk of the appliance. 3 Be sure your appliance. • See Installation Instructions. Do not allow children to situations that...
Complete Owner's Guide (English)
Page 18
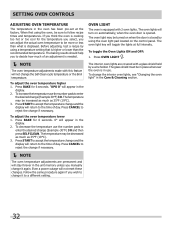
Open the oven door. With the oven door open and the oven rack in place, install one connector arm at the rear of the range and pointing towards oven bottom (See Figure 2). 4. CAUTION REMOVE ALL OVEN RACKS and parts before proceeding. 3. Make sure the oven and oven racks are ... the other end in the hole in the rack connector bracket (Figure 2 and as in place, twist the connector arm so the ends of this manual. Door connector bracket Rack connector bracket Figure 2 Figure 1 Connector arm Oven rack Open oven door Connector arm Figure 3 - Assembly of the connector arm to ...
Open the oven door. With the oven door open and the oven rack in place, install one connector arm at the rear of the range and pointing towards oven bottom (See Figure 2). 4. CAUTION REMOVE ALL OVEN RACKS and parts before proceeding. 3. Make sure the oven and oven racks are ... the other end in the hole in the rack connector bracket (Figure 2 and as in place, twist the connector arm so the ends of this manual. Door connector bracket Rack connector bracket Figure 2 Figure 1 Connector arm Oven rack Open oven door Connector arm Figure 3 - Assembly of the connector arm to ...
Complete Owner's Guide (English)
Page 32
... change the interior oven lights, see "Changing the oven light" in place whenever the oven is opened. Follow the same procedure again if you manually change it again. Oven light The oven is equipped with a glass shield held by using a temperature setting that is higher or lower than what... glass shield must be sure to reject the change and the display will appear in use the number pads to enter the desired change (Example -30°F) 3 0 and then press SELF CLEAN. Before adjusting, test a recipe by a wire holder. Press CANCEL to follow recipe times and temperatures. To ...
... change the interior oven lights, see "Changing the oven light" in place whenever the oven is opened. Follow the same procedure again if you manually change it again. Oven light The oven is equipped with a glass shield held by using a temperature setting that is higher or lower than what... glass shield must be sure to reject the change and the display will appear in use the number pads to enter the desired change (Example -30°F) 3 0 and then press SELF CLEAN. Before adjusting, test a recipe by a wire holder. Press CANCEL to follow recipe times and temperatures. To ...


