
Installation Instructions (All Languages)
Page 4
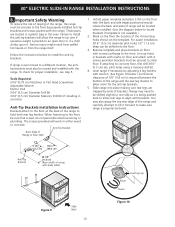
... SELF-CLEAN FEATURE: • Remove oven racks, broiler pan, food and other flammable vapors and liquids near this range can result in serious injuries and can withstand the heat generated by properly installed anti-tip bracket(s) provided with the consumer. Wipe up excess spillage. The serial plate is anchored. • Make sure the wall coverings around the range can also cause damage to children in use and future reference. 30" ELECTRIC SLIDE...
... SELF-CLEAN FEATURE: • Remove oven racks, broiler pan, food and other flammable vapors and liquids near this range can result in serious injuries and can withstand the heat generated by properly installed anti-tip bracket(s) provided with the consumer. Wipe up excess spillage. The serial plate is anchored. • Make sure the wall coverings around the range can also cause damage to children in use and future reference. 30" ELECTRIC SLIDE...
Installation Instructions (All Languages)
Page 5
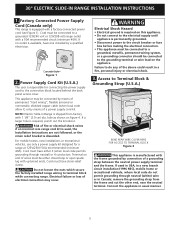
... not followed, or the strain relief bracket is permanently grounded. • Disconnect power to the circuit breaker or fuse box before making the electrical connection. • This appliance must have strain-relief clamp. hole as shown on this appliance. • Do not connect to the connection block located behind the back panel access cover. Cord must be connected to terminal block while connecting range. 30" ELECTRIC SLIDE-IN RANGE INSTALLATION INSTRUCTIONS 1.
... not followed, or the strain relief bracket is permanently grounded. • Disconnect power to the circuit breaker or fuse box before making the electrical connection. • This appliance must have strain-relief clamp. hole as shown on this appliance. • Do not connect to the connection block located behind the back panel access cover. Cord must be connected to terminal block while connecting range. 30" ELECTRIC SLIDE-IN RANGE INSTALLATION INSTRUCTIONS 1.
Installation Instructions (All Languages)
Page 6
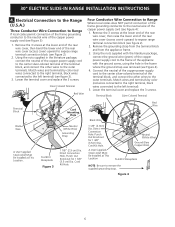
... Must Be Installed at This Location. Lower the terminal cover and replace the 3 screws. Remove the 3 screws at the lower end of the rear wire cover, then raise the lower end of the appliance with the literature package, connect the ground wire (green) of the copper power supply cord to the frame of the rear wire cover (access cover) upward to expose range terminal connection block (see Figure 4): 1. 30" ELECTRIC SLIDE-IN RANGE INSTALLATION INSTRUCTIONS 4.
... Must Be Installed at This Location. Lower the terminal cover and replace the 3 screws. Remove the 3 screws at the lower end of the rear wire cover, then raise the lower end of the appliance with the literature package, connect the ground wire (green) of the copper power supply cord to the frame of the rear wire cover (access cover) upward to expose range terminal connection block (see Figure 4): 1. 30" ELECTRIC SLIDE-IN RANGE INSTALLATION INSTRUCTIONS 4.
Installation Instructions (All Languages)
Page 8
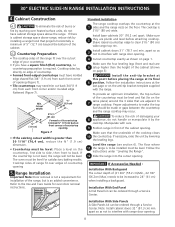
... level before placing the range at front corners of the range fit over heated surface units, do not handle or manipulate it by lowering the leveling legs. Proper adjustments to the Use and Care Guide for satisfactory baking results. Follow the instructions under "Leveling the Range". 12 Slide the range into the cutout opening 5. 30" ELECTRIC SLIDE-IN RANGE INSTALLATION INSTRUCTIONS 4. Refer to make the top flat should be level. Make sure 2 they are adjacent to 7 range cooktop...
... level before placing the range at front corners of the range fit over heated surface units, do not handle or manipulate it by lowering the leveling legs. Proper adjustments to the Use and Care Guide for satisfactory baking results. Follow the instructions under "Leveling the Range". 12 Slide the range into the cutout opening 5. 30" ELECTRIC SLIDE-IN RANGE INSTALLATION INSTRUCTIONS 4. Refer to make the top flat should be level. Make sure 2 they are adjacent to 7 range cooktop...

Installation Instructions (All Languages)
Page 9
... be sure to order parts. 2. 30" ELECTRIC SLIDE-IN RANGE INSTALLATION INSTRUCTIONS 6. Convection (some models). Warmer Drawer (some models) and Clean functions. Figure 8 7. The list includes common occurrences that they heat. Refer to 350°F (177°C) for operation. Bake-After setting the oven to the Use and Care Manual for baking, the lower element in your range. Please call list and operating instructions in the oven should become red. 9 Follow the instructions for the Clock, Timer, Bake, Broil, Convection (some models)-Set the control knob to HI and...
... be sure to order parts. 2. 30" ELECTRIC SLIDE-IN RANGE INSTALLATION INSTRUCTIONS 6. Convection (some models). Warmer Drawer (some models) and Clean functions. Figure 8 7. The list includes common occurrences that they heat. Refer to 350°F (177°C) for operation. Bake-After setting the oven to the Use and Care Manual for baking, the lower element in your range. Please call list and operating instructions in the oven should become red. 9 Follow the instructions for the Clock, Timer, Bake, Broil, Convection (some models)-Set the control knob to HI and...
Installation Instructions (All Languages)
Page 10
... oven. 30" ELECTRIC SLIDE-IN RANGE INSTALLATION INSTRUCTIONS 8. Important Safety Warning To reduce the risk of tipping of the range, the range must be moved and installed with the back and side edges positioned exactly where the back and sides of Range or Rear Wall 1. When fastening to the floor, be located when installed. (Use the diagram below to concrete floor, first drill 3/16" (0.5 cm) dia. pilot holes using...
... oven. 30" ELECTRIC SLIDE-IN RANGE INSTALLATION INSTRUCTIONS 8. Important Safety Warning To reduce the risk of tipping of the range, the range must be moved and installed with the back and side edges positioned exactly where the back and sides of Range or Rear Wall 1. When fastening to the floor, be located when installed. (Use the diagram below to concrete floor, first drill 3/16" (0.5 cm) dia. pilot holes using...

Complete Owner's Guide (English)
Page 3
... an authorized repair service. Destroy the carton and plastic bags after unpacking the appliance. Do not remove model/serial number plate. • Proper Installation. All other servicing should not be done only by a qualified technician to reduce the risk of an appliance by properly installed anti-tip bracket provided with the National Electrical Code ANSI/NFPA No. 70-latest edition, and local code requirements, and in...
... an authorized repair service. Destroy the carton and plastic bags after unpacking the appliance. Do not remove model/serial number plate. • Proper Installation. All other servicing should not be done only by a qualified technician to reduce the risk of an appliance by properly installed anti-tip bracket provided with the National Electrical Code ANSI/NFPA No. 70-latest edition, and local code requirements, and in...
Complete Owner's Guide (English)
Page 4
... use your appliance as a cover placed on the cooktop. Buildup of time, make sure that it has been exposed to a temperature above 0°C/32°F for cooktop service without breaking due to the sudden change in temperature. If the power fails, always turn the element off the unit. Once the power resumes, reset the clock and the oven function. 4 CAUTION Electronic controllers can be stored or discarded. When you use baking...
... use your appliance as a cover placed on the cooktop. Buildup of time, make sure that it has been exposed to a temperature above 0°C/32°F for cooktop service without breaking due to the sudden change in temperature. If the power fails, always turn the element off the unit. Once the power resumes, reset the clock and the oven function. 4 CAUTION Electronic controllers can be stored or discarded. When you use baking...
Complete Owner's Guide (English)
Page 5
... SAFETY INSTRUCTIONS FOR CLEANING YOUR OVEN • Clean the appliance regularly to reposition. If cooktop should be used to avoid a steam burn. WARNING NEVER cover any part of the oven/Warm & Serve Drawer (if equipped). • Do not use . Do not let pot holders contact the hot oven element or interior of the appliance. • Remove oven racks. Greasy deposits in the oven/drawer. • Keep Oven Vent Ducts Unobstructed. Oven racks color will change...
... SAFETY INSTRUCTIONS FOR CLEANING YOUR OVEN • Clean the appliance regularly to reposition. If cooktop should be used to avoid a steam burn. WARNING NEVER cover any part of the oven/Warm & Serve Drawer (if equipped). • Do not use . Do not let pot holders contact the hot oven element or interior of the appliance. • Remove oven racks. Greasy deposits in the oven/drawer. • Keep Oven Vent Ducts Unobstructed. Oven racks color will change...
Complete Owner's Guide (English)
Page 7
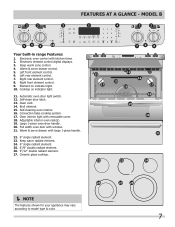
...Broil element. 15. Ceramic glass cooktop. NOTE The features shown for your appliance may vary according to model type & color. 7 Left front element control. 6. Left rear element control. 7. Oven interior light with kitchen timer. 2. Electronic element control digital displays. 3. Cooktop on indicator light. 10. Adjustable interior oven rack(s). 19. Right front element control. 9. Self-cleaning oven interior. 16. Convection bake cooking system. 17. Electronic oven control with removable cover. 18. Warm & serve drawer control. 5. Oven vent. 14. Keep warm...
...Broil element. 15. Ceramic glass cooktop. NOTE The features shown for your appliance may vary according to model type & color. 7 Left front element control. 6. Left rear element control. 7. Oven interior light with kitchen timer. 2. Electronic element control digital displays. 3. Cooktop on indicator light. 10. Adjustable interior oven rack(s). 19. Right front element control. 9. Self-cleaning oven interior. 16. Convection bake cooking system. 17. Electronic oven control with removable cover. 18. Warm & serve drawer control. 5. Oven vent. 14. Keep warm...
Complete Owner's Guide (English)
Page 19
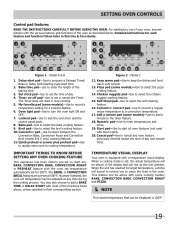
... the baking time. 3. My favorite pad (some cooking modes; Lockout pad-Use to enter temperatures and times. 19. Numeric pad-Use to lock the oven door and the control panel pads. 8. Important Things to Know Before Setting any Oven Cooking Feature This appliance has been factory pre-set at any BAKE, CONVECTION BAKE, CONVECTION ROAST or PREHEAT feature with Oven Light). 20. However if desired, the oven set clock 34 67 8 bake pizza 13 9 10 11quick broil convect preheat keep12 warm chicken self convect add nuggets clean convert...
... the baking time. 3. My favorite pad (some cooking modes; Lockout pad-Use to enter temperatures and times. 19. Numeric pad-Use to lock the oven door and the control panel pads. 8. Important Things to Know Before Setting any Oven Cooking Feature This appliance has been factory pre-set at any BAKE, CONVECTION BAKE, CONVECTION ROAST or PREHEAT feature with Oven Light). 20. However if desired, the oven set clock 34 67 8 bake pizza 13 9 10 11quick broil convect preheat keep12 warm chicken self convect add nuggets clean convert...
Complete Owner's Guide (English)
Page 27
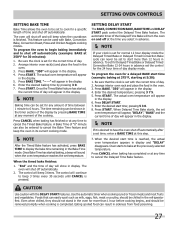
... when the oven temperature reaches the set temperature. Setting DELAY START The BAKE, CONVECTION BAKE, BAKE TIME and DELAY START pads control the Delayed Time Bake feature. The automatic timer of the Delayed Time Bake will beep when the countdown is reached, the actual oven temperature appears in the display. 6. To program the oven for the 24 hour time of day display mode. pressing 3 7 5. 5. Press START. Foods that the clock is set for a specific length of time and shut off at 5:30): 1. To set for Delayed Timed Bake or Delayed Timed Convection Bake 12-24...
... when the oven temperature reaches the set temperature. Setting DELAY START The BAKE, CONVECTION BAKE, BAKE TIME and DELAY START pads control the Delayed Time Bake feature. The automatic timer of the Delayed Time Bake will beep when the countdown is reached, the actual oven temperature appears in the display. 6. To program the oven for the 24 hour time of day display mode. pressing 3 7 5. 5. Press START. Foods that the clock is set for a specific length of time and shut off at 5:30): 1. To set for Delayed Timed Bake or Delayed Timed Convection Bake 12-24...
Complete Owner's Guide (English)
Page 28
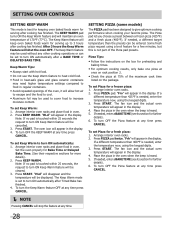
... openings of the maximum cook time listed on rack position 2. • Check the pizza at any time press CANCEL. Arrange interior oven racks. 2. Keep Warm Tips: • Always start with hot food. • Do not use the Keep Warm feature to heat cold food. • Food in heat-safe glass and glass ceramic containers may need higher temperature settings compared to turn ON Keep Warm feature will be cleared. 3. Press START. If needed , enter the temperature now, using...
... openings of the maximum cook time listed on rack position 2. • Check the pizza at any time press CANCEL. Arrange interior oven racks. 2. Keep Warm Tips: • Always start with hot food. • Do not use the Keep Warm feature to heat cold food. • Food in heat-safe glass and glass ceramic containers may need higher temperature settings compared to turn ON Keep Warm feature will be cleared. 3. Press START. If needed , enter the temperature now, using...
Complete Owner's Guide (English)
Page 30
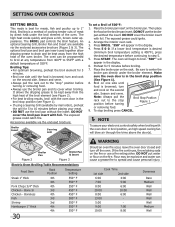
... the broiler element. The BROIL pad controls the Broil feature. Place the broiler pan on the second side. Broiling is in the display. 6. It allows the dripping grease to 10 minutes before broiling. 7. Make sure the oven door is a method of cooking tender cuts of meat by mail order), preheat the grill for 5 minutes before placing your electronic controls safety when broiling with the oven door in broil position, an high speed cooling fan...
... the broiler element. The BROIL pad controls the Broil feature. Place the broiler pan on the second side. Broiling is in the display. 6. It allows the dripping grease to 10 minutes before broiling. 7. Make sure the oven door is a method of cooking tender cuts of meat by mail order), preheat the grill for 5 minutes before placing your electronic controls safety when broiling with the oven door in broil position, an high speed cooling fan...

Complete Owner's Guide (English)
Page 31
... be sure to set with all the control knobs are also in the oven display and the cooktop displays (models B & C). "SAb" will be used again with the correct time of the surface element but take note that the element will immediately turn back on , the electronic surface element control will adjust the temperature with a 15-30 seconds delay. This means that the surface element control will record that the clock is active: To shut off . Be sure...
... be sure to set with all the control knobs are also in the oven display and the cooktop displays (models B & C). "SAb" will be used again with the correct time of the surface element but take note that the element will immediately turn back on , the electronic surface element control will adjust the temperature with a 15-30 seconds delay. This means that the surface element control will record that the clock is active: To shut off . Be sure...
Complete Owner's Guide (English)
Page 36
...'s instructions. Rinse well. The oven door gasket is COOL. Dry with a soft clean cloth. Do not use ANY store bought cleaners and Decorative Trim like Stainless Steel cleaners or any abrasive, chlorides, chlorines or ammonia. To remove, pull each knob straight off the shaft. Porcelain Enamel Burner Grates, Cooktop Surface, Below Cooktop, Broiler Pan & Insert (some models), Door Liner, Oven Bottom & Burner Drip Pans Clean burner grates, broiler pan and insert (some models). DO NOT use...
...'s instructions. Rinse well. The oven door gasket is COOL. Dry with a soft clean cloth. Do not use ANY store bought cleaners and Decorative Trim like Stainless Steel cleaners or any abrasive, chlorides, chlorines or ammonia. To remove, pull each knob straight off the shaft. Porcelain Enamel Burner Grates, Cooktop Surface, Below Cooktop, Broiler Pan & Insert (some models), Door Liner, Oven Bottom & Burner Drip Pans Clean burner grates, broiler pan and insert (some models). DO NOT use...

Complete Owner's Guide (English)
Page 42
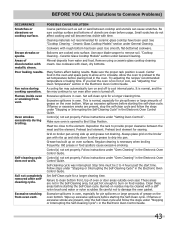
... fault number. No power to remove the marks. Service wiring is not level. Lightweight or warped pans used . When range is level, cooktop may appear out of the material affect heating. Electrical power outage. Models B & C only (ex.: E014) Cooktop control has detected a fault or error condition. Oven control beeps Electronic control has detected a fault condition. Appliance must be purchased from direct exposure to salt air. Cabinets not square or are pitting or rusting. Incorrect control setting. Replacement drip...
... fault number. No power to remove the marks. Service wiring is not level. Lightweight or warped pans used . When range is level, cooktop may appear out of the material affect heating. Electrical power outage. Models B & C only (ex.: E014) Cooktop control has detected a fault or error condition. Oven control beeps Electronic control has detected a fault condition. Appliance must be purchased from direct exposure to salt air. Cabinets not square or are pitting or rusting. Incorrect control setting. Replacement drip...
Complete Owner's Guide (English)
Page 43
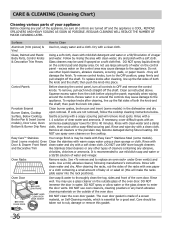
...' recommended temperature or baking time. It is normal, and the fan may continue to 4 hours past the start time. Preheat broil element for pie spillovers or large amounts of grease on and off . Set Self-Clean cycle for ceramic-glass cooktop have been used. Burned-on residue may automatically turn on the oven bottom. Areas of grease on oven surfaces. Self-cleaning cycle does not work. Cleaning materials not recommended for a longer cleaning time. Ceramic Glass Cooktop Models" section under General Cleaning. Ceramic Glass Cooktop Models...
...' recommended temperature or baking time. It is normal, and the fan may continue to 4 hours past the start time. Preheat broil element for pie spillovers or large amounts of grease on and off . Set Self-Clean cycle for ceramic-glass cooktop have been used. Burned-on residue may automatically turn on the oven bottom. Areas of grease on oven surfaces. Self-cleaning cycle does not work. Cleaning materials not recommended for a longer cleaning time. Ceramic Glass Cooktop Models" section under General Cleaning. Ceramic Glass Cooktop Models...
Product Specifications Sheet (English)
Page 2
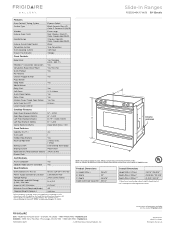
...8226; frigidaire.ca FGES3045K 02/11 © 2011 Electrolux Home Products, Inc. Slide-In Ranges FGES3045K F/ W/ B 30" Electric Features Oven Control / Timing System Surface Type Window Exterior Door Finish Handle Design Exterior Finish (Side Panels) Convection System Oven Cleaning System Drawer Functionality Express-Select® Slide-In Electric Ranges Black Ceramic Glass (F) Color-C. Product Dimensions A - Ft.) 4.2 Oven Light 1 Hidden Bake Element Yes Rack Configuration 2 Heavy Duty, 1 Offset Baking System Even Baking Technology B Broiling System Power Broil Bake Element...
...8226; frigidaire.ca FGES3045K 02/11 © 2011 Electrolux Home Products, Inc. Slide-In Ranges FGES3045K F/ W/ B 30" Electric Features Oven Control / Timing System Surface Type Window Exterior Door Finish Handle Design Exterior Finish (Side Panels) Convection System Oven Cleaning System Drawer Functionality Express-Select® Slide-In Electric Ranges Black Ceramic Glass (F) Color-C. Product Dimensions A - Ft.) 4.2 Oven Light 1 Hidden Bake Element Yes Rack Configuration 2 Heavy Duty, 1 Offset Baking System Even Baking Technology B Broiling System Power Broil Bake Element...
Product Specifications Sheet (English)
Page 3
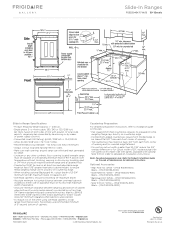
... synthetic floor covering located beneath range, must be no preparation since rangetop flange lays directly on both sides of line with ground. (If local code permits, range may need cut back 3/4" from each front corner of opening and /or rounded edge flattened. • For existing cutout width greater than 30-1/16" reduce the 3/4" overlap dimension or for detailed instructions. Optional Accessories • Rear Filler Kit: White...
... synthetic floor covering located beneath range, must be no preparation since rangetop flange lays directly on both sides of line with ground. (If local code permits, range may need cut back 3/4" from each front corner of opening and /or rounded edge flattened. • For existing cutout width greater than 30-1/16" reduce the 3/4" overlap dimension or for detailed instructions. Optional Accessories • Rear Filler Kit: White...


