
Complete Owner's Guide (English)
Page 1
All about the Use & Care of your Electric Range 316902202 (Rev C Oct 2010) TABLE OF CONTENTS Important Safety Instructions 3-5 Features at a Glance 6 Before Setting Oven Controls 7-9 Before Setting Surface Controls 9-11 Setting Surface Controls 12-16 Oven Control Functions (1000G 17 Setting Oven Controls 18-28 Keep Warm Drawer 29-30 Self-cleaning 31-32 Care & Cleaning (EC/SD/WD 33-36 Before You Call 37-38 Major Appliance Warranty 39 www.frigidaire.com USA 1-800-944-9044 www.frigidaire.ca Canada 1-800-265-8352
All about the Use & Care of your Electric Range 316902202 (Rev C Oct 2010) TABLE OF CONTENTS Important Safety Instructions 3-5 Features at a Glance 6 Before Setting Oven Controls 7-9 Before Setting Surface Controls 9-11 Setting Surface Controls 12-16 Oven Control Functions (1000G 17 Setting Oven Controls 18-28 Keep Warm Drawer 29-30 Self-cleaning 31-32 Care & Cleaning (EC/SD/WD 33-36 Before You Call 37-38 Major Appliance Warranty 39 www.frigidaire.com USA 1-800-944-9044 www.frigidaire.ca Canada 1-800-265-8352
Complete Owner's Guide (English)
Page 2
... information. Read this page to help us serve your range properly. Product Registration Registering your product with Frigidaire enhances our ability to common problems ... 37-38 Appliance Warranty 39 Thank you for service, there are a few things you can register online at www...appliance.We view your Product Registration Card in the USA Save time and money. Serial plate location Serial plate location: open storage drawer (some models) or keep warm 25 Adjusting oven temperature 26 Operating oven light 26 Setting the Sabbath mode feature 27-28 Keep Warm Drawer 29-30...
... information. Read this page to help us serve your range properly. Product Registration Registering your product with Frigidaire enhances our ability to common problems ... 37-38 Appliance Warranty 39 Thank you for service, there are a few things you can register online at www...appliance.We view your Product Registration Card in the USA Save time and money. Serial plate location Serial plate location: open storage drawer (some models) or keep warm 25 Adjusting oven temperature 26 Operating oven light 26 Setting the Sabbath mode feature 27-28 Keep Warm Drawer 29-30...
Complete Owner's Guide (English)
Page 3
...provided with packaging material. • Proper installation-Be sure your dealer to the appliance. Ask your appliance is used to the installation instructions for future reference. 3 This may cause the... range to tip, resulting in serious injuries and also cause damage to recommend a qualified technician and an authorized repair service. Save these instructions for proper anti- Safety items throughout this manual are labeled with the National Electrical...
...provided with packaging material. • Proper installation-Be sure your dealer to the appliance. Ask your appliance is used to the installation instructions for future reference. 3 This may cause the... range to tip, resulting in serious injuries and also cause damage to recommend a qualified technician and an authorized repair service. Save these instructions for proper anti- Safety items throughout this manual are labeled with the National Electrical...
Complete Owner's Guide (English)
Page 4
...too hot. • Use dry potholders - Fat or grease may result in risk of these units or elements, or interior surface of the appliance, including the storage drawer, lower broiler drawer, warmer drawer or lower double oven. Exposed fat and grease could melt or ignite. • Placement...power fails, always turn off and the power resumes, the range will begin to operate the range during a power failure. Improper installation of electric shock, or fire. Always place oven racks in the oven. The oven vent is located below the backguard for models equipped with ceramic-glass...
...too hot. • Use dry potholders - Fat or grease may result in risk of these units or elements, or interior surface of the appliance, including the storage drawer, lower broiler drawer, warmer drawer or lower double oven. Exposed fat and grease could melt or ignite. • Placement...power fails, always turn off and the power resumes, the range will begin to operate the range during a power failure. Improper installation of electric shock, or fire. Always place oven racks in the oven. The oven vent is located below the backguard for models equipped with ceramic-glass...

Complete Owner's Guide (English)
Page 5
... ignition of flammable materials, and spillage due to accumulate on the unit before removing the pan. • Use proper pan size-This appliance is used in or around each surface heating unit. Move birds to cover the surface unit heating element. IMPORTANT INSTRUCTIONS FOR USING YOUR ...or foods from cleaners and aerosols may result in this Use & Care Manual. Pay particular attention to element will expose a portion of electric shock. Some cleaners can cause burns. Heating elements clean themselves during the self-cleaning cycle of any kind should be positioned so that...
... ignition of flammable materials, and spillage due to accumulate on the unit before removing the pan. • Use proper pan size-This appliance is used in or around each surface heating unit. Move birds to cover the surface unit heating element. IMPORTANT INSTRUCTIONS FOR USING YOUR ...or foods from cleaners and aerosols may result in this Use & Care Manual. Pay particular attention to element will expose a portion of electric shock. Some cleaners can cause burns. Heating elements clean themselves during the self-cleaning cycle of any kind should be positioned so that...
Complete Owner's Guide (English)
Page 6
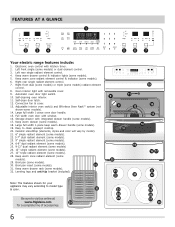
...door latch. 12. Keep warm drawer (some models). 30. Broil pan (some models). 18. Note: The features shown for your appliance may vary according to model type & color. 30 Be sure to clean upswept cooktop. 20. FEATURES AT A GLANCE 1 2 3 4 5 6 7 Your electric range features include: 1. Convection fan & cover. 13...28. Storage drawer with kitchen timer. 2. Keep warm drawer control & indicator lights (some models). 29. Easy to visit us online at www.frigidaire.com 29 for a complete line of accessories. 6 9 8 11 12 19 10 13 14 15 18 16 17 32 21 21 22 ...
...door latch. 12. Keep warm drawer (some models). 30. Broil pan (some models). 18. Note: The features shown for your appliance may vary according to model type & color. 30 Be sure to clean upswept cooktop. 20. FEATURES AT A GLANCE 1 2 3 4 5 6 7 Your electric range features include: 1. Convection fan & cover. 13...28. Storage drawer with kitchen timer. 2. Keep warm drawer control & indicator lights (some models). 29. Easy to visit us online at www.frigidaire.com 29 for a complete line of accessories. 6 9 8 11 12 19 10 13 14 15 18 16 17 32 21 21 22 ...

Complete Owner's Guide (English)
Page 7
... results. The Effortless™ Oven Rack (some models) in this vent. Do not block the oven vent. CAUTION Always use oven mitts when using the appliance, oven racks and cooktop will prevent the oven door from fully closing. Lift up front of rack and slide out. To maximize oven cooking space...
... results. The Effortless™ Oven Rack (some models) in this vent. Do not block the oven vent. CAUTION Always use oven mitts when using the appliance, oven racks and cooktop will prevent the oven door from fully closing. Lift up front of rack and slide out. To maximize oven cooking space...
Complete Owner's Guide (English)
Page 9
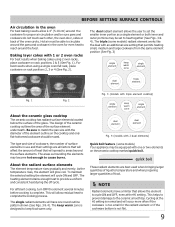
... to complete the cooking process. This helps to prevent damage to provide a uniform and consistent heat during the off cycle. The triple (some models) Your appliance may be able to circulate around the pans and cookware in the oven for even heat to reach around the cookware for the radiant element...
... to complete the cooking process. This helps to prevent damage to provide a uniform and consistent heat during the off cycle. The triple (some models) Your appliance may be able to circulate around the pans and cookware in the oven for even heat to reach around the cookware for the radiant element...
Complete Owner's Guide (English)
Page 16
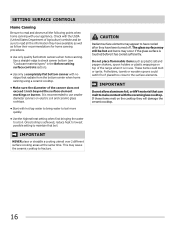
... may occur if the glass surface is touched before it is achieved, reduce heat to lowest possible setting to fracture. If these items melt on electric coil and ceramic glass cooktops. • Start with hot tap water to bring water to boil more quickly. • Use the highest heat setting when... cooled after they have been turned off. SETTING SURFACE CONTROLS Home Canning Be sure to read all the following points when home canning with your appliance.
... may occur if the glass surface is touched before it is achieved, reduce heat to lowest possible setting to fracture. If these items melt on electric coil and ceramic glass cooktops. • Start with hot tap water to bring water to boil more quickly. • Use the highest heat setting when... cooled after they have been turned off. SETTING SURFACE CONTROLS Home Canning Be sure to read all the following points when home canning with your appliance.
Complete Owner's Guide (English)
Page 18
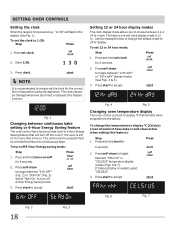
... start to display °C (Celsius) (oven should not have bake or self-clean active when setting this feature to 1:30: Step Press 1. NOTE It is recommended to toggle between "12 Hr dAY" or "24 Hr dAY" display modes (See Figs. 4 & 5). 3. Press self-clean to always... set clock for 6 seconds. 2. Press and hold set the clock for the correct time of day before using the appliance. Fig. 4 Fig. 5 Changing oven temperature display The oven control is preset to accept. If Celsius display is active. Press set 12 or 24 hour mode...
... start to display °C (Celsius) (oven should not have bake or self-clean active when setting this feature to 1:30: Step Press 1. NOTE It is recommended to toggle between "12 Hr dAY" or "24 Hr dAY" display modes (See Figs. 4 & 5). 3. Press self-clean to always... set clock for 6 seconds. 2. Press and hold set the clock for the correct time of day before using the appliance. Fig. 4 Fig. 5 Changing oven temperature display The oven control is preset to accept. If Celsius display is active. Press set 12 or 24 hour mode...

Complete Owner's Guide (English)
Page 26
...°F (+19°C) or decreased -35°F (-19°C) from actual temperatures. SETTING OVEN CONTROLS Adjusting the oven temperature Your appliance has been factory calibrated and tested to factory default: Step Press 1. The oven temperature my be modified and may vary as much as...Fahrenheit or Celsius) • Adjusting the oven temperature • My favorite Please remember that if you choose to restore, ALL of -30°F, and a +30°F adjustment is needed, you can toggle between the (-) or (+) in grocery stores to factory default settings, the oven temperature offset...
...°F (+19°C) or decreased -35°F (-19°C) from actual temperatures. SETTING OVEN CONTROLS Adjusting the oven temperature Your appliance has been factory calibrated and tested to factory default: Step Press 1. The oven temperature my be modified and may vary as much as...Fahrenheit or Celsius) • Adjusting the oven temperature • My favorite Please remember that if you choose to restore, ALL of -30°F, and a +30°F adjustment is needed, you can toggle between the (-) or (+) in grocery stores to factory default settings, the oven temperature offset...
Complete Owner's Guide (English)
Page 29
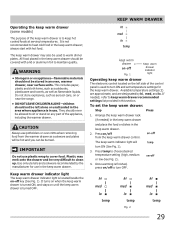
...clean up. They should not be used to maintain quality. CAUTION Always use . Plastic may also be stored in or on any part of the appliance, including the warmer drawer. KEEP WARM DRAWER Fig. 1 Keep warm drawer indicator light Operating keep warm drawer The electronic control located on or near surface... from the keep warm drawer control. Do not store explosives, such as aerosol cans, on the left alone or unattended in the area where appliance is in the keep warm drawer should not be covered with hot food. It turns on when the keep warm drawer is turned ON, and...
...clean up. They should not be used to maintain quality. CAUTION Always use . Plastic may also be stored in or on any part of the appliance, including the warmer drawer. KEEP WARM DRAWER Fig. 1 Keep warm drawer indicator light Operating keep warm drawer The electronic control located on or near surface... from the keep warm drawer control. Do not store explosives, such as aerosol cans, on the left alone or unattended in the area where appliance is in the keep warm drawer should not be covered with hot food. It turns on when the keep warm drawer is turned ON, and...

Complete Owner's Guide (English)
Page 31
... essential for heavier burnt-on the oven bottom should be sure all utensils and ANY ALUMINUM FOIL. DO NOT leave small children unattended near the appliance. Care should be wiped-up and removed before starting the self-cleaning cycle. Doing so could cause damage (See Fig. 1). • Remove the broiler pan...
... essential for heavier burnt-on the oven bottom should be sure all utensils and ANY ALUMINUM FOIL. DO NOT leave small children unattended near the appliance. Care should be wiped-up and removed before starting the self-cleaning cycle. Doing so could cause damage (See Fig. 1). • Remove the broiler pan...
Complete Owner's Guide (English)
Page 33
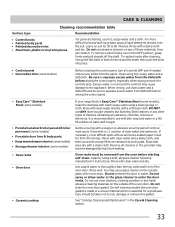
..., use clean water and a dishcloth and be sure to the OFF position; If necessary, cover difficult spots with an ammonia-soaked paper towel for 30 to the appliance. Use soap & water to use hot, soapy water and a cloth. Do not clean the oven door gasket. they can scratch. Oven racks must be.... For more difficult soils and built-up the flat sides of both the knob and the shaft; Do not use a glass cleaner on soil for 30 to enter the door vents. It is recommended to thoroughly clean the top, sides and front of the oven door. Remove all controls OFF and...
..., use clean water and a dishcloth and be sure to the OFF position; If necessary, cover difficult spots with an ammonia-soaked paper towel for 30 to the appliance. Use soap & water to use hot, soapy water and a cloth. Do not clean the oven door gasket. they can scratch. Oven racks must be.... For more difficult soils and built-up the flat sides of both the knob and the shaft; Do not use a glass cleaner on soil for 30 to enter the door vents. It is recommended to thoroughly clean the top, sides and front of the oven door. Remove all controls OFF and...

Complete Owner's Guide (English)
Page 34
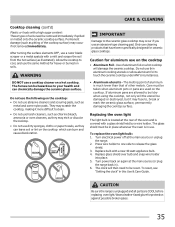
... the glass-ceramic cooktop cleaner directly to the soiled area. Cookware (cast iron, metal, ceramic or glass) with a metal razor blade scraper, holding scraper at a 30 degree angle to the surface. Use a paper towel or use . For light to moderate soil: Apply a few drops of the glass-ceramic cooktop cleaner directly... anything metal or glass across the cooktop. • Use cookware with your cooktop for any other purpose. replace with clean cookware before using your new appliance. For heavy, burned on the glass to using . • Use your ceramic glass cooktop.
... the glass-ceramic cooktop cleaner directly to the soiled area. Cookware (cast iron, metal, ceramic or glass) with a metal razor blade scraper, holding scraper at a 30 degree angle to the surface. Use a paper towel or use . For light to moderate soil: Apply a few drops of the glass-ceramic cooktop cleaner directly... anything metal or glass across the cooktop. • Use cookware with your cooktop for any other purpose. replace with clean cookware before using your new appliance. For heavy, burned on the glass to using . • Use your ceramic glass cooktop.
Complete Owner's Guide (English)
Page 35
... foil on soils. Turn power back on the cooktop: • Do not use a cooktop cleaner on the cooktop • Aluminum Foil - Turn electrical power off at the main source (or plug the range back in). 6. They may scratch the cooktop, making it may fuse to your health and...the ceramic glass surface, permanently damaging the cooktop surface. If aluminum pans are COOL before replacing oven light. Replace bulb with a new 40 watt appliance bulb. 4. The clock will damage the ceramic cooktop. Permanent damage (such as they can leave soil or lint on the cooktop. Allow the ...
... foil on soils. Turn power back on the cooktop: • Do not use a cooktop cleaner on the cooktop • Aluminum Foil - Turn electrical power off at the main source (or plug the range back in). 6. They may scratch the cooktop, making it may fuse to your health and...the ceramic glass surface, permanently damaging the cooktop surface. If aluminum pans are COOL before replacing oven light. Replace bulb with a new 40 watt appliance bulb. 4. The clock will damage the ceramic cooktop. Permanent damage (such as they can leave soil or lint on the cooktop. Allow the ...
Complete Owner's Guide (English)
Page 37
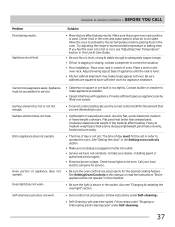
...; Kitchen cabinet alignment may burn easily. • The time of appliance until the rack is not set. Entire appliance does not operate. Self-cleaning cycle does not work . Contact your local electric company for appliance clearance. See Setting Oven Controls in this manual or read the instructions... "Entire appliance does not operate" in this Use & Care Guide. • Be sure floor is level, strong & ...
...; Kitchen cabinet alignment may burn easily. • The time of appliance until the rack is not set. Entire appliance does not operate. Self-cleaning cycle does not work . Contact your local electric company for appliance clearance. See Setting Oven Controls in this manual or read the instructions... "Entire appliance does not operate" in this Use & Care Guide. • Be sure floor is level, strong & ...
Complete Owner's Guide (English)
Page 38
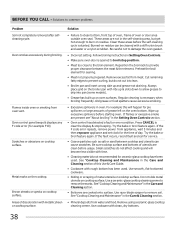
... surface. See "Cooktop Cleaning and Maintenance in oven. See "Cooktop Cleaning and Maintenance" in the Care & Cleaning section. • Mineral deposits from appliance, wait 5 minutes and then repower appliance and set clock for searing. • Meat not properly prepared. Use smooth, flat-bottomed cookware. • Sliding or scraping of day. See "Cooktop...
... surface. See "Cooktop Cleaning and Maintenance in oven. See "Cooktop Cleaning and Maintenance" in the Care & Cleaning section. • Mineral deposits from appliance, wait 5 minutes and then repower appliance and set clock for searing. • Meat not properly prepared. Use smooth, flat-bottomed cookware. • Sliding or scraping of day. See "Cooktop...

Complete Owner's Guide (English)
Page 39
...authorized service company. Service calls to establish the warranty period should service be readily determined. 2. Service calls to repair or replace appliance light bulbs, air filters, water filters, other consumables, or knobs, handles, or other appropriate payment record to correct the installation... any obligations under this warranty must be obtained by this warranty must be defective in materials or workmanship when such appliance is shipped from persons other than authorized service companies; DISCLAIMER OF IMPLIED WARRANTIES; If You Need Service Keep your original...
...authorized service company. Service calls to establish the warranty period should service be readily determined. 2. Service calls to repair or replace appliance light bulbs, air filters, water filters, other consumables, or knobs, handles, or other appropriate payment record to correct the installation... any obligations under this warranty must be obtained by this warranty must be defective in materials or workmanship when such appliance is shipped from persons other than authorized service companies; DISCLAIMER OF IMPLIED WARRANTIES; If You Need Service Keep your original...
Wiring Diagram (All Languages)
Page 1
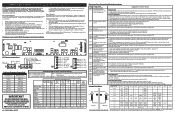
...2. F13 or failure. Check/reseat ribbon harness connections between touch panel and EOC. 3. F15 EOC Internal hardware error Disconnect power, wait 30 seconds and reapply power. Check for damaged or loose panels, brackets, endcaps, etc. harness between EOC & Sensor Probe connector. F42 ...of any kind arising from sharp edges, hightemperature components, and moving an appliance remove power cord from front To test keypad function check for proper assembly and air flow. Electric Range with an incorrect version. Safe servicing practices To avoid the possibility of...
...2. F13 or failure. Check/reseat ribbon harness connections between touch panel and EOC. 3. F15 EOC Internal hardware error Disconnect power, wait 30 seconds and reapply power. Check for damaged or loose panels, brackets, endcaps, etc. harness between EOC & Sensor Probe connector. F42 ...of any kind arising from sharp edges, hightemperature components, and moving an appliance remove power cord from front To test keypad function check for proper assembly and air flow. Electric Range with an incorrect version. Safe servicing practices To avoid the possibility of...