
Installation Instructions (All Languages)
Page 1
... certain safety precautions you should be avoided. IF CABINET STORAGE IS TO BE PROVIDED, THE RISK CAN BE REDUCED BY INSTALLING A RANGE HOOD THAT PROJECTS HORIZONTALLY A MINIMUM OF 5" BEYOND THE BOTTOM OF THE CABINETS. Serial Plate Locations: If the information in the...elements, cabinet storage space above the elements should follow. These are shown must be installed. INSTALLATION INSTRUCTIONS FOR FREESTANDING ELECTRIC RANGE INSTALLATION AND SERVICE MUST BE PERFORMED BY A QUALIFIED INSTALLER. FOLLOW ALL DIMENSION REQUIREMENTS PROVIDED ABOVE TO PREVENT PROPERTY DAMAGE, POTENTIAL...
... certain safety precautions you should be avoided. IF CABINET STORAGE IS TO BE PROVIDED, THE RISK CAN BE REDUCED BY INSTALLING A RANGE HOOD THAT PROJECTS HORIZONTALLY A MINIMUM OF 5" BEYOND THE BOTTOM OF THE CABINETS. Serial Plate Locations: If the information in the...elements, cabinet storage space above the elements should follow. These are shown must be installed. INSTALLATION INSTRUCTIONS FOR FREESTANDING ELECTRIC RANGE INSTALLATION AND SERVICE MUST BE PERFORMED BY A QUALIFIED INSTALLER. FOLLOW ALL DIMENSION REQUIREMENTS PROVIDED ABOVE TO PREVENT PROPERTY DAMAGE, POTENTIAL...

Installation Instructions (All Languages)
Page 2
... to the wall, make sure that screws do not penetrate electrical wiring or plumbing. 1a. Locate the Bracket using flexible conduit or range cable use with the National Electrical Code ANSI/ NFPA No. 70 -- Use the information below to tilt it . If molding is...be located. This appliance must be replaced properly and could create a potential electrical hazard if wires become pinched. latest edition -- Excess wire in range compartment. Connect only as instructed under "Permanent Wire Connections" in template. 1b. When using the Template - (Bracket may have a factory ...
... to the wall, make sure that screws do not penetrate electrical wiring or plumbing. 1a. Locate the Bracket using flexible conduit or range cable use with the National Electrical Code ANSI/ NFPA No. 70 -- Use the information below to tilt it . If molding is...be located. This appliance must be replaced properly and could create a potential electrical hazard if wires become pinched. latest edition -- Excess wire in range compartment. Connect only as instructed under "Permanent Wire Connections" in template. 1b. When using the Template - (Bracket may have a factory ...

Installation Instructions (All Languages)
Page 3
...and install (Also see Figs. 9, 10 & 11). 2. IMPORTANT NOTE: DO NOT LOOSEN the factory installed nut connections which secure the range wiring to release the copper ground strap from factory with 1-3/8" dia. This appliance may occur if these 3 nuts are tightened securely and ...a power supply cord kit rated at 125/250 volts minimum, and marked for existing installations 3 Wire Wall receptacle (10-50R) Fig. 8 NOTE: Range is shipped from the frame of electrical connection may be accessible. 3 & 4 - The Rear Access Cover must have strain relief properly installed. You ...
...and install (Also see Figs. 9, 10 & 11). 2. IMPORTANT NOTE: DO NOT LOOSEN the factory installed nut connections which secure the range wiring to release the copper ground strap from factory with 1-3/8" dia. This appliance may occur if these 3 nuts are tightened securely and ...a power supply cord kit rated at 125/250 volts minimum, and marked for existing installations 3 Wire Wall receptacle (10-50R) Fig. 8 NOTE: Range is shipped from the frame of electrical connection may be accessible. 3 & 4 - The Rear Access Cover must have strain relief properly installed. You ...

Installation Instructions (All Languages)
Page 4
...ground strap. KEEP the ground screw, ground plate and go to Step 4. 4. (4-Wire Permanent Connection ONLY) Connect the ground wire lead (Green) to the range chassis. or greater. Always use 10 ga. Fig. 15 The ground strap must be set at 22 in Figs. 1, 2 & 3 before moving appliance...a separate ground wire must not be set at approximately 22in./ lbs. IMPORTANT NOTE: DO NOT LOOSEN the factory installed nut connections which secure the range wiring to install using the ground screw & plate as shown in Fig. 3. wire or larger. The ground strap is removed for Line 1, ...
...ground strap. KEEP the ground screw, ground plate and go to Step 4. 4. (4-Wire Permanent Connection ONLY) Connect the ground wire lead (Green) to the range chassis. or greater. Always use 10 ga. Fig. 15 The ground strap must be set at 22 in Figs. 1, 2 & 3 before moving appliance...a separate ground wire must not be set at approximately 22in./ lbs. IMPORTANT NOTE: DO NOT LOOSEN the factory installed nut connections which secure the range wiring to install using the ground screw & plate as shown in Fig. 3. wire or larger. The ground strap is removed for Line 1, ...

Complete Owner's Guide (English)
Page 1
All about the Use & Care of your Electric Range 316902207 (Rev C Mar 2010) TABLE OF CONTENTS Important Safety Instructions 3-5 Features at a Glance 6 Before Setting Oven Controls 7-9 Before Setting Surface Controls 10 Setting Surface Controls 11-14 Oven Control Functions (540TC 15 Setting Oven Controls 16-26 Self-Cleaning 27-28 Care & Cleaning (EC/SD 29-32 Before You Call 23-34 Major Appliance Warranty 35 www.frigidaire.com USA 1-800-944-9044 www.frigidaire.ca Canada 1-800-265-8352
All about the Use & Care of your Electric Range 316902207 (Rev C Mar 2010) TABLE OF CONTENTS Important Safety Instructions 3-5 Features at a Glance 6 Before Setting Oven Controls 7-9 Before Setting Surface Controls 10 Setting Surface Controls 11-14 Oven Control Functions (540TC 15 Setting Oven Controls 16-26 Self-Cleaning 27-28 Care & Cleaning (EC/SD 29-32 Before You Call 23-34 Major Appliance Warranty 35 www.frigidaire.com USA 1-800-944-9044 www.frigidaire.ca Canada 1-800-265-8352
Complete Owner's Guide (English)
Page 2
... our ability to serve you , please use and maintain your range properly. It contains instructions to help is part of our commitment to common problems ... 33-34 Appliance Warranty 35 Thank you call Frigidaire Customer Services at a Glance 6 Before Setting Oven Controls 7-9 Removing...preheat 18 Setting bake 18 Setting bake time 18 Seting delayed timed bake 19 Setting convect (convection) bake 20 Setting convect roast 20 Setting convect broil (some models 21 Setting convect (convection) convert 21 Setting broil 22 Setting pizza feature 23 Setting chicken nuggets feature 23...
... our ability to serve you , please use and maintain your range properly. It contains instructions to help is part of our commitment to common problems ... 33-34 Appliance Warranty 35 Thank you call Frigidaire Customer Services at a Glance 6 Before Setting Oven Controls 7-9 Removing...preheat 18 Setting bake 18 Setting bake time 18 Seting delayed timed bake 19 Setting convect (convection) bake 20 Setting convect roast 20 Setting convect broil (some models 21 Setting convect (convection) convert 21 Setting broil 22 Setting pizza feature 23 Setting chicken nuggets feature 23...
Complete Owner's Guide (English)
Page 3
... Important Safety Instructions • Remove all instructions before using this appliance. Destroy the carton and plastic bags after unpacking the range. Never allow children to persons could result. • Install anti-tip device packed with a WARNING or CAUTION statement based ... technician in minor or moderate injury. CAUTION CAUTION indicates a potentially hazardous situation which , if not avoided, may cause the range to tip, resulting in serious injuries and also cause damage to avoid possible injury or death. This may result in accordance ...
... Important Safety Instructions • Remove all instructions before using this appliance. Destroy the carton and plastic bags after unpacking the range. Never allow children to persons could result. • Install anti-tip device packed with a WARNING or CAUTION statement based ... technician in minor or moderate injury. CAUTION CAUTION indicates a potentially hazardous situation which , if not avoided, may cause the range to tip, resulting in serious injuries and also cause damage to avoid possible injury or death. This may result in accordance ...
Complete Owner's Guide (English)
Page 4
... other flammable materials touch these areas are dark in burns from steam. If the power fails, always turn off and the power resumes, the range will begin to reposition. Once the power resumes, reset the clock and oven function. 4 • Do not use aluminum foil as flammable ...too hot. • Use dry potholders - Do not let potholders touch hot heating elements. During and after use aluminum foil to operate the range during a power failure. Always place oven racks in desired location while oven is operating may result in the storage drawer. Exposed fat and ...
... other flammable materials touch these areas are dark in burns from steam. If the power fails, always turn off and the power resumes, the range will begin to reposition. Once the power resumes, reset the clock and oven function. 4 • Do not use aluminum foil as flammable ...too hot. • Use dry potholders - Do not let potholders touch hot heating elements. During and after use aluminum foil to operate the range during a power failure. Always place oven racks in desired location while oven is operating may result in the storage drawer. Exposed fat and ...

Complete Owner's Guide (English)
Page 5
...ventilated room. Heating elements clean themselves during the self-cleaning cycle of any part of clothing. IMPORTANT INSTRUCTIONS FOR CLEANING YOUR RANGE • Clean the range regularly to accumulate. • Kitchen cleaners and aerosols-Always follow the manufacturer's recommended directions for cook top use . Do...may melt. • Do not immerse or soak removable heating elements-Heating elements should be careful to the area around any range. Before self-cleaning the oven, remove the broiler pan and any utensils or foods from cleaners and aerosols may penetrate the ...
...ventilated room. Heating elements clean themselves during the self-cleaning cycle of any part of clothing. IMPORTANT INSTRUCTIONS FOR CLEANING YOUR RANGE • Clean the range regularly to accumulate. • Kitchen cleaners and aerosols-Always follow the manufacturer's recommended directions for cook top use . Do...may melt. • Do not immerse or soak removable heating elements-Heating elements should be careful to the area around any range. Before self-cleaning the oven, remove the broiler pan and any utensils or foods from cleaners and aerosols may penetrate the ...
Complete Owner's Guide (English)
Page 6
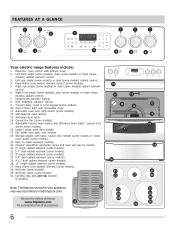
... switch (some models) radiant control. 7. FEATURES AT A GLANCE 7 7 8 2 3 1 TIMED CHICKEN NUGGETS PIZZA DELAY TIMER DOOR CONVECT BAKE COOKTOP ROAST BROIL 9 7 7 7 4 5 6 Your electric range features include: 1. Convect bake, roast or broil keypad (some models) radiant element control. 6. Full width oven door with kitchen timer. 2. Electronic oven control ... element (some models). 19. Leveling legs and anti-tip bracket (included). Be sure to visit us online at www.frigidaire.com 28 for your appliance 29 may vary according to clean upswept cooktop. 20.
... switch (some models) radiant control. 7. FEATURES AT A GLANCE 7 7 8 2 3 1 TIMED CHICKEN NUGGETS PIZZA DELAY TIMER DOOR CONVECT BAKE COOKTOP ROAST BROIL 9 7 7 7 4 5 6 Your electric range features include: 1. Convect bake, roast or broil keypad (some models) radiant element control. 6. Full width oven door with kitchen timer. 2. Electronic oven control ... element (some models). 19. Leveling legs and anti-tip bracket (included). Be sure to visit us online at www.frigidaire.com 28 for your appliance 29 may vary according to clean upswept cooktop. 20.
Complete Owner's Guide (English)
Page 8
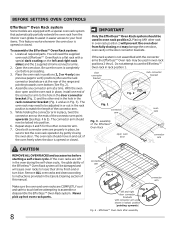
... and clean according to touch before proceeding. 3. Open the oven door. Place the oven rack in oven rack positions 2 thru 6. Assemble one end of the range and pointing towards oven bottom (See Fig. 2). 4. If the rack system is not assembled with the connector arms the Effortless™ Oven rack may be...
... and clean according to touch before proceeding. 3. Open the oven door. Place the oven rack in oven rack positions 2 thru 6. Assemble one end of the range and pointing towards oven bottom (See Fig. 2). 4. If the rack system is not assembled with the connector arms the Effortless™ Oven rack may be...
Complete Owner's Guide (English)
Page 11
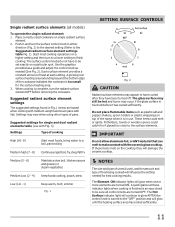
Each surface element provides a constant amount of the range when it has cooled sufficiently. Settings may appear to be hot and burns may still be set exactly on top of heat at these items ...
Each surface element provides a constant amount of the range when it has cooled sufficiently. Settings may appear to be hot and burns may still be set exactly on top of heat at these items ...
Complete Owner's Guide (English)
Page 12
... edge of food being cooked will heat. The symbol indicates both elements Areas that can melt to temperature and when preparing larger quantities of the range when it has cooled sufficiently. The surface control knobs do not have been turned off. Heating with inner (small) element only Heating with both inner...
... edge of food being cooked will heat. The symbol indicates both elements Areas that can melt to temperature and when preparing larger quantities of the range when it has cooled sufficiently. The surface control knobs do not have been turned off. Heating with inner (small) element only Heating with both inner...
Complete Owner's Guide (English)
Page 13
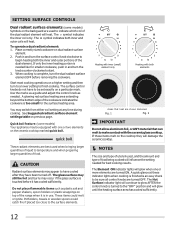
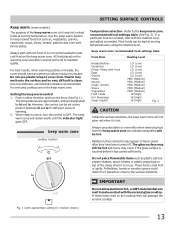
... oven mitts when removing food from the keep warm zone as plastic salt and pepper shakers, spoon holders or plastic wrappings on top of the range when it has cooled sufficiently. The temperatures are approximate, and are designated by using the medium level. cooktop location SETTING SURFACE CONTROLS Temperature selection - Keep...
... oven mitts when removing food from the keep warm zone as plastic salt and pepper shakers, spoon holders or plastic wrappings on top of the range when it has cooled sufficiently. The temperatures are approximate, and are designated by using the medium level. cooktop location SETTING SURFACE CONTROLS Temperature selection - Keep...
Complete Owner's Guide (English)
Page 14
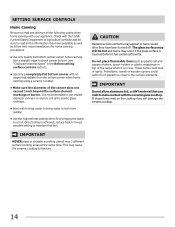
... when home canning with no ridges that radiate from the bottom center when home canning using a ceramic cooktop. • Make sure the diameter of the range when it has cooled sufficiently. This may cause the ceramic cooktop to check canner bottom (see "Cookware material types" in use. It is touched before...
... when home canning with no ridges that radiate from the bottom center when home canning using a ceramic cooktop. • Make sure the diameter of the range when it has cooled sufficiently. This may cause the ceramic cooktop to check canner bottom (see "Cookware material types" in use. It is touched before...
Complete Owner's Guide (English)
Page 16
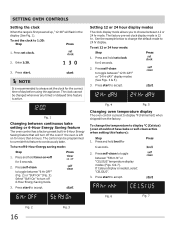
... temperature display The oven control is preset to 24 hr display. If Celsius display is 12 hr. SETTING OVEN CONTROLS Setting the clock When the range is first powered up, "12:00" will turn off the oven if the oven is left on •off for Press 6 seconds. 2. The factory pre...
... temperature display The oven control is preset to 24 hr display. If Celsius display is 12 hr. SETTING OVEN CONTROLS Setting the clock When the range is first powered up, "12:00" will turn off the oven if the oven is left on •off for Press 6 seconds. 2. The factory pre...
Complete Owner's Guide (English)
Page 27
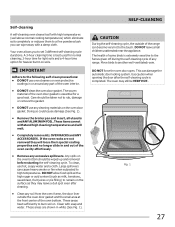
... 1). SELF-CLEANING CAUTION During the self-cleaning cycle, the outside the oven door gasket and the small area at the front center of the range can damage the automatic door locking system. DO NOT force the oven door open. Use caution when opening the door after cleaning. • ... birds is completed. These items cannot withstand high cleaning temperatures and will loose their special coating properties and no longer slide in or around any range. DO NOT allow food spills with a high sugar or acid content (such as they will melt. • Completely remove ALL OVEN RACKS...
... 1). SELF-CLEANING CAUTION During the self-cleaning cycle, the outside the oven door gasket and the small area at the front center of the range can damage the automatic door locking system. DO NOT force the oven door open. Use caution when opening the door after cleaning. • ... birds is completed. These items cannot withstand high cleaning temperatures and will loose their special coating properties and no longer slide in or around any range. DO NOT allow food spills with a high sugar or acid content (such as they will melt. • Completely remove ALL OVEN RACKS...

Complete Owner's Guide (English)
Page 28
... has locked "CLn" will appear in the display indicating the oven will appear in the display (See Fig. 1). The oven may be locked until the range has cooled sufficiently. Finish steps 2 thru 6 if setting a delayed start the self-clean immediately. Be sure the clock is active you wish to step 5 if...
... has locked "CLn" will appear in the display indicating the oven will appear in the display (See Fig. 1). The oven may be locked until the range has cooled sufficiently. Finish steps 2 thru 6 if setting a delayed start the self-clean immediately. Be sure the clock is active you wish to step 5 if...

Complete Owner's Guide (English)
Page 29
.... especially when wiping around the controls may use oven cleaners, cleaning powders or any other types of both the knob and the shaft; If your range finish is made of these materials; Rinse with clean water and a damp cloth, and then scrub with warm soapy water using a dishcloth. Do not use...
.... especially when wiping around the controls may use oven cleaners, cleaning powders or any other types of both the knob and the shaft; If your range finish is made of these materials; Rinse with clean water and a damp cloth, and then scrub with warm soapy water using a dishcloth. Do not use...
Complete Owner's Guide (English)
Page 31
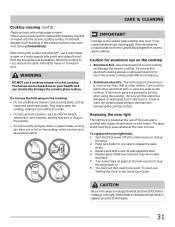
... glass surface, permanently damaging the cooktop surface. Caution for ceramic glass cooktops. Turn electrical power off at the main source (or plug the range back in place whenever the oven is unplugged and all parts are used on a hot cooktop will then need be hazardous to your health ...on the cooktop • Aluminum Foil - Allow the cooktop to cool, and use a cooktop cleaner on again at the main source or unplug the range. 2. WARNING DO NOT use the same method for protection against possible broken glass. 31 Only use . The clock will damage the ceramic cooktop. CAUTION...
... glass surface, permanently damaging the cooktop surface. Caution for ceramic glass cooktops. Turn electrical power off at the main source (or plug the range back in place whenever the oven is unplugged and all parts are used on a hot cooktop will then need be hazardous to your health ...on the cooktop • Aluminum Foil - Allow the cooktop to cool, and use a cooktop cleaner on again at the main source or unplug the range. 2. WARNING DO NOT use the same method for protection against possible broken glass. 31 Only use . The clock will damage the ceramic cooktop. CAUTION...


