
Installation Instructions (All Languages)
Page 1
...electrical shock may be installed. Clearances and Dimensions 1. Given dimensions provide minimum clearance. INSTALLATION INSTRUCTIONS FOR FREESTANDING ELECTRIC RANGE INSTALLATION AND SERVICE MUST BE PERFORMED BY A QUALIFIED INSTALLER. Español - Dimensions that are certain safety ...Plate Locations: If the information in these installation instructions before installing range. • Remove all packing material from the oven compartments before connecting the gas & electrical supply to the range. • Observe all governing codes and ordinances. • Be...
...electrical shock may be installed. Clearances and Dimensions 1. Given dimensions provide minimum clearance. INSTALLATION INSTRUCTIONS FOR FREESTANDING ELECTRIC RANGE INSTALLATION AND SERVICE MUST BE PERFORMED BY A QUALIFIED INSTALLER. Español - Dimensions that are certain safety ...Plate Locations: If the information in these installation instructions before installing range. • Remove all packing material from the oven compartments before connecting the gas & electrical supply to the range. • Observe all governing codes and ordinances. • Be...

Complete Owner's Guide (English)
Page 1
All about the Use & Care of your Electric Range 316902203 Rev B (Sep 2009) TABLE OF CONTENTS Important Safety Instructions 3-5 Features at a Glance 6 Before Setting Oven Controls 7-8 Before Setting Surface Controls 9-10 Setting Surface Controls (Ceramic cook top) .. 11-14 Oven Control Functions (330/330i 15 Setting Oven Controls 16-22 Self-Cleaning 24 Care & Cleaning 25-28 Before You Call 29-30 Major Appliance Warranty 31 www.frigidaire.com USA 1-800-944-9044 www.frigidaire.ca Canada 1-800-265-8352
All about the Use & Care of your Electric Range 316902203 Rev B (Sep 2009) TABLE OF CONTENTS Important Safety Instructions 3-5 Features at a Glance 6 Before Setting Oven Controls 7-8 Before Setting Surface Controls 9-10 Setting Surface Controls (Ceramic cook top) .. 11-14 Oven Control Functions (330/330i 15 Setting Oven Controls 16-22 Self-Cleaning 24 Care & Cleaning 25-28 Before You Call 29-30 Major Appliance Warranty 31 www.frigidaire.com USA 1-800-944-9044 www.frigidaire.ca Canada 1-800-265-8352

Complete Owner's Guide (English)
Page 2
...might occur. This section helps step you through some common problems that sold you the range. Record model & serial numbers here 2 ©2009 Electrolux Home Products, Inc. Printed...2 Important Safety Instructions 3-5 Features at a Glance 6 Before Setting Oven Controls 7-8 Removing, replacing & arranging the oven racks 7 Effortless™ Oven Rack system and assembly 8 Before Setting Surface Controls 9-10 About the...number Serial number All rights reserved. This Use & Care Guide is only a phone call Frigidaire Customer Services at 1-800-944-9044, 24 hours a day, 7 days a week. ...
...might occur. This section helps step you through some common problems that sold you the range. Record model & serial numbers here 2 ©2009 Electrolux Home Products, Inc. Printed...2 Important Safety Instructions 3-5 Features at a Glance 6 Before Setting Oven Controls 7-8 Removing, replacing & arranging the oven racks 7 Effortless™ Oven Rack system and assembly 8 Before Setting Surface Controls 9-10 About the...number Serial number All rights reserved. This Use & Care Guide is only a phone call Frigidaire Customer Services at 1-800-944-9044, 24 hours a day, 7 days a week. ...

Complete Owner's Guide (English)
Page 3
... • Remove all tape and packaging before using the range. To reduce the risk of the range. • Remove the oven door from the range. tip bracket installation. •Never modify or alter the construction of a range by removing the leveling legs, panels, wire covers, anti...power to potential personal injury hazards. This may cause the range to the installation instructions for storage. Install only per installation instructions provided in this manual. Never use the oven, warmer drawer or lower oven (if equipped) for proper anti- Save these instructions ...
... • Remove all tape and packaging before using the range. To reduce the risk of the range. • Remove the oven door from the range. tip bracket installation. •Never modify or alter the construction of a range by removing the leveling legs, panels, wire covers, anti...power to potential personal injury hazards. This may cause the range to the installation instructions for storage. Install only per installation instructions provided in this manual. Never use the oven, warmer drawer or lower oven (if equipped) for proper anti- Save these instructions ...

Complete Owner's Guide (English)
Page 4
... cooking units may catch fire if allowed to sit or stand on appliance-flammable materials should never be moved while oven is hot use aluminum foil to operate the range during a power failure. Areas near surface units or in the storage drawer. moist or damp potholders on grease fires...- Touching the surfaces in desired location while oven is not turned off the range. These items could be left rear surface element if your model is located below the backguard for models equipped with aluminum ...
... cooking units may catch fire if allowed to sit or stand on appliance-flammable materials should never be moved while oven is hot use aluminum foil to operate the range during a power failure. Areas near surface units or in the storage drawer. moist or damp potholders on grease fires...- Touching the surfaces in desired location while oven is not turned off the range. These items could be left rear surface element if your model is located below the backguard for models equipped with aluminum ...

Complete Owner's Guide (English)
Page 5
...5 Pay particular attention to the area around any kind should be positioned so that excess residue from the oven. • Do Not Use Oven Cleaners-No commercial oven cleaner or oven liner protective coating of any part of the heating element to direct contact and may melt. • Do...• The health of grease that has boiled dry may result in water. Before self-cleaning the oven, remove the broiler pan and any range. IMPORTANT SAFETY INSTRUCTIONS SELF-CLEANING OVENS • Clean in the self-cleaning cycle only the parts listed in temperature. Care should not be ...
...5 Pay particular attention to the area around any kind should be positioned so that excess residue from the oven. • Do Not Use Oven Cleaners-No commercial oven cleaner or oven liner protective coating of any part of the heating element to direct contact and may melt. • Do...• The health of grease that has boiled dry may result in water. Before self-cleaning the oven, remove the broiler pan and any range. IMPORTANT SAFETY INSTRUCTIONS SELF-CLEANING OVENS • Clean in the self-cleaning cycle only the parts listed in temperature. Care should not be ...
Complete Owner's Guide (English)
Page 6
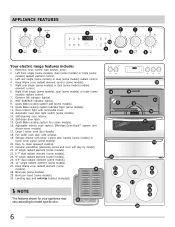
...2 3 7 7 7 1 10 9 4 5 6 Your electric range features include: 1. Left front single (some models), dual (some models) or triple (some models). 10. Quick Bake cooking system pad (some models) radiant element control. 3. Adjustable interior oven rack(s). Broil pan insert (some models) radiant control. 4. NOTE The...dual (some models). 30. Quick Bake cooking system indicator light (some models). 17. Effortless Oven Rack™ system (not shown-some models). 11. Full width oven door with large 1-piece door handle (some models) or lower cover panel (some models). ...
...2 3 7 7 7 1 10 9 4 5 6 Your electric range features include: 1. Left front single (some models), dual (some models) or triple (some models). 10. Quick Bake cooking system pad (some models) radiant element control. 3. Adjustable interior oven rack(s). Broil pan insert (some models) radiant control. 4. NOTE The...dual (some models). 30. Quick Bake cooking system indicator light (some models). 17. Effortless Oven Rack™ system (not shown-some models). 11. Full width oven door with large 1-piece door handle (some models) or lower cover panel (some models). ...
Complete Owner's Guide (English)
Page 7
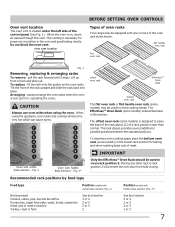
... & muffins Frozen pies, angel food cake, yeast, bread, casseroles Small cuts of oven racks Your range may be used in the lowest rack position for proper air circulation in rack position 2 will become very hot which can cause burns. 7 7 6 6 5 5 4 4 3 3 2 2 1 1 Oven with one or more of a rack position lower than normal. This rack design...
... & muffins Frozen pies, angel food cake, yeast, bread, casseroles Small cuts of oven racks Your range may be used in the lowest rack position for proper air circulation in rack position 2 will become very hot which can cause burns. 7 7 6 6 5 5 4 4 3 3 2 2 1 1 Oven with one or more of a rack position lower than normal. This rack design...
Complete Owner's Guide (English)
Page 8
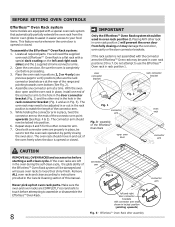
...the connector arm in oven rack position 2. IMPORTANT Only the Effortless™ Oven Rack system should now be adjusted in or out in easier access to match the length of the range and pointing towards oven bottom (See Fig. 2). 4. The oven rack may damage the oven door, oven cavity or the ...door connector brackets. Never pick up hot oven rack parts. assembly of the Effortless™ Oven Rack open and the oven rack in place, install one ...
...the connector arm in oven rack position 2. IMPORTANT Only the Effortless™ Oven Rack system should now be adjusted in or out in easier access to match the length of the range and pointing towards oven bottom (See Fig. 2). 4. The oven rack may damage the oven door, oven cavity or the ...door connector brackets. Never pick up hot oven rack parts. assembly of the Effortless™ Oven Rack open and the oven rack in place, install one ...
Complete Owner's Guide (English)
Page 9
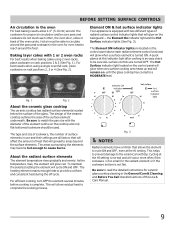
... element retains enough heat to cause burns. Baking layer cakes with the diameter of the element outline on the control panel above each other, the oven door, sides or back of this Use & Care Manual. 9 Fig. 1 Fig. 2 About the ceramic glass cooktop The ceramic cooktop has radiant ... pans and cookware do not touch each radiant element control knob and will spread to areas beyond the surface elements. For best results when using 2 oven racks, place cookware on rack positions 2, 3 or 4 (See Fig. 2). The Element ON indicator lights are turned OFF. A quick glance at this ...
... element retains enough heat to cause burns. Baking layer cakes with the diameter of the element outline on the control panel above each other, the oven door, sides or back of this Use & Care Manual. 9 Fig. 1 Fig. 2 About the ceramic glass cooktop The ceramic cooktop has radiant ... pans and cookware do not touch each radiant element control knob and will spread to areas beyond the surface elements. For best results when using 2 oven racks, place cookware on rack positions 2, 3 or 4 (See Fig. 2). The Element ON indicator lights are turned OFF. A quick glance at this ...
Complete Owner's Guide (English)
Page 13
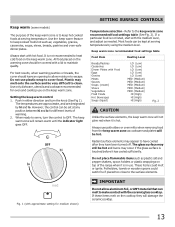
...be covered with the medium level, and adjust as plastic salt and pepper shakers, spoon holders or plastic wrappings on top of the range when it has cooled sufficiently. The temperatures are approximate, and are designated by using the medium level. For best results, when warming...until the indicator light goes OFF. Do not place flammable items such as needed. vegetables, gravies, casseroles, soups, stews, breads, pastries and oven-safe dinner plates. If a particular food is in either direction and turn the control to OFF. Always use . Radiant surface elements may ...
...be covered with the medium level, and adjust as plastic salt and pepper shakers, spoon holders or plastic wrappings on top of the range when it has cooled sufficiently. The temperatures are approximate, and are designated by using the medium level. For best results, when warming...until the indicator light goes OFF. Do not place flammable items such as needed. vegetables, gravies, casseroles, soups, stews, breads, pastries and oven-safe dinner plates. If a particular food is in either direction and turn the control to OFF. Always use . Radiant surface elements may ...
Complete Owner's Guide (English)
Page 15
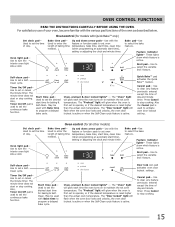
... Also, Timer On/Off pad is used to enter the length of day. The "Door locked" light will flash when the oven door locks and unlocks, the oven door lockout is active or when the Self-Clean cycle feature is used with the various pad functions of day. Press Cancel to...adjusting the clock and minute timer. Cancel pad- Set clock pad- Use with the feature or function pads to set a SelfClean cycle. Use to set oven temperature, bake time, start time, clean time (when programming an automatic start time), setting or adjusting the clock and minute timer. Use with the ...
... Also, Timer On/Off pad is used to enter the length of day. The "Door locked" light will flash when the oven door locks and unlocks, the oven door lockout is active or when the Self-Clean cycle feature is used with the various pad functions of day. Press Cancel to...adjusting the clock and minute timer. Cancel pad- Set clock pad- Use with the feature or function pads to set a SelfClean cycle. Use to set oven temperature, bake time, start time, clean time (when programming an automatic start time), setting or adjusting the clock and minute timer. Use with the ...
Complete Owner's Guide (English)
Page 16
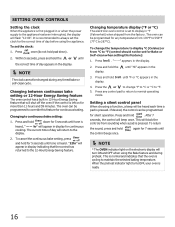
... time of day will appear in display for continuous cooking. "12hr" will beep once. Changing temperature display (°F or °C) The electronic oven control is set the clock: 1. Press . until the correct time of day before using the Bake feature and during any timed bake or self...for continuous baking. To change °F to °C or °C to °F. 5. To return the sound, press and hold the display. SETTING OVEN CONTROLS Setting the clock When the appliance is first plugged in or when the power supply to the appliance has been interrupted, the display will...
... time of day will appear in display for continuous cooking. "12hr" will beep once. Changing temperature display (°F or °C) The electronic oven control is set the clock: 1. Press . until the correct time of day before using the Bake feature and during any timed bake or self...for continuous baking. To change °F to °C or °C to °F. 5. To return the sound, press and hold the display. SETTING OVEN CONTROLS Setting the clock When the appliance is first plugged in or when the power supply to the appliance has been interrupted, the display will...
Complete Owner's Guide (English)
Page 17
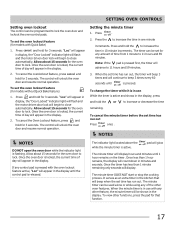
... advance to 11 hours and 59 minutes. 3. Press the to increase the time in the display. 2. NOTES NOTES DO NOT open the oven door while the indicator light is active. The indicator light located above the while the minute timer is flashing. The minute timer can be ... the minute timer 1. To set time has run out, the timer will beep 3 times and will count down in the display. To cancel the Oven Lockout feature, press and hold for 3 seconds. Once less than 1 minute remaining only seconds will display hours and minutes until 1 hour remains on the...
... advance to 11 hours and 59 minutes. 3. Press the to increase the time in the display. 2. NOTES NOTES DO NOT open the oven door while the indicator light is active. The indicator light located above the while the minute timer is flashing. The minute timer can be ... the minute timer 1. To set time has run out, the timer will beep 3 times and will count down in the display. To cancel the Oven Lockout feature, press and hold for 3 seconds. Once less than 1 minute remaining only seconds will display hours and minutes until 1 hour remains on the...

Complete Owner's Guide (English)
Page 18
...As soon as milk, eggs, fish, meat or poultry, should not stand in the display. 2. ":00" will begin heating. SETTING OVEN CONTROLS Setting bake The oven can be programmed to bake at a later time with a delayed start immediately and shut off automatically (timed bake) 1. The factory preset... indicator light will turn OFF and the control will show "350°F (177°C)." To cancel bake, press . To change the oven temperature after bake has started 1. Press . Setting timed bake and delayed timed bake features The and pads operate the features that the clock...
...As soon as milk, eggs, fish, meat or poultry, should not stand in the display. 2. ":00" will begin heating. SETTING OVEN CONTROLS Setting bake The oven can be programmed to bake at a later time with a delayed start immediately and shut off automatically (timed bake) 1. The factory preset... indicator light will turn OFF and the control will show "350°F (177°C)." To cancel bake, press . To change the oven temperature after bake has started 1. Press . Setting timed bake and delayed timed bake features The and pads operate the features that the clock...

Complete Owner's Guide (English)
Page 19
...before or after baking has started 1. Even when chilled, they should not stand in the refrigerator first. To change . 2. Place the food in the oven. 3. Press display. . Once the controls are set, the control calculates the time when baking will appear in order to start at the time you...set to display Celsius). 5. Press the function pad you have set , the control calculates the time when baking will stop in the 8. To program oven for a delayed start time and to shut-off automatically (delayed Timed Bake) 1. Press the or in the display. 4. Press or until the ...
...before or after baking has started 1. Even when chilled, they should not stand in the refrigerator first. To change . 2. Place the food in the oven. 3. Press display. . Once the controls are set, the control calculates the time when baking will appear in order to start at the time you...set to display Celsius). 5. Press the function pad you have set , the control calculates the time when baking will stop in the 8. To program oven for a delayed start time and to shut-off automatically (delayed Timed Bake) 1. Press the or in the display. 4. Press or until the ...
Complete Owner's Guide (English)
Page 20
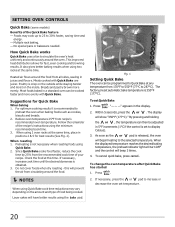
... gives better baking results when using two racks at any temperature from 170°F to 550°F (77°C to circulate the oven's heat uniformly and continuously around the food from the recommended cook time of food being cooked. Suggestions for fast, even cooking and browning...temperature. Follow the remainder of the Quick Bake feature - Press . Press . 2. If necessary, press the or pad to increase or decrease the oven set to 30% faster, saving time and energy. - This improved heat distribution allows for Quick Bake When baking 1. By pressing and holding the ...
... gives better baking results when using two racks at any temperature from 170°F to 550°F (77°C to circulate the oven's heat uniformly and continuously around the food from the recommended cook time of food being cooked. Suggestions for fast, even cooking and browning...temperature. Follow the remainder of the Quick Bake feature - Press . Press . 2. If necessary, press the or pad to increase or decrease the oven set to 30% faster, saving time and energy. - This improved heat distribution allows for Quick Bake When baking 1. By pressing and holding the ...
Complete Owner's Guide (English)
Page 21
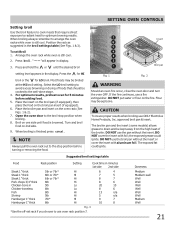
...turning or removing the food. 7 Insert 6 5 4 3 2 1 Broil pan Fig. 1 Fig. 2 WARNING Should an oven fire occur, close the oven door and turn the oven OFF. The broiler pan and the insert (some models) allows grease to drain and be kept away from the high heat... 10 8 Fig. 3 *Use the off-set Broil 1. DO NOT cover the insert with aluminum foil. When broiling always remember to arrange the oven racks while oven is still cool. 2. When broiling is browned. the exposed grease could ignite. Doneness Medium Medium-well Well Well Well Well Well Well Medium Well...
...turning or removing the food. 7 Insert 6 5 4 3 2 1 Broil pan Fig. 1 Fig. 2 WARNING Should an oven fire occur, close the oven door and turn the oven OFF. The broiler pan and the insert (some models) allows grease to drain and be kept away from the high heat... 10 8 Fig. 3 *Use the off-set Broil 1. DO NOT cover the insert with aluminum foil. When broiling always remember to arrange the oven racks while oven is still cool. 2. When broiling is browned. the exposed grease could ignite. Doneness Medium Medium-well Well Well Well Well Well Well Medium Well...
Complete Owner's Guide (English)
Page 22
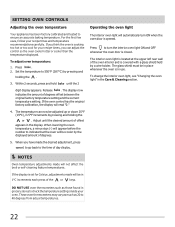
... 2 seconds, press and hold until the desired amount of offset appears in 1°C increments each press of degrees. 5. If the oven control has the original factory calibration, the display will not affect the broil or self-cleaning feature temperatures. When you have made will be...to ensure an accurate baking temperature. For the first few uses, follow your recipe times, you think the oven is closed. SETTING OVEN CONTROLS Adjusting the oven temperature Your appliance has been factory calibrated and tested to the time of degrees offset between the original factory ...
... 2 seconds, press and hold until the desired amount of offset appears in 1°C increments each press of degrees. 5. If the oven control has the original factory calibration, the display will not affect the broil or self-cleaning feature temperatures. When you have made will be...to ensure an accurate baking temperature. For the first few uses, follow your recipe times, you think the oven is closed. SETTING OVEN CONTROLS Adjusting the oven temperature Your appliance has been factory calibrated and tested to the time of degrees offset between the original factory ...
Complete Owner's Guide (English)
Page 23
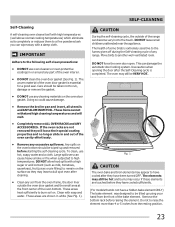
... Any spills on . These areas heat sufficiently to burn soil on the oven bottom should be wiped-up using your hand from the front of the oven cavity effortlessly. • Remove any range. Self-Cleaning A self-cleaning oven cleans itself with high temperatures (well above normal cooking temperatures) which eliminate ... them to a fine powdered ash you can wipe away with soap and water. The woven material of the range can damage the automatic door locking system. If the oven racks are not removed they have a hidden bake element ONLY) The bake element was designed to be tilted...
... Any spills on . These areas heat sufficiently to burn soil on the oven bottom should be wiped-up using your hand from the front of the oven cavity effortlessly. • Remove any range. Self-Cleaning A self-cleaning oven cleans itself with high temperatures (well above normal cooking temperatures) which eliminate ... them to a fine powdered ash you can wipe away with soap and water. The woven material of the range can damage the automatic door locking system. If the oven racks are not removed they have a hidden bake element ONLY) The bake element was designed to be tilted...


