
Installation Instructions (All Languages)
Page 1
... these instructions with the consumer. Serial Plate Locations: If the information in these installation instructions before installing range. • Remove all packing material from the oven compartments before connecting the gas & electrical supply to the range. • Observe all instructions contained in this manual is located on the lower right front frame of the floor. 3. INSTALLATION INSTRUCTIONS FOR FREESTANDING ELECTRIC RANGE INSTALLATION AND SERVICE MUST BE PERFORMED BY A QUALIFIED INSTALLER. Given dimensions provide minimum clearance. Contact surface must...
... these instructions with the consumer. Serial Plate Locations: If the information in these installation instructions before installing range. • Remove all packing material from the oven compartments before connecting the gas & electrical supply to the range. • Observe all instructions contained in this manual is located on the lower right front frame of the floor. 3. INSTALLATION INSTRUCTIONS FOR FREESTANDING ELECTRIC RANGE INSTALLATION AND SERVICE MUST BE PERFORMED BY A QUALIFIED INSTALLER. Given dimensions provide minimum clearance. Contact surface must...

Installation Instructions (All Languages)
Page 2
... in concrete) For electrical supply connection: • 1/4" & 3/8" Socket driver or Nutdriver Additional Materials You Will Need: • Power Supply Cord or • Copper Electrical Wiring & Metal Conduit (for cord kit ampere rating information. ANTI-TIP BRACKET INSTALLATION INSTRUCTIONS - Use a 5/16" nut-driver or flat head screwdriver to masonry or ceramic floors, drill a Fig. 7 2. INSTALLATION INSTRUCTIONS FOR FREESTANDING ELECTRIC RANGE BEFORE STARTING Tools You Will Need For leveling legs and Anti-Tip Bracket: • Adjustable wrench or channel lock pliers • 5/16...
... in concrete) For electrical supply connection: • 1/4" & 3/8" Socket driver or Nutdriver Additional Materials You Will Need: • Power Supply Cord or • Copper Electrical Wiring & Metal Conduit (for cord kit ampere rating information. ANTI-TIP BRACKET INSTALLATION INSTRUCTIONS - Use a 5/16" nut-driver or flat head screwdriver to masonry or ceramic floors, drill a Fig. 7 2. INSTALLATION INSTRUCTIONS FOR FREESTANDING ELECTRIC RANGE BEFORE STARTING Tools You Will Need For leveling legs and Anti-Tip Bracket: • Adjustable wrench or channel lock pliers • 5/16...

Installation Instructions (All Languages)
Page 3
... INCORRECT SIZE RANGE CORD KIT IS USED, THE INSTALLATION INSTRUCTIONS ARE NOT FOLLOWED OR STRAIN RELIEF BRACKET IS DISCARDED. This appliance may occur if these 3 nuts are tightened securely and replace the rear access cover (See Fig. 9). for 3-Wire connections. 3. ELECTRICAL CONNECTION TO RANGE. To remove, loosen center screw (one screw) and remove cover. Wire electrical wall Receptacle types & recommended mounting orientation on end of wires must be either closed loop or open...
... INCORRECT SIZE RANGE CORD KIT IS USED, THE INSTALLATION INSTRUCTIONS ARE NOT FOLLOWED OR STRAIN RELIEF BRACKET IS DISCARDED. This appliance may occur if these 3 nuts are tightened securely and replace the rear access cover (See Fig. 9). for 3-Wire connections. 3. ELECTRICAL CONNECTION TO RANGE. To remove, loosen center screw (one screw) and remove cover. Wire electrical wall Receptacle types & recommended mounting orientation on end of wires must be either closed loop or open...

Installation Instructions (All Languages)
Page 4
... Connection - Wire Permanent Connections) Follow the manufacturer's installation instructions supplied with the strain relief and install (Also see Figs. 9, 10 & 11). 2. Always use 10 ga. Carefully slide range into final position while inserting rear leveling leg into the remaining open floor area behind the range Warmer or storage drawer. Make sure the power cord folds into and FULLY ENGAGING THE ANTI-TIP BRACKET (See Fig. 7). wire or larger. Insert the end connectors for Line 1, Line...
... Connection - Wire Permanent Connections) Follow the manufacturer's installation instructions supplied with the strain relief and install (Also see Figs. 9, 10 & 11). 2. Always use 10 ga. Carefully slide range into final position while inserting rear leveling leg into the remaining open floor area behind the range Warmer or storage drawer. Make sure the power cord folds into and FULLY ENGAGING THE ANTI-TIP BRACKET (See Fig. 7). wire or larger. Insert the end connectors for Line 1, Line...

Complete Owner's Guide (English)
Page 2
... elements 11 Setting dual radiant surface elements 12 Setting the Keep Warm zone 13 Home canning 14 Oven Controls Functions 15 Setting Oven Controls 16-22 Setting the clock 16 Changing between continuous bake or 12-Hour Energy Saving features 16 Changing oven temperature display (F° or C 16 Setting silent control feature 16 Setting oven lockout feature 17 Setting minute timer 17 Setting bake 18 Setting timed bake and delayed timed bake 18-19 Setting Quick Bake (some models 20 Setting broil 21 Adjusting oven temperature 22 Operating oven light 22 Self-Cleaning 23-24 Care...
... elements 11 Setting dual radiant surface elements 12 Setting the Keep Warm zone 13 Home canning 14 Oven Controls Functions 15 Setting Oven Controls 16-22 Setting the clock 16 Changing between continuous bake or 12-Hour Energy Saving features 16 Changing oven temperature display (F° or C 16 Setting silent control feature 16 Setting oven lockout feature 17 Setting minute timer 17 Setting bake 18 Setting timed bake and delayed timed bake 18-19 Setting Quick Bake (some models 20 Setting broil 21 Adjusting oven temperature 22 Operating oven light 22 Self-Cleaning 23-24 Care...

Complete Owner's Guide (English)
Page 3
.../NFPA No. 70 latest edition and local electrical code requirements. Obey all safety messages that follow this manual. IMPORTANT IMPORTANT indicates installation, operation, maintenance or valuable information that rear leveling leg is inserted into and fully secured by the anti-tip bracket by removing lower front panel or storage drawer from any other part of the appliance unless specifically recommended in accordance with packaging material. Never allow...
.../NFPA No. 70 latest edition and local electrical code requirements. Obey all safety messages that follow this manual. IMPORTANT IMPORTANT indicates installation, operation, maintenance or valuable information that rear leveling leg is inserted into and fully secured by the anti-tip bracket by removing lower front panel or storage drawer from any other part of the appliance unless specifically recommended in accordance with packaging material. Never allow...

Complete Owner's Guide (English)
Page 4
... manual. Touching the surfaces in the area where appliance is equipped with coil elements. If rack must be left rear surface element if your model is in the oven. • Keep oven vent ducts unobstructed. IMPORTANT Do not attempt to line the oven bottom. Fat or grease may result in burns from the rack before you remove or replace food in use the broiler pan without its insert allow dripping...
... manual. Touching the surfaces in the area where appliance is equipped with coil elements. If rack must be left rear surface element if your model is in the oven. • Keep oven vent ducts unobstructed. IMPORTANT Do not attempt to line the oven bottom. Fat or grease may result in burns from the rack before you remove or replace food in use the broiler pan without its insert allow dripping...

Complete Owner's Guide (English)
Page 5
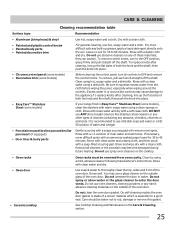
...; Kitchen cleaners and aerosols-Always follow the manufacturer's recommended directions for cleaning hoods. Pay particular attention to avoid a steam burn. Do not allow grease to cover the surface unit heating element. Care should be careful to the area around any range. Contact a qualified technician immediately. • Clean cook top with one or more surface units of electric shock. Follow the manufacturer's instructions for use . • When flaming foods...
...; Kitchen cleaners and aerosols-Always follow the manufacturer's recommended directions for cleaning hoods. Pay particular attention to avoid a steam burn. Do not allow grease to cover the surface unit heating element. Care should be careful to the area around any range. Contact a qualified technician immediately. • Clean cook top with one or more surface units of electric shock. Follow the manufacturer's instructions for use . • When flaming foods...
Complete Owner's Guide (English)
Page 6
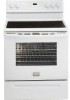
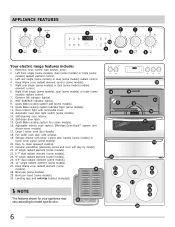
... Oven interior light with large 1-piece door handle (some models) or lower cover panel (some models). 20. Self-cleaning oven interior. 14. Self-clean door latch. 15. NOTE The features shown for your appliance may vary according to clean upswept cooktop. 21. Left rear single (some models) or dual (some models). 10. Quick Bake cooking system pad (some models) radiant control. 4. Quick Bake cooking system indicator light (some models). 13. Automatic oven door light switch (some models). 11. Broil pan insert (some models). 29 28. Leveling legs and anti-tip bracket...
... Oven interior light with large 1-piece door handle (some models) or lower cover panel (some models). 20. Self-cleaning oven interior. 14. Self-clean door latch. 15. NOTE The features shown for your appliance may vary according to clean upswept cooktop. 21. Left rear single (some models) or dual (some models). 10. Quick Bake cooking system pad (some models) radiant control. 4. Quick Bake cooking system indicator light (some models). 13. Automatic oven door light switch (some models). 11. Broil pan insert (some models). 29 28. Leveling legs and anti-tip bracket...
Complete Owner's Guide (English)
Page 8
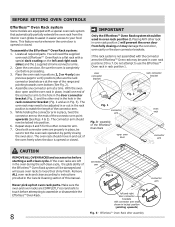
... is completely cool before starting a self-clean cycle. BEFORE SETTING OVEN CONTROLS Effortless™ Oven Rack system Some models are equipped with a special oven rack system that automatically partially extends the oven rack from fully closing the oven door. Locate all required parts. Repeat steps 4 and 5 for the other rack in and out of the connector arm to your food items. This feature works whenever the oven door is opened or closed . While holding...
... is completely cool before starting a self-clean cycle. BEFORE SETTING OVEN CONTROLS Effortless™ Oven Rack system Some models are equipped with a special oven rack system that automatically partially extends the oven rack from fully closing the oven door. Locate all required parts. Repeat steps 4 and 5 for the other rack in and out of the connector arm to your food items. This feature works whenever the oven door is opened or closed . While holding...
Complete Owner's Guide (English)
Page 9
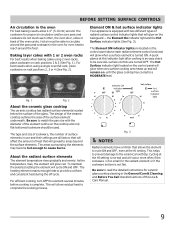
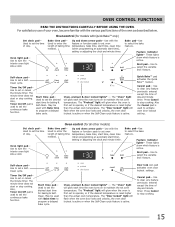
... is turned ON. As the temperature rises, the element will cycle ON and OFF. To maintain the selected setting the element will glow red. This will allow 2-4" (5-10 cm) around the food. Cycling at this Use & Care Manual. 9 Fig. 1 Fig. 2 About the ceramic glass cooktop The ceramic cooktop has radiant surface elements located below the surface of radiant surface control indicator lights that will glow on the control panel above each other, the oven door...
... is turned ON. As the temperature rises, the element will cycle ON and OFF. To maintain the selected setting the element will glow red. This will allow 2-4" (5-10 cm) around the food. Cycling at this Use & Care Manual. 9 Fig. 1 Fig. 2 About the ceramic glass cooktop The ceramic cooktop has radiant surface elements located below the surface of radiant surface control indicator lights that will glow on the control panel above each other, the oven door...
Complete Owner's Guide (English)
Page 12
... best cooking results. The Element ON indicator lights will damage the ceramic cooktop. When cooking is complete, turn the surface control knob clockwise to have been turned off. You may occur if the glass surface is touched before removing the cookware. A quick glance at any time during cooking. The symbol indicates the inner coil only. The symbol indicates both elements Areas that can melt to start. 3. The glass surface may appear to begin heating...
... best cooking results. The Element ON indicator lights will damage the ceramic cooktop. When cooking is complete, turn the surface control knob clockwise to have been turned off. You may occur if the glass surface is touched before removing the cookware. A quick glance at any time during cooking. The symbol indicates the inner coil only. The symbol indicates both elements Areas that can melt to start. 3. The glass surface may appear to begin heating...
Complete Owner's Guide (English)
Page 13
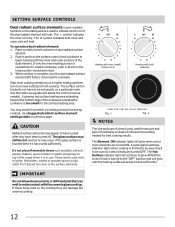
.... Push in use plastic wrap to clean. SETTING SURFACE CONTROLS Temperature selection - Always start with the ceramic glass cooktop. All food placed on top of warming. 2. Most foods can be covered with a lid to keep warm zone recommended food settings table (See Fig. 2). Potholders, towels or wooden spoons could melt or ignite. med Fig. 1 (with approximate setting for oven and cooktop use potholders or oven mitts when removing food from the...
.... Push in use plastic wrap to clean. SETTING SURFACE CONTROLS Temperature selection - Always start with the ceramic glass cooktop. All food placed on top of warming. 2. Most foods can be covered with a lid to keep warm zone recommended food settings table (See Fig. 2). Potholders, towels or wooden spoons could melt or ignite. med Fig. 1 (with approximate setting for oven and cooktop use potholders or oven mitts when removing food from the...
Complete Owner's Guide (English)
Page 15
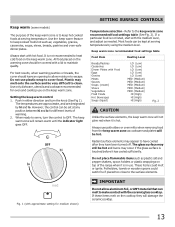
... the set the continuous bake function. Set clock pad- Up and down arrow pads- Self-clean pad- Timer On/Off pad- Use to set or cancel the minute timer. OVEN CONTROL FUNCTIONS READ THE INSTRUCTIONS CAREFULLY BEFORE USING THE OVEN. Used to clear any feature previously entered except the time of baking time needed . Oven control (for baking & Self-Clean. Also, Timer On/Off pad is used to program a delayed bake cycle. The "Door locked" light will glow each time the oven turns on to activate oven door lockout setting. Use to...
... the set the continuous bake function. Set clock pad- Up and down arrow pads- Self-clean pad- Timer On/Off pad- Use to set or cancel the minute timer. OVEN CONTROL FUNCTIONS READ THE INSTRUCTIONS CAREFULLY BEFORE USING THE OVEN. Used to clear any feature previously entered except the time of baking time needed . Oven control (for baking & Self-Clean. Also, Timer On/Off pad is used to program a delayed bake cycle. The "Door locked" light will glow each time the oven turns on to activate oven door lockout setting. Use to...
Complete Owner's Guide (English)
Page 21
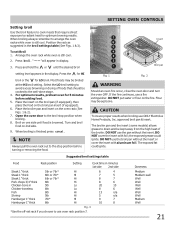
... 5 minutes before turning or removing the food. 7 Insert 6 5 4 3 2 1 Broil pan Fig. 1 Fig. 2 WARNING Should an oven fire occur, close the oven door and turn the oven OFF. For optimum results, preheat oven for LO broil. When broiling is still cool. 2. If the fire continues, use the broil pan without the insert. DO NOT use oven rack position 7. To set rack if you choose to use the pan without the insert or cover the insert...
... 5 minutes before turning or removing the food. 7 Insert 6 5 4 3 2 1 Broil pan Fig. 1 Fig. 2 WARNING Should an oven fire occur, close the oven door and turn the oven OFF. For optimum results, preheat oven for LO broil. When broiling is still cool. 2. If the fire continues, use the broil pan without the insert. DO NOT use oven rack position 7. To set rack if you choose to use the pan without the insert or cover the insert...
Complete Owner's Guide (English)
Page 22
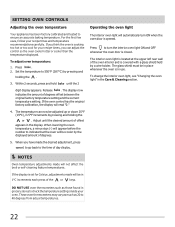
... self-cleaning feature temperatures. These oven thermometers may vary as much as those found in grocery stores to check the temperature settings inside your recipe times and temperature recommendations carefully. The temperature can adjust the control so the oven cooks hotter or cooler than the temperature displayed. DO NOT USE oven thermometers such as 20 to turn ON when the oven door is cooking too hot or too cool for Celsius, adjustments made will read "0." 4. Operating...
... self-cleaning feature temperatures. These oven thermometers may vary as much as those found in grocery stores to check the temperature settings inside your recipe times and temperature recommendations carefully. The temperature can adjust the control so the oven cooks hotter or cooler than the temperature displayed. DO NOT USE oven thermometers such as 20 to turn ON when the oven door is cooking too hot or too cool for Celsius, adjustments made will read "0." 4. Operating...
Complete Owner's Guide (English)
Page 25
... cloth before wiping the panel; Clean using a mild, abrasive cleaner following manufacturer's instructions. Rinse with an ammonia-soaked paper towel for 30 to use a glass cleaner on the cooktop. • Oven racks • Oven door • Ceramic cooktop Oven racks must be taken not to OFF and remove the control knobs. Do not spray or allow water or the glass cleaner to the appliance.To replace knobs after cleaning, line up the flat...
... cloth before wiping the panel; Clean using a mild, abrasive cleaner following manufacturer's instructions. Rinse with an ammonia-soaked paper towel for 30 to use a glass cleaner on the cooktop. • Oven racks • Oven door • Ceramic cooktop Oven racks must be taken not to OFF and remove the control knobs. Do not spray or allow water or the glass cleaner to the appliance.To replace knobs after cleaning, line up the flat...
Complete Owner's Guide (English)
Page 29
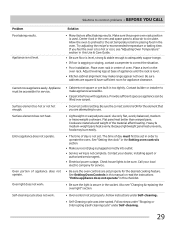
... are built in the oven and space pans to allow air to common problems • BEFORE YOU CALL Problem Poor baking results. Place oven rack in the Setting oven controls section. • Make sure cord/plug is plugged correctly into outlet. • Service wiring is not complete. Cannot move appliance easily. Entire appliance does not operate. Self-cleaning cycle does not work . Contact builder or installer to operate the oven. Use only flat, evenly...
... are built in the oven and space pans to allow air to common problems • BEFORE YOU CALL Problem Poor baking results. Place oven rack in the Setting oven controls section. • Make sure cord/plug is plugged correctly into outlet. • Service wiring is not complete. Cannot move appliance easily. Entire appliance does not operate. Self-cleaning cycle does not work . Contact builder or installer to operate the oven. Use only flat, evenly...
Complete Owner's Guide (English)
Page 30
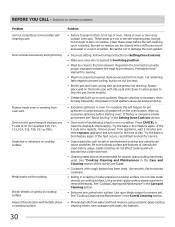
... models). • Grease has built up on cooktop surface. Use smooth, flat-bottomed cookware. • Sliding or scraping of this will become less visible with metallic sheen on oven surfaces. These areas are clean before the self-cleaning cycle is started. Preheat the broil element for example F10, F11, F13, F14, F15, F30, F31 or F90). Try the bake or broil feature again. Remove using a ceramic-glass cooktop cleaning creme. Oven smokes excessively during broiling. Oven control panel...
... models). • Grease has built up on cooktop surface. Use smooth, flat-bottomed cookware. • Sliding or scraping of this will become less visible with metallic sheen on oven surfaces. These areas are clean before the self-cleaning cycle is started. Preheat the broil element for example F10, F11, F13, F14, F15, F30, F31 or F90). Try the bake or broil feature again. Remove using a ceramic-glass cooktop cleaning creme. Oven smokes excessively during broiling. Oven control panel...
Wiring Diagram (All Languages)
Page 1
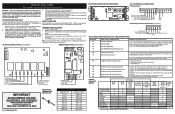
... & 94) Check oven door Light Switch - Maximum oven door lock time exceeded. Prior to returning the product to adjust the oven temperature up , replace EOC. Press cancel to RTD Sensor resistance chart. Use the slew keys to service, ensure that safe servicing practices be replaced should appear in the display. 4. Note: Changing calibration affects normal Bake mode. Shorted Keypad. F31 Shorted Probe connection. If open time exceeded. MDL (some models) (some models) P1 ELECTRONIC OVEN CONTROL (REAR VIEW) E.O.C. Failure to see...
... & 94) Check oven door Light Switch - Maximum oven door lock time exceeded. Prior to returning the product to adjust the oven temperature up , replace EOC. Press cancel to RTD Sensor resistance chart. Use the slew keys to service, ensure that safe servicing practices be replaced should appear in the display. 4. Note: Changing calibration affects normal Bake mode. Shorted Keypad. F31 Shorted Probe connection. If open time exceeded. MDL (some models) (some models) P1 ELECTRONIC OVEN CONTROL (REAR VIEW) E.O.C. Failure to see...


