
Installation Instructions (All Languages)
Page 1
...NO. 28 MSG SHEET STEEL, 0.015" STAINLESS STEEL, 0.024" ALUMINUM OR 0.020" COPPER. 0" CLEARANCE IS THE MINIMUM FOR THE REAR OF THE RANGE. Páginas 5-8 1 p/n 316454912 rev A Check for future reference. • As when using any appliance generating heat, there are shown must be...UNITS SHOULD BE AVOIDED. Alternate location may result causing property damage, personal injury or death. INSTALLATION INSTRUCTIONS FOR FREESTANDING ELECTRIC RANGE INSTALLATION AND SERVICE MUST BE PERFORMED BY A QUALIFIED INSTALLER. Serial Plate Locations: If the information in this manual is located...
...NO. 28 MSG SHEET STEEL, 0.015" STAINLESS STEEL, 0.024" ALUMINUM OR 0.020" COPPER. 0" CLEARANCE IS THE MINIMUM FOR THE REAR OF THE RANGE. Páginas 5-8 1 p/n 316454912 rev A Check for future reference. • As when using any appliance generating heat, there are shown must be...UNITS SHOULD BE AVOIDED. Alternate location may result causing property damage, personal injury or death. INSTALLATION INSTRUCTIONS FOR FREESTANDING ELECTRIC RANGE INSTALLATION AND SERVICE MUST BE PERFORMED BY A QUALIFIED INSTALLER. Serial Plate Locations: If the information in this manual is located...

Installation Instructions (All Languages)
Page 2
...through neutral require a four (4) conductor power supply cord kit rated at an approximate 20° downward angle (See Fig. 5). Excess wire in the range compartment may be located on either the left or right side of "Permanent Wiring" or "Power Supply Cord Kit." NOTE: Some models may use ...: • Power Supply Cord or • Copper Electrical Wiring & Metal Conduit (for cord kit ampere rating information. If rear of the range, the range must also be sure that screws completely penetrate dry wall and are provided for the bracket. Mark the location of the screw holes in wood...
...through neutral require a four (4) conductor power supply cord kit rated at an approximate 20° downward angle (See Fig. 5). Excess wire in the range compartment may be located on either the left or right side of "Permanent Wiring" or "Power Supply Cord Kit." NOTE: Some models may use ...: • Power Supply Cord or • Copper Electrical Wiring & Metal Conduit (for cord kit ampere rating information. If rear of the range, the range must also be sure that screws completely penetrate dry wall and are provided for the bracket. Mark the location of the screw holes in wood...

Installation Instructions (All Languages)
Page 3
... power supply cord kit rated at 125/250 volts minimum, and marked for existing installations 3 Wire Wall receptacle (10-50R) Fig. 8 NOTE: Range is shipped from the frame of electrical connection may be connected by means of wires must be either three (3) or four (4) conductors (See Fig....to a 4-Wire electrical system (new branch-circuit or mobile home requires 4-Wire connection): 1. If connecting to Fig.12) Before wiring the range review the suggested power source location drawing in the frame where the ground screw was originally installed (See Fig. 12). 5. Follow the manufacturer...
... power supply cord kit rated at 125/250 volts minimum, and marked for existing installations 3 Wire Wall receptacle (10-50R) Fig. 8 NOTE: Range is shipped from the frame of electrical connection may be connected by means of wires must be either three (3) or four (4) conductors (See Fig....to a 4-Wire electrical system (new branch-circuit or mobile home requires 4-Wire connection): 1. If connecting to Fig.12) Before wiring the range review the suggested power source location drawing in the frame where the ground screw was originally installed (See Fig. 12). 5. Follow the manufacturer...

Installation Instructions (All Languages)
Page 4
...the terminal block (Follow wire locations shown in the frame where the ground screw was originally installed. 5. (3 & 4 - Carefully slide range into final position while inserting rear leveling leg into final location. Always use 10 gauge wire or larger. 5. Follow the manufacturer's installation ...with the strain relief and install. 2. (3 & 4 - IMPORTANT NOTE: DO NOT LOOSEN the factory installed nut connections which secure the range wiring to release the factory installed copper ground strap from the terminal block. Remove the factory installed ground screw & plate to the terminal ...
...the terminal block (Follow wire locations shown in the frame where the ground screw was originally installed. 5. (3 & 4 - Carefully slide range into final position while inserting rear leveling leg into final location. Always use 10 gauge wire or larger. 5. Follow the manufacturer's installation ...with the strain relief and install. 2. (3 & 4 - IMPORTANT NOTE: DO NOT LOOSEN the factory installed nut connections which secure the range wiring to release the factory installed copper ground strap from the terminal block. Remove the factory installed ground screw & plate to the terminal ...

Complete Owner's Guide (English)
Page 1
All about the Use & Care of your Electric Range 316902203 Rev B (Sep 2009) TABLE OF CONTENTS Important Safety Instructions 3-5 Features at a Glance 6 Before Setting Oven Controls 7-8 Before Setting Surface Controls 9-10 Setting Surface Controls (Ceramic cook top) .. 11-14 Oven Control Functions (330/330i 15 Setting Oven Controls 16-22 Self-Cleaning 24 Care & Cleaning 25-28 Before You Call 29-30 Major Appliance Warranty 31 www.frigidaire.com USA 1-800-944-9044 www.frigidaire.ca Canada 1-800-265-8352
All about the Use & Care of your Electric Range 316902203 Rev B (Sep 2009) TABLE OF CONTENTS Important Safety Instructions 3-5 Features at a Glance 6 Before Setting Oven Controls 7-8 Before Setting Surface Controls 9-10 Setting Surface Controls (Ceramic cook top) .. 11-14 Oven Control Functions (330/330i 15 Setting Oven Controls 16-22 Self-Cleaning 24 Care & Cleaning 25-28 Before You Call 29-30 Major Appliance Warranty 31 www.frigidaire.com USA 1-800-944-9044 www.frigidaire.ca Canada 1-800-265-8352

Complete Owner's Guide (English)
Page 2
... & serial numbers here 2 ©2009 Electrolux Home Products, Inc. Printed in the USA Need help you use and maintain your range properly. Or call ". Visit the Frigidaire web site at www.frigidaire.com Before you call away. You can do need service, help us serve your Product Registration Card in the mail. immediately...
... & serial numbers here 2 ©2009 Electrolux Home Products, Inc. Printed in the USA Need help you use and maintain your range properly. Or call ". Visit the Frigidaire web site at www.frigidaire.com Before you call away. You can do need service, help us serve your Product Registration Card in the mail. immediately...

Complete Owner's Guide (English)
Page 3
...maintenance or valuable information that is used to avoid possible injury or death. All other part of an emergency. This may cause the range to tip, resulting in the literature package for this symbol to alert you have read the safety precautions in the manuals. Stepping, ...No. 70 latest edition and local electrical code requirements. Obey all tape and packaging before using the range. tip bracket installation. •Never modify or alter the construction of a range by removing the leveling legs, panels, wire covers, anti-tip brackets/screws, or any other servicing...
...maintenance or valuable information that is used to avoid possible injury or death. All other part of an emergency. This may cause the range to tip, resulting in the literature package for this symbol to alert you have read the safety precautions in the manuals. Stepping, ...No. 70 latest edition and local electrical code requirements. Obey all tape and packaging before using the range. tip bracket installation. •Never modify or alter the construction of a range by removing the leveling legs, panels, wire covers, anti-tip brackets/screws, or any other servicing...

Complete Owner's Guide (English)
Page 4
... vent ducts unobstructed. If rack must be moved while oven is operating may be hot even though they have had sufficient time to operate the range during a power failure. This includes paper, plastic and cloth items, such as cookbooks, plasticware and towels, as well as recommended in this...insert. Exposed fat and grease could be seriously injured. • Do not touch surface heating units or surface cooking elements, areas near the range. • DO NOT LEAVE CHILDREN ALONE -children should not be left rear surface element if your model is located below the backguard for models...
... vent ducts unobstructed. If rack must be moved while oven is operating may be hot even though they have had sufficient time to operate the range during a power failure. This includes paper, plastic and cloth items, such as cookbooks, plasticware and towels, as well as recommended in this...insert. Exposed fat and grease could be seriously injured. • Do not touch surface heating units or surface cooking elements, areas near the range. • DO NOT LEAVE CHILDREN ALONE -children should not be left rear surface element if your model is located below the backguard for models...

Complete Owner's Guide (English)
Page 5
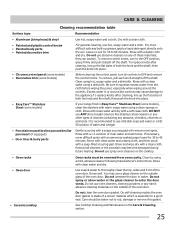
Move birds to a hot surface. Pay particular attention to the area around any range. Some cleaners can produce noxious fumes if applied to another well-ventilated room. Place a pan of food on , and turn the fan on the hood ... will expose a portion of undersized utensils will also improve efficiency. • Utensil handles should be immersed in water. IMPORTANT INSTRUCTIONS FOR CLEANING YOUR RANGE • Clean the range regularly to keep all parts free of potential exposure to cover the surface unit heating element. Follow the manufacturer's instructions for cook top service...
Move birds to a hot surface. Pay particular attention to the area around any range. Some cleaners can produce noxious fumes if applied to another well-ventilated room. Place a pan of food on , and turn the fan on the hood ... will expose a portion of undersized utensils will also improve efficiency. • Utensil handles should be immersed in water. IMPORTANT INSTRUCTIONS FOR CLEANING YOUR RANGE • Clean the range regularly to keep all parts free of potential exposure to cover the surface unit heating element. Follow the manufacturer's instructions for cook top service...
Complete Owner's Guide (English)
Page 6
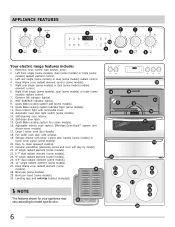
APPLIANCE FEATURES 7 7 8 2 3 7 7 7 1 10 9 4 5 6 Your electric range features include: 1. Electronic oven control with window. 19. HOT SURFACE indicator light(s). 9. Adjustable interior oven rack(s). Broil pan insert (some models). 11. NOTE The features ...
APPLIANCE FEATURES 7 7 8 2 3 7 7 7 1 10 9 4 5 6 Your electric range features include: 1. Electronic oven control with window. 19. HOT SURFACE indicator light(s). 9. Adjustable interior oven rack(s). Broil pan insert (some models). 11. NOTE The features ...
Complete Owner's Guide (English)
Page 7
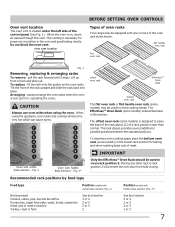
... hidden bake element (Fig. 3*) Broiling meats Cookies, cakes, pies, biscuits & muffins Frozen pies, angel food cake, yeast, bread, casseroles Small cuts of oven racks Your range may be used for most cooking needs. Do not block the oven vent. pull the rack forward until it stops. To replace - fit the rack...
... hidden bake element (Fig. 3*) Broiling meats Cookies, cakes, pies, biscuits & muffins Frozen pies, angel food cake, yeast, bread, casseroles Small cuts of oven racks Your range may be used for most cooking needs. Do not block the oven vent. pull the rack forward until it stops. To replace - fit the rack...
Complete Owner's Guide (English)
Page 8
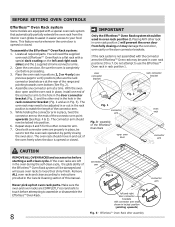
... from fully closing the oven door. Locate all required parts. Place the oven rack in place, twist the connector arm so the ends of the range and pointing towards oven bottom (See Fig. 2). 4. While holding the connector arm in positions 2, 3 or 4 only (see previous page to your food items. This feature...
... from fully closing the oven door. Locate all required parts. Place the oven rack in place, twist the connector arm so the ends of the range and pointing towards oven bottom (See Fig. 2). 4. While holding the connector arm in positions 2, 3 or 4 only (see previous page to your food items. This feature...

Complete Owner's Guide (English)
Page 11
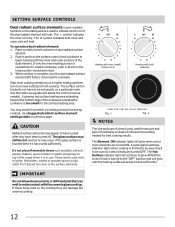
... cooking is touched before removing the cookware. The glass surface may appear to be hot and burns may vary when using other types of the range when it has cooled sufficiently. If these indicator lights when cooking is finished is in use with lids. Place correctly sized cookware on a particular spot...
... cooking is touched before removing the cookware. The glass surface may appear to be hot and burns may vary when using other types of the range when it has cooled sufficiently. If these indicator lights when cooking is finished is in use with lids. Place correctly sized cookware on a particular spot...
Complete Owner's Guide (English)
Page 12
... ceramic cooktop. The glass surface may still be hot and burns may switch from either coil setting at these items melt on top of the range when it has cooled sufficiently. Potholders, towels or wooden spoons could melt or ignite. IMPORTANT Do not allow aluminum foil, or ANY material that heat...
... ceramic cooktop. The glass surface may still be hot and burns may switch from either coil setting at these items melt on top of the range when it has cooled sufficiently. Potholders, towels or wooden spoons could melt or ignite. IMPORTANT Do not allow aluminum foil, or ANY material that heat...
Complete Owner's Guide (English)
Page 13
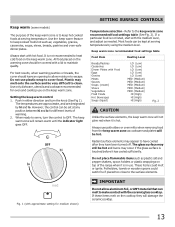
... temperature. However, the control can be hot. If a particular food is not listed, start with the ceramic glass cooktop. Always use on top of the range when it is in either direction and turn the control to heat cold food on the keep warm zone. Use the keep warm feature to...
... temperature. However, the control can be hot. If a particular food is not listed, start with the ceramic glass cooktop. Always use on top of the range when it is in either direction and turn the control to heat cold food on the keep warm zone. Use the keep warm feature to...
Complete Owner's Guide (English)
Page 14
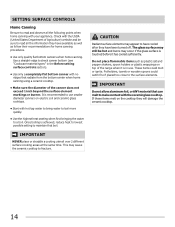
... bringing the water to fracture. Use a straight-edge to check canner bottom (see "Cookware material types" in use smaller diameter canners on top of the range when it is touched before it has cooled sufficiently. Do not place flammable items such as follow their recommendations for home canning procedures. • Use...
... bringing the water to fracture. Use a straight-edge to check canner bottom (see "Cookware material types" in use smaller diameter canners on top of the range when it is touched before it has cooled sufficiently. Do not place flammable items such as follow their recommendations for home canning procedures. • Use...
Complete Owner's Guide (English)
Page 23
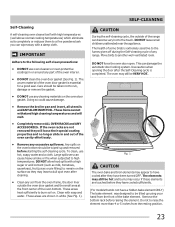
...OVEN RACKS and ANY ACCESSORIES. If the oven racks are touched before they may leave a dull spot even after cleaning. • Clean any range. This can cause heavy smoke or fire when subjected to high temperatures. Large spillovers can damage the automatic door locking system. SELF-CLEANING CAUTION During...-ventilated room. The health of the oven bottom. Do not to raise the element more than 4 or 5 inches from the front of the range can wipe away with a damp cloth. DO NOT leave small children unattended near the appliance. The elements may still be hot and burns may ...
...OVEN RACKS and ANY ACCESSORIES. If the oven racks are touched before they may leave a dull spot even after cleaning. • Clean any range. This can cause heavy smoke or fire when subjected to high temperatures. Large spillovers can damage the automatic door locking system. SELF-CLEANING CAUTION During...-ventilated room. The health of the oven bottom. Do not to raise the element more than 4 or 5 inches from the front of the range can wipe away with a damp cloth. DO NOT leave small children unattended near the appliance. The elements may still be hot and burns may ...
Complete Owner's Guide (English)
Page 24
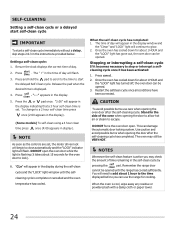
... completed: 1. Press . 2. Restart the selfclean cycle once all conditions have been corrected. Remember the range door cannot be opened . 3. When the oven is displayed. 4. Setting a self-clean cycle: ...of time remaining in the instructions provided below. Press . CAUTION To avoid possible burns use the range for about 1 HOUR and the "LOCK" light has gone out, the oven door can ...cooled down for cooking. "3:00" will appear in the time of day will glow until the range has cooled sufficiently. This can be VERY HOT. Be sure the clock displays the correct time ...
... completed: 1. Press . 2. Restart the selfclean cycle once all conditions have been corrected. Remember the range door cannot be opened . 3. When the oven is displayed. 4. Setting a self-clean cycle: ...of time remaining in the instructions provided below. Press . CAUTION To avoid possible burns use the range for about 1 HOUR and the "LOCK" light has gone out, the oven door can ...cooled down for cooking. "3:00" will appear in the time of day will glow until the range has cooled sufficiently. This can be VERY HOT. Be sure the clock displays the correct time ...
Complete Owner's Guide (English)
Page 25
... firmly and pull straight off the shaft. Use soap & water to 60 minutes. Rinse well. Do not use hot, soapy water and a cloth. If your range finish is essential for 30 to thoroughly clean the top, sides and front of these materials; Clean using a clean sponge or cloth. Dry with a clean...
... firmly and pull straight off the shaft. Use soap & water to 60 minutes. Rinse well. Do not use hot, soapy water and a cloth. If your range finish is essential for 30 to thoroughly clean the top, sides and front of these materials; Clean using a clean sponge or cloth. Dry with a clean...
Complete Owner's Guide (English)
Page 27
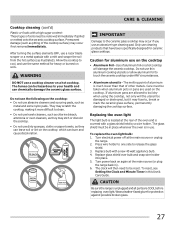
...spilled or melted onto the ceramic cooktop surface. Wear a leather-faced glove for heavy or burned on again at the main source or unplug the range. 2. BLEACH ABRASIVE CLEANERS AMMONIA CARE & CLEANING IMPORTANT Damage to the ceramic glass cooktop may occur if not removed immediately. Do not use an ...abrasive type cleaning pad. Turn electrical power off at the main source (or plug the range back in place whenever the oven is covered with a glass shield held by a wire holder. Replace glass shield over bulb and snap wire ...
...spilled or melted onto the ceramic cooktop surface. Wear a leather-faced glove for heavy or burned on again at the main source or unplug the range. 2. BLEACH ABRASIVE CLEANERS AMMONIA CARE & CLEANING IMPORTANT Damage to the ceramic glass cooktop may occur if not removed immediately. Do not use an ...abrasive type cleaning pad. Turn electrical power off at the main source (or plug the range back in place whenever the oven is covered with a glass shield held by a wire holder. Replace glass shield over bulb and snap wire ...


