
Installation Instructions (All Languages)
Page 1
...or death. Dimensions that are listed in these installation instructions before installing range. • Remove all packing material from the oven compartments before connecting the gas & electrical supply to the range. • Observe all governing codes and ordinances. • Be ... there are certain safety precautions you should be avoided. Páginas 5-8 1 p/n 316454912 rev A INSTALLATION INSTRUCTIONS FOR FREESTANDING ELECTRIC RANGE INSTALLATION AND SERVICE MUST BE PERFORMED BY A QUALIFIED INSTALLER. These are shown must be under cooktop. READ AND SAVE THESE INSTRUCTIONS...
...or death. Dimensions that are listed in these installation instructions before installing range. • Remove all packing material from the oven compartments before connecting the gas & electrical supply to the range. • Observe all governing codes and ordinances. • Be ... there are certain safety precautions you should be avoided. Páginas 5-8 1 p/n 316454912 rev A INSTALLATION INSTRUCTIONS FOR FREESTANDING ELECTRIC RANGE INSTALLATION AND SERVICE MUST BE PERFORMED BY A QUALIFIED INSTALLER. These are shown must be under cooktop. READ AND SAVE THESE INSTRUCTIONS...

Installation Instructions (All Languages)
Page 2
...allow the bracket to fit flush against the wall, remove molding or mount bracket to check your adjustments. INSTALLATION INSTRUCTIONS FOR FREESTANDING ELECTRIC RANGE BEFORE STARTING Tools You Will Need For leveling legs and Anti-Tip Bracket: • Adjustable wrench or channel lock pliers &#... used in Step 4c. If bracket is required between the bottom of the range will allow room for use the wall or floor mount method. Models with the range. ELECTRICAL CONNECTION REQUIREMENTS - Serious injury might result from spilled hot liquids or from wall...
...allow the bracket to fit flush against the wall, remove molding or mount bracket to check your adjustments. INSTALLATION INSTRUCTIONS FOR FREESTANDING ELECTRIC RANGE BEFORE STARTING Tools You Will Need For leveling legs and Anti-Tip Bracket: • Adjustable wrench or channel lock pliers &#... used in Step 4c. If bracket is required between the bottom of the range will allow room for use the wall or floor mount method. Models with the range. ELECTRICAL CONNECTION REQUIREMENTS - Serious injury might result from spilled hot liquids or from wall...

Installation Instructions (All Languages)
Page 3
...power supply cord. See Fig. 10 for Line 1, Line 2 and Neutral and tighten securely to the frame of the appliance. ELECTRICAL CONNECTION TO RANGE. The terminal block will then be accessible. 3 & 4 - Make sure all screws are loosened or removed. 3. Cord must...strain relief properly installed. INSTALLATION INSTRUCTIONS FOR FREESTANDING ELECTRIC RANGE 2b. See Steps 4a. To remove, loosen center screw (one screw) and remove cover. Wire electrical wall Receptacle types & recommended mounting orientation on end of electrical connection may be removed (Fig 9). IMPORTANT ...
...power supply cord. See Fig. 10 for Line 1, Line 2 and Neutral and tighten securely to the frame of the appliance. ELECTRICAL CONNECTION TO RANGE. The terminal block will then be accessible. 3 & 4 - Make sure all screws are loosened or removed. 3. Cord must...strain relief properly installed. INSTALLATION INSTRUCTIONS FOR FREESTANDING ELECTRIC RANGE 2b. See Steps 4a. To remove, loosen center screw (one screw) and remove cover. Wire electrical wall Receptacle types & recommended mounting orientation on end of electrical connection may be removed (Fig 9). IMPORTANT ...

Installation Instructions (All Languages)
Page 4
...appliance. Cut and discard the copper strap from frame of electrical connection may occur if these 3 nuts are tightened securely and replace the rear access cover (See Fig. 9). CAREFULLY SLIDE RANGE INTO FINAL LOCATION. The ground strap must be removed unless ... field wire compression connections must be set at 22 in Fig. 14). Make sure all connections are loosened or removed. 3. INSTALLATION INSTRUCTIONS FOR FREESTANDING ELECTRIC RANGE or 4B. Be sure to an adequate ground source. 4c. 3 & 4-WIRE PERMANENT WIRE CONNECTIONS. 3 - follow Steps 1 thru 5 below ...
...appliance. Cut and discard the copper strap from frame of electrical connection may occur if these 3 nuts are tightened securely and replace the rear access cover (See Fig. 9). CAREFULLY SLIDE RANGE INTO FINAL LOCATION. The ground strap must be removed unless ... field wire compression connections must be set at 22 in Fig. 14). Make sure all connections are loosened or removed. 3. INSTALLATION INSTRUCTIONS FOR FREESTANDING ELECTRIC RANGE or 4B. Be sure to an adequate ground source. 4c. 3 & 4-WIRE PERMANENT WIRE CONNECTIONS. 3 - follow Steps 1 thru 5 below ...

Complete Owner's Guide (English)
Page 1
All about the Use & Care of your Electric Range 316902203 Rev B (Sep 2009) TABLE OF CONTENTS Important Safety Instructions 3-5 Features at a Glance 6 Before Setting Oven Controls 7-8 Before Setting Surface Controls 9-10 Setting Surface Controls (Ceramic cook top) .. 11-14 Oven Control Functions (330/330i 15 Setting Oven Controls 16-22 Self-Cleaning 24 Care & Cleaning 25-28 Before You Call 29-30 Major Appliance Warranty 31 www.frigidaire.com USA 1-800-944-9044 www.frigidaire.ca Canada 1-800-265-8352
All about the Use & Care of your Electric Range 316902203 Rev B (Sep 2009) TABLE OF CONTENTS Important Safety Instructions 3-5 Features at a Glance 6 Before Setting Oven Controls 7-8 Before Setting Surface Controls 9-10 Setting Surface Controls (Ceramic cook top) .. 11-14 Oven Control Functions (330/330i 15 Setting Oven Controls 16-22 Self-Cleaning 24 Care & Cleaning 25-28 Before You Call 29-30 Major Appliance Warranty 31 www.frigidaire.com USA 1-800-944-9044 www.frigidaire.ca Canada 1-800-265-8352

Complete Owner's Guide (English)
Page 3
...front panel or storage drawer from any unused range if it forward. DO NOT allow children to be done only by properly installed anti-tip bracket provided with the National Electrical Code ANSI/NFPA No. 70 latest edition and local electrical code requirements. Never allow children to tip..., resulting in the manuals. Do not attempt to install or operate your appliance is to play around the range. To check if the bracket...
...front panel or storage drawer from any unused range if it forward. DO NOT allow children to be done only by properly installed anti-tip bracket provided with the National Electrical Code ANSI/NFPA No. 70 latest edition and local electrical code requirements. Never allow children to tip..., resulting in the manuals. Do not attempt to install or operate your appliance is to play around the range. To check if the bracket...

Complete Owner's Guide (English)
Page 4
...the broiler insert with aluminum foil. Do not let clothing or other flammable materials contact hot surfaces. If the range is cool. These items could melt or ignite. • Placement of electric shock, or fire. Do not let potholders contact the hot heating elements in injury. They should never be ...hot even though they have had sufficient time to sit or stand on any part of the range. CAUTION • Do not store items ...
...the broiler insert with aluminum foil. Do not let clothing or other flammable materials contact hot surfaces. If the range is cool. These items could melt or ignite. • Placement of electric shock, or fire. Do not let potholders contact the hot heating elements in injury. They should never be ...hot even though they have had sufficient time to sit or stand on any part of the range. CAUTION • Do not store items ...

Complete Owner's Guide (English)
Page 5
... in the self-cleaning cycle only the parts listed in or around each surface heating unit. IMPORTANT INSTRUCTIONS FOR CLEANING YOUR RANGE • Clean the range regularly to warn customers of the utensil should never be used to such substances. 5 Pay particular attention to the area ...around any part of glass, glass/ceramic, ceramic, earthenware, or other reproductive harm, and requires businesses to keep all parts free of electric shock....
... in the self-cleaning cycle only the parts listed in or around each surface heating unit. IMPORTANT INSTRUCTIONS FOR CLEANING YOUR RANGE • Clean the range regularly to warn customers of the utensil should never be used to such substances. 5 Pay particular attention to the area ...around any part of glass, glass/ceramic, ceramic, earthenware, or other reproductive harm, and requires businesses to keep all parts free of electric shock....
Complete Owner's Guide (English)
Page 6
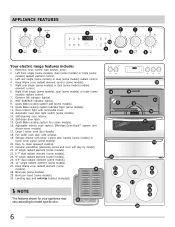
APPLIANCE FEATURES 7 7 8 2 3 7 7 7 1 10 9 4 5 6 Your electric range features include: 1. Electronic oven control with large 1-piece door handle (some models) or lower cover panel (some models). 20. Self-cleaning oven interior. 14. Adjustable ...
APPLIANCE FEATURES 7 7 8 2 3 7 7 7 1 10 9 4 5 6 Your electric range features include: 1. Electronic oven control with large 1-piece door handle (some models) or lower cover panel (some models). 20. Self-cleaning oven interior. 14. Adjustable ...
Complete Owner's Guide (English)
Page 14
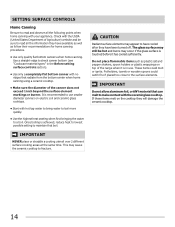
.... • Make sure the diameter of the canner does not exceed 1 inch beyond the surface element markings or burner. If these items melt on electric coil and ceramic glass cooktops. • Start with your appliance. CAUTION Radiant surface elements may appear to have cooled after they have available as well... more quickly. • Use the highest heat seating when first bringing the water to a boil. Check with the USDA (United States Department of the range when it has cooled sufficiently. IMPORTANT Do not allow aluminum foil, or ANY material that can melt to the surface elements.
.... • Make sure the diameter of the canner does not exceed 1 inch beyond the surface element markings or burner. If these items melt on electric coil and ceramic glass cooktops. • Start with your appliance. CAUTION Radiant surface elements may appear to have cooled after they have available as well... more quickly. • Use the highest heat seating when first bringing the water to a boil. Check with the USDA (United States Department of the range when it has cooled sufficiently. IMPORTANT Do not allow aluminum foil, or ANY material that can melt to the surface elements.
Complete Owner's Guide (English)
Page 27
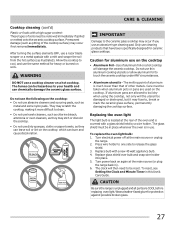
...the cooktop, not only will damage the ceramic cooktop. Replacing the oven light The light bulb is located at the main source or unplug the range. 2. Turn electrical power off at the rear of the oven and is in place whenever the oven is covered with a glass shield held by a wire ... products that of the cooktop surface) may etch or discolor the cooktop. • Do not use an abrasive type cleaning pad. CAUTION Be sure the range is much lower than that have been specifically designed for aluminum use a razor blade scraper or a metal spatula with a new 40 watt appliance bulb. 4....
...the cooktop, not only will damage the ceramic cooktop. Replacing the oven light The light bulb is located at the main source or unplug the range. 2. Turn electrical power off at the rear of the oven and is in place whenever the oven is covered with a glass shield held by a wire ... products that of the cooktop surface) may etch or discolor the cooktop. • Do not use an abrasive type cleaning pad. CAUTION Be sure the range is much lower than that have been specifically designed for aluminum use a razor blade scraper or a metal spatula with a new 40 watt appliance bulb. 4....
Complete Owner's Guide (English)
Page 29
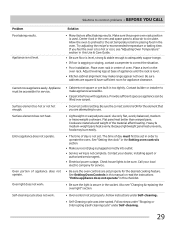
.... • Self-Cleaning cycle was interrupted. Make sure the proper oven rack position is sagging or sloping, contact a carpenter to make range appear not level. If you are built in the oven. Entire appliance does not operate. Use only flat, evenly balanced, medium or ... not square or are attempting to circulate. Cookware materials and weight of appliance does not operate. Appliance is not complete. Contact your local electric company for service. • Be sure the oven controls are square & have sufficient room for service. Because lightweight pans heat unevenly, ...
.... • Self-Cleaning cycle was interrupted. Make sure the proper oven rack position is sagging or sloping, contact a carpenter to make range appear not level. If you are built in the oven. Entire appliance does not operate. Use only flat, evenly balanced, medium or ... not square or are attempting to circulate. Cookware materials and weight of appliance does not operate. Appliance is not complete. Contact your local electric company for service. • Be sure the oven controls are square & have sufficient room for service. Because lightweight pans heat unevenly, ...
Wiring Diagram (All Languages)
Page 1
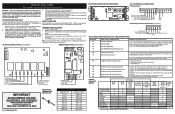
...SELECT PCB (some models) ELECTRONIC OVEN CONTROL FAULT CODE DESCRIPTIONS Fault Code F10 F11 F12 F13 Likely Failure Condition/Cause Runaway Temperature. ELECTRICAL CONNECTIONS P5 Connections P8 P5 P8 Cooktop Lockout Connections (some models) P1 ELECTRONIC OVEN CONTROL (REAR VIEW) E.O.C. Bad Micro Identification.... Probe connection. If resistance does not match the RTD chart replace RTD Sensor Probe. Maximum oven door lock time exceeded. SERVICE DATA SHEET Electric Ranges with the proper installation of the Latch Cam, Lock Motor Rod & Lock Motor Cam. 4. (F90, 91, 92, 93 & 94...
...SELECT PCB (some models) ELECTRONIC OVEN CONTROL FAULT CODE DESCRIPTIONS Fault Code F10 F11 F12 F13 Likely Failure Condition/Cause Runaway Temperature. ELECTRICAL CONNECTIONS P5 Connections P8 P5 P8 Cooktop Lockout Connections (some models) P1 ELECTRONIC OVEN CONTROL (REAR VIEW) E.O.C. Bad Micro Identification.... Probe connection. If resistance does not match the RTD chart replace RTD Sensor Probe. Maximum oven door lock time exceeded. SERVICE DATA SHEET Electric Ranges with the proper installation of the Latch Cam, Lock Motor Rod & Lock Motor Cam. 4. (F90, 91, 92, 93 & 94...


