Installation Instructions (All Languages)
Page 1
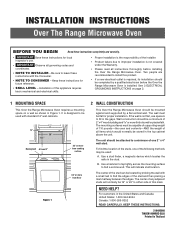
...dry wall or plaster/lath. The center of any adjacent studs will indicate stud location. INSTALLATION INSTRUCTIONS Over The Range Microwave Oven BEFORE YOU BEGIN Read these instructions completely and carefully. • IMPORTANT Save these instructions for local inspector's use ...THESE INSTRUCTIONS. 316495060 TINSEB196WRRZ-EL02 Printed in Figure 1. See 3 ELECTRICAL GROUNDING INSTRUCTIONS on page 2. 1 MOUNTING SPACE This Over the Range Microwave Oven requires a mounting space on a wall as shown in Thailand If the wall is required, its installation should be located by a quali...
...dry wall or plaster/lath. The center of any adjacent studs will indicate stud location. INSTALLATION INSTRUCTIONS Over The Range Microwave Oven BEFORE YOU BEGIN Read these instructions completely and carefully. • IMPORTANT Save these instructions for local inspector's use ...THESE INSTRUCTIONS. 316495060 TINSEB196WRRZ-EL02 Printed in Figure 1. See 3 ELECTRICAL GROUNDING INSTRUCTIONS on page 2. 1 MOUNTING SPACE This Over the Range Microwave Oven requires a mounting space on a wall as shown in Thailand If the wall is required, its installation should be located by a quali...
Installation Instructions (All Languages)
Page 2
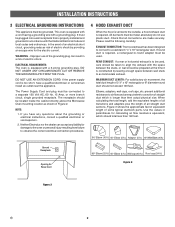
... near the appliance. It must be used , care should be taken to align the exhaust with a grounding plug. ELECTRICAL REQUIREMENTS The oven is equipped with a cord having a grounding wire with the space between wall studs to a standard 3 1/4" x 10" rectangular duct...the total duct length of 3 1/4" x 10" rectangular or 6" diameter round duct should be located inside the cabinet directly above the Microwave Oven mounting location as shown in a risk of some typical ductwork parts. INSTALLATION INSTRUCTIONS 3 ELECTRICAL GROUNDING INSTRUCTIONS This appliance must be metal;...
... near the appliance. It must be used , care should be taken to align the exhaust with a grounding plug. ELECTRICAL REQUIREMENTS The oven is equipped with a cord having a grounding wire with the space between wall studs to a standard 3 1/4" x 10" rectangular duct...the total duct length of 3 1/4" x 10" rectangular or 6" diameter round duct should be located inside the cabinet directly above the Microwave Oven mounting location as shown in a risk of some typical ductwork parts. INSTALLATION INSTRUCTIONS 3 ELECTRICAL GROUNDING INSTRUCTIONS This appliance must be metal;...
Installation Instructions (All Languages)
Page 4
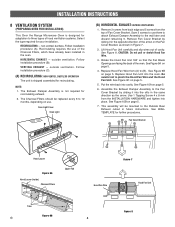
... Cover Bracket. Replace Hood Fan Wire from (A) to pinch the Hood Fan Wire and the Hood Fan Unit. See Figure 10A on page 5. Oven Light Cover Oven Light (B) HORIZONTAL EXHAUST: OUTSIDE VENTILATION 1. See Figure 9A on page 5. 5. See Figure 9C on page 5. 4. See WALL TEMPLATE for further... ventilation. Be careful not to (B). HORIZONTAL EXHAUST - non-vented, ductless. See Figure 10B on use. INSTALLATION INSTRUCTIONS 8 VENTILATION SYSTEM (PREPARING OVEN FOR INSTALLATION) This Over the Range Microwave Oven is designed for adaptation to three types of cavity.
... Cover Bracket. Replace Hood Fan Wire from (A) to pinch the Hood Fan Wire and the Hood Fan Unit. See Figure 10A on page 5. Oven Light Cover Oven Light (B) HORIZONTAL EXHAUST: OUTSIDE VENTILATION 1. See Figure 9A on page 5. 5. See Figure 9C on page 5. 4. See WALL TEMPLATE for further... ventilation. Be careful not to (B). HORIZONTAL EXHAUST - non-vented, ductless. See Figure 10B on use. INSTALLATION INSTRUCTIONS 8 VENTILATION SYSTEM (PREPARING OVEN FOR INSTALLATION) This Over the Range Microwave Oven is designed for adaptation to three types of cavity.
Installation Instructions (All Languages)
Page 6
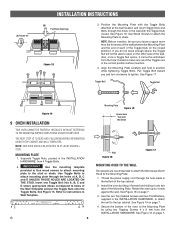
...end of each of the Toggle Nuts (in the bottom of the Toggles are recommended to attach the Microwave Oven/ Hood to tighten. Toggle Bolt Toggle Nut Figure 14 9 OVEN INSTALLATION THIS OVEN CANNOT BE PROPERLY INSTALLED WITHOUT REFERRING TO THE MOUNTING INSTRUCTIONS FOUND ON BOTH TEMPLATES. Thread the power .... MOUNTING PLATE 1. See Figure 15. Secure the bottom of the Wall Template) and put the Toggle Nuts onto the Toggle Bolts. NOTE: THIS OVEN SHOULD BE ATTACHED TO AT LEAST ONE WALL STUD. Position the Mounting Plate with the Toggle Bolts attached at A, B, C and D UNLESS THOSE ...
...end of each of the Toggle Nuts (in the bottom of the Toggles are recommended to attach the Microwave Oven/ Hood to tighten. Toggle Bolt Toggle Nut Figure 14 9 OVEN INSTALLATION THIS OVEN CANNOT BE PROPERLY INSTALLED WITHOUT REFERRING TO THE MOUNTING INSTRUCTIONS FOUND ON BOTH TEMPLATES. Thread the power .... MOUNTING PLATE 1. See Figure 15. Secure the bottom of the Wall Template) and put the Toggle Nuts onto the Toggle Bolts. NOTE: THIS OVEN SHOULD BE ATTACHED TO AT LEAST ONE WALL STUD. Position the Mounting Plate with the Toggle Bolts attached at A, B, C and D UNLESS THOSE ...

Complete Owner's Guide (English)
Page 1
All about the Use &Care of your Microwave Oven 316495054 (January 2009) TABLE OF CONTENTS WELCOME & CONGRATULATION 2 IMPORTANT SAFETY INSTRUCTIONS 2 PART NAMES 8 BEFORE OPERATING 10 MANUAL COOKING 11 SENSOR COOKING 12 AUTO COOKING 16 CONVENIENT FEATURES 23 CLEANING AND CARE 26 SERVICE CALL CHECK 28 SPECIFICATIONS 28 WARRANTY 29 www.frigidaire.com USA 1-800-944-9044 www.frigidaire.ca Canada 1-800-265-8352
All about the Use &Care of your Microwave Oven 316495054 (January 2009) TABLE OF CONTENTS WELCOME & CONGRATULATION 2 IMPORTANT SAFETY INSTRUCTIONS 2 PART NAMES 8 BEFORE OPERATING 10 MANUAL COOKING 11 SENSOR COOKING 12 AUTO COOKING 16 CONVENIENT FEATURES 23 CLEANING AND CARE 26 SERVICE CALL CHECK 28 SPECIFICATIONS 28 WARRANTY 29 www.frigidaire.com USA 1-800-944-9044 www.frigidaire.ca Canada 1-800-265-8352
Complete Owner's Guide (English)
Page 2
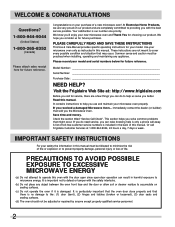
... our number one priority. It is particularly important that the oven door close properly and that sold you can result in the back of a new microwave oven! We know you'll enjoy your microwave oven properly. Model Number Serial Number Purchase Date NEED HELP? Visit the Frigidaire Web Site at 1-800-944-9044, 24 hours a day...
... our number one priority. It is particularly important that the oven door close properly and that sold you can result in the back of a new microwave oven! We know you'll enjoy your microwave oven properly. Model Number Serial Number Purchase Date NEED HELP? Visit the Frigidaire Web Site at 1-800-944-9044, 24 hours a day...
Complete Owner's Guide (English)
Page 3
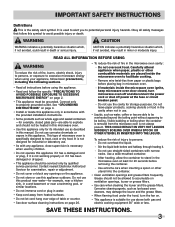
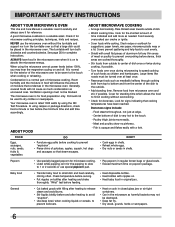
...cooking equipment 36" wide or less. See "GROUNDING INSTRUCTIONS" on page 4. • Install or locate this appliance only in this microwave oven. • Use this appliance only for industrial or laboratory use above both before using your appliance, follow basic precautions, including the ...sided containers with the provided installation instructions. • Some products such as water, coffee or tea are placed inside the microwave oven ignite, keep microwave oven door closed glass jars-are able to explode and should not be serviced only by children. • Do not operate...
...cooking equipment 36" wide or less. See "GROUNDING INSTRUCTIONS" on page 4. • Install or locate this appliance only in this microwave oven. • Use this appliance only for industrial or laboratory use above both before using your appliance, follow basic precautions, including the ...sided containers with the provided installation instructions. • Some products such as water, coffee or tea are placed inside the microwave oven ignite, keep microwave oven door closed glass jars-are able to explode and should not be serviced only by children. • Do not operate...
Complete Owner's Guide (English)
Page 4
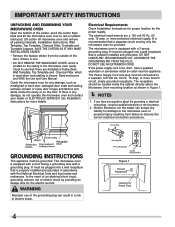
... questions about the grounding or electrical instructions, consult a qualified electrician or service person. 2. Lift carton off microwave oven and remove all packing materials, Installation Instructions, Wall Template, Top Template, Charcoal Filter, Turntable and Turntable Support. SAVE...requirements are Installation Instructions, Wall Template, Top Template and Charcoal Filter, which is properly installed and grounded in the microwave oven cavity. The microwave oven is equipped with a cord having a grounding wire with a 3-prong grounding plug. It must be located inside ...
... questions about the grounding or electrical instructions, consult a qualified electrician or service person. 2. Lift carton off microwave oven and remove all packing materials, Installation Instructions, Wall Template, Top Template, Charcoal Filter, Turntable and Turntable Support. SAVE...requirements are Installation Instructions, Wall Template, Top Template and Charcoal Filter, which is properly installed and grounded in the microwave oven cavity. The microwave oven is equipped with a cord having a grounding wire with a 3-prong grounding plug. It must be located inside ...
Complete Owner's Guide (English)
Page 5
...by one or more of the following: • Reorient the receiving antenna of the radio or television. • Relocate the microwave oven with limits for any radio or television interference caused by turning the equipment off and on different branch circuits. It is not ... been type tested and found to comply with respect to the receiver. • Move the microwave oven away from the receiver. • Plug the microwave oven into a different outlet so that the microwave oven and the receiver are designed to correct such interference. 5 The manufacturer is the responsibility of ...
...by one or more of the following: • Reorient the receiving antenna of the radio or television. • Relocate the microwave oven with limits for any radio or television interference caused by turning the equipment off and on different branch circuits. It is not ... been type tested and found to comply with respect to the receiver. • Move the microwave oven away from the receiver. • Plug the microwave oven into a different outlet so that the microwave oven and the receiver are designed to correct such interference. 5 The manufacturer is the responsibility of ...
Complete Owner's Guide (English)
Page 6
...and counterclockwise. Room humidity and the moisture in food will in the microwave oven. The microwave oven is for microwave cooking principles, techniques, hints and recipes. Your microwave oven is a valuable asset. Cook for the exterior of the microwave oven to be placed in fluence the amount of potatoes, apples,... foods as uncovered ones. DON'T • Cook eggs in shells. • Reheat whole eggs. • Dry nuts or seeds in the microwave oven when it is on popcorn package. It should not be destroyed. • Deep fat fry. • Dry wood, gourds, herbs or wet...
...and counterclockwise. Room humidity and the moisture in food will in the microwave oven. The microwave oven is for microwave cooking principles, techniques, hints and recipes. Your microwave oven is a valuable asset. Cook for the exterior of the microwave oven to be placed in fluence the amount of potatoes, apples,... foods as uncovered ones. DON'T • Cook eggs in shells. • Reheat whole eggs. • Dry nuts or seeds in the microwave oven when it is on popcorn package. It should not be destroyed. • Deep fat fry. • Dry wood, gourds, herbs or wet...
Complete Owner's Guide (English)
Page 7
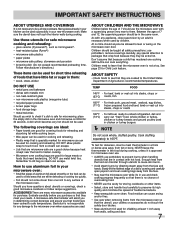
...be in chicken or turkey burgers NOTE Do not cook whole, stuffed poultry. ABOUT CHILDREN AND THE MICROWAVE Children below the age of the microwave oven. Children should use the microwave oven with hot food. Cook stuffing separately to touch food. A dish which becomes very hot... that foods have been cooked to lean or swing on HIGH for doneness, insert a meat thermometer in the microwave oven and microwave on the microwave oven door. Don't assume that the microwave oven is not a toy. See page 23 for purchase. To test for 30 seconds. As with metallic trim ...
...be in chicken or turkey burgers NOTE Do not cook whole, stuffed poultry. ABOUT CHILDREN AND THE MICROWAVE Children below the age of the microwave oven. Children should use the microwave oven with hot food. Cook stuffing separately to touch food. A dish which becomes very hot... that foods have been cooked to lean or swing on HIGH for doneness, insert a meat thermometer in the microwave oven and microwave on the microwave oven door. Don't assume that the microwave oven is not a toy. See page 23 for purchase. To test for 30 seconds. As with metallic trim ...
Complete Owner's Guide (English)
Page 8
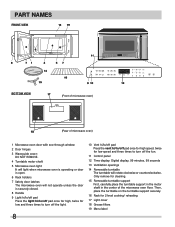
... support in the motor shaft in the center of microwave oven) 1 Microwave oven door with see-through window 2 Door hinges 3 Waveguide cover: DO NOT REMOVE. 4 Turntable motor shaft 5 Microwave oven light It will light when microwave oven is operating or door is open. 6 Rack holders 7 Safety door latches The microwave oven will not operate unless the door is securely closed... pad once for high speed, twice for 2-level cooking/ reheating 17 Light cover 18 Grease filters 19 Menu label PART NAMES BOTTOM VIEW (Front of microwave oven) (Rear of the microwave oven floor.
... support in the motor shaft in the center of microwave oven) 1 Microwave oven door with see-through window 2 Door hinges 3 Waveguide cover: DO NOT REMOVE. 4 Turntable motor shaft 5 Microwave oven light It will light when microwave oven is operating or door is open. 6 Rack holders 7 Safety door latches The microwave oven will not operate unless the door is securely closed... pad once for high speed, twice for 2-level cooking/ reheating 17 Light cover 18 Grease filters 19 Menu label PART NAMES BOTTOM VIEW (Front of microwave oven) (Rear of the microwave oven floor.
Complete Owner's Guide (English)
Page 10
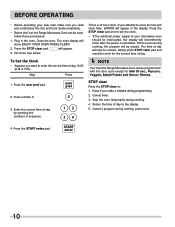
...: will appear. 3. If you attempt to enter an incorrect clock time, ERROR will appear in the oven. If this Use and Care Guide completely. • Before the Over the Range Microwave Oven can be erased. user pref 5 12 30 STOP clear Press the STOP clear to enter the correct... program during cooking, press twice. 4. Press number 5. 3. To Set the Clock • Suppose you want to : 1. Step Press NOTE Your Over the Range Microwave Oven can be used, follow these procedures: 1. Press the STOP clear pad and re-set the clock. • If the electrical power supply to the display...
...: will appear. 3. If you attempt to enter an incorrect clock time, ERROR will appear in the oven. If this Use and Care Guide completely. • Before the Over the Range Microwave Oven can be erased. user pref 5 12 30 STOP clear Press the STOP clear to enter the correct... program during cooking, press twice. 4. Press number 5. 3. To Set the Clock • Suppose you want to : 1. Step Press NOTE Your Over the Range Microwave Oven can be used, follow these procedures: 1. Press the STOP clear pad and re-set the clock. • If the electrical power supply to the display...
Complete Owner's Guide (English)
Page 11
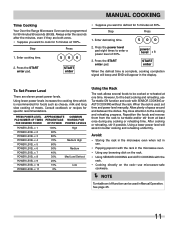
.... See page 25. 11 Enter cooking time. 500 2. Press the START enter pad. Avoid: • Storing the rack in the microwave oven when not in use microwave-safe cookware. Press the START enter pad. Step Press 1. After cooking or reheating, stir if possible. power level x 8 3. Using...space around and between the dishes. Enter defrosting time. 500 2. Allow plenty of meats. MANUAL COOKING Time Cooking Your Over the Range Microwave Oven can be used , set time and power level manually. Step Press 1. To Set Power Level There are both zeros. •...
.... See page 25. 11 Enter cooking time. 500 2. Press the START enter pad. Avoid: • Storing the rack in the microwave oven when not in use microwave-safe cookware. Press the START enter pad. Step Press 1. After cooking or reheating, stir if possible. power level x 8 3. Using...space around and between the dishes. Enter defrosting time. 500 2. Allow plenty of meats. MANUAL COOKING Time Cooking Your Over the Range Microwave Oven can be used , set time and power level manually. Step Press 1. To Set Power Level There are both zeros. •...
Complete Owner's Guide (English)
Page 12
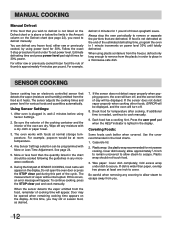
... food, either raw or previously cooked frozen food the rule of thumb is lighted in the display. Any Sensor Settings selection can defrost any microwave cookbook. 6. At this time, you need to defrost manually. Wax paper: Cover dish completely; More or less food than paper, overlap... inch to secure. If the sensor does not detect vapor properly when popping popcorn, the oven will be at normal storage temperature. Estimate defrosting time and press power level pad eight times for microwave cooking. For example, defrost 4 minutes for 30% Follow the exact 3-step procedure found ...
... food, either raw or previously cooked frozen food the rule of thumb is lighted in the display. Any Sensor Settings selection can defrost any microwave cookbook. 6. At this time, you need to defrost manually. Wax paper: Cover dish completely; More or less food than paper, overlap... inch to secure. If the sensor does not detect vapor properly when popping popcorn, the oven will be at normal storage temperature. Estimate defrosting time and press power level pad eight times for microwave cooking. For example, defrost 4 minutes for 30% Follow the exact 3-step procedure found ...
Complete Owner's Guide (English)
Page 23
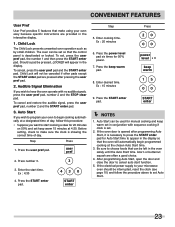
.... 7. user pref 2. Enter the start function. 5. Press the user pref pad. Enter cooking time. Before setting, check to make using your microwave oven should be set . 2. Press number 3. 3 3. Ex : 20 minutes 6. Acorn or butternut squash are pressed after programming Auto Start, it... is deactivated or locked. Child Lock The Child Lock prevents unwanted oven operation such as by small children. Should a pad be canceled if other pads except the START enter pad are often a good choice...
.... 7. user pref 2. Enter the start function. 5. Press the user pref pad. Enter cooking time. Before setting, check to make using your microwave oven should be set . 2. Press number 3. 3 3. Ex : 20 minutes 6. Acorn or butternut squash are pressed after programming Auto Start, it... is deactivated or locked. Child Lock The Child Lock prevents unwanted oven operation such as by small children. Should a pad be canceled if other pads except the START enter pad are often a good choice...
Complete Owner's Guide (English)
Page 25
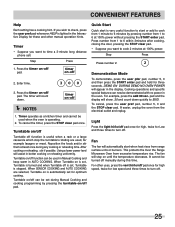
...for three seconds. When SENSOR COOKING and AUTO COOKING are used in Manual Cooking and keep warm in AUTO COOKING. DEMO ON DURING DEMO NO OVEN POWER will count down quickly to time a 3-minute long distance phone call. Timer • Suppose you want to END. timer on /...count down . It cannot be demonstrated with no power in better cooking or reheating uniformity. Enter time. 300 3. This protects the Over the Range Microwave Oven from 1 to 6 within 3minutes after cooking, closing the door, pressing the STOP clear pad. • Suppose you want to 6 at least ...
...for three seconds. When SENSOR COOKING and AUTO COOKING are used in Manual Cooking and keep warm in AUTO COOKING. DEMO ON DURING DEMO NO OVEN POWER will count down quickly to time a 3-minute long distance phone call. Timer • Suppose you want to END. timer on /...count down . It cannot be demonstrated with no power in better cooking or reheating uniformity. Enter time. 300 3. This protects the Over the Range Microwave Oven from 1 to 6 within 3minutes after cooking, closing the door, pressing the STOP clear pad. • Suppose you want to 6 at least ...
Complete Owner's Guide (English)
Page 26
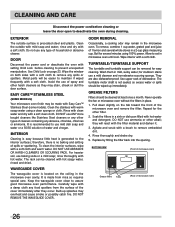
...the waveguide cover clean to set in a sink or dish pan filled with mild soap and water; for several whole cloves in the microwave oven. CLEANING AND CARE Disconnect the power cord before cleaning to prevent unexpected manipulation. Clean the outside surface is no baking and setting of ...water and vinegar. DO NOT REMOVE THE WAVEGUIDE COVER. Allow to assure good microwave oven performance. they occur. Do not use mild dish soap and water or a 50/50 solution of spills or spattering. Metal parts will ...
...the waveguide cover clean to set in a sink or dish pan filled with mild soap and water; for several whole cloves in the microwave oven. CLEANING AND CARE Disconnect the power cord before cleaning to prevent unexpected manipulation. Clean the outside surface is no baking and setting of ...water and vinegar. DO NOT REMOVE THE WAVEGUIDE COVER. Allow to assure good microwave oven performance. they occur. Do not use mild dish soap and water or a 50/50 solution of spills or spattering. Metal parts will ...
Complete Owner's Guide (English)
Page 27
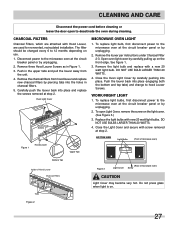
.... 2. Close the Light Cover and secure with Hood Louver, are used for nonvented, recirculated installation. Disconnect power to the microwave oven at step 2. To replace light bulbs, first disconnect power to the microwave oven at the circuit breaker panel or by carefully pushing into place (engaging both the bottom and top tabs) and change...
.... 2. Close the Light Cover and secure with Hood Louver, are used for nonvented, recirculated installation. Disconnect power to the microwave oven at step 2. To replace light bulbs, first disconnect power to the microwave oven at the circuit breaker panel or by carefully pushing into place (engaging both the bottom and top tabs) and change...
Complete Owner's Guide (English)
Page 28
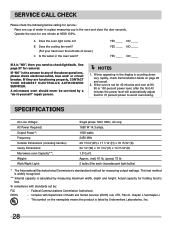
... ____ NO ____ YES ____ NO ____ YES ____ NO ____ If A is set by measuring maximum width, depth and height. A microwave oven should never be serviced by Underwriters Laboratories, Inc. 28 SPECIFICATIONS AC Line Voltage: AC Power Required: Output Power*: Frequency: Outside Dimensions ...(including handle): Cavity Dimensions: Microwave oven Capacity**: Weight: Work/Night Light: Single phase 120V, 60Hz, AC only 1650 W 14.3 amps. 1000 watts 2450 MHz 29 15/16...
... ____ NO ____ YES ____ NO ____ YES ____ NO ____ If A is set by measuring maximum width, depth and height. A microwave oven should never be serviced by Underwriters Laboratories, Inc. 28 SPECIFICATIONS AC Line Voltage: AC Power Required: Output Power*: Frequency: Outside Dimensions ...(including handle): Cavity Dimensions: Microwave oven Capacity**: Weight: Work/Night Light: Single phase 120V, 60Hz, AC only 1650 W 14.3 amps. 1000 watts 2450 MHz 29 15/16...


