
Installation Instructions (All Languages)
Page 1
... the cabinet on removing and replacing doors.) • Is the ice maker power switch turned On? provides all four sides. Press firmly on top of toe grille until you reattach water and power connectors at the door hinges? (See the Use & Care Guide for detailed instructions on all materials for a water supply • A compression nut and ferrule (sleeve) installation, including 25 feet of copper tubing and for the water supply connection at the rear...
... the cabinet on removing and replacing doors.) • Is the ice maker power switch turned On? provides all four sides. Press firmly on top of toe grille until you reattach water and power connectors at the door hinges? (See the Use & Care Guide for detailed instructions on all materials for a water supply • A compression nut and ferrule (sleeve) installation, including 25 feet of copper tubing and for the water supply connection at the rear...
Complete Owner s Guide
Page 2
... also destroy finishes if they will result in Ice Maker House water supply connected to refrigerator No water leaks present at all connections - Definitions This is unpacked. DANGER Installation Checklist Doors Handles are not problems of this or any moving parts of your old refrigerator or 2 Final Checks Shipping material removed Refrigerator and freezer temperatures set WARNING Crisper humidity controls set Registration card sent in WARNING...
... also destroy finishes if they will result in Ice Maker House water supply connected to refrigerator No water leaks present at all connections - Definitions This is unpacked. DANGER Installation Checklist Doors Handles are not problems of this or any moving parts of your old refrigerator or 2 Final Checks Shipping material removed Refrigerator and freezer temperatures set WARNING Crisper humidity controls set Registration card sent in WARNING...
Complete Owner s Guide
Page 3
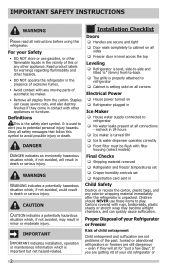
... legislation. Check with a threeprong grounding plug for three seconds, located on recycling your warranty. • Do not plug the unit into an electrical outlet controlled by 10% or more information on the temperature control panel (Electronic controls), or turning the Freezer and Refrigerator controls to "0" (Mechanical controls) will operate properly. These guidelines must be replaced by a qualified service technician. Shelves may be followed to sudden temperature change. 3 Such damage is damaged...
... legislation. Check with a threeprong grounding plug for three seconds, located on recycling your warranty. • Do not plug the unit into an electrical outlet controlled by 10% or more information on the temperature control panel (Electronic controls), or turning the Freezer and Refrigerator controls to "0" (Mechanical controls) will operate properly. These guidelines must be replaced by a qualified service technician. Shelves may be followed to sudden temperature change. 3 Such damage is damaged...
Complete Owner s Guide
Page 5
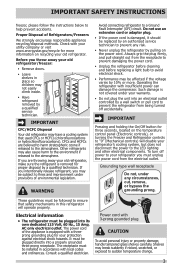
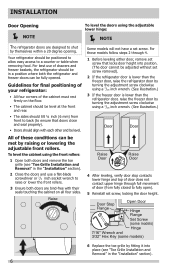
... on top of toe grille until top of direct sunlight and away from bottom hinge groove. 2 Open both doors. Use the refrigerator only as instructed in this Use & Care Guide. Do Not use an extension cord or an adapter plug. • If possible, place the refrigerator out of toe grille pops off of your refrigerator. INSTALLATION This Use & Care Guide provides general operating instructions for your refrigerator is near a grounded electrical outlet.
... on top of toe grille until top of direct sunlight and away from bottom hinge groove. 2 Open both doors. Use the refrigerator only as instructed in this Use & Care Guide. Do Not use an extension cord or an adapter plug. • If possible, place the refrigerator out of toe grille pops off of your refrigerator. INSTALLATION This Use & Care Guide provides general operating instructions for your refrigerator is near a grounded electrical outlet.
Complete Owner s Guide
Page 6
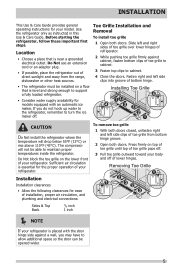
... leveling either door, remove set screw. Door Stop Flange Open Door Hinge Flange Set Screw (some models) Hinge 7/16" Wrench and 3/32" Hex Key (some models) 6 Replace the toe grille by raising or lowering the adjustable front rollers. Your refrigerator should be level at the front and rear. Some models will not have a set screw that locks door height into place (see "Toe Grille Installation and Removal" in the "Installation" section). 2 Close the doors and use...
... leveling either door, remove set screw. Door Stop Flange Open Door Hinge Flange Set Screw (some models) Hinge 7/16" Wrench and 3/32" Hex Key (some models) 6 Replace the toe grille by raising or lowering the adjustable front rollers. Your refrigerator should be level at the front and rear. Some models will not have a set screw that locks door height into place (see "Toe Grille Installation and Removal" in the "Installation" section). 2 Close the doors and use...
Complete Owner s Guide
Page 7
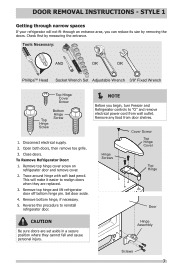
... Remove Refrigerator Door: 1. DOOR REMOVAL INSTRUCTIONS - Open both doors, then remove toe grille. 3. Hinge Screws Cover Screw Top Hinge Cover Top Hinge Door CAUTION Be sure doors are replaced. 3. This will not fit through an entrance area, you begin, turn Freezer and Refrigerator controls to "O" and remove electrical power cord from door shelves. Remove any food from wall outlet. Hinge Assembly Screws 7 Tools Necessary: AND OR OR PhillipsTM Head Socket Wrench Set Adjustable Wrench 3/8" Fixed Wrench Top Hinge Cover Screw Top Hinge Screw Bottom Hinge Screw 1. Remove...
... Remove Refrigerator Door: 1. DOOR REMOVAL INSTRUCTIONS - Open both doors, then remove toe grille. 3. Hinge Screws Cover Screw Top Hinge Cover Top Hinge Door CAUTION Be sure doors are replaced. 3. This will not fit through an entrance area, you begin, turn Freezer and Refrigerator controls to "O" and remove electrical power cord from door shelves. Remove any food from wall outlet. Hinge Assembly Screws 7 Tools Necessary: AND OR OR PhillipsTM Head Socket Wrench Set Adjustable Wrench 3/8" Fixed Wrench Top Hinge Cover Screw Top Hinge Screw Bottom Hinge Screw 1. Remove...
Complete Owner s Guide
Page 13
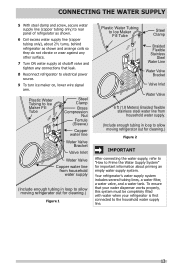
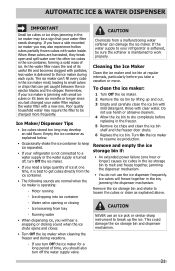
... electrical power source. 9 To turn ice maker on, lower wire signal arm. Plastic Water Tubing to Ice Maker Fill Tube Steel Clamp Brass Compression Nut Ferrule (Sleeve) Copper water line Water Valve Bracket Valve Inlet Water Valve Copper water line from household water supply (Include enough tubing in loop to allow moving refrigerator out for cleaning.) Figure 1 Plastic Water Tubing to Ice Maker Fill Tube Steel Clamp Braided Flexible Stainless Steel Water Line Water Valve Bracket Valve Inlet Water Valve 6 ft (1.8 Meters) Braided flexible stainless steel water line from household water...
... electrical power source. 9 To turn ice maker on, lower wire signal arm. Plastic Water Tubing to Ice Maker Fill Tube Steel Clamp Brass Compression Nut Ferrule (Sleeve) Copper water line Water Valve Bracket Valve Inlet Water Valve Copper water line from household water supply (Include enough tubing in loop to allow moving refrigerator out for cleaning.) Figure 1 Plastic Water Tubing to Ice Maker Fill Tube Steel Clamp Braided Flexible Stainless Steel Water Line Water Valve Bracket Valve Inlet Water Valve 6 ft (1.8 Meters) Braided flexible stainless steel water line from household water...
Complete Owner s Guide
Page 18
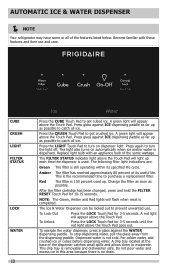
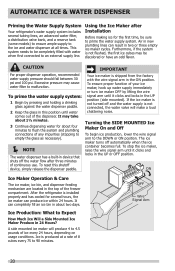
... CRUSH Touch Pad to catch all ice. Press glass against ICE dispensing paddle as far up . The light also turns on dispenser light. To operate the water dispenser, press a glass against ICE dispensing paddle as possible to get cubed ice. This drip tray is dispensed. Press again to purchase a replacement filter. A red light will appear above the Touch Pad. Dispensed water is completed. A green light will flash when reset is not cold. NOTE: The Green, Amber and Red...
... CRUSH Touch Pad to catch all ice. Press glass against ICE dispensing paddle as far up . The light also turns on dispenser light. To operate the water dispenser, press a glass against ICE dispensing paddle as possible to get cubed ice. This drip tray is dispensed. Press again to purchase a replacement filter. A red light will appear above the Touch Pad. Dispensed water is completed. A green light will flash when reset is not cold. NOTE: The Green, Amber and Red...
Complete Owner s Guide
Page 20
... is installed properly and has cooled for several tubing lines, an advanced water filter, a distribution valve bank, and a reserve tank (some models) to ensure ample supply to the ice and water dispenser at a rate of 8 cubes every 75 to 90 minutes. Turning the SIDE MOUNTED Ice Maker On and Off To begin ice production, lower the wire signal arm to malfunction. The ice maker turns off the water flow after Installation Before making ice for...
... is installed properly and has cooled for several tubing lines, an advanced water filter, a distribution valve bank, and a reserve tank (some models) to ensure ample supply to the ice and water dispenser at a rate of 8 cubes every 75 to 90 minutes. Turning the SIDE MOUNTED Ice Maker On and Off To begin ice production, lower the wire signal arm to malfunction. The ice maker turns off the water flow after Installation Before making ice for...
Complete Owner s Guide
Page 21
... its useful life and becomes clogged with a new one. Remember, if your refrigerator is not connected to a water supply or the water supply is turned off, turn off the water supply valve. 21 Empty the ice container as explained above. - If the water supply to your refrigerator is softened, be changed your water filter needs changing. Rinse with water inside. Water valve opening or closing - This could damage the ice storage bin and dispenser mechanism. • Turn Off the ice maker when cleaning the freezer...
... its useful life and becomes clogged with a new one. Remember, if your refrigerator is not connected to a water supply or the water supply is turned off, turn off the water supply valve. 21 Empty the ice container as explained above. - If the water supply to your refrigerator is softened, be changed your water filter needs changing. Rinse with water inside. Water valve opening or closing - This could damage the ice storage bin and dispenser mechanism. • Turn Off the ice maker when cleaning the freezer...
Complete Owner s Guide
Page 23
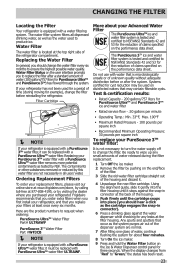
.... 4 Unpackage the new filter cartridge. Frigidaire recommends that you order extra filters when you should change the water filter every six months to "Green," the status has been reset. 23 Water Filter Status on the user interface prompts you should hear a click as tested by pushing on the Ice & Water Dispenser control panel for three seconds. More about four minutes. 8 Turn On the ice maker. 9 Press and hold the Water Filter button on the...
.... 4 Unpackage the new filter cartridge. Frigidaire recommends that you order extra filters when you should change the water filter every six months to "Green," the status has been reset. 23 Water Filter Status on the user interface prompts you should hear a click as tested by pushing on the Ice & Water Dispenser control panel for three seconds. More about four minutes. 8 Turn On the ice maker. 9 Press and hold the Water Filter button on the...

Complete Owner s Guide
Page 26
... to clean smooth doors. • Soap and water • Stainless Steel Cleaners Never use a dry cloth to clean stainless steel. NOTE: Always clean, wipe and dry with sudsy cloth or sponge. CARE & CLEANING Part Interior & Door Liners Door Gaskets Drawers & Bins Glass Shelves Toe Grille Exterior & Handles Exterior & Handles (Stainless Steel Models Only) Replacing LED Bulbs Care & Cleaning Tips What To Use Tips and Precautions • Soap and water • Baking soda and water Use two tablespoons of baking soda in warm water...
... to clean smooth doors. • Soap and water • Stainless Steel Cleaners Never use a dry cloth to clean stainless steel. NOTE: Always clean, wipe and dry with sudsy cloth or sponge. CARE & CLEANING Part Interior & Door Liners Door Gaskets Drawers & Bins Glass Shelves Toe Grille Exterior & Handles Exterior & Handles (Stainless Steel Models Only) Replacing LED Bulbs Care & Cleaning Tips What To Use Tips and Precautions • Soap and water • Baking soda and water Use two tablespoons of baking soda in warm water...
Complete Owner s Guide
Page 27
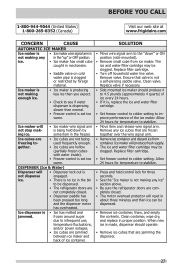
... water filter cartridge may be dispensed. • Remove ice container, thaw, and empty the contents. Remove valve. Remove any ice cubes that are frozen together over the wire signal arm. • Remove ice container and discard ice from ice maker. Allow 24 hours for temperature to colder setting. Ice maker will reset in the freezer. Clean container, wipe dry, and replace in the bin to see if water dispenser is dispensing slower than normal. • Freezer control is set too warm. When new ice...
... water filter cartridge may be dispensed. • Remove ice container, thaw, and empty the contents. Remove valve. Remove any ice cubes that are frozen together over the wire signal arm. • Remove ice container and discard ice from ice maker. Allow 24 hours for temperature to colder setting. Ice maker will reset in the freezer. Clean container, wipe dry, and replace in the bin to see if water dispenser is dispensing slower than normal. • Freezer control is set too warm. When new ice...
Complete Owner s Guide
Page 28
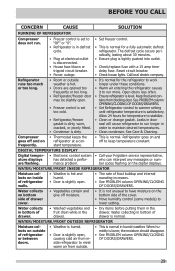
... other door to open . • Press and hold control lock for a reverse osmosis system to cup or container before dispensing water OPENING/CLOSING OF DOORS/DRAWERS Door(s) will not dispense water. • Dispenser lock out is engaged. • Water filter not seated properly. • Water filter is clogged. • Household water line valve is level and solid, and can adequately support the refrigerator. Be sure to push the filter firmly so that supplies water to cold water line that...
... other door to open . • Press and hold control lock for a reverse osmosis system to cup or container before dispensing water OPENING/CLOSING OF DOORS/DRAWERS Door(s) will not dispense water. • Dispenser lock out is engaged. • Water filter not seated properly. • Water filter is clogged. • Household water line valve is level and solid, and can adequately support the refrigerator. Be sure to push the filter firmly so that supplies water to cold water line that...
Complete Owner s Guide
Page 29
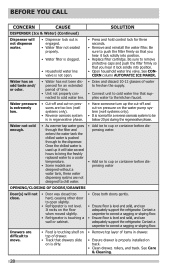
... maintain desired temperatures. • Clean condenser. WATER/MOISTURE/FROST OUTSIDE REFRIGERATOR Moisture collects on refrigerator at electrical outlet is disconnected. • House fuse blown or tripped circuit breaker. • Power outage. • Set freezer control. • This is lower, the moisture should disappear. • See PROBLEM column OPENING/CLOSING OF DOORS/DRAWERS. 29 Compressor • Thermostat keeps the goes off to stabilize. • Clean or change gasket. Reset circuit breaker...
... maintain desired temperatures. • Clean condenser. WATER/MOISTURE/FROST OUTSIDE REFRIGERATOR Moisture collects on refrigerator at electrical outlet is disconnected. • House fuse blown or tripped circuit breaker. • Power outage. • Set freezer control. • This is lower, the moisture should disappear. • See PROBLEM column OPENING/CLOSING OF DOORS/DRAWERS. 29 Compressor • Thermostat keeps the goes off to stabilize. • Clean or change gasket. Reset circuit breaker...

Complete Owner s Guide
Page 30
...; Food loss due to repair or replace appliance light bulbs, air filters, water filters, other consumables, or knobs, handles, or other appropriate payment record to any obligations under this warranty must be obtained by contacting Electrolux at the addresses or phone numbers below. Service calls to any refrigerator or freezer failures. 6. or external causes such as removal of trim, cupboards, shelves, etc., which do not involve...
...; Food loss due to repair or replace appliance light bulbs, air filters, water filters, other consumables, or knobs, handles, or other appropriate payment record to any obligations under this warranty must be obtained by contacting Electrolux at the addresses or phone numbers below. Service calls to any refrigerator or freezer failures. 6. or external causes such as removal of trim, cupboards, shelves, etc., which do not involve...
Wiring Diagram
Page 1
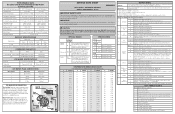
... Hertz Thermostat Heater Wattage Opens at 48ºF (9ºC) Closes at 15ºF (-9ºC) 165 ICE MAKER PLUG CONNECTIONS Wire Number Wire Color Connect to 20cc (.68 oz.). The correct fill is blank when selecting test. SERVICE DATA SHEET ICE & WATER - AUTOMATIC DEFROST SIDE BY SIDE MODELS - Disconnect power cord before servicing this test to aide in evaluation of electrical shock. IMPORTANT If any green grounding wires are no errors, displays "-" on single digit and "- -" on evaporator fan, displays...
... Hertz Thermostat Heater Wattage Opens at 48ºF (9ºC) Closes at 15ºF (-9ºC) 165 ICE MAKER PLUG CONNECTIONS Wire Number Wire Color Connect to 20cc (.68 oz.). The correct fill is blank when selecting test. SERVICE DATA SHEET ICE & WATER - AUTOMATIC DEFROST SIDE BY SIDE MODELS - Disconnect power cord before servicing this test to aide in evaluation of electrical shock. IMPORTANT If any green grounding wires are no errors, displays "-" on single digit and "- -" on evaporator fan, displays...
Wiring Diagram
Page 2
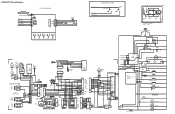
A02644901 Wiring Diagram ICE & WATER CONTROL BOARD DISPENSER HOUSING HEATER PURPLE (CUBE) BLUE/WHT (LINE) LT. SWITCH TAN/BLK WHT NC NO RED DISPENSER LED ICE DISP. MOTOR 6 3 S 2 5 * M L1 PTC STARTER CAPACITOR IS ONLY USED WITH * SOME P.T.C. FAN LIGHT COMPRESSOR GROUND LT. YELLOW WATER DISPENSER VALVE GREEN I /M WATER VALVE MAIN WATER VALVE DISPENSER WATER VALVE ACTUATOR,ICE DOOR MOTOR,AUGER HEATER,ICE DOOR MID LEVEL LIGHT CRISPER LIGHT RED/BLK PURP/WHITE COMP GRN/YEL LT.BLUE DAMPER SW MOTOR FREEZER LIGHT / SAFETY SWITCH REFRIG. FAN DEFROST HEATER LT. BLU ...
A02644901 Wiring Diagram ICE & WATER CONTROL BOARD DISPENSER HOUSING HEATER PURPLE (CUBE) BLUE/WHT (LINE) LT. SWITCH TAN/BLK WHT NC NO RED DISPENSER LED ICE DISP. MOTOR 6 3 S 2 5 * M L1 PTC STARTER CAPACITOR IS ONLY USED WITH * SOME P.T.C. FAN LIGHT COMPRESSOR GROUND LT. YELLOW WATER DISPENSER VALVE GREEN I /M WATER VALVE MAIN WATER VALVE DISPENSER WATER VALVE ACTUATOR,ICE DOOR MOTOR,AUGER HEATER,ICE DOOR MID LEVEL LIGHT CRISPER LIGHT RED/BLK PURP/WHITE COMP GRN/YEL LT.BLUE DAMPER SW MOTOR FREEZER LIGHT / SAFETY SWITCH REFRIG. FAN DEFROST HEATER LT. BLU ...
Product Specifications Sheet
Page 2
... Number of Dispenser Buttons 4 Crushed Ice / Cube Ice / Water Yes / Yes / Yes Ice Option / Freeze Option Display On / Off Option Lock / Light No / Yes Temp / Door Ajar / Power Failure Alerts Water Filter Change Indicator Light Yes Air Filter Change Indicator Light Refrigerator Features Standard A Interior Lighting LED Refrigerator Depth Water Filter Type PureSource 3® vs. Standard-Depth Features Door Design Door Handle Design Cabinet Finish Door Stops / Door Closers Door Hinge Covers Rollers - Ft.) Freezer Capacity (Cu. Ft.) Power Supply Connection Location...
... Number of Dispenser Buttons 4 Crushed Ice / Cube Ice / Water Yes / Yes / Yes Ice Option / Freeze Option Display On / Off Option Lock / Light No / Yes Temp / Door Ajar / Power Failure Alerts Water Filter Change Indicator Light Yes Air Filter Change Indicator Light Refrigerator Features Standard A Interior Lighting LED Refrigerator Depth Water Filter Type PureSource 3® vs. Standard-Depth Features Door Design Door Handle Design Cabinet Finish Door Stops / Door Closers Door Hinge Covers Rollers - Ft.) Freezer Capacity (Cu. Ft.) Power Supply Connection Location...

Product Specifications Sheet
Page 3
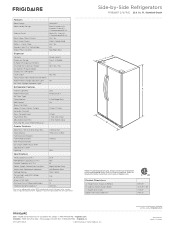
... plumbing / electrical connections. • Remove all wall / floor molding prior to household water supply line plus 7 additional feet. Standard-Depth A C B "Built-In Look"Cutout Dimensions (A) 70 1/4" (B) 36" (C) 287/8" Top View Recessed water line Recessed electrical outlet 24" Cabinet Allow 1" min. Optional Water Supply Installation Kits available. Specifications subject to allow for proper air circulation and water / electrical connections 287/8" Side Panels, 1/2" min. Cold water line must be grounded for safe operation.) • Amps @ 120 Volts = 8.5 Amps •...
... plumbing / electrical connections. • Remove all wall / floor molding prior to household water supply line plus 7 additional feet. Standard-Depth A C B "Built-In Look"Cutout Dimensions (A) 70 1/4" (B) 36" (C) 287/8" Top View Recessed water line Recessed electrical outlet 24" Cabinet Allow 1" min. Optional Water Supply Installation Kits available. Specifications subject to allow for proper air circulation and water / electrical connections 287/8" Side Panels, 1/2" min. Cold water line must be grounded for safe operation.) • Amps @ 120 Volts = 8.5 Amps •...


