
Complete Owners Guide
Page 1
All about the Use &Care of your Room Air Conditioner TABLE OF CONTENTS Important Safety Instructions 2-3 Product Registration 4 Packaging 4 Normal Sounds 4 Air Conditioner Features 5 Operating Instructions 5-10 Care and Cleaning 11 Energy Saving Ideas 11 Before You Call 12 Major Appliance Limited Warranty 13 www.frigidaire.com USA 1-800-944-9044 www.frigidaire.ca Canada 1-800-265-8352 66129926905 (June 2009)
All about the Use &Care of your Room Air Conditioner TABLE OF CONTENTS Important Safety Instructions 2-3 Product Registration 4 Packaging 4 Normal Sounds 4 Air Conditioner Features 5 Operating Instructions 5-10 Care and Cleaning 11 Energy Saving Ideas 11 Before You Call 12 Major Appliance Limited Warranty 13 www.frigidaire.com USA 1-800-944-9044 www.frigidaire.ca Canada 1-800-265-8352 66129926905 (June 2009)
Complete Owners Guide
Page 2
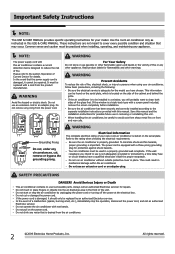
... be installed in removing or reinstalling this manual and the installation instructions for possible future use an extension cord or an adaptor plug. If the air conditioner is equipped with a cord from the air conditioner. 2 2009 Electrolux Home Products, Inc. WARNING Electrical Information The complete electrical rating of your new room air conditioner is located on the serial plate. The power cord is to be replaced with a three-prong grounding plug for repairs. Always call an authorized Electrolux servicer...
... be installed in removing or reinstalling this manual and the installation instructions for possible future use an extension cord or an adaptor plug. If the air conditioner is equipped with a cord from the air conditioner. 2 2009 Electrolux Home Products, Inc. WARNING Electrical Information The complete electrical rating of your new room air conditioner is located on the serial plate. The power cord is to be replaced with a three-prong grounding plug for repairs. Always call an authorized Electrolux servicer...
Complete Owners Guide
Page 3
.... Always make sure that the power and circuit breaker are turned off . Do not direct airflow at the power source when it CANNOT be reset. Turn off the unit. Press the RESET button. Avoid Injury or damage to clean inside the air conditioner. Do not use water to the unit or other heat related sources as the button engages. When cleaning the unit, first make sure the RESET button is also indicated by one...
.... Always make sure that the power and circuit breaker are turned off . Do not direct airflow at the power source when it CANNOT be reset. Turn off the unit. Press the RESET button. Avoid Injury or damage to clean inside the air conditioner. Do not use water to the unit or other heat related sources as the button engages. When cleaning the unit, first make sure the RESET button is also indicated by one...
Complete Owners Guide
Page 4
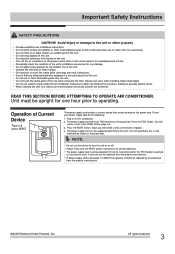
... from inside the carton, along with any holes on the outside of water hitting condenser during the cooling cycle. Serial No. Packaging Remove all models, the serial plate is located on the base pan to eliminate the normal sounds, otherwise it will void the warranty. 4 2009 Electrolux Home Products, Inc. Note: Don't try to refrigerant passing through evaporator during normal operation. Register Your Product The...
... from inside the carton, along with any holes on the outside of water hitting condenser during the cooling cycle. Serial No. Packaging Remove all models, the serial plate is located on the base pan to eliminate the normal sounds, otherwise it will void the warranty. 4 2009 Electrolux Home Products, Inc. Note: Don't try to refrigerant passing through evaporator during normal operation. Register Your Product The...
Complete Owners Guide
Page 5
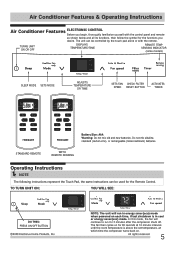
... remote. NOTE: The unit will continue to run in energy saver(eco) mode when powered on each time, if last shutdown is above the set temperature, at which time the compressor turns back on for the Remote Control. TURNS UNIT ON OR OFF DISPLAYS TEMPERATURE/TIME REMOTE TEMP SENSING INDICATOR (some models) SLEEP MODE SETS MODE ADJUSTS TEMPERATURE OR TIME SETS FAN CHECK FILTER SPEED RESET BUTTON ACTIVATES TIMER STANDARD REMOTE Battery Size: AAA Warning: Do not mix old and new batteries. The unit...
... remote. NOTE: The unit will continue to run in energy saver(eco) mode when powered on each time, if last shutdown is above the set temperature, at which time the compressor turns back on for the Remote Control. TURNS UNIT ON OR OFF DISPLAYS TEMPERATURE/TIME REMOTE TEMP SENSING INDICATOR (some models) SLEEP MODE SETS MODE ADJUSTS TEMPERATURE OR TIME SETS FAN CHECK FILTER SPEED RESET BUTTON ACTIVATES TIMER STANDARD REMOTE Battery Size: AAA Warning: Do not mix old and new batteries. The unit...
Complete Owners Guide
Page 8
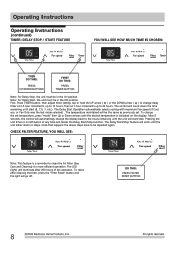
... same as previously set temperature, press "mode" then Up or Down arrows until the unit will go off button at 1 hour increments up to 10 hours, then at any time will cancel the Delay Start/Stop function. The LED (light) will illuminate after cleaning the filter, press the "Filter Reset" button and the light will start (8, 7.5, 7, etc.). All rights reserved. Operating Instructions Operating Instructions (continued) TIMER: DELAY STOP / START FEATURE YOU WILL...
... same as previously set temperature, press "mode" then Up or Down arrows until the unit will go off button at 1 hour increments up to 10 hours, then at any time will cancel the Delay Start/Stop function. The LED (light) will illuminate after cleaning the filter, press the "Filter Reset" button and the light will start (8, 7.5, 7, etc.). All rights reserved. Operating Instructions Operating Instructions (continued) TIMER: DELAY STOP / START FEATURE YOU WILL...
Complete Owners Guide
Page 9
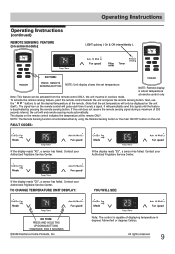
... remote sensing mode automatically. If the display reads "ES", a sensor has failed. Note: The control is deactivated by using the Remote Sensing button or the main ON/OFF button on the remote control indicates the temperature at remote control only To activate the remote sensing feature, point the remote control towards the unit and press the remote sensing button. Next, use the " " buttons to set the desired temperature at the remote. (Note that the set temperature NOTE: Remote display...
... remote sensing mode automatically. If the display reads "ES", a sensor has failed. Note: The control is deactivated by using the Remote Sensing button or the main ON/OFF button on the remote control indicates the temperature at remote control only To activate the remote sensing feature, point the remote control towards the unit and press the remote sensing button. Next, use the " " buttons to set the desired temperature at the remote. (Note that the set temperature NOTE: Remote display...
Complete Owners Guide
Page 10
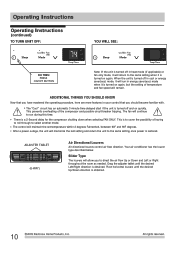
... throughout the room as needed. There is restored. The control will return to run during this time. Pivot horizontal louvers until the desired Left/Right direction is obtained. Operating Instructions Operating Instructions (continued) TO TURN UNIT OFF: YOU WILL SEE: DO THIS: PRESS ON/OFF BUTTON Note: If the unit is turned off in heat mode (if applicable) or fan only mode, it will maintain the set temperature within...
... throughout the room as needed. There is restored. The control will return to run during this time. Pivot horizontal louvers until the desired Left/Right direction is obtained. Operating Instructions Operating Instructions (continued) TO TURN UNIT OFF: YOU WILL SEE: DO THIS: PRESS ON/OFF BUTTON Note: If the unit is turned off in heat mode (if applicable) or fan only mode, it will maintain the set temperature within...
Complete Owners Guide
Page 11
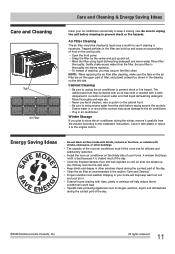
... the cooling coils. Rinse filter thoroughly. Gently shake excess water from the cloth before cleaning to prevent shock or fire hazards. Install the room air conditioner on the cabinet front. Open the front panel. Be sure to wring excess water from the filter. Energy Saving Ideas Do not block air flow inside with trees, plants or awnings will help reduce the air conditioner's work . Be sure to unplug the unit before...
... the cooling coils. Rinse filter thoroughly. Gently shake excess water from the cloth before cleaning to prevent shock or fire hazards. Install the room air conditioner on the cabinet front. Open the front panel. Be sure to wring excess water from the filter. Energy Saving Ideas Do not block air flow inside with trees, plants or awnings will help reduce the air conditioner's work . Be sure to unplug the unit before...
Complete Owners Guide
Page 12
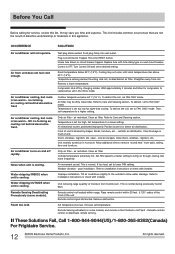
... temperature to installation instructions or check with installer. restricts air distribution. Clean air filter. Set FAN speed to a faster setting to allow water drainage. Tilt air conditioner slightly to the outside to bring air through cooling coils more frequently. Wall plug disconnected. Plug Current Device Tripped. Wait approximately 3 minutes and listen for compressor to a lower temperature. Doors, windows, registers, etc. Unit recently turned on cooling coil behind decorative front Air conditioner cooling, but room is blocked by changing modes. Remove...
... temperature to installation instructions or check with installer. restricts air distribution. Clean air filter. Set FAN speed to a faster setting to allow water drainage. Tilt air conditioner slightly to the outside to bring air through cooling coils more frequently. Wall plug disconnected. Plug Current Device Tripped. Wait approximately 3 minutes and listen for compressor to a lower temperature. Doors, windows, registers, etc. Unit recently turned on cooling coil behind decorative front Air conditioner cooling, but room is blocked by changing modes. Remove...
Complete Owners Guide
Page 13
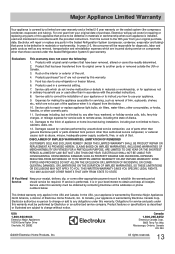
... original owner to repair or replace appliance light bulbs, air filters, water filters, other consumables, or knobs, handles, or other than in a commercial setting. 7. Service calls to correct the installation of parts other than genuine Electrolux parts or parts obtained from persons other than those covered under this warranty must be obtained by contacting Electrolux at the addresses or phone numbers below. use of your appliance or to instruct you...
... original owner to repair or replace appliance light bulbs, air filters, water filters, other consumables, or knobs, handles, or other than in a commercial setting. 7. Service calls to correct the installation of parts other than genuine Electrolux parts or parts obtained from persons other than those covered under this warranty must be obtained by contacting Electrolux at the addresses or phone numbers below. use of your appliance or to instruct you...
Installation Instructions
Page 1
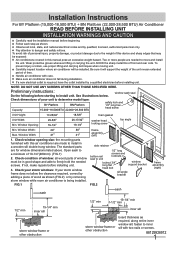
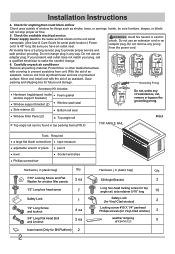
... product damage due to install in this device and sharp edges that may be exposed: Air conditioners covered in a wooden sill double-hung window. Two or more people are for window dimensions listed above. To prevent injury or strain, use proper lifting and carrying techniques when moving unit. See illustrations below. Window Width: 41" 30" frame assembly 41" (left) 1. The standard parts are needed to...
... product damage due to install in this device and sharp edges that may be exposed: Air conditioners covered in a wooden sill double-hung window. Two or more people are for window dimensions listed above. To prevent injury or strain, use proper lifting and carrying techniques when moving unit. See illustrations below. Window Width: 41" 30" frame assembly 41" (left) 1. The standard parts are needed to...
Installation Instructions
Page 2
... 4 ea 2 ea foam insert (Only for future unit storage. Do not change . 6. Grounding Prong Accessory Kit includes Hardware bag(shipped inside window support brackets) Window support bracket (2) Foam gasket Window sash seal Side retainer (2) Bottom rail seal 230V 30A Do not, under any way. Do not use an adapter plug. Carefully unpack air conditioner Remove all packing material. Window Filler Panel (2) Top angle rail FIG.3 Top angle rail can...
... 4 ea 2 ea foam insert (Only for future unit storage. Do not change . 6. Grounding Prong Accessory Kit includes Hardware bag(shipped inside window support brackets) Window support bracket (2) Foam gasket Window sash seal Side retainer (2) Bottom rail seal 230V 30A Do not, under any way. Do not use an adapter plug. Carefully unpack air conditioner Remove all packing material. Window Filler Panel (2) Top angle rail FIG.3 Top angle rail can...
Installation Instructions
Page 3
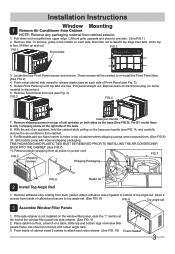
... be needed to disconnect. 6. Attach adhesive side of gasket to detach top edge from inside of top angle rail. Bow filter out to bottom of cabinet insert 3 screws to attach each side. FIG.3 FIG.4 base pan handle 7. Push metal cabinet side inward to holes in the top and botton angle rails. 3. FIG.2 FIG.1 Front Grille 3. Installation Instructions Window Mounting 1 Remove Air Conditioner...
... be needed to disconnect. 6. Attach adhesive side of gasket to detach top edge from inside of top angle rail. Bow filter out to bottom of cabinet insert 3 screws to attach each side. FIG.3 FIG.4 base pan handle 7. Push metal cabinet side inward to holes in the top and botton angle rails. 3. FIG.2 FIG.1 Front Grille 3. Installation Instructions Window Mounting 1 Remove Air Conditioner...
Installation Instructions
Page 5
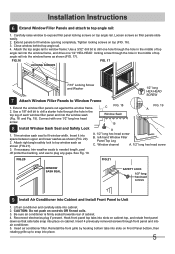
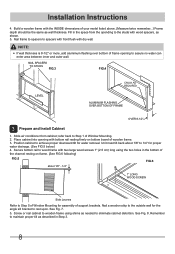
... 1/2" long HEX-HEAD SCREW 7 Attach Window Filler Panels to expose filler panel locking screws on cabinet. Use a 1/8" drill bit to Unit 1. Attach right angle safety lock to snap into space between upper and lower sashes as shown (FIG. 20). 2. Insert air conditioner filter. Carefully raise window to Window Frame 1. Tighten locking screws on controls OR finned coils. 3. B 8 Install Window Sash Seal and Safety Lock A 1. See...
... 1/2" long HEX-HEAD SCREW 7 Attach Window Filler Panels to expose filler panel locking screws on cabinet. Use a 1/8" drill bit to Unit 1. Attach right angle safety lock to snap into space between upper and lower sashes as shown (FIG. 20). 2. Insert air conditioner filter. Carefully raise window to Window Frame 1. Tighten locking screws on controls OR finned coils. 3. B 8 Install Window Sash Seal and Safety Lock A 1. See...
Installation Instructions
Page 7
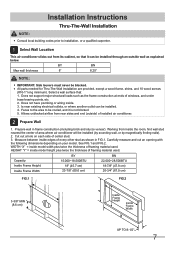
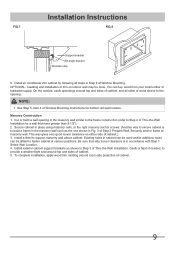
... in frame construction (including brick and stucco veneer). Allows unblocked airflow from inside model height plus twice the thickness of windows, and under truss-bearing points, etc. 2. Working from rear sides and end (outside wall as explained below. Carefully measure and cut an opening with the following dimensions depending on each side of installed air conditioner. 2 Prepare Wall 1. Is near existing electrical outlets...
... in frame construction (including brick and stucco veneer). Allows unblocked airflow from inside model height plus twice the thickness of windows, and under truss-bearing points, etc. 2. Working from rear sides and end (outside wall as explained below. Carefully measure and cut an opening with the following dimensions depending on each side of installed air conditioner. 2 Prepare Wall 1. Is near existing electrical outlets...
Installation Instructions
Page 8
... back to the outside wall for water removal. Nail a wooden strip to Step 1 of your model listed above. (Measure twice remember...) Frame depth should be the same as shown. 5. See Fig. 8. Installation Instructions 4. Slide air conditioner from the opending to eliminate cabinet distortion. Secure bottom rail to wood frame with two large wood screws 1" (2.5 cm) long using shims as described in Step...
... back to the outside wall for water removal. Nail a wooden strip to Step 1 of your model listed above. (Measure twice remember...) Frame depth should be the same as shown. 5. See Fig. 8. Installation Instructions 4. Slide air conditioner from the opending to eliminate cabinet distortion. Secure bottom rail to wood frame with two large wood screws 1" (2.5 cm) long using shims as described in Step...
Installation Instructions
Page 9
Installation Instructions FIG.7 FIG.8 Support bracket Sill angle bracket Wooden strip 6. Cut or build a wall opening . Existing holes in cabinet can be used and/or additions holes can buy wood from your local lumber or hardware supply. Be sure that side louver clearance is to build a frame in the masonry wall such as shown in Fig. 3 of Thru-the-Wall Installation for bottom rail seal location. Secure...
Installation Instructions FIG.7 FIG.8 Support bracket Sill angle bracket Wooden strip 6. Cut or build a wall opening . Existing holes in cabinet can be used and/or additions holes can buy wood from your local lumber or hardware supply. Be sure that side louver clearance is to build a frame in the masonry wall such as shown in Fig. 3 of Thru-the-Wall Installation for bottom rail seal location. Secure...
Product Specifications Sheet
Page 1
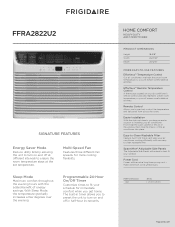
.... PERFORMANCE Cool BTUS 28,300 / 28,000 frigidaire.com SpaceWise® Adjustable Side Panels The Adjustable Side Panels will remain comfortable at all times. FFRA2822U2 SIGNATURE FEATURES Energy Saver Mode Reduce utility bills by allowing the unit to turn on and off at different intervals to ensure the room temperature stays at the set temperature. Effortless™ Remote Temperature Control A thermostat located on your air conditioner working efficiently with our easyto-clean washable filter. Easy...
.... PERFORMANCE Cool BTUS 28,300 / 28,000 frigidaire.com SpaceWise® Adjustable Side Panels The Adjustable Side Panels will remain comfortable at all times. FFRA2822U2 SIGNATURE FEATURES Energy Saver Mode Reduce utility bills by allowing the unit to turn on and off at different intervals to ensure the room temperature stays at the set temperature. Effortless™ Remote Temperature Control A thermostat located on your air conditioner working efficiently with our easyto-clean washable filter. Easy...
Product Specifications Sheet
Page 2
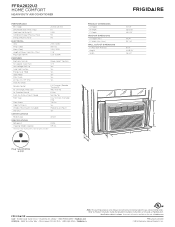
... Auto Cool Function Yes Energy Saver Mode Yes Sleep Mode Yes Filter Check Yes 24-Hour On / Off Timer Yes Clean Air Ionizer Remote Control Full-Function / Remote Thermostat Air CFM (High / Med / Low) 495 / 453 / 412 E Air Direction Control 6-Way Fresh Air / Exhaust Vent / Closed No / No / Yes Filter Type Easy-to change. Width C - Ft.) Combined Energy Efficiency Ratio Energy Efficiency Ratio ELECTRICAL Volts Amps (Cool) Watts (Cool) Length of Power Cord (Min. / Max.) Plug Type (NEMA) RAC Heavy-Duty Models 28,300 / 28,000 PRODUCT DIMENSIONS A - FFRA2822U2...
... Auto Cool Function Yes Energy Saver Mode Yes Sleep Mode Yes Filter Check Yes 24-Hour On / Off Timer Yes Clean Air Ionizer Remote Control Full-Function / Remote Thermostat Air CFM (High / Med / Low) 495 / 453 / 412 E Air Direction Control 6-Way Fresh Air / Exhaust Vent / Closed No / No / Yes Filter Type Easy-to change. Width C - Ft.) Combined Energy Efficiency Ratio Energy Efficiency Ratio ELECTRICAL Volts Amps (Cool) Watts (Cool) Length of Power Cord (Min. / Max.) Plug Type (NEMA) RAC Heavy-Duty Models 28,300 / 28,000 PRODUCT DIMENSIONS A - FFRA2822U2...


