
Complete Owners Guide
Page 1
All about the Use &Care of your Microwave Oven A06823420 (January, 2020) TABLE OF CONTENTS WELCOME & CONGRATULATIONS 2 IMPORTANT SAFETY INSTRUCTIONS 2 PART NAMES 8 CONTROL PANEL 9 BEFORE OPERATING 10 MANUAL COOKING 11 AUTO COOKING 17 COOKING CHARTS 19 CONVENIENT FEATURES 21 CLEANING AND CARE 23 SERVICE CALL CHECK 27 SPECIFICATIONS 27 WARRANTY 28 www.frigidaire.com USA 1-800-374-4432 www.frigidaire.ca Canada 1-800-265-8352
All about the Use &Care of your Microwave Oven A06823420 (January, 2020) TABLE OF CONTENTS WELCOME & CONGRATULATIONS 2 IMPORTANT SAFETY INSTRUCTIONS 2 PART NAMES 8 CONTROL PANEL 9 BEFORE OPERATING 10 MANUAL COOKING 11 AUTO COOKING 17 COOKING CHARTS 19 CONVENIENT FEATURES 21 CLEANING AND CARE 23 SERVICE CALL CHECK 27 SPECIFICATIONS 27 WARRANTY 28 www.frigidaire.com USA 1-800-374-4432 www.frigidaire.ca Canada 1-800-265-8352

Complete Owners Guide
Page 2
...proud of life. These instructions are completely committed to help you can do need service, you use and maintain your microwave oven properly. Visit the Frigidaire Web Site at 1-800-374-4432, 24 hours a day, 7 days a week. It contains instructions to providing you with the safety interlocks....reference. Use your microwave oven only as instructed in the back of toll-free customer service numbers is damaged. A list of this manual. It is our number one priority. We hope you the Microwave Oven. Common sense and caution must be adjusted or repaired by ...
...proud of life. These instructions are completely committed to help you can do need service, you use and maintain your microwave oven properly. Visit the Frigidaire Web Site at 1-800-374-4432, 24 hours a day, 7 days a week. It contains instructions to providing you with the safety interlocks....reference. Use your microwave oven only as instructed in the back of toll-free customer service numbers is damaged. A list of this manual. It is our number one priority. We hope you the Microwave Oven. Common sense and caution must be adjusted or repaired by ...
Complete Owners Guide
Page 3
..., coffee or tea are placed inside the microwave oven ignite, keep microwave oven door closed, turn the fan on page 5. • Install or locate this manual. Remove wire twist-ties from paper or plastic bags before and halfway through heating it is the safety alert symbol. Do not use the cavity...
..., coffee or tea are placed inside the microwave oven ignite, keep microwave oven door closed, turn the fan on page 5. • Install or locate this manual. Remove wire twist-ties from paper or plastic bags before and halfway through heating it is the safety alert symbol. Do not use the cavity...
Complete Owners Guide
Page 5
... recommended that there are a 120 volt 60 Hz, AC only, 15 amp. This microwave oven is chosen. Read enclosures and SAVE the Use and Care Manual. Electrical Requirements Check Installation Instructions for proper location for more details. Check to observe the correct electrical connection procedures. The electrical requirements are Installation Instructions...
... recommended that there are a 120 volt 60 Hz, AC only, 15 amp. This microwave oven is chosen. Read enclosures and SAVE the Use and Care Manual. Electrical Requirements Check Installation Instructions for proper location for more details. Check to observe the correct electrical connection procedures. The electrical requirements are Installation Instructions...
Complete Owners Guide
Page 6
... time. Doneness signs include: - General • Cut baked goods with small flat edge. - IMPORTANT SAFETY INSTRUCTIONS ABOUT YOUR MICROWAVE OVEN This Use and Care Manual is valuable: read it carefully and always save it for microwave cooking principles, techniques, hints and recipes. Check it for the shortest amount of moisture...
... time. Doneness signs include: - General • Cut baked goods with small flat edge. - IMPORTANT SAFETY INSTRUCTIONS ABOUT YOUR MICROWAVE OVEN This Use and Care Manual is valuable: read it carefully and always save it for microwave cooking principles, techniques, hints and recipes. Check it for the shortest amount of moisture...
Complete Owners Guide
Page 11
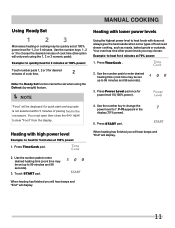
... selected within 5 minutes of food need slower cooking, such as roasts, baked goods or custards. Press START pad. When heating has finished you may choose. MANUAL COOKING Using Ready Set Heating with lower power levels Microwave heating or cooking may be quickly set at 100% power level for 4 minutes at 70...
... selected within 5 minutes of food need slower cooking, such as roasts, baked goods or custards. Press START pad. When heating has finished you may choose. MANUAL COOKING Using Ready Set Heating with lower power levels Microwave heating or cooking may be quickly set at 100% power level for 4 minutes at 70...

Complete Owners Guide
Page 12
... display (50 % power). 2. Start cooking for cooking. Cancel timer setting process. 3. Using the +10 sec /+ 30 sec key 5. P-50 appears in the display (80 % power). 5. MANUAL COOKING Heating with multiple cooking stages Using the Stop/Cancel key For best results, some microwave recipes call for different power levels or different lengths...
... display (50 % power). 2. Start cooking for cooking. Cancel timer setting process. 3. Using the +10 sec /+ 30 sec key 5. P-50 appears in the display (80 % power). 5. MANUAL COOKING Heating with multiple cooking stages Using the Stop/Cancel key For best results, some microwave recipes call for different power levels or different lengths...

Complete Owners Guide
Page 13
... this time open the door and turn the food if needed and remove any weight from 0.1 to 6.0lbs. 2. Press Defrost pad twice. 0:00 will display. MANUAL COOKING Setting Defrost (by Time) Example: to defrost food with the default power level and cook time determined automatically: 1.
... this time open the door and turn the food if needed and remove any weight from 0.1 to 6.0lbs. 2. Press Defrost pad twice. 0:00 will display. MANUAL COOKING Setting Defrost (by Time) Example: to defrost food with the default power level and cook time determined automatically: 1.

Complete Owners Guide
Page 14
....) After each stage, remove any warm or thawed portions of food, shield them with narrow strips of aluminum foil. After each stage, rearrange the food. MANUAL COOKING Defrosting tips • When using the defrost weight feature, the weight entered should always be thawed is stored outside the freezer for up to...
....) After each stage, remove any warm or thawed portions of food, shield them with narrow strips of aluminum foil. After each stage, rearrange the food. MANUAL COOKING Defrosting tips • When using the defrost weight feature, the weight entered should always be thawed is stored outside the freezer for up to...

Complete Owners Guide
Page 15
KEY 1 2 1 2 3 1 2 1 2 15 Press START pad. Then press 2 number pad, cook time will appear in the display . 2. MANUAL COOKING Reheat The reheat feature provides 3 quick preset settings based on serving size to melt 8 oz. of food. 24oz will appear in the display (see ...
KEY 1 2 1 2 3 1 2 1 2 15 Press START pad. Then press 2 number pad, cook time will appear in the display . 2. MANUAL COOKING Reheat The reheat feature provides 3 quick preset settings based on serving size to melt 8 oz. of food. 24oz will appear in the display (see ...

Complete Owners Guide
Page 16
... sauces. 2 20 % • Softening butter & cream cheese. • Heating small amounts of food. • Natural moisture Very moist foods cook more evenly when cooked together. MANUAL COOKING Suggested power levels for cooking The 10 power levels available with foil or a casserole lid and let it is not necessary. • Turn over...
... sauces. 2 20 % • Softening butter & cream cheese. • Heating small amounts of food. • Natural moisture Very moist foods cook more evenly when cooked together. MANUAL COOKING Suggested power levels for cooking The 10 power levels available with foil or a casserole lid and let it is not necessary. • Turn over...
Installation Instructions
Page 5
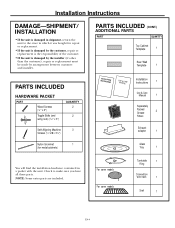
... Screws (1⁄4" x 2") Toggle Bolts (and wing nuts) (3⁄16" x 3") QUANTITY 2 2 Self-Aligning Machine 3 Screws (1⁄4"-28 x 31⁄4") ININSSTTRAULCLTAITOIONNS UMSEAN&UCAALRE Installation Instructions 1 Use & Care Manual 1 Separately Packed Grease 2 Filters Exhaust adaptor 1 Nylon Grommet 1 (for metal cabinets) Glass Tray 1 You will find the installation hardware contained in which it was bought...
... Screws (1⁄4" x 2") Toggle Bolts (and wing nuts) (3⁄16" x 3") QUANTITY 2 2 Self-Aligning Machine 3 Screws (1⁄4"-28 x 31⁄4") ININSSTTRAULCLTAITOIONNS UMSEAN&UCAALRE Installation Instructions 1 Use & Care Manual 1 Separately Packed Grease 2 Filters Exhaust adaptor 1 Nylon Grommet 1 (for metal cabinets) Glass Tray 1 You will find the installation hardware contained in which it was bought...
Installation Instructions
Page 25
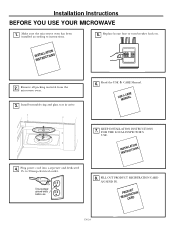
... to 20-amp electrical outlet. FILL OUT PRODUCT REGISTRATION CARD AN SEND IN. Remove all packing material from the microwave oven. 3. Read the USE & CARE Manual. KEEP INSTALLATION INSTRUCTIONS FOR THE LOCAL INSPECTOR'S USE. D RPEGROISDCTUARCRATDTION D D G D G EN-24 Install turntable ring and glass tray in cavity. 6. Installation Instructions BEFORE YOU USE YOUR...
... to 20-amp electrical outlet. FILL OUT PRODUCT REGISTRATION CARD AN SEND IN. Remove all packing material from the microwave oven. 3. Read the USE & CARE Manual. KEEP INSTALLATION INSTRUCTIONS FOR THE LOCAL INSPECTOR'S USE. D RPEGROISDCTUARCRATDTION D D G D G EN-24 Install turntable ring and glass tray in cavity. 6. Installation Instructions BEFORE YOU USE YOUR...


