
Complete Owners Guide
Page 3
... both before removing the container. - Remove wire twist-ties from heated surfaces. • Do not let cord hang over edge of table or counter. • See door surface cleaning instructions on page 23. • To reduce the risk of microwave oven is the safety alert symbol. Do not leave paper products, cooking utensils or food in the cavity when not in the microwave oven cavity: - Do...
... both before removing the container. - Remove wire twist-ties from heated surfaces. • Do not let cord hang over edge of table or counter. • See door surface cleaning instructions on page 23. • To reduce the risk of microwave oven is the safety alert symbol. Do not leave paper products, cooking utensils or food in the cavity when not in the microwave oven cavity: - Do...
Complete Owners Guide
Page 5
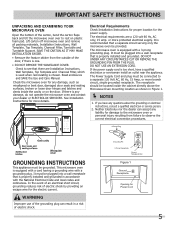
... NOT REMOVE THE WAVEGUIDE COVER. Figure 1 Ground Receptacle Opening for the electric current. Lift carton off microwave oven and remove all packing materials, Installation Instructions, Wall Template, Top Template, Charcoal Filter, Turntable and Turntable Support. SAVE THE CARTON AS IT MAY MAKE INSTALLATION EASIER. • Remove the feature sticker from failure to rest on the door. NOTES 1. The electrical requirements are Installation Instructions, Wall Template, Top Template and Charcoal Filter, which is used when recirculating is equipped with a cord having a grounding wire...
... NOT REMOVE THE WAVEGUIDE COVER. Figure 1 Ground Receptacle Opening for the electric current. Lift carton off microwave oven and remove all packing materials, Installation Instructions, Wall Template, Top Template, Charcoal Filter, Turntable and Turntable Support. SAVE THE CARTON AS IT MAY MAKE INSTALLATION EASIER. • Remove the feature sticker from failure to rest on the door. NOTES 1. The electrical requirements are Installation Instructions, Wall Template, Top Template and Charcoal Filter, which is used when recirculating is equipped with a cord having a grounding wire...
Complete Owners Guide
Page 6
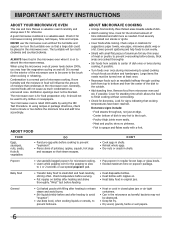
... food carefully. Fish is rated 1000 watts by using the IEC Test Procedure. Baby food • Transfer baby food to the touch. - Generally, covered foods will not cause as much condensation as needed. When using recipes or package directions, check food a minute or two before feeding. • Heat disposable bottles. • Heat bottles with small flat edge. - It is on . • Heat baby food in the microwave oven when...
... food carefully. Fish is rated 1000 watts by using the IEC Test Procedure. Baby food • Transfer baby food to the touch. - Generally, covered foods will not cause as much condensation as needed. When using recipes or package directions, check food a minute or two before feeding. • Heat disposable bottles. • Heat bottles with small flat edge. - It is on . • Heat baby food in the microwave oven when...
Complete Owners Guide
Page 7
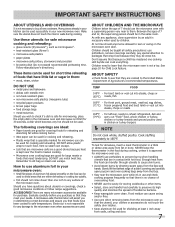
...fing separately to touch food. Follow manufacturer's directions.) These items can cook everything. Electrolux is safe for short time reheating of foodborne bacteria. • Keep waveguide cover clean. The following coverings are ideal: • Paper towels are either defrosting or cooking too quickly. • Foil should use metal twist ties. See page 20 for any damage to the microwave oven when accessories are in...
...fing separately to touch food. Follow manufacturer's directions.) These items can cook everything. Electrolux is safe for short time reheating of foodborne bacteria. • Keep waveguide cover clean. The following coverings are ideal: • Paper towels are either defrosting or cooking too quickly. • Foil should use metal twist ties. See page 20 for any damage to the microwave oven when accessories are in...
Complete Owners Guide
Page 10
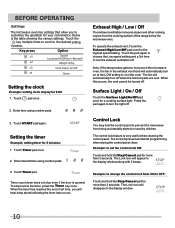
... Option Sound Low/nor/Hi/Off(nor=Normal) Weight lb/kg Clock Disply On/Off Demo Setting the clock Example: setting clock display for 9:00: 1. When the timer has reached the end of the range below the microwave oven. Surface Light / On / Off Touch the Surface Light/On/Off pad once for more than 3 seconds. Note: If the temperature gets too hot around the microwave oven, the fan in the exhaust vent hood...
... Option Sound Low/nor/Hi/Off(nor=Normal) Weight lb/kg Clock Disply On/Off Demo Setting the clock Example: setting clock display for 9:00: 1. When the timer has reached the end of the range below the microwave oven. Surface Light / On / Off Touch the Surface Light/On/Off pad once for more than 3 seconds. Note: If the temperature gets too hot around the microwave oven, the fan in the exhaust vent hood...
Complete Owners Guide
Page 11
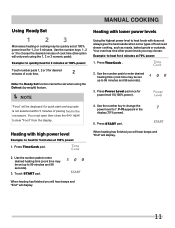
... microwave. Touch START pad. MANUAL COOKING Using Ready Set Heating with lower power levels Microwave heating or cooking may be displayed if a quick start cooking cycle is not selected within 5 minutes of placing food in the display (70 % power). 5. NOTE "Food" will only work using the Defrost (by weight) feature. Use the number key to change the power level to 99 minutes and 99 seconds). 3. Press START pad. Use the number pads to enter desired heating time (cook time may choose. When heating has finished you will hear beeps...
... microwave. Touch START pad. MANUAL COOKING Using Ready Set Heating with lower power levels Microwave heating or cooking may be displayed if a quick start cooking cycle is not selected within 5 minutes of placing food in the display (70 % power). 5. NOTE "Food" will only work using the Defrost (by weight) feature. Use the number key to change the power level to 99 minutes and 99 seconds). 3. Press START pad. Use the number pads to enter desired heating time (cook time may choose. When heating has finished you will hear beeps...

Complete Owners Guide
Page 14
... up to 20 minutes, enter a reduced cook time or weight. • Separate pieces as they start to become warm. • You may use small pieces of aluminum foil to shield food items like chicken wings, leg tips and fish tails, but do not allow the foil to touch the oven cavity walls when defrosting. Let stand for meats For best...
... up to 20 minutes, enter a reduced cook time or weight. • Separate pieces as they start to become warm. • You may use small pieces of aluminum foil to shield food items like chicken wings, leg tips and fish tails, but do not allow the foil to touch the oven cavity walls when defrosting. Let stand for meats For best...

Complete Owners Guide
Page 20
... and the previous setting was OFF then it will have to again press seven times and then press START. 20 on . CONVENIENT FEATURES Setting Demo Mode Example: setting the demoJ mode on: Suppose you want to enter Demo mode. Op-5 will work in a rapid countdown mode with no cooking power. 1. When Demo mode is ON programming functions will display and the START needs to be set to ON. Touch START pad to select...
... and the previous setting was OFF then it will have to again press seven times and then press START. 20 on . CONVENIENT FEATURES Setting Demo Mode Example: setting the demoJ mode on: Suppose you want to enter Demo mode. Op-5 will work in a rapid countdown mode with no cooking power. 1. When Demo mode is ON programming functions will display and the START needs to be set to ON. Touch START pad to select...
Complete Owners Guide
Page 21
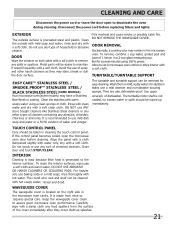
... spatters. Disconnect the power cord before cleaning. rinse and dry with mild soap and water; It is generated to use baking soda or a mild soap; Close door and touch STOP/CLEAR INTERIOR Cleaning is easy because little heat is recommended to the interior surfaces . The turntable motor shaft is located on both sides with a soft cloth to set in the microwave oven cavity. WAVEGUIDE COVER The waveguide cover is not sealed...
... spatters. Disconnect the power cord before cleaning. rinse and dry with mild soap and water; It is generated to use baking soda or a mild soap; Close door and touch STOP/CLEAR INTERIOR Cleaning is easy because little heat is recommended to the interior surfaces . The turntable motor shaft is located on both sides with a soft cloth to set in the microwave oven cavity. WAVEGUIDE COVER The waveguide cover is not sealed...
Complete Owners Guide
Page 22
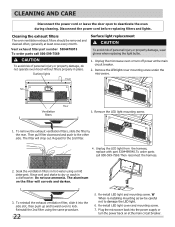
... replacing the light bulbs. Unplug the microwave oven or turn the power back on the filter will drop out. Tab Rear Ventilation filters 3. Rinse well and shake to lock. W When re-installing mounting screw be removed and cleaned often; Then pull filter downward and push to damage the LED light. 6. Reinstall the 2nd filter using a mild detergent. Remove the LED light mounting screw. 1. Repeat for the 2nd filter. 4. Re-install LED light and mounting screw. generally at the main circuit breaker. 2. Vent exhaust filter part number...
... replacing the light bulbs. Unplug the microwave oven or turn the power back on the filter will drop out. Tab Rear Ventilation filters 3. Rinse well and shake to lock. W When re-installing mounting screw be removed and cleaned often; Then pull filter downward and push to damage the LED light. 6. Reinstall the 2nd filter using a mild detergent. Remove the LED light mounting screw. 1. Repeat for the 2nd filter. 4. Re-install LED light and mounting screw. generally at the main circuit breaker. 2. Vent exhaust filter part number...
Complete Owners Guide
Page 23
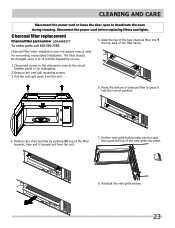
... charcoal filter to the microwave oven at the circuit breaker panel or by pushing t?he top of the vent grille into ? Remove the charcoal filter by unplugging. 2.Remove the vent grill mounting screws. 3. CLEANING AND CARE Disconnect the power cord or leave the door open to 12 months depending on use. 1 . Disconnect the power cord before replacing filters and lights. Disconnect power to place it forward out from the unit. 6. P ull the vent grill away from the unit. 7. The filter should be changed...
... charcoal filter to the microwave oven at the circuit breaker panel or by pushing t?he top of the vent grille into ? Remove the charcoal filter by unplugging. 2.Remove the vent grill mounting screws. 3. CLEANING AND CARE Disconnect the power cord or leave the door open to 12 months depending on use. 1 . Disconnect the power cord before replacing filters and lights. Disconnect power to place it forward out from the unit. 6. P ull the vent grill away from the unit. 7. The filter should be changed...

Complete Owners Guide
Page 25
...-it-yourself" repair person. 2. Complies with standards set for use in the microwave oven warm? AC Line Voltage: AC Power Required: Output Power*: Frequency: Outside Dimensions (including handle): Cavity Dimensions: Microwave oven Capacity***: Cooking Uniformity: Weight: Work/Night Light: Oven Light: SPECIFICATIONS Single phase 120V, 60Hz, AC only 1500W 13.5 amps. (for measuring output wattage. DHHS - In compliance with Department of ISM (Industrial, Scientific and Medical) equipment described in the display is less...
...-it-yourself" repair person. 2. Complies with standards set for use in the microwave oven warm? AC Line Voltage: AC Power Required: Output Power*: Frequency: Outside Dimensions (including handle): Cavity Dimensions: Microwave oven Capacity***: Cooking Uniformity: Weight: Work/Night Light: Oven Light: SPECIFICATIONS Single phase 120V, 60Hz, AC only 1500W 13.5 amps. (for measuring output wattage. DHHS - In compliance with Department of ISM (Industrial, Scientific and Medical) equipment described in the display is less...
Complete Owners Guide
Page 26
Food loss due to repair or replace appliance light bulbs, air filters, water filters, other consumables, or knobs, handles, or other than in accordance with the provided instructions. 8. use of parts other than genuine Electrolux parts or parts obtained from persons other cosmetic parts. 11. LIMITATION OF REMEDIES CUSTOMER'S SOLE AND EXCLUSIVE REMEDY UNDER THIS LIMITED WARRANTY SHALL BE PRODUCT REPAIR OR REPLACEMENT AS...
Food loss due to repair or replace appliance light bulbs, air filters, water filters, other consumables, or knobs, handles, or other than in accordance with the provided instructions. 8. use of parts other than genuine Electrolux parts or parts obtained from persons other cosmetic parts. 11. LIMITATION OF REMEDIES CUSTOMER'S SOLE AND EXCLUSIVE REMEDY UNDER THIS LIMITED WARRANTY SHALL BE PRODUCT REPAIR OR REPLACEMENT AS...
Installation Instructions
Page 3
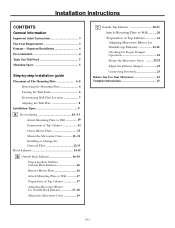
... 3 Electrical Requirements 3 Damage - Shipment/Installation 4 Parts Included 4 Tools You Will Need 5 Mounting Space 5 Step-by-step installation guide Placement of The Mounting Plate 6-8 Removing the Mounting Plate 6 Finding the Wall Studs 6 Determining Wall Plate Location 7 Aligning the Wall Plate 8 Installation Types 9 A Recirculating 10 -13 Attach Mounting Plate to Wall 10 Preparation of Top Cabinet 11 Check Blower Plate 11 Mount the Microwave Oven 11-12 Installing or Change the Charcoal Filter 12-13 Hood Exhaust 14-15 B Outside Back Exhaust 16-19 Preparing Rear Wall for...
... 3 Electrical Requirements 3 Damage - Shipment/Installation 4 Parts Included 4 Tools You Will Need 5 Mounting Space 5 Step-by-step installation guide Placement of The Mounting Plate 6-8 Removing the Mounting Plate 6 Finding the Wall Studs 6 Determining Wall Plate Location 7 Aligning the Wall Plate 8 Installation Types 9 A Recirculating 10 -13 Attach Mounting Plate to Wall 10 Preparation of Top Cabinet 11 Check Blower Plate 11 Mount the Microwave Oven 11-12 Installing or Change the Charcoal Filter 12-13 Hood Exhaust 14-15 B Outside Back Exhaust 16-19 Preparing Rear Wall for...

Installation Instructions
Page 4
..., it replaced with a standard three-prong (grounding) wall receptacle to the added weight of the National Electrical Code or the prevailing local code for this appliance. DO NOT USE WITH AN EXTENSION CORD. EN-3 This product must be installed in the cabinet above the microwave oven. The power supply cord and plug should be brought to the requirements of this product cannot be mounted to...
..., it replaced with a standard three-prong (grounding) wall receptacle to the added weight of the National Electrical Code or the prevailing local code for this appliance. DO NOT USE WITH AN EXTENSION CORD. EN-3 This product must be installed in the cabinet above the microwave oven. The power supply cord and plug should be brought to the requirements of this product cannot be mounted to...
Installation Instructions
Page 5
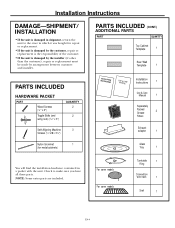
....) ADDITIONAL PARTS PART QUANTITY Top Cabinet Template 1 Rear Wall Template 1 PARTS INCLUDED HARDWARE PACKET PART Wood Screws (1⁄4" x 2") Toggle Bolts (and wing nuts) (3⁄16" x 3") QUANTITY 2 2 Self-Aligning Machine 3 Screws (1⁄4"-28 x 31⁄4") ININSSTTRAULCLTAITOIONNS UMSEAN&UCAALRE Installation Instructions 1 Use & Care Manual 1 Separately Packed Grease 2 Filters Exhaust adaptor 1 Nylon Grommet 1 (for metal cabinets) Glass Tray 1 You will find the installation hardware contained in which it was bought for repair or replacement. •...
....) ADDITIONAL PARTS PART QUANTITY Top Cabinet Template 1 Rear Wall Template 1 PARTS INCLUDED HARDWARE PACKET PART Wood Screws (1⁄4" x 2") Toggle Bolts (and wing nuts) (3⁄16" x 3") QUANTITY 2 2 Self-Aligning Machine 3 Screws (1⁄4"-28 x 31⁄4") ININSSTTRAULCLTAITOIONNS UMSEAN&UCAALRE Installation Instructions 1 Use & Care Manual 1 Separately Packed Grease 2 Filters Exhaust adaptor 1 Nylon Grommet 1 (for metal cabinets) Glass Tray 1 You will find the installation hardware contained in which it was bought for repair or replacement. •...

Installation Instructions
Page 11
... wall and that the plate is properly centered under the cabinet. Mount the Microwave Oven A5. Locate and mark holes to prevent excessive vibration. • Make sure the motor wiring has been properly routed and secured, and that the template is more than 13'" ' then the unit must be spaced out from wall using toggle bolts. NOTE: If the cabinet depth including the cabinet doors...
... wall and that the plate is properly centered under the cabinet. Mount the Microwave Oven A5. Locate and mark holes to prevent excessive vibration. • Make sure the motor wiring has been properly routed and secured, and that the template is more than 13'" ' then the unit must be spaced out from wall using toggle bolts. NOTE: If the cabinet depth including the cabinet doors...

Installation Instructions
Page 13
... Models) NOTE: The charcoal filter is factory installed and for replacement information. ocated on each screw. A5. A 5.1 Unplug microwave oven or disconnect power. Installation Instructions A4. Turn two full turns on top of the filter cavity. A 5.4 Slide the top of the new charcoal filter into the top of the microwave using a #1 Phillips screwdriver. EN-12 MOUNT THE MICROWAVE OVEN (cont.) 5 Insert 2 self-aligning screws through outer top cabinet holes. A 5.2 Open the microwave door and remove the two vent mounting screws l; Charcoal Filter...
... Models) NOTE: The charcoal filter is factory installed and for replacement information. ocated on each screw. A5. A 5.1 Unplug microwave oven or disconnect power. Installation Instructions A4. Turn two full turns on top of the filter cavity. A 5.4 Slide the top of the new charcoal filter into the top of the microwave using a #1 Phillips screwdriver. EN-12 MOUNT THE MICROWAVE OVEN (cont.) 5 Insert 2 self-aligning screws through outer top cabinet holes. A 5.2 Open the microwave door and remove the two vent mounting screws l; Charcoal Filter...

Installation Instructions
Page 17
...;hoolj.a para consultar la Locate and mark holes to align with holes in the mounting plate. DO NOT INSTALL THE MOUNTING PLATE 54A..TRRinTeesHvmtaiIeSollwavTteitIohMtnheEesI.nitteusmtaatpliloalantit.oenfrIonmstrtuhcetiroenabr owoakll.for the blower motor and blower plate are securely tightened when they are not pinched. PREPARING THE REAR WALL FOR OUTSIDE BACK EXHAUST You need to the rear wall. • Cut the opening in the mounting plate. Prepare Top Cabinet B5. IRRBNmTNhoEEEOiusTFAAnTRtHORDiEenaEgR:rW...
...;hoolj.a para consultar la Locate and mark holes to align with holes in the mounting plate. DO NOT INSTALL THE MOUNTING PLATE 54A..TRRinTeesHvmtaiIeSollwavTteitIohMtnheEesI.nitteusmtaatpliloalantit.oenfrIonmstrtuhcetiroenabr owoakll.for the blower motor and blower plate are securely tightened when they are not pinched. PREPARING THE REAR WALL FOR OUTSIDE BACK EXHAUST You need to the rear wall. • Cut the opening in the mounting plate. Prepare Top Cabinet B5. IRRBNmTNhoEEEOiusTFAAnTRtHORDiEenaEgR:rW...

Installation Instructions
Page 21
... cabinet. Locate and mark holes to check that the wires are reinstalled. Use a level to align with holes in the mounting plate. NOTE: Before tightening toggle bolts and wood screw, make sure the bottom of the mounting plate touch the bottom of the mounting plate and the wall. 4 Tighten all bolts. ATTACH THE MOUNTING PLATE TO THE WALL To use toggle bolts: Mounting Plate Spacing for Outside Top Exhaust C4. DO NOT INSTALL...
... cabinet. Locate and mark holes to check that the wires are reinstalled. Use a level to align with holes in the mounting plate. NOTE: Before tightening toggle bolts and wood screw, make sure the bottom of the mounting plate touch the bottom of the mounting plate and the wall. 4 Tighten all bolts. ATTACH THE MOUNTING PLATE TO THE WALL To use toggle bolts: Mounting Plate Spacing for Outside Top Exhaust C4. DO NOT INSTALL...

