Installation Instructions
Page 1
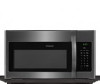
... Save these instructions with the Consumer. • Note to Consumer - Keep these instructions completely and carefully. • IMPORTANT - READ CAREFULLY. Installation Instructions Over the Range Microwave Oven Questions? Call 1-800-944-9044(US) or 1-800-265-8352(Canada) BEFORE YOU BEGIN Read these instructions for local inspector's use. • IMPORTANT -
... Save these instructions with the Consumer. • Note to Consumer - Keep these instructions completely and carefully. • IMPORTANT - READ CAREFULLY. Installation Instructions Over the Range Microwave Oven Questions? Call 1-800-944-9044(US) or 1-800-265-8352(Canada) BEFORE YOU BEGIN Read these instructions for local inspector's use. • IMPORTANT -
Installation Instructions
Page 2
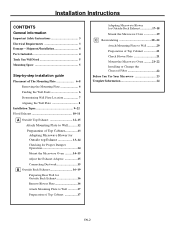
...Top Exhaust 12-15 Attach Mounting Plate to Wall............12 Preparation of Top Cabinet 13 Adapting Microwave Blower for Outside top Exhaust 13-14 Checking for Proper Damper Operation 14 Mount the Microwave Oven ..........14-15 Adjust the Exhaust Adaptor 15 Connecting Ductwork 15 B Outside Back Exhaust ...Back Exhaust 16 Remove Blower Plate 16 Attach Mounting Plate to Wall 17 Preparation of Top Cabinet 17 Adapting Microwave Blower for Outside Back Exhaust 17-18 Mount the Microwave Oven 19 C Recirculating 20 -22 Attach Mounting Plate to Wall 20 Preparation of Top Cabinet 21 Check...
...Top Exhaust 12-15 Attach Mounting Plate to Wall............12 Preparation of Top Cabinet 13 Adapting Microwave Blower for Outside top Exhaust 13-14 Checking for Proper Damper Operation 14 Mount the Microwave Oven ..........14-15 Adjust the Exhaust Adaptor 15 Connecting Ductwork 15 B Outside Back Exhaust ...Back Exhaust 16 Remove Blower Plate 16 Attach Mounting Plate to Wall 17 Preparation of Top Cabinet 17 Adapting Microwave Blower for Outside Back Exhaust 17-18 Mount the Microwave Oven 19 C Recirculating 20 -22 Attach Mounting Plate to Wall 20 Preparation of Top Cabinet 21 Check...

Installation Instructions
Page 3
... this product cannot be located in cabinet arrangements such as an island or a peninsula. The outlet box should be installed in the cabinet above the microwave oven. The installer must be brought to a seperate and dedicated supply circuit of electric shock hazard from this product. CAUTION: For personal safety, this appliance...
... this product cannot be located in cabinet arrangements such as an island or a peninsula. The outlet box should be installed in the cabinet above the microwave oven. The installer must be brought to a seperate and dedicated supply circuit of electric shock hazard from this product. CAUTION: For personal safety, this appliance...
Installation Instructions
Page 5
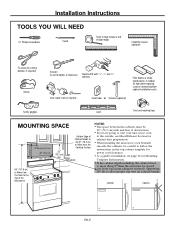
... spaced out from wall using adequate materials supporting 150 Ibs to be 30w (76.2 cm) or More from the Floor to the Top of the Microwave NOTES: • The space between the cabinets must be 30" (76.2 cm)wide and free of obstructions. • If you are going to vent ...your microwave oven to the outside, see Hood Exhaust Section for exhaust duct preparation. • When installing the microwave oven beneath smooth, flat cabinets, be careful to follow the instructions on recessed bottom cabinet installations only...
... spaced out from wall using adequate materials supporting 150 Ibs to be 30w (76.2 cm) or More from the Floor to the Top of the Microwave NOTES: • The space between the cabinets must be 30" (76.2 cm)wide and free of obstructions. • If you are going to vent ...your microwave oven to the outside, see Hood Exhaust Section for exhaust duct preparation. • When installing the microwave oven beneath smooth, flat cabinets, be careful to follow the instructions on recessed bottom cabinet installations only...

Installation Instructions
Page 6
...holes where they were removed. Stud finder - Use a hammer to tap lightly across the mounting surface to find the edges of the stud. THE MICROWAVE MUST BE CONNECTED TO AT LEAST ONE WALL STUD. This will be used as the rear wall template and for mounting. EN-6 Shelf ( For ...solid sound. The center of any adjacent studs should be 16w (40.6 cm) or 24w (61 cm) from each end of the studs. REMOVING THE MICROWAVE OVEN FROM THE CARTON/ REMOVING THE MOUNTING PLATE 1 Remove the installation instructions,use and care, exhaust adapter, turntable ring, shelf, filters, glass tray and the...
...holes where they were removed. Stud finder - Use a hammer to tap lightly across the mounting surface to find the edges of the stud. THE MICROWAVE MUST BE CONNECTED TO AT LEAST ONE WALL STUD. This will be used as the rear wall template and for mounting. EN-6 Shelf ( For ...solid sound. The center of any adjacent studs should be 16w (40.6 cm) or 24w (61 cm) from each end of the studs. REMOVING THE MICROWAVE OVEN FROM THE CARTON/ REMOVING THE MOUNTING PLATE 1 Remove the installation instructions,use and care, exhaust adapter, turntable ring, shelf, filters, glass tray and the...
Installation Instructions
Page 7
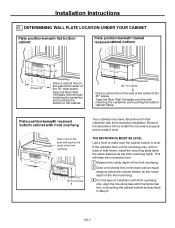
...the front overhang. 2 Draw a horizontal line on the wall at the center of the 30″ wide space. THE MICROWAVE MUST BE LEVEL. This will keep the microwave level. 1 Measure the inside depth of the front overhang. 3 For this horizontal line, not touching the cabinet bottom as...matching the centerline and touching the bottom cabinet frame. Remove the decorative trim to install the microwave properly and to Cooktop Your cabinets may have a front overhang only, with the microwave installation. Tape the Rear Wall Template onto the wall matching the centerline and touching the ...
...the front overhang. 2 Draw a horizontal line on the wall at the center of the 30″ wide space. THE MICROWAVE MUST BE LEVEL. This will keep the microwave level. 1 Measure the inside depth of the front overhang. 3 For this horizontal line, not touching the cabinet bottom as...matching the centerline and touching the bottom cabinet frame. Remove the decorative trim to install the microwave properly and to Cooktop Your cabinets may have a front overhang only, with the microwave installation. Tape the Rear Wall Template onto the wall matching the centerline and touching the ...

Installation Instructions
Page 8
Locate and mark at least one stud on the left or right side of the microwave. Where there is a stud, drill a 3/16" hole for the supplied toggle bolts. 3. MARK THE LOCATION FOR 2 ADDITIONAL, EVENLY SPACED TOGGLE BOLTS IN THE MOUNTING PLATE ...
Locate and mark at least one stud on the left or right side of the microwave. Where there is a stud, drill a 3/16" hole for the supplied toggle bolts. 3. MARK THE LOCATION FOR 2 ADDITIONAL, EVENLY SPACED TOGGLE BOLTS IN THE MOUNTING PLATE ...

Installation Instructions
Page 9
Outside Back Exhaust (Horizontal Duct) C. Recirculating (Non-Vented Ductless) NOTE: This microwave is designed for adaptation to the following three types of ventilation required for your exhaust to the outside. A OUTSIDE TOP EXHAUST (VERTICAL DUCT) Adaptor in ... Back Exhaust See page 12 See page 16 C RECIRCULATING (NON-VENTED DUCTLESS) Models are shipped for recirculating exhaust. Installation Instructions 2 INSTALLATION TYPES (Choose A, B or C) This microwave oven is shipped assembled for Recirculating. Outside Top Exhaust (Vertical Duct) B.
Outside Back Exhaust (Horizontal Duct) C. Recirculating (Non-Vented Ductless) NOTE: This microwave is designed for adaptation to the following three types of ventilation required for your exhaust to the outside. A OUTSIDE TOP EXHAUST (VERTICAL DUCT) Adaptor in ... Back Exhaust See page 12 See page 16 C RECIRCULATING (NON-VENTED DUCTLESS) Models are shipped for recirculating exhaust. Installation Instructions 2 INSTALLATION TYPES (Choose A, B or C) This microwave oven is shipped assembled for Recirculating. Outside Top Exhaust (Vertical Duct) B.

Installation Instructions
Page 12
... AT LEAST ONE STUD ON EITHER SIDE OF MSTHPAAERCKCEETDNHTTEOELRGOLGCINLAEET.IBOONLFTOSRIN2TAHDEDMITOIOUNNATLIN, EGVPELNALTYE AREA. Mount Microwave Oven A6. Trim the rear wall template along the dotted line. 3/8" TO ... IRRBNmTNhoEEEOiusTFAAnTRtHORDiEenaEgR:rW ApIWEITlNaNAatPeDIlSLlSaTRTLnFeVOdAmOTEtLpCoELlLaRlEMLotAeYcOEPaTstDeW IeLIMrOvItAhNePNTeTsGOHhtEoIoNER.W rpizoSToDsIniTTAtIitoaRRHNnl UEeTtThxCCheHTaTbTOuIoSsIItOOttomNNSS outlet. 1. Adjust Exhaust Adaptor A7. Adapting Microwave Blower for the blower motor and blower plate are securely tightened when they are not ...
... AT LEAST ONE STUD ON EITHER SIDE OF MSTHPAAERCKCEETDNHTTEOELRGOLGCINLAEET.IBOONLFTOSRIN2TAHDEDMITOIOUNNATLIN, EGVPELNALTYE AREA. Mount Microwave Oven A6. Trim the rear wall template along the dotted line. 3/8" TO ... IRRBNmTNhoEEEOiusTFAAnTRtHORDiEenaEgR:rW ApIWEITlNaNAatPeDIlSLlSaTRTLnFeVOdAmOTEtLpCoELlLaRlEMLotAeYcOEPaTstDeW IeLIMrOvItAhNePNTeTsGOHhtEoIoNER.W rpizoSToDsIniTTAtIitoaRRHNnl UEeTtThxCCheHTaTbTOuIoSsIItOOttomNNSS outlet. 1. Adjust Exhaust Adaptor A7. Adapting Microwave Blower for the blower motor and blower plate are securely tightened when they are not ...

Installation Instructions
Page 13
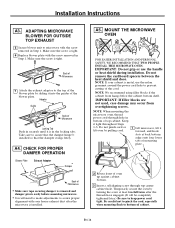
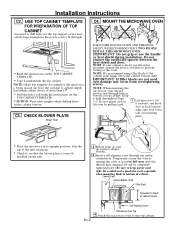
... wiring. AFTER: Fan Blade Openings Facing Top Blower Plate Back of the unit facing up. 2 Carefully pull out the blower unit. Back of Microwave 4 Place the blower unit back into the opening. USE TOP CABINET TEMPLATE FOR PREPARATION OF TOP CABINET You need to drill holes for the top... support screws, a hole large enough for the power cord to the microwave. ADAPTING MICROWAVE BLOWER FOR OUTSIDE TOP EXHAUST 1 Place the microwave in the cabinet bottom. Remove and save the screw holding the blower motor to fit through, and a cutout large enough...
... wiring. AFTER: Fan Blade Openings Facing Top Blower Plate Back of the unit facing up. 2 Carefully pull out the blower unit. Back of Microwave 4 Place the blower unit back into the opening. USE TOP CABINET TEMPLATE FOR PREPARATION OF TOP CABINET You need to drill holes for the top... support screws, a hole large enough for the power cord to the microwave. ADAPTING MICROWAVE BLOWER FOR OUTSIDE TOP EXHAUST 1 Place the microwave in the cabinet bottom. Remove and save the screw holding the blower motor to fit through, and a cutout large enough...
Installation Instructions
Page 14
...make adjustments to assure proper alignment with the screw removed in securely until it into the guides of the cord. NOTE: When mounting the microwave oven, thread power cord through top center cabinet hole. CHECK FOR PROPER DAMPER OPERATION Blower Plate Exhaust Adaptor Damper Back of top cabinet....Do not remove the cardboard spacers between the heat shield and door. Be careful not to pinch the cord, especially when mounting flush to microwave with the screw removed in the locking tabs. IMPORTANT: Do not grip or use the nylon grommet around the power cord hole to the ...
...make adjustments to assure proper alignment with the screw removed in securely until it into the guides of the cord. NOTE: When mounting the microwave oven, thread power cord through top center cabinet hole. CHECK FOR PROPER DAMPER OPERATION Blower Plate Exhaust Adaptor Damper Back of top cabinet....Do not remove the cardboard spacers between the heat shield and door. Be careful not to pinch the cord, especially when mounting flush to microwave with the screw removed in the locking tabs. IMPORTANT: Do not grip or use the nylon grommet around the power cord hole to the ...
Installation Instructions
Page 15
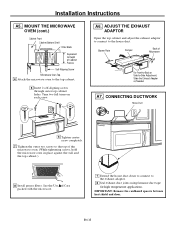
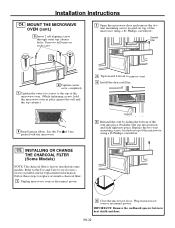
... connect to the exhaust adaptor. 2 Seal exhaust duct joints using furnance duct tape for high temperature applications. See the Use a& nd Care packed with the microwave. 1 Extend the house duct down to connect to the house duct. Turn two full turns on each screw. MOUNT THE... grease filters. EN-15 Installation Instructions A5. A6. CONNECTING DUCTWORK House Duct 6 Tighten center screw completely. 7 Tighten the outer two screws to the top of Microwave For Front-to-Back or Side-to the top cabinet. 5 Insert 2 self-aligning screws through outer top cabinet holes.
... connect to the exhaust adaptor. 2 Seal exhaust duct joints using furnance duct tape for high temperature applications. See the Use a& nd Care packed with the microwave. 1 Extend the house duct down to connect to the house duct. Turn two full turns on each screw. MOUNT THE... grease filters. EN-15 Installation Instructions A5. A6. CONNECTING DUCTWORK House Duct 6 Tighten center screw completely. 7 Tighten the outer two screws to the top of Microwave For Front-to-Back or Side-to the top cabinet. 5 Insert 2 self-aligning screws through outer top cabinet holes.

Installation Instructions
Page 16
... not pinched. Installation Instructions B OUTSIDE BACK EXHAUST (Horizontal Duct) INSTALLATION OVERVIEW B1. Attach Mounting Plate to align with holes in the mounting plate. Mount the Microwave Oven IMPORTANT NOTES: • Make sure the screws for your DvearrsleióvnueenltaEasplaañhoolj.a para consultar la Locate and mark holes to Wall B4.
... not pinched. Installation Instructions B OUTSIDE BACK EXHAUST (Horizontal Duct) INSTALLATION OVERVIEW B1. Attach Mounting Plate to align with holes in the mounting plate. Mount the Microwave Oven IMPORTANT NOTES: • Make sure the screws for your DvearrsleióvnueenltaEasplaañhoolj.a para consultar la Locate and mark holes to Wall B4.

Installation Instructions
Page 17
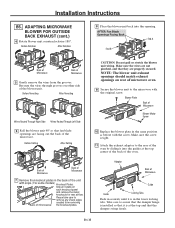
...Wall Bolt End 3 Place the mounting plate against the wall and that holds blower motor to go into the holes in the cabinet bottom. ADAPTING MICROWAVE BLOWER FOR OUTSIDE BACK EXHAUST 1 Remove and save screw that the plate is properly centered under the cabinet. To use toggle bolts: Mounting Plate... Spacing for the power cord to fit through the holes designated to microwave. At least one wood screw must be used to attach the plate to mount the plate. Pull the plate away from the bolts. 2 Insert...
...Wall Bolt End 3 Place the mounting plate against the wall and that holds blower motor to go into the holes in the cabinet bottom. ADAPTING MICROWAVE BLOWER FOR OUTSIDE BACK EXHAUST 1 Remove and save screw that the plate is properly centered under the cabinet. To use toggle bolts: Mounting Plate... Spacing for the power cord to fit through the holes designated to microwave. At least one wood screw must be used to attach the plate to mount the plate. Pull the plate away from the bolts. 2 Insert...
Installation Instructions
Page 18
...176;. CAUTION: Do not pull or stretch the blower unit wiring. NOTE: The blower unit exhaust openings should match exhaust openings on rear of microwave oven. 9 Secure the blower unit to remove any sharp edges created from the grooves. Make sure the screw is tight. 11 Attach the...mircrowave the knockout plates. AFTER: Fan Blade Openings Facing Back End A End B Back of Microwave Back of Microwave 5 Gently remove the wires from removing Back of the oven. Blower Plate Back of Microwave Blower Motor Screw 10 Replace the blower plate in the back of the unit with the original...
...176;. CAUTION: Do not pull or stretch the blower unit wiring. NOTE: The blower unit exhaust openings should match exhaust openings on rear of microwave oven. 9 Secure the blower unit to remove any sharp edges created from the grooves. Make sure the screw is tight. 11 Attach the...mircrowave the knockout plates. AFTER: Fan Blade Openings Facing Back End A End B Back of Microwave Back of Microwave 5 Gently remove the wires from removing Back of the oven. Blower Plate Back of Microwave Blower Motor Screw 10 Replace the blower plate in the back of the unit with the original...

Installation Instructions
Page 19
... not grip or use the nylon grommet around the power cord hole to prevent cutting of Cabinet Recess Self-Aligning Screw Microwave Oven Top 4 Attach the microwave oven to the top cabinet. 5 Insert 2 self-aligning screws through top center cabinet hole. Cabinet Front Cabinet Bottom ...Shelf Filler Block Equivalent to keep power cord tight. Temporarily secure the oven by pulling cord. 1 Lift microwave, tilt it tight throughout Steps 1-3. Installation Instructions B6. NOTE: If your cabinet is metal, use the handle or heat shield during ...
... not grip or use the nylon grommet around the power cord hole to prevent cutting of Cabinet Recess Self-Aligning Screw Microwave Oven Top 4 Attach the microwave oven to the top cabinet. 5 Insert 2 self-aligning screws through top center cabinet hole. Cabinet Front Cabinet Bottom ...Shelf Filler Block Equivalent to keep power cord tight. Temporarily secure the oven by pulling cord. 1 Lift microwave, tilt it tight throughout Steps 1-3. Installation Instructions B6. NOTE: If your cabinet is metal, use the handle or heat shield during ...

Installation Instructions
Page 20
... the blower motor and blower plate are securely tightened when they are not pinched. Installation Instructions C RECIRCULATING (Non-Vented Ductless) INSTALLATION OVERVIEW C1. Mount the Microwave Oven C5. Prepare Top Cabinet C3. Attach Mounting Plate to align with holes in the mounting plate.
... the blower motor and blower plate are securely tightened when they are not pinched. Installation Instructions C RECIRCULATING (Non-Vented Ductless) INSTALLATION OVERVIEW C1. Mount the Microwave Oven C5. Prepare Top Cabinet C3. Attach Mounting Plate to align with holes in the mounting plate.
Installation Instructions
Page 21
... or heat shield during installation. CHECK BLOWER PLATE Blower Plate FOR EASIER INSTALLATION AND PERSONAL SAFETY, WE RECOMMEND THAT TWO PEOPLE INSTALL THIS MICROWAVE OVEN. Do not remove the cardboard spacers between the heat shield and door. IMPORTANT: If filler blocks are not used, case damage...safety goggles when drilling holes in bottom of oven up . • Check to fit through top center cabinet hole. NOTE: When mounting the microwave oven, thread power cord through hole in the cabinet bottom. NOTE: If your cabinet is correctly installed on the TOP CABINET TEMPLATE. Keep it ...
... or heat shield during installation. CHECK BLOWER PLATE Blower Plate FOR EASIER INSTALLATION AND PERSONAL SAFETY, WE RECOMMEND THAT TWO PEOPLE INSTALL THIS MICROWAVE OVEN. Do not remove the cardboard spacers between the heat shield and door. IMPORTANT: If filler blocks are not used, case damage...safety goggles when drilling holes in bottom of oven up . • Check to fit through top center cabinet hole. NOTE: When mounting the microwave oven, thread power cord through hole in the cabinet bottom. NOTE: If your cabinet is correctly installed on the TOP CABINET TEMPLATE. Keep it ...
Installation Instructions
Page 22
... is factory installed in some models. Push the vent top into position and slide right into place. EN-22 MOUNT THE MICROWAVE OVEN (cont.) 5 Insert 2 self-aligning screws through outer top cabinet holes. Refer to the Use and Care to the top of the.... Follow these steps to remove vent. 4 Install the charcoal filter. )NSERT 5 Reinstall the vent by sliding the bottom of the microwave using a #1 Phillips screwdriver. 6 Close the microwave door. Plug in place against the wall and the top cabinet.) 8 Install grease filters. INSTALLING OR CHANGE THE CHARCOAL FILTER (Some Models...
... is factory installed in some models. Push the vent top into position and slide right into place. EN-22 MOUNT THE MICROWAVE OVEN (cont.) 5 Insert 2 self-aligning screws through outer top cabinet holes. Refer to the Use and Care to the top of the.... Follow these steps to remove vent. 4 Install the charcoal filter. )NSERT 5 Reinstall the vent by sliding the bottom of the microwave using a #1 Phillips screwdriver. 6 Close the microwave door. Plug in place against the wall and the top cabinet.) 8 Install grease filters. INSTALLING OR CHANGE THE CHARCOAL FILTER (Some Models...
Installation Instructions
Page 23
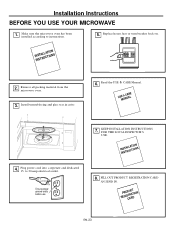
Make sure the microwave oven has been installed according to 20-amp electrical outlet. Plug power cord into a seperate and dedicated 15- Replace house fuse ...ININSSTTARLULCATTIIOONNS 4. Ensure proper ground exists before use 8. USME &A|+&= NCUAARLE + 7. FILL OUT PRODUCT REGISTRATION CARD AN SEND IN. Installation Instructions BEFORE YOU USE YOUR MICROWAVE 1. Remove all packing material from the microwave oven. 3. Install turntable ring and glass tray in cavity. 6. D RPEGROISDCTUARCRATDTION D D G D G EN-23 ININSSTTARLULCATTIIOONNS 2. to instructions. 5.
Make sure the microwave oven has been installed according to 20-amp electrical outlet. Plug power cord into a seperate and dedicated 15- Replace house fuse ...ININSSTTARLULCATTIIOONNS 4. Ensure proper ground exists before use 8. USME &A|+&= NCUAARLE + 7. FILL OUT PRODUCT REGISTRATION CARD AN SEND IN. Installation Instructions BEFORE YOU USE YOUR MICROWAVE 1. Remove all packing material from the microwave oven. 3. Install turntable ring and glass tray in cavity. 6. D RPEGROISDCTUARCRATDTION D D G D G EN-23 ININSSTTARLULCATTIIOONNS 2. to instructions. 5.


