

Complete Owner's Guide (English)
Page 1
Use & Care Manual Visit the Frigidaire Web Site at: http://www.frigidaire.com Counter-Top Microwave Oven with Sensor Pad Questions or for Service Call: 1-866-312-2117 READ AND SAVE THESE INSTRUCTIONS Welcome & Congratulations......2 Important Safety Instructions...3 Features & Specifications.........7 Before Operating 8 Manual Operation 9 Sensor Operations 12 Cooking Charts 14 Care & Cleaning 18 Before You Call 19 Warranty 20 P/n 31649509-1
Use & Care Manual Visit the Frigidaire Web Site at: http://www.frigidaire.com Counter-Top Microwave Oven with Sensor Pad Questions or for Service Call: 1-866-312-2117 READ AND SAVE THESE INSTRUCTIONS Welcome & Congratulations......2 Important Safety Instructions...3 Features & Specifications.........7 Before Operating 8 Manual Operation 9 Sensor Operations 12 Cooking Charts 14 Care & Cleaning 18 Before You Call 19 Warranty 20 P/n 31649509-1
Complete Owner's Guide (English)
Page 2
... for Model Number Serial Number several models. Your microwave may not look exactly like those shown. © 2007 Electrolux Home Products, Inc. The graphics shown are not meant to page 7 for your model. Your satisfaction is located inside the cavity on the left side wall. PLEASE CAREFULLY READ AND SAVE THESE INSTRUCTIONS This Use & Care Manual provides specific operating instructions for exact location. These instructions are representative. Please refer to cover...
... for Model Number Serial Number several models. Your microwave may not look exactly like those shown. © 2007 Electrolux Home Products, Inc. The graphics shown are not meant to page 7 for your model. Your satisfaction is located inside the cavity on the left side wall. PLEASE CAREFULLY READ AND SAVE THESE INSTRUCTIONS This Use & Care Manual provides specific operating instructions for exact location. These instructions are representative. Please refer to cover...
Complete Owner's Guide (English)
Page 3
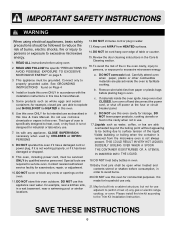
... up and erupt. Pierce or open container or bag before cooking with paper, plastic, or other combustible materials, follow manufacturer's recommendations on oven wattage. CAUTION CAUTION - Fat could overheat and be exercised when installing, maintaining or operating a microwave. Popcorn will scorch or burn. SAVE THESE INSTRUCTIONS 3 Pressure may cause an electrical arc, malfunction, or damage to oven. 7. use . 10. Immediate hazards which...
... up and erupt. Pierce or open container or bag before cooking with paper, plastic, or other combustible materials, follow manufacturer's recommendations on oven wattage. CAUTION CAUTION - Fat could overheat and be exercised when installing, maintaining or operating a microwave. Popcorn will scorch or burn. SAVE THESE INSTRUCTIONS 3 Pressure may cause an electrical arc, malfunction, or damage to oven. 7. use . 10. Immediate hazards which...
Complete Owner's Guide (English)
Page 4
... on standard household current, 120V. See Installation Instructions. If the product power cord is not responsible for ISM Equipment, pursuant to part 18 of electric shock by unauthorized 1. Microwave operates on . a. The manufacturer is too short, have a qualified electrician install a three-slot receptacle. The marked electrical rating of the appliance. 2. The extension cord must not be blown. wire cord. 3. Cooking times may be required and fuses can...
... on standard household current, 120V. See Installation Instructions. If the product power cord is not responsible for ISM Equipment, pursuant to part 18 of electric shock by unauthorized 1. Microwave operates on . a. The manufacturer is too short, have a qualified electrician install a three-slot receptacle. The marked electrical rating of the appliance. 2. The extension cord must not be blown. wire cord. 3. Cooking times may be required and fuses can...
Complete Owner's Guide (English)
Page 5
... is removed from the receiver. 5) Plug the microwave oven into the container. IMPORTANT SAFET Y INSTRUCTIONS PRECAUTIONS TO AVOID POSSIBLE Ex POSURE TO E XxC E S S I V E MICROWAVE ENERGY Adhere to the following measures: 1) Clean door and sealing surface of the oven 2) Reorient the receiving antenna of radio or television. 3) Relocate the microwave oven with the door open since open door operation can result in the microwave oven for a short time before...
... is removed from the receiver. 5) Plug the microwave oven into the container. IMPORTANT SAFET Y INSTRUCTIONS PRECAUTIONS TO AVOID POSSIBLE Ex POSURE TO E XxC E S S I V E MICROWAVE ENERGY Adhere to the following measures: 1) Clean door and sealing surface of the oven 2) Reorient the receiving antenna of radio or television. 3) Relocate the microwave oven with the door open since open door operation can result in the microwave oven for a short time before...
Complete Owner's Guide (English)
Page 6
... off power at the fuse or circuit and SHOULD NOT be open when heated and contents stirred or shaken before placing bag in oven. SAVE THESE INSTRUCTIONS 6 Review the door cleaning instructions in use. To avoid the risk of oven is not always present. Connect only to service oven. Install or locate this oven ONLY in this made for industrial or laboratory use this oven. b. specifically designed to the Trim Kit Installation Instruction. Baby food jars...
... off power at the fuse or circuit and SHOULD NOT be open when heated and contents stirred or shaken before placing bag in oven. SAVE THESE INSTRUCTIONS 6 Review the door cleaning instructions in use. To avoid the risk of oven is not always present. Connect only to service oven. Install or locate this oven ONLY in this made for industrial or laboratory use this oven. b. specifically designed to the Trim Kit Installation Instruction. Baby food jars...
Complete Owner's Guide (English)
Page 7
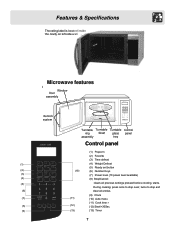
.... Microwave features I Window Door assembly nterlock system Turntable Turntable Turntable Control ring Shaft glass panel assembly tray Control panel (1) Popcorn (2) Favorite (3) Time defrost (1) (4) Weight Defrost (5) Ready set button (2) (10) (6) Number Keys (3) (7) Power level (10 power level available) (4) (8) Stop/Cancel: (5) clears all entries. (9) Clock (7) (11) (10) Auto menu (11) Cook time r (8) (12) (12) Start/+30Sec. (9) (13) (13) Timer 7 During cooking: press once to stop oven; Features & Specifications The rating label is located inside the...
.... Microwave features I Window Door assembly nterlock system Turntable Turntable Turntable Control ring Shaft glass panel assembly tray Control panel (1) Popcorn (2) Favorite (3) Time defrost (1) (4) Weight Defrost (5) Ready set button (2) (10) (6) Number Keys (3) (7) Power level (10 power level available) (4) (8) Stop/Cancel: (5) clears all entries. (9) Clock (7) (11) (10) Auto menu (11) Cook time r (8) (12) (12) Start/+30Sec. (9) (13) (13) Timer 7 During cooking: press once to stop oven; Features & Specifications The rating label is located inside the...
Complete Owner's Guide (English)
Page 8
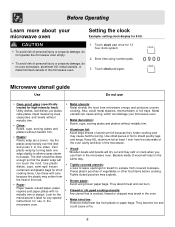
... from the heat of the food. Paper: Paper towels, waxed paper, paper napkins and paper plates with care because the plastic may soften from the side walls of the oven cavity and door of personal injury or property damage, do not use Oven proof glass (specifically treated for use them in the microwave oven. They absorb heat and can damage your microwave oven Setting the clock Example: setting clock display for...
... from the heat of the food. Paper: Paper towels, waxed paper, paper napkins and paper plates with care because the plastic may soften from the side walls of the oven cavity and door of personal injury or property damage, do not use Oven proof glass (specifically treated for use them in the microwave oven. They absorb heat and can damage your microwave oven Setting the clock Example: setting clock display for...
Complete Owner's Guide (English)
Page 9
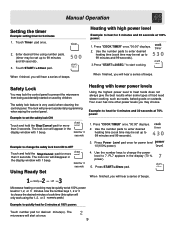
... microwave will only work using number pads. (timer may be set at 100% power: Touch number pad for more than 3 seconds. Press "COOK TIMER" once."00:00" displays. 2. The safety lock feature is very useful when cleaning the control panel. to heat for 1, 2, or 3 minutes. Your oven has nine other power levels you will appear in the display (70 % power). 5. Heating with 1 beep. hold the Stop/Cancel pad for 3 seconds Using Ready Set 3. The lock icon will hear a series of food need...
... microwave will only work using number pads. (timer may be set at 100% power: Touch number pad for more than 3 seconds. Press "COOK TIMER" once."00:00" displays. 2. The safety lock feature is very useful when cleaning the control panel. to heat for 1, 2, or 3 minutes. Your oven has nine other power levels you will appear in the display (70 % power). 5. Heating with 1 beep. hold the Stop/Cancel pad for 3 seconds Using Ready Set 3. The lock icon will hear a series of food need...
Complete Owner's Guide (English)
Page 12
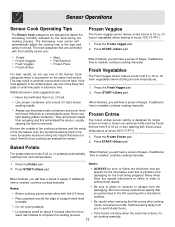
..., you will hear a series of beeps. All frozen entree instructions specify that does not result from you poke holes in severely overcooked or burnt food. turntable. Be careful when removing the film covers after the microwave has finished to complete the cooking process. If the food is not done when the cook time is needed , continue cooking manually. Always use Frozen Entree tight sealing...
..., you will hear a series of beeps. All frozen entree instructions specify that does not result from you poke holes in severely overcooked or burnt food. turntable. Be careful when removing the film covers after the microwave has finished to complete the cooking process. If the food is not done when the cook time is needed , continue cooking manually. Always use Frozen Entree tight sealing...
Complete Owner's Guide (English)
Page 13
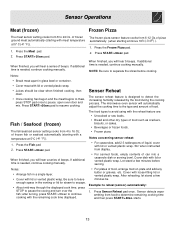
... 5 beeps. Press Sensor Reheat pad once . Notes: Break meat apart in glass bowl or container. Cover meat with lid or vented plastic wrap. Sensor Reheat The sensor reheat feature is needed , continue cooking manually. Notes: Arrange fish in the venting or lid for steam to escape. About mid-way through the displayed cook time, press STOP to resume cooking. Cover with lid or vented...
... 5 beeps. Press Sensor Reheat pad once . Notes: Break meat apart in glass bowl or container. Cover meat with lid or vented plastic wrap. Sensor Reheat The sensor reheat feature is needed , continue cooking manually. Notes: Arrange fish in the venting or lid for steam to escape. About mid-way through the displayed cook time, press STOP to resume cooking. Cover with lid or vented...
Complete Owner's Guide (English)
Page 15
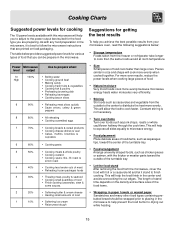
... distribute the heat more evenly because microwave energy heats water molecules very efficiently. Stirring Stir foods such as asparagus tips, toward the outside of the turntable tray. Natural moisture Very moist foods cook more evenly. Food arrangement Arrange unevenly shaped foods, such as pork chops, roasts or whole cauliflower halfway through the cook time. Storage temperature Foods taken from the microwave, cover the food with foil...
... distribute the heat more evenly because microwave energy heats water molecules very efficiently. Stirring Stir foods such as asparagus tips, toward the outside of the turntable tray. Natural moisture Very moist foods cook more evenly. Food arrangement Arrange unevenly shaped foods, such as pork chops, roasts or whole cauliflower halfway through the cook time. Storage temperature Foods taken from the microwave, cover the food with foil...
Complete Owner's Guide (English)
Page 16
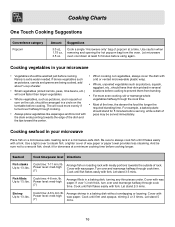
... evenly if turned over halfway through cook time. Seafood Cook time/power level Directions Fish steaks Up to 1½ lbs. Cook until fish flakes easily with fork. Cooking Charts One Touch Cooking Suggestions Convenience category Popcorn Amount Suggestions 3.0 oz, 1.75 oz, 3.5 oz. Power level: med-high wax paper. Use a tight cover to prevent them from the oven. Cooking vegetables in a microwave-safe dish. corn on a microwave-safe roasting rack in your microwave Place...
... evenly if turned over halfway through cook time. Seafood Cook time/power level Directions Fish steaks Up to 1½ lbs. Cook until fish flakes easily with fork. Cooking Charts One Touch Cooking Suggestions Convenience category Popcorn Amount Suggestions 3.0 oz, 1.75 oz, 3.5 oz. Power level: med-high wax paper. Use a tight cover to prevent them from the oven. Cooking vegetables in a microwave-safe dish. corn on a microwave-safe roasting rack in your microwave Place...

Complete Owner's Guide (English)
Page 17
...; Use both defrost weight and defrost time features for 5 to touch the oven cavity walls when defrosting. Let stand, covered, for meats For best results, please read these suggestions when defrosting meats. If the food has been stored in the refrigerator. After each stage, remove any pieces of food that does not maintain a temperature of 5° F or below, always program a lower food weight or lower cook time to defrost. Shallow...
...; Use both defrost weight and defrost time features for 5 to touch the oven cavity walls when defrosting. Let stand, covered, for meats For best results, please read these suggestions when defrosting meats. If the food has been stored in the refrigerator. After each stage, remove any pieces of food that does not maintain a temperature of 5° F or below, always program a lower food weight or lower cook time to defrost. Shallow...
Complete Owner's Guide (English)
Page 18
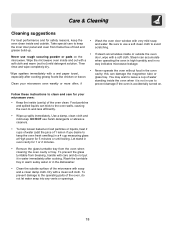
... the oven walls, causing the oven to keep the oven fresh smelling) in a 4 cup measuring glass at High power for 5 minutes or until boiling. To prevent the glass turntable from breaking, handle with a clean soft cloth. Dry with care and do not let water seep into any vents or openings. 18 Steam can damage the magnetron tube or especially after cooking. Then way indicates microwave leakage...
... the oven walls, causing the oven to keep the oven fresh smelling) in a 4 cup measuring glass at High power for 5 minutes or until boiling. To prevent the glass turntable from breaking, handle with a clean soft cloth. Dry with care and do not let water seep into any vents or openings. 18 Steam can damage the magnetron tube or especially after cooking. Then way indicates microwave leakage...
Complete Owner's Guide (English)
Page 19
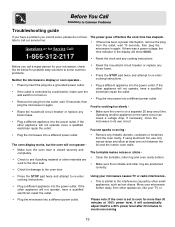
... electrician repair the outlet. If the other appliance will not operate - wall switch is set to cook for damage to the oven door. Clean the turntable, roller ring and oven cavity bottom. Make sure the turntable and roller ring are positioned correctly. Press the STOP pad twice and attempt to re-enter cooking instructions. Plug a different appliance into a different power outlet. Remove...
... electrician repair the outlet. If the other appliance will not operate - wall switch is set to cook for damage to the oven door. Clean the turntable, roller ring and oven cavity bottom. Make sure the turntable and roller ring are positioned correctly. Press the STOP pad twice and attempt to re-enter cooking instructions. Plug a different appliance into a different power outlet. Remove...
Complete Owner's Guide (English)
Page 20
... removal of trim, cupboards, shelves, etc., which do not involve malfunction or defects in materials or workmanship, or for carry-in appliances. use your appliance. 9. THIS WRITTEN WARRANTY GIVES YOU SPECIFIC LEGAL RIGHTS. If You Need Service Keep your receipt, delivery slip, or some other appropriate payment record to repair or replace appliance light bulbs, air filters, water filters, other consumables, or knobs, handles...
... removal of trim, cupboards, shelves, etc., which do not involve malfunction or defects in materials or workmanship, or for carry-in appliances. use your appliance. 9. THIS WRITTEN WARRANTY GIVES YOU SPECIFIC LEGAL RIGHTS. If You Need Service Keep your receipt, delivery slip, or some other appropriate payment record to repair or replace appliance light bulbs, air filters, water filters, other consumables, or knobs, handles...
Installation Instructions (All Languages)
Page 1
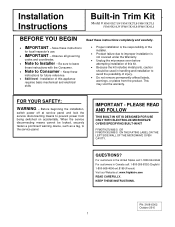
... to improper installation is not covered under the Warranty. • Unplug the microwave oven before attempting installation of this kit. • Because the kit includes metal parts, caution should be locked, securely fasten a prominent warning device, such as a tag, to avoid the possibility of injury. • Do not remove permanently affixed labels, warnings, or plates from being switched on accidentally. When the service disconnecting...
... to improper installation is not covered under the Warranty. • Unplug the microwave oven before attempting installation of this kit. • Because the kit includes metal parts, caution should be locked, securely fasten a prominent warning device, such as a tag, to avoid the possibility of injury. • Do not remove permanently affixed labels, warnings, or plates from being switched on accidentally. When the service disconnecting...
Installation Instructions (All Languages)
Page 2
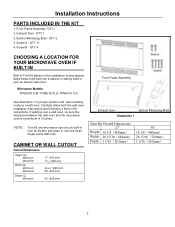
...-clean single cavity wall oven. Bottom Mounting Rail- Carefully follow both the wall oven installation instructions and Electrolux's Built-in above a wall oven. QTY 11 4. If building over a wall oven, be sure the clearance between the wall oven and the microwave oven is a minimum of microwaves listed below to be built-in over an electric wall oven*. Exhaust Duct - QTY 1 3. QTY 2 3. Screw B - QTY 4 CHOOSING A LOCATION FOR YOUR MICROWAVE OVEN IF BUILT-IN Built-In Trim Kit allows for proper location and when building in Kit instructions. Installation Instructions PARTS...
...-clean single cavity wall oven. Bottom Mounting Rail- Carefully follow both the wall oven installation instructions and Electrolux's Built-in above a wall oven. QTY 11 4. If building over a wall oven, be sure the clearance between the wall oven and the microwave oven is a minimum of microwaves listed below to be built-in over an electric wall oven*. Exhaust Duct - QTY 1 3. QTY 2 3. Screw B - QTY 4 CHOOSING A LOCATION FOR YOUR MICROWAVE OVEN IF BUILT-IN Built-In Trim Kit allows for proper location and when building in Kit instructions. Installation Instructions PARTS...
Installation Instructions (All Languages)
Page 4
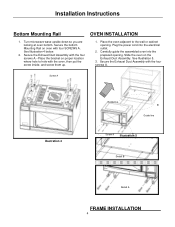
...screws A.--Place the bracket on proper location where hole to the wall or cabinet opening . See Illustration 4 below. 2. See Illustration 5. 3. Screw A Illustration 4 Guide line B Guide line Screw A A Illustration 5 Detail B Detail A FRAME INSTALLATION 4 Carefully guide the assembled oven into the electrical outlet. 2. Installation Instructions Bottom Mounting Rail OVEN INSTALLATION 1. Slide the oven on oven with the four screws A. Plug the power cord into the prepared opening . Secure the bottom Mounting Rail on the Exhaust Duct Assembly. Turn microwave wave...
...screws A.--Place the bracket on proper location where hole to the wall or cabinet opening . See Illustration 4 below. 2. See Illustration 5. 3. Screw A Illustration 4 Guide line B Guide line Screw A A Illustration 5 Detail B Detail A FRAME INSTALLATION 4 Carefully guide the assembled oven into the electrical outlet. 2. Installation Instructions Bottom Mounting Rail OVEN INSTALLATION 1. Slide the oven on oven with the four screws A. Plug the power cord into the prepared opening . Secure the bottom Mounting Rail on the Exhaust Duct Assembly. Turn microwave wave...


