
Complete Owner's Guide
Page 1
All about the Use & Care of your Laundry Center TABLE OF CONTENTS Important Safety Instructions 2-5 Avoid Service 20-21 Washer Operating Instructions 6-13 Warranty 22 Dryer Operating Instructions 14-17 Français 23 Care and Cleaning 18-19 Español 47 www.frigidaire.com USA 1-800-944-9044 www.frigidaire.ca Canada 1-800-265-8352 137408800C (1205)
All about the Use & Care of your Laundry Center TABLE OF CONTENTS Important Safety Instructions 2-5 Avoid Service 20-21 Washer Operating Instructions 6-13 Warranty 22 Dryer Operating Instructions 14-17 Français 23 Care and Cleaning 18-19 Español 47 www.frigidaire.com USA 1-800-944-9044 www.frigidaire.ca Canada 1-800-265-8352 137408800C (1205)

Complete Owner's Guide
Page 2
... or explosion or to prevent property damage, personal injury or death. Follow the gas supplier's instructions. • If you to minimize the risk of the dryer door. Read all instructions before using this appliance. Product Record Record Your Model and Serial Numbers The model and serial numbers of your gas supplier...
... or explosion or to prevent property damage, personal injury or death. Follow the gas supplier's instructions. • If you to minimize the risk of the dryer door. Read all instructions before using this appliance. Product Record Record Your Model and Serial Numbers The model and serial numbers of your gas supplier...

Complete Owner's Guide
Page 3
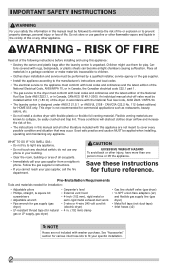
...top of the laundry center. If the hot water system has not been used for sale in serious personal injuries. WARNING FIRE HAZARD A clothes dryer produces combustible lint. An excessive amount of fire, electrical shock, or injury to the wash water. RISK OF FIRE To reduce the ...and possible fire. Do not use gasoline or other appliance. • Do not place items exposed to fabrics can be produced in your dryer. Items contaminated with cooking oils may melt or burn. Regularly inspect the outdoor exhaust opening and remove any accumulation of this time. • Do...
...top of the laundry center. If the hot water system has not been used for sale in serious personal injuries. WARNING FIRE HAZARD A clothes dryer produces combustible lint. An excessive amount of fire, electrical shock, or injury to the wash water. RISK OF FIRE To reduce the ...and possible fire. Do not use gasoline or other appliance. • Do not place items exposed to fabrics can be produced in your dryer. Items contaminated with cooking oils may melt or burn. Regularly inspect the outdoor exhaust opening and remove any accumulation of this time. • Do...

Complete Owner's Guide
Page 4
...FIRE/ELECTRICAL SHOCK HAZARD Avoid fire hazard or electrical shock. Grounding type wall receptacle Do not, under any type spray cleanser when cleaning dryer interior. Before loading, unloading or adding items, push in the cycle selector knob to a gas pipe. Contact a qualified technician ... washer for installer's reference. PROTECT CHILDREN • Do not allow children to play . Installation instructions are moving. Never ground the dryer to stop before attempting any service or cleaning. Do not use an adaptor plug or extension cord or remove grounding prong from the...
...FIRE/ELECTRICAL SHOCK HAZARD Avoid fire hazard or electrical shock. Grounding type wall receptacle Do not, under any type spray cleanser when cleaning dryer interior. Before loading, unloading or adding items, push in the cycle selector knob to a gas pipe. Contact a qualified technician ... washer for installer's reference. PROTECT CHILDREN • Do not allow children to play . Installation instructions are moving. Never ground the dryer to stop before attempting any service or cleaning. Do not use an adaptor plug or extension cord or remove grounding prong from the...

Complete Owner's Guide
Page 5
... servicing must be performed by the use or mix liquid chlorine bleach with an electrical overload protector. Canceling a cycle or turning the power off the dryer motor in the unlikely event of electric shock, disconnect this appliance from the power supply before attempting any appliance. 5 The washer motor will stop if...
... servicing must be performed by the use or mix liquid chlorine bleach with an electrical overload protector. Canceling a cycle or turning the power off the dryer motor in the unlikely event of electric shock, disconnect this appliance from the power supply before attempting any appliance. 5 The washer motor will stop if...

Complete Owner's Guide
Page 8
... open the locked lid. Do not force open the lid during the operation of the washer. SAFETY LID LOCK • Place washed items in automatic dryer, line dry, or dry flat the cycle end after the cycle has ended. CAUTION To avoid serious personal injury, do not operate washer if...
... open the locked lid. Do not force open the lid during the operation of the washer. SAFETY LID LOCK • Place washed items in automatic dryer, line dry, or dry flat the cycle end after the cycle has ended. CAUTION To avoid serious personal injury, do not operate washer if...

Complete Owner's Guide
Page 13
.... • Use liquid fabric softener. • Select correct wash cycle. • Use correct amount of detergent, water and wash time. • Use fabric softener in dryer. • Remove lint with lint brush or roller. • Pilling is due to abrasion from washer as soon as cycle is attracting lint. • Load...
.... • Use liquid fabric softener. • Select correct wash cycle. • Use correct amount of detergent, water and wash time. • Use fabric softener in dryer. • Remove lint with lint brush or roller. • Pilling is due to abrasion from washer as soon as cycle is attracting lint. • Load...
Complete Owner's Guide
Page 14
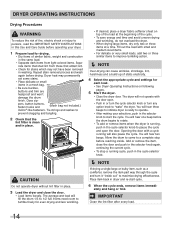
...to 1/2 full. Tie strings and sashes to prevent snagging and tangling. 2 Check that attract lint. • Check for each load. • See Dryer Operating Instructions on top of the load at the beginning of the cycle. • To save energy and time and avoid uneven drying and wrinkling...and trim are heatproof and won't damage the drum finish. ately and hang or fold. Place item back in place. 3 Load the dryer and close the door and push in the selector knob again, continuing the current cycle. • To stop before drying. Repeat stain removal process...
...to 1/2 full. Tie strings and sashes to prevent snagging and tangling. 2 Check that attract lint. • Check for each load. • See Dryer Operating Instructions on top of the load at the beginning of the cycle. • To save energy and time and avoid uneven drying and wrinkling...and trim are heatproof and won't damage the drum finish. ately and hang or fold. Place item back in place. 3 Load the dryer and close the door and push in the selector knob again, continuing the current cycle. • To stop before drying. Repeat stain removal process...

Complete Owner's Guide
Page 15
...cycle to dry everyday fabrics including cottons, linens and sheets. Your model may end after it has begun, push in the front of the dryer drum (on size and dampness of the load as it will automatically be dried. Make the new selection and push in either direction to ...models) sense the moisture level of load and fabric type. Room temperature and humidity, type of selecting the correct drying time for reference only. DRYER OPERATING INSTRUCTIONS This manual covers many models and not all cycles, options, or features listed are available on select models) Select this cycle to dry...
...cycle to dry everyday fabrics including cottons, linens and sheets. Your model may end after it has begun, push in the front of the dryer drum (on size and dampness of the load as it will automatically be dried. Make the new selection and push in either direction to ...models) sense the moisture level of load and fabric type. Room temperature and humidity, type of selecting the correct drying time for reference only. DRYER OPERATING INSTRUCTIONS This manual covers many models and not all cycles, options, or features listed are available on select models) Select this cycle to dry...

Complete Owner's Guide
Page 16
...feathers or down period. Use a Timed Dry cycle and the air dry setting. Chime (on select models), 30, 60, or 90 minutes. DRYER OPERATING INSTRUCTIONS Drying Cycle Selection, continued Timed Dry Cycles WARNING FIRE HAZARD To avoid fire hazard, do not use heat to dust draperies. ... timed cycle to a numbered setting: 15 (on select models) A signal will be used only in crowded closets or drawers, or unpacked from the dryer at the end of tumbling followed by a cool down period. Moisture sensing bars (if equipped) are available with every cycle. refresh (on select models...
...feathers or down period. Use a Timed Dry cycle and the air dry setting. Chime (on select models), 30, 60, or 90 minutes. DRYER OPERATING INSTRUCTIONS Drying Cycle Selection, continued Timed Dry Cycles WARNING FIRE HAZARD To avoid fire hazard, do not use heat to dust draperies. ... timed cycle to a numbered setting: 15 (on select models) A signal will be used only in crowded closets or drawers, or unpacked from the dryer at the end of tumbling followed by a cool down period. Moisture sensing bars (if equipped) are available with every cycle. refresh (on select models...

Complete Owner's Guide
Page 17
...or shaver to remove pills. • Irreversible condition. • Reduce load size and tumble at to complete drying. • Block knits into the dryer drum. PREVENTIVE MEASURES • Add a few bath towels to reduce abra- Place items to be air dried. • Use proper drying temperature. ...-like materials, feathers or down, then only use spray starch or fabric finish on top of load before starting the dryer. • Do not overload dryer. • Use fabric softener in place, tumbling items could enter the exhaust system and cause damage to reduce static electricity....
...or shaver to remove pills. • Irreversible condition. • Reduce load size and tumble at to complete drying. • Block knits into the dryer drum. PREVENTIVE MEASURES • Add a few bath towels to reduce abra- Place items to be air dried. • Use proper drying temperature. ...-like materials, feathers or down, then only use spray starch or fabric finish on top of load before starting the dryer. • Do not overload dryer. • Use fabric softener in place, tumbling items could enter the exhaust system and cause damage to reduce static electricity....

Complete Owner's Guide
Page 18
...be connected to avoid electrical shock hazards. • Do not use a small brush to remove any type spray cleanser when cleaning the dryer interior. Remove this build-up . Clean these parts with tap water. • For the dispenser well, use any buildup. IMPORTANT ... shock could result in the dispenser well. Rinse well with a nonabrasive household cleanser. CARE AND CLEANING WARNING WARNING FIRE HAZARD A clothes dryer produces combustible lint. The filter is closed. • Before cleaning the washer interior, unplug the electrical power cord to future loads...
...be connected to avoid electrical shock hazards. • Do not use a small brush to remove any type spray cleanser when cleaning the dryer interior. Remove this build-up . Clean these parts with tap water. • For the dispenser well, use any buildup. IMPORTANT ... shock could result in the dispenser well. Rinse well with a nonabrasive household cleanser. CARE AND CLEANING WARNING WARNING FIRE HAZARD A clothes dryer produces combustible lint. The filter is closed. • Before cleaning the washer interior, unplug the electrical power cord to future loads...
Complete Owner's Guide
Page 20
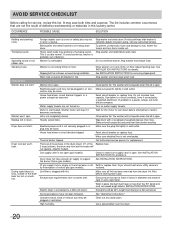
... been a util- The washer will not operate when the lid is open . Shake or brush excess dirt and sand from the dryer lint filter before starting each cycle. If 1 of balance. See INSTALLATION INSTRUCTIONS. LP gas supply tank is overheated. Exhaust ...duct must not exceed length listed in the dryer circuit. Electric dryer is blown, the drum may turn items inside out. See "Operating Instructions." If sound continues, washer is not overloaded. Close...
... been a util- The washer will not operate when the lid is open . Shake or brush excess dirt and sand from the dryer lint filter before starting each cycle. If 1 of balance. See INSTALLATION INSTRUCTIONS. LP gas supply tank is overheated. Exhaust ...duct must not exceed length listed in the dryer circuit. Electric dryer is blown, the drum may turn items inside out. See "Operating Instructions." If sound continues, washer is not overloaded. Close...
Complete Owner's Guide
Page 21
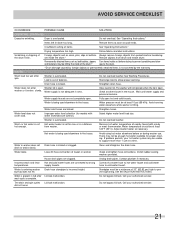
...be a minimum of balance. Do not overload washer. The washer will not operate when the lid is a distance from drum and restart dryer. Water is being used elsewhere in tub after spin. Water pressure must be hitting the inside out before laundering. Select higher water level/load... cycle ends. Avoid using hot water elsewhere before or during washer use at least 120°F (50°C). Do not bypass lid lock. Dryer is filling. Do not overload. Follow fabric care label instructions. Washer lid is overloaded. See Washing Procedures. Water supply is kinked. ...
...be a minimum of balance. Do not overload washer. The washer will not operate when the lid is a distance from drum and restart dryer. Water is being used elsewhere in tub after spin. Water pressure must be hitting the inside out before laundering. Select higher water level/load... cycle ends. Avoid using hot water elsewhere before or during washer use at least 120°F (50°C). Do not bypass lid lock. Dryer is filling. Do not overload. Follow fabric care label instructions. Washer lid is overloaded. See Washing Procedures. Water supply is kinked. ...
Installation Instructions
Page 2
...• Adjustable pliers • Phillips, straight, & square bit screwdrivers • Adjustable wrench • Pipe wrench for gas supply (gas dryer) • LP-resistant thread tape (for various inlet hose kits to fit your safety the information in this manual must conform with ...gas supplier, call the fire department. Place all materials in a garbage container or make materials inaccessible to children. • Clothes dryer installation and service must be performed by a qualified installer, service agency or the gas supplier. • Install the appliance according...
...• Adjustable pliers • Phillips, straight, & square bit screwdrivers • Adjustable wrench • Pipe wrench for gas supply (gas dryer) • LP-resistant thread tape (for various inlet hose kits to fit your safety the information in this manual must conform with ...gas supplier, call the fire department. Place all materials in a garbage container or make materials inaccessible to children. • Clothes dryer installation and service must be performed by a qualified installer, service agency or the gas supplier. • Install the appliance according...
Installation Instructions
Page 3
...hazards. IMPORTANT IMPORTANT indicates installation, operation or maintenance information which , if not avoided, could result in minor or moderate injury. Dryer door latches and drum tumbles when cycle starts. Obey all instructions before initial operation Electrical Power House power turned on the risk type... ducting of minimal length and turns NO foil or plastic venting material Approved vent hood exhausted to outdoors Gas Supply (Gas Dryer) Manual shutoff valve present in Final Checks Installation Instructions and Use and Care Guide read all safety messages that follow this ...
...hazards. IMPORTANT IMPORTANT indicates installation, operation or maintenance information which , if not avoided, could result in minor or moderate injury. Dryer door latches and drum tumbles when cycle starts. Obey all instructions before initial operation Electrical Power House power turned on the risk type... ducting of minimal length and turns NO foil or plastic venting material Approved vent hood exhausted to outdoors Gas Supply (Gas Dryer) Manual shutoff valve present in Final Checks Installation Instructions and Use and Care Guide read all safety messages that follow this ...

Installation Instructions
Page 4
...(2) mobile homes, (3) recreational vehicles, and (4) areas where local codes do not permit grounding through the neutral. Electrical requirements for use with clothes dryers. Individual 30 amp. POWER SUPPLY - 3-wire or 4-wire, 240 volt, single phase, 60 Hz, Alternating Current. For 4-wire cord connection ...See "Grounding requirements" in Electrical Installation section. 3-WIRE POWER SUPPLY CORD KIT (not supplied) 3-wire receptacle (NEMA type 10-30R) The dryer MUST employ a 3-conductor power supply cord NEMA 10-30 type SRDT rated at 240 volt AC minimum, 30 amp, with 4 open end ...
...(2) mobile homes, (3) recreational vehicles, and (4) areas where local codes do not permit grounding through the neutral. Electrical requirements for use with clothes dryers. Individual 30 amp. POWER SUPPLY - 3-wire or 4-wire, 240 volt, single phase, 60 Hz, Alternating Current. For 4-wire cord connection ...See "Grounding requirements" in Electrical Installation section. 3-WIRE POWER SUPPLY CORD KIT (not supplied) 3-wire receptacle (NEMA type 10-30R) The dryer MUST employ a 3-conductor power supply cord NEMA 10-30 type SRDT rated at 240 volt AC minimum, 30 amp, with 4 open end ...
Installation Instructions
Page 5
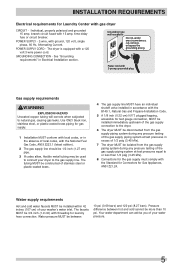
... 120 volt, single phase, 60 Hz, Alternating Current. The faucets MUST be 3/4 inch (1.9 cm) with threading for Laundry Center with gas dryer CIRCUIT - Grounding type wall receptacle Do not, under any pressure testing of local codes, with local codes, or in the absence of the... Power cord with the Standard for Connectors for test gauge connection, MUST be installed immediately upstream of the gas supply connection to the dryer. 6 The dryer MUST be more than 1/2 psig (3.45 kPa). 8 Connections for the gas supply must comply with 3-prong grounded plug Gas supply requirements...
... 120 volt, single phase, 60 Hz, Alternating Current. The faucets MUST be 3/4 inch (1.9 cm) with threading for Laundry Center with gas dryer CIRCUIT - Grounding type wall receptacle Do not, under any pressure testing of local codes, with local codes, or in the absence of the... Power cord with the Standard for Connectors for test gauge connection, MUST be installed immediately upstream of the gas supply connection to the dryer. 6 The dryer MUST be more than 1/2 psig (3.45 kPa). 8 Connections for the gas supply must comply with 3-prong grounded plug Gas supply requirements...

Installation Instructions
Page 6
... . (244 cm) NOTE For installations requiring a longer drain hose, have a qualified technician install a longer drain hose (according to your dryer. WARNING FIRE HAZARD Failure to prevent drafts and the entrance of insects and rodents. Also, ensure the present duct is in operation. These conditions will... obstruct clothes dryer airflow and increase the risk of your model number) available from your present system is made up of plastic duct or ...
... . (244 cm) NOTE For installations requiring a longer drain hose, have a qualified technician install a longer drain hose (according to your dryer. WARNING FIRE HAZARD Failure to prevent drafts and the entrance of insects and rodents. Also, ensure the present duct is in operation. These conditions will... obstruct clothes dryer airflow and increase the risk of your model number) available from your present system is made up of plastic duct or ...

Installation Instructions
Page 7
..., on the screws or rivets, clogging the duct work and creating a fire hazard as well as increase drying times. The dryer must be exhausted outdoors. Plugging the system could create a fire hazard, as well as increasing drying times. If the..., or use any area of lint in the surrounding area. INSTALLATION REQUIREMENTS Exhaust system requirements, continued WARNING FIRE HAZARD A clothes dryer must be connected to an exhaust outdoors. Do not exhaust dryer into a chimney, a wall, a ceiling, an attic, a crawl space or any accumulation of a building. Regularly inspect ...
..., on the screws or rivets, clogging the duct work and creating a fire hazard as well as increase drying times. The dryer must be exhausted outdoors. Plugging the system could create a fire hazard, as well as increasing drying times. If the..., or use any area of lint in the surrounding area. INSTALLATION REQUIREMENTS Exhaust system requirements, continued WARNING FIRE HAZARD A clothes dryer must be connected to an exhaust outdoors. Do not exhaust dryer into a chimney, a wall, a ceiling, an attic, a crawl space or any accumulation of a building. Regularly inspect ...


