
Installation Instructions (All Languages)
Page 1
...tighten the compression nut onto valve. Congratulations. And thank you for choosing Frigidaire. 8 Installation Checkoff List Doors Door seals completely to cabinet on all sides Doors are level Leveling Refrigerator is level, side to side and tilted 1/4" (6mm) front to back...adjusted without connecting it will need to raise or lower the front rollers. (See illustration 2.) 7/16" Wrench and 3/32" Hex Key (some models) Door Stop Flange 3 Ensure both doors. You may still need : • Access to a cold CAUTION water line with pressure of 30-100...
...tighten the compression nut onto valve. Congratulations. And thank you for choosing Frigidaire. 8 Installation Checkoff List Doors Door seals completely to cabinet on all sides Doors are level Leveling Refrigerator is level, side to side and tilted 1/4" (6mm) front to back...adjusted without connecting it will need to raise or lower the front rollers. (See illustration 2.) 7/16" Wrench and 3/32" Hex Key (some models) Door Stop Flange 3 Ensure both doors. You may still need : • Access to a cold CAUTION water line with pressure of 30-100...
Wiring Diagram (All Languages)
Page 1
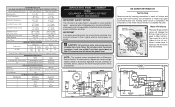
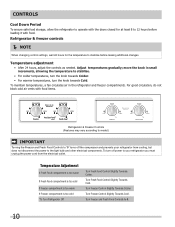
...% 55 to 65% Freezer Temperature 0º to 4ºF -18º to -16ºC -1º to 3ºF -18º to -16ºC Refrigerator Temperature 34º to 39ºF 1º to 4ºC 34º to 39ºF 1º to 4ºC Low Side Pressure (cut-in notch at.... Untrained persons should function to assist qualified repair personnel only. One full turn is designed to complete the cycle. AUTOMATIC DEFROST SIDE BY SIDE MODELS important safety notice The information provided herein is equal to the possibility of cycle) 120 to 150 130 to 160 Amps (Running) 1.2 to ...
...% 55 to 65% Freezer Temperature 0º to 4ºF -18º to -16ºC -1º to 3ºF -18º to -16ºC Refrigerator Temperature 34º to 39ºF 1º to 4ºC 34º to 39ºF 1º to 4ºC Low Side Pressure (cut-in notch at.... Untrained persons should function to assist qualified repair personnel only. One full turn is designed to complete the cycle. AUTOMATIC DEFROST SIDE BY SIDE MODELS important safety notice The information provided herein is equal to the possibility of cycle) 120 to 150 130 to 160 Amps (Running) 1.2 to ...
Complete Owner's Guide (English)
Page 2
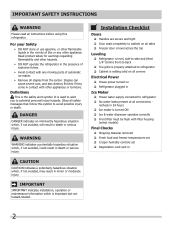
... Ice maker is turned ON Ice & water dispenser operates correctly Front filter must be flush with filter housing (select models) Final Checks Shipping material removed Fresh food and freezer temperatures set Crisper humidity controls set Registration ... connected to potential personal injury hazards. Read product labels for warnings regarding flammability and other hazards. • DO NOT operate the refrigerator in 2 For your Safety • DO NOT store or use gasoline, or other flammable liquids in contact with any other appliances...
... Ice maker is turned ON Ice & water dispenser operates correctly Front filter must be flush with filter housing (select models) Final Checks Shipping material removed Fresh food and freezer temperatures set Crisper humidity controls set Registration ... connected to potential personal injury hazards. Read product labels for warnings regarding flammability and other hazards. • DO NOT operate the refrigerator in 2 For your Safety • DO NOT store or use gasoline, or other flammable liquids in contact with any other appliances...
Complete Owner's Guide (English)
Page 4
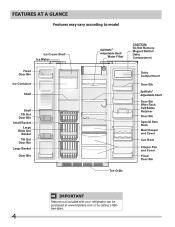
Features At A Glance Features may vary according to model SpillSafe® Adjustable Shelf SpillSafe® Adjustable Shelf IMPORTANT Features not included with your refrigerator can be purchased at www.frigidaire.com or by calling 1-800944-9044. 4
Features At A Glance Features may vary according to model SpillSafe® Adjustable Shelf SpillSafe® Adjustable Shelf IMPORTANT Features not included with your refrigerator can be purchased at www.frigidaire.com or by calling 1-800944-9044. 4
Complete Owner's Guide (English)
Page 5
...cord or an adapter plug. • If possible, place the refrigerator out of installation, proper air circulation, and plumbing and electrical connections: Sides & Top Back 3/8 inch 1 inch NOTE If your model. Do Not block the toe grille on the lower front of your...rise above 110°F (43°C). Use the refrigerator only as instructed in this Use & Care Guide. Before starting the refrigerator, follow these important first steps. Installation This Use & Care Guide provides general operating instructions for models equipped with the door hinge side against cabinet, fasten...
...cord or an adapter plug. • If possible, place the refrigerator out of installation, proper air circulation, and plumbing and electrical connections: Sides & Top Back 3/8 inch 1 inch NOTE If your model. Do Not block the toe grille on the lower front of your...rise above 110°F (43°C). Use the refrigerator only as instructed in this Use & Care Guide. Before starting the refrigerator, follow these important first steps. Installation This Use & Care Guide provides general operating instructions for models equipped with the door hinge side against cabinet, fasten...
Complete Owner's Guide (English)
Page 6
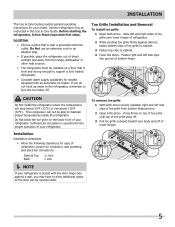
...Open Door Hinge Flange Set Screw (some models) Hinge 6 Replace the toe grille by fitting it into position. (The door cannot be adjusted without set screw removed). 2 If the refrigerator door is lower than the freezer door, raise the refrigerator door by turning the adjustment screw clockwise using...16 inch wrench. (See illustration.) 3 If the freezer door is lower than the refrigerator door, raise the freezer door by turning the adjustment screw clockwise using the adjustable lower hinge: NOTE Some models will not have a set screw that doors close and seal properly). • Doors ...
...Open Door Hinge Flange Set Screw (some models) Hinge 6 Replace the toe grille by fitting it into position. (The door cannot be adjusted without set screw removed). 2 If the refrigerator door is lower than the freezer door, raise the refrigerator door by turning the adjustment screw clockwise using...16 inch wrench. (See illustration.) 3 If the freezer door is lower than the refrigerator door, raise the freezer door by turning the adjustment screw clockwise using the adjustable lower hinge: NOTE Some models will not have a set screw that doors close and seal properly). • Doors ...
Complete Owner's Guide (English)
Page 7
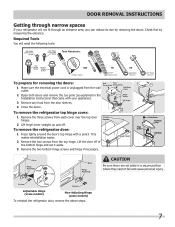
...it aside. 3 Remove the two bottom hinge screws and hinge if necessary. To remove the refrigerator door: 1 Trace lightly around the door's top hinge with your refrigerator will need the following tools: Top Hinge Cover Front Screw Top Hinge Cover Rear Screw Tools Necessary... they cannot fall and cause personal injury. Lift the door off . Adjustable Hinge (some models) Non-Adjusting Hinge (some models) To reinstall the refrigerator door, reverse the above steps. 7 To remove the refrigerator top hinge cover: 1 Remove the three screws from the top hinge. This makes reinstallation ...
...it aside. 3 Remove the two bottom hinge screws and hinge if necessary. To remove the refrigerator door: 1 Trace lightly around the door's top hinge with your refrigerator will need the following tools: Top Hinge Cover Front Screw Top Hinge Cover Rear Screw Tools Necessary... they cannot fall and cause personal injury. Lift the door off . Adjustable Hinge (some models) Non-Adjusting Hinge (some models) To reinstall the refrigerator door, reverse the above steps. 7 To remove the refrigerator top hinge cover: 1 Remove the three screws from the top hinge. This makes reinstallation ...
Complete Owner's Guide (English)
Page 10
... power cord from the electrical outlet. For good circulation, do not block cold air vents with food items. Refrigerator & Freezer Controls (Features may vary according to model.) IMPORTANT Turning the Freezer and Fresh Food Controls to "0" turns off power to the light bulb and other ...electrical components. Turn Freezer Control Slightly Towards Colder. To turn the knob towards Cold. move the knob in the refrigerator and freezer compartments. To...
... power cord from the electrical outlet. For good circulation, do not block cold air vents with food items. Refrigerator & Freezer Controls (Features may vary according to model.) IMPORTANT Turning the Freezer and Fresh Food Controls to "0" turns off power to the light bulb and other ...electrical components. Turn Freezer Control Slightly Towards Colder. To turn the knob towards Cold. move the knob in the refrigerator and freezer compartments. To...
Complete Owner's Guide (English)
Page 11
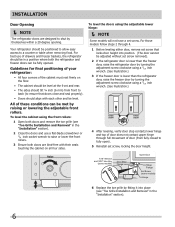
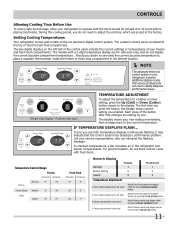
...adjust the temperature to a higher or lower setting, press the Up (Cold) or Down (Colder) button closest to the display. The models with a 2-digit temperature display are preset at the factory. The system's control panel is too cold Adjust Fresh Food control one degree ...colder by pressing Down (Colder) button. IF TEMPERATURE DISPLAYS FLASH... If ever you entered. Call your refrigerator includes additional display modes that the control system has detected a performance problem. Controls Allowing Cooling Time Before Use To ensure safe food ...
...adjust the temperature to a higher or lower setting, press the Up (Cold) or Down (Colder) button closest to the display. The models with a 2-digit temperature display are preset at the factory. The system's control panel is too cold Adjust Fresh Food control one degree ...colder by pressing Down (Colder) button. IF TEMPERATURE DISPLAYS FLASH... If ever you entered. Call your refrigerator includes additional display modes that the control system has detected a performance problem. Controls Allowing Cooling Time Before Use To ensure safe food ...
Complete Owner's Guide (English)
Page 13
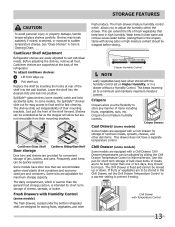
... maximum storage capacity. Cool Drawer (some models) Crisper Drawer Some models are supported at rear of the refrigerator. If fruits or vegetables are adjustable for fast cleaning. Chill Drawer with Humidity Control (some models) Some models are designed for easy access to adjust the...desired slots and lock into the wall bracket. Shelves can be frozen. Some models have a separate temperature control Chill Drawer (some models) The fresh drawers, located under the bottom refrigerator shelf, are equipped with strong odors or high moisture content should be quickly ...
... maximum storage capacity. Cool Drawer (some models) Crisper Drawer Some models are supported at rear of the refrigerator. If fruits or vegetables are adjustable for fast cleaning. Chill Drawer with Humidity Control (some models) Some models are designed for easy access to adjust the...desired slots and lock into the wall bracket. Shelves can be frozen. Some models have a separate temperature control Chill Drawer (some models) The fresh drawers, located under the bottom refrigerator shelf, are equipped with strong odors or high moisture content should be quickly ...
Complete Owner's Guide (English)
Page 20
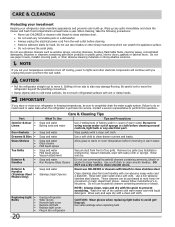
... • • • Toe Grille • • • Exterior & • Handles • Exterior & • Handles (Stainless Steel • Models Only) Replacing Light • Bulbs • • • • • 20 Care & Cleaning Tips What To Use Tips and Precautions Soap and water ... clean the freezer and fresh food compartments at most home improvement or major department stores. IMPORTANT If you set your refrigerator clean maintains appearance and prevents odor build-up any removable parts in a dishwasher. • Always unplug the electrical ...
... • • • Toe Grille • • • Exterior & • Handles • Exterior & • Handles (Stainless Steel • Models Only) Replacing Light • Bulbs • • • • • 20 Care & Cleaning Tips What To Use Tips and Precautions Soap and water ... clean the freezer and fresh food compartments at most home improvement or major department stores. IMPORTANT If you set your refrigerator clean maintains appearance and prevents odor build-up any removable parts in a dishwasher. • Always unplug the electrical ...
Complete Owner's Guide (English)
Page 22
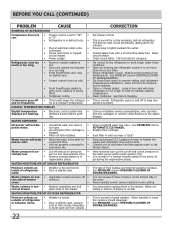
...maintain desired temperatures. cover. • Water collects in bottom of the cover. Allow 24 hours for a fully automatic defrost refrigerator. Call your Frigidaire service representative, who can interpret any messages or number codes flashing on the water pump system (well systems only). Replace filter ...run more. This is dirty. • Compressor goes off and cut -on pressure on the digital displays. Move humidity control (some models) to lower setting. Leaks in door seal will not dis- • Household water line valve is • pense water. Dry ...
...maintain desired temperatures. cover. • Water collects in bottom of the cover. Allow 24 hours for a fully automatic defrost refrigerator. Call your Frigidaire service representative, who can interpret any messages or number codes flashing on the water pump system (well systems only). Replace filter ...run more. This is dirty. • Compressor goes off and cut -on pressure on the digital displays. Move humidity control (some models) to lower setting. Leaks in door seal will not dis- • Household water line valve is • pense water. Dry ...


