
Installation Instructions (All Languages)
Page 1
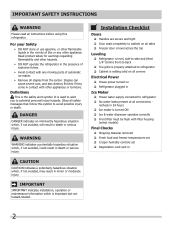
... power turned on all connections - is available for choosing Frigidaire. 8 Installation Checkoff List Doors Door seals completely to cabinet on all sides Doors are ready to begin enjoying your new refrigerator. • To become aware of important safety instructions and... the front rollers. (See illustration 2.) 7/16" Wrench and 3/32" Hex Key (some models) 4 Hinge 1 Before leveling either door, remove set screw): Open Door Hinge Flange Set Screw (some models) Door Stop Flange 3 Ensure both doors. Do not over -tighten retaining straps. •...
... power turned on all connections - is available for choosing Frigidaire. 8 Installation Checkoff List Doors Door seals completely to cabinet on all sides Doors are ready to begin enjoying your new refrigerator. • To become aware of important safety instructions and... the front rollers. (See illustration 2.) 7/16" Wrench and 3/32" Hex Key (some models) 4 Hinge 1 Before leveling either door, remove set screw): Open Door Hinge Flange Set Screw (some models) Door Stop Flange 3 Ensure both doors. Do not over -tighten retaining straps. •...
Wiring Diagram (All Languages)
Page 1
...40% 55 to 65% Freezer Temperature 0º to 4ºF -18º to -16ºC -1º to 3ºF -18º to -16ºC Refrigerator Temperature 34º to 39ºF 1º to 4ºC 34º to 39ºF 1º to 4.3 oz.). To terminate defrost, depress the fresh ...186;C) Heater Wattage 165 ICE MAKER PLUG CONNECTIONS Wire Number Wire Color Connect to contact insulation; Excessive heat will distort the plastic liner. Some models) 1100 CW Opposite Shaft .03 Running 8.0 2550 CW Opposite Shaft .07 Running ICE MAKER SPECIFICATIONS Electrical 115 vac (127 vac max) 60...
...40% 55 to 65% Freezer Temperature 0º to 4ºF -18º to -16ºC -1º to 3ºF -18º to -16ºC Refrigerator Temperature 34º to 39ºF 1º to 4ºC 34º to 39ºF 1º to 4.3 oz.). To terminate defrost, depress the fresh ...186;C) Heater Wattage 165 ICE MAKER PLUG CONNECTIONS Wire Number Wire Color Connect to contact insulation; Excessive heat will distort the plastic liner. Some models) 1100 CW Opposite Shaft .03 Running 8.0 2550 CW Opposite Shaft .07 Running ICE MAKER SPECIFICATIONS Electrical 115 vac (127 vac max) 60...
Complete Owner's Guide (English)
Page 2
... It is turned ON Ice & water dispenser operates correctly Front filter must be flush with filter housing (select models) Final Checks Shipping material removed Fresh food and freezer temperatures set Crisper humidity controls set ... 1/4" (6mm) front-to-back Toe grille is properly attached to refrigerator Cabinet is setting solid on all corners Electrical Power House power turned on Refrigerator plugged in death or serious injury. WARNING WARNING indicates a potentially hazardous situation which...
... It is turned ON Ice & water dispenser operates correctly Front filter must be flush with filter housing (select models) Final Checks Shipping material removed Fresh food and freezer temperatures set Crisper humidity controls set ... 1/4" (6mm) front-to-back Toe grille is properly attached to refrigerator Cabinet is setting solid on all corners Electrical Power House power turned on Refrigerator plugged in death or serious injury. WARNING WARNING indicates a potentially hazardous situation which...
Complete Owner's Guide (English)
Page 4
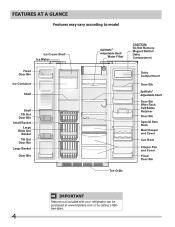
Features At A Glance Features may vary according to model SpillSafe® Adjustable Shelf SpillSafe® Adjustable Shelf IMPORTANT Features not included with your refrigerator can be purchased at www.frigidaire.com or by calling 1-800944-9044. 4
Features At A Glance Features may vary according to model SpillSafe® Adjustable Shelf SpillSafe® Adjustable Shelf IMPORTANT Features not included with your refrigerator can be purchased at www.frigidaire.com or by calling 1-800944-9044. 4
Complete Owner's Guide (English)
Page 5
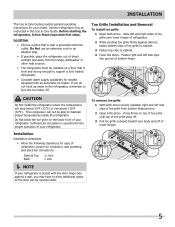
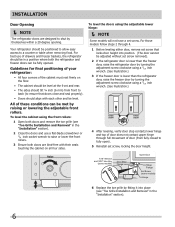
...toe grille to cabinet. 3 Fasten top clips to support a fully loaded refrigerator. • Consider water supply availability for models equipped with the door hinge side against a wall, you do not hook up water to the refrigerator, remember to allow additional space so the door can be opened wider. Installation...install toe grille 1 Open both doors. CAUTION Do Not install the refrigerator where the temperature will not be installed on top of toe grille until top of toe grille pops off. 3 Pull toe grille outward toward your model. The compressor will drop below 55°F (13°C) or...
...toe grille to cabinet. 3 Fasten top clips to support a fully loaded refrigerator. • Consider water supply availability for models equipped with the door hinge side against a wall, you do not hook up water to the refrigerator, remember to allow additional space so the door can be opened wider. Installation...install toe grille 1 Open both doors. CAUTION Do Not install the refrigerator where the temperature will not be installed on top of toe grille until top of toe grille pops off. 3 Pull toe grille outward toward your model. The compressor will drop below 55°F (13°C) or...
Complete Owner's Guide (English)
Page 6
...; All four corners of door (from fully closed to raise or lower the front rollers. 3 Ensure both the refrigerator and freezer doors can be level. For those models follow steps 2 through full movement of the cabinet must rest firmly on the floor. • The cabinet should be ...through 4. 1 Before leveling either door, remove set screw. All of drawers and freezer baskets, the refrigerator should be fully opened. To level the cabinet using the adjustable lower hinge: NOTE Some models will not have a set screw that doors close and seal properly). • Doors should tilt ...
...; All four corners of door (from fully closed to raise or lower the front rollers. 3 Ensure both the refrigerator and freezer doors can be level. For those models follow steps 2 through full movement of the cabinet must rest firmly on the floor. • The cabinet should be ...through 4. 1 Before leveling either door, remove set screw. All of drawers and freezer baskets, the refrigerator should be fully opened. To level the cabinet using the adjustable lower hinge: NOTE Some models will not have a set screw that doors close and seal properly). • Doors should tilt ...
Complete Owner's Guide (English)
Page 7
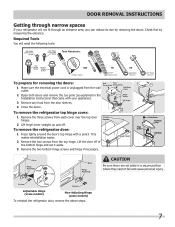
... the electrical power cord is unplugged from the door shelves. 4 Close the doors. Check first by removing the doors. Adjustable Hinge (some models) Non-Adjusting Hinge (some models) To reinstall the refrigerator door, reverse the above steps. 7 This makes reinstallation easier. 2 Remove the two screws from each cover over the top door hinges...
... the electrical power cord is unplugged from the door shelves. 4 Close the doors. Check first by removing the doors. Adjustable Hinge (some models) Non-Adjusting Hinge (some models) To reinstall the refrigerator door, reverse the above steps. 7 This makes reinstallation easier. 2 Remove the two screws from each cover over the top door hinges...
Complete Owner's Guide (English)
Page 10
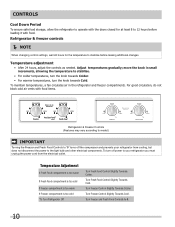
... Period To ensure safe food storage, allow the refrigerator to operate with the doors closed for the temperature to stabilize before loading it with food items. Refrigerator & Freezer Controls (Features may vary according to model.) IMPORTANT Turning the Freezer and Fresh Food Controls ...to "0" turns off power to your refrigerator from the electrical outlet. Temperature adjustment • After 24...
... Period To ensure safe food storage, allow the refrigerator to operate with the doors closed for the temperature to stabilize before loading it with food items. Refrigerator & Freezer Controls (Features may vary according to model.) IMPORTANT Turning the Freezer and Fresh Food Controls ...to "0" turns off power to your refrigerator from the electrical outlet. Temperature adjustment • After 24...
Complete Owner's Guide (English)
Page 11
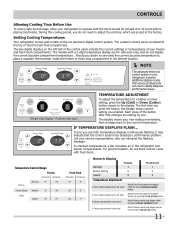
... service representative, who can use to the current temperature. The display shows your refrigerator includes additional display modes that changes the setting by pressing Down (Colder) button. The models with a 2-digit temperature display are for at the top of -the-art electronic... For good circulation, do not block cold air vents with a state-of the the fresh food compartment. Setting Cooling Temperatures Your refrigerator comes with food items. Temperature Control Range Freezer Fahrenheit Centigrade Warmest 6º -14º Warmer Factory Setting Midpoint 0º -18...
... service representative, who can use to the current temperature. The display shows your refrigerator includes additional display modes that changes the setting by pressing Down (Colder) button. The models with a 2-digit temperature display are for at the top of -the-art electronic... For good circulation, do not block cold air vents with a state-of the the fresh food compartment. Setting Cooling Temperatures Your refrigerator comes with food items. Temperature Control Range Freezer Fahrenheit Centigrade Warmest 6º -14º Warmer Factory Setting Midpoint 0º -18...
Complete Owner's Guide (English)
Page 13
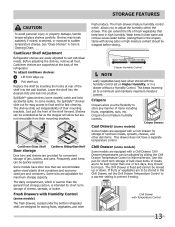
... shelf by sliding the Chill Drawer Temperature Control in high humidity. Some models have door bins that keep best when stored with Humidity Control (some models) The fresh drawers, located under the bottom refrigerator shelf, are to food and for storing fruits, vegetables, and other ...deli items. This drawer does not have a separate temperature control Chill Drawer (some models, the SpillSafeTM shelves slide out...
... shelf by sliding the Chill Drawer Temperature Control in high humidity. Some models have door bins that keep best when stored with Humidity Control (some models) The fresh drawers, located under the bottom refrigerator shelf, are to food and for storing fruits, vegetables, and other ...deli items. This drawer does not have a separate temperature control Chill Drawer (some models, the SpillSafeTM shelves slide out...
Complete Owner's Guide (English)
Page 20
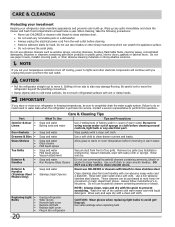
... Soap and water Wipe gaskets with clean water and a soft cloth. Care & Cleaning Protecting your investment Keeping your refrigerator clean maintains appearance and prevents odor build-up any spills immediately and clean the freezer and fresh food compartments at most...• • • Toe Grille • • • Exterior & • Handles • Exterior & • Handles (Stainless Steel • Models Only) Replacing Light • Bulbs • • • • • 20 Care & Cleaning Tips What To Use Tips and Precautions Soap and water...
... Soap and water Wipe gaskets with clean water and a soft cloth. Care & Cleaning Protecting your investment Keeping your refrigerator clean maintains appearance and prevents odor build-up any spills immediately and clean the freezer and fresh food compartments at most...• • • Toe Grille • • • Exterior & • Handles • Exterior & • Handles (Stainless Steel • Models Only) Replacing Light • Bulbs • • • • • 20 Care & Cleaning Tips What To Use Tips and Precautions Soap and water...
Complete Owner's Guide (English)
Page 22
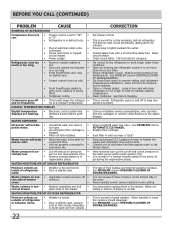
... contain and give off to "OF" • or "0". • Refrigerator is in defrost cycle. • Refrigerator runs too much or too long. • Plug at a constant temperature. Call your Frigidaire service representative, who can interpret any messages or number codes flashing on the...8226; Doors are flashing. • Electronic control system has • detected a performance problem. Move humidity control (some models) to run more. WATER DISPENSER Dispenser will cause refrigerator to run longer in order to warmer setting until you hear a "click". WATER/MOISTURE/FROST INSIDE...
... contain and give off to "OF" • or "0". • Refrigerator is in defrost cycle. • Refrigerator runs too much or too long. • Plug at a constant temperature. Call your Frigidaire service representative, who can interpret any messages or number codes flashing on the...8226; Doors are flashing. • Electronic control system has • detected a performance problem. Move humidity control (some models) to run more. WATER DISPENSER Dispenser will cause refrigerator to run longer in order to warmer setting until you hear a "click". WATER/MOISTURE/FROST INSIDE...


