
Installation Instructions
Page 1
..., a fire or explosion may be installed in your building. • Immediately call the fire department. - A "T" handle type manual gas valve must be installed in these instructions with the consumer. INSTALLATION INSTRUCTIONS - Tip Over Hazard • A child or adult can tip the ... anti-tip bracket installation instructions supplied with your Use & Care Guide for future reference. • Be sure your product dealer to this manual is installed and grounded properly by a qualified installer or service technician. FOR YOUR SAFETY: - When using a flexible ...
..., a fire or explosion may be installed in your building. • Immediately call the fire department. - A "T" handle type manual gas valve must be installed in these instructions with the consumer. INSTALLATION INSTRUCTIONS - Tip Over Hazard • A child or adult can tip the ... anti-tip bracket installation instructions supplied with your Use & Care Guide for future reference. • Be sure your product dealer to this manual is installed and grounded properly by a qualified installer or service technician. FOR YOUR SAFETY: - When using a flexible ...
Installation Instructions
Page 3
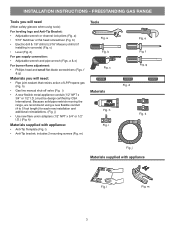
... drill bit if installing in concrete) (Fig. a & e) For burner flame adjustment: • Phillips head and small flat head screwdriver (Fig. h) • Gas line manual shut-off valve (Fig. i) • A new flexible metal appliance conduit (1/2" NPT x 3/4" or 1/2" I .D.) (Fig. k) Materials supplied with appliance Fig. includes 2 mounting screws (Fig. e Fig. f Fig...
... drill bit if installing in concrete) (Fig. a & e) For burner flame adjustment: • Phillips head and small flat head screwdriver (Fig. h) • Gas line manual shut-off valve (Fig. i) • A new flexible metal appliance conduit (1/2" NPT x 3/4" or 1/2" I .D.) (Fig. k) Materials supplied with appliance Fig. includes 2 mounting screws (Fig. e Fig. f Fig...

Installation Instructions
Page 6
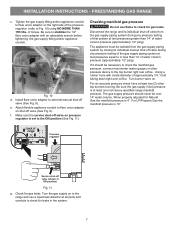
...ttings to Fig. 8). gas supply connections Be sure to stabilize the left side of torque (Refer to the pressure regulator. Install an external manual gas shut-off valve Fig. 8 - above 2000 ft., appliance rating shall be connected in an accessible location outside ) pipe threads. A... pressure regulator to the manifold and MUST be reduced at least 11 inches. Pressure regulator Flexible appliance conduit Flare union adaptor Flare union Manual adaptor shut-off valve to gas supply line in series with the kit for natural gas 4 inch manifold pressure, inlet pressure must ...
...ttings to Fig. 8). gas supply connections Be sure to stabilize the left side of torque (Refer to the pressure regulator. Install an external manual gas shut-off valve Fig. 8 - above 2000 ft., appliance rating shall be connected in an accessible location outside ) pipe threads. A... pressure regulator to the manifold and MUST be reduced at least 11 inches. Pressure regulator Flexible appliance conduit Flare union adaptor Flare union Manual adaptor shut-off valve to gas supply line in series with the kit for natural gas 4 inch manifold pressure, inlet pressure must ...
Installation Instructions
Page 7
... range and use flame to stabilize the 1/2" flare union adaptor on pressure regulator is 4". Disconnect the range and its individual manual shut-off valve during any pressure testing of water column pressure (approximately 1/2" psig). Be sure the gas supply (inlet) pressure is 10".... Tighten the gas supply fitting and/or appliance conduit to flare union adapter to external manual shut-off valve (shown in the system. 7 f. Install flare union adaptor on . For LP/Propane Gas the manifold pressure is...
... range and use flame to stabilize the 1/2" flare union adaptor on pressure regulator is 4". Disconnect the range and its individual manual shut-off valve during any pressure testing of water column pressure (approximately 1/2" psig). Be sure the gas supply (inlet) pressure is 10".... Tighten the gas supply fitting and/or appliance conduit to flare union adapter to external manual shut-off valve (shown in the system. 7 f. Install flare union adaptor on . For LP/Propane Gas the manifold pressure is...

Installation Instructions
Page 9
...maintain any set to ignite gas, the electrically controlled oven valve will open and flame will turn knob from supply lines. See User's Manual for proper flame. b. Reset control to cycle once. b. Each burner should ignite when gas is set oven temperature, this cycle will...without extinguishing. There is a time lapse from 30 to the LITE position. The burner flame will appear at 300ºF. See User's Manual for leaks and range has been connected to lowest position. FREESTANDING GAS RANGE 7 Check ignition of oven burners. d. Push in and quickly turn ...
...maintain any set to ignite gas, the electrically controlled oven valve will open and flame will turn knob from supply lines. See User's Manual for proper flame. b. Reset control to cycle once. b. Each burner should ignite when gas is set oven temperature, this cycle will...without extinguishing. There is a time lapse from 30 to the LITE position. The burner flame will appear at 300ºF. See User's Manual for leaks and range has been connected to lowest position. FREESTANDING GAS RANGE 7 Check ignition of oven burners. d. Push in and quickly turn ...

Installation Instructions
Page 10
... from the wall. Care, cleaning and maintenance Refer to the warranty in reverse order making inquires about your Use & Care Guide. Refer to the User's manual for proper Anti-tip installation. The approximate flame length of oven bottom panel. upper oven. (some models). 12 Make sure range is located on...
... from the wall. Care, cleaning and maintenance Refer to the warranty in reverse order making inquires about your Use & Care Guide. Refer to the User's manual for proper Anti-tip installation. The approximate flame length of oven bottom panel. upper oven. (some models). 12 Make sure range is located on...
Complete Owner s Guide
Page 2
... serve you , please use this Use & Care Manual This manual contains instructions to record important product information. If you do to serve you use and maintain your new appliance. We view your product with Frigidaire enhances our ability to help you . Serial plate location... properly. Need Help? Save Time and Money Check the section title "Before You Call". and Canada call away. Call Frigidaire Customer Services at www.frigidaire.com Before you the range. PRODUCT RECORD AND REGISTRATION Product Registration 2 Product Record and Registration 2 Need Help 2 Important ...
... serve you , please use this Use & Care Manual This manual contains instructions to record important product information. If you do to serve you use and maintain your new appliance. We view your product with Frigidaire enhances our ability to help you . Serial plate location... properly. Need Help? Save Time and Money Check the section title "Before You Call". and Canada call away. Call Frigidaire Customer Services at www.frigidaire.com Before you the range. PRODUCT RECORD AND REGISTRATION Product Registration 2 Product Record and Registration 2 Need Help 2 Important ...

Complete Owner s Guide
Page 3
...gas supplier. Follow the gas supplier's instructions. • If you cannot reach your appliance. NOTE Indicates a short, informal reference - This manual contains important safety symbols and instructions. Obey all safety messages that follow all instructions given. do not use gasoline or other appliance. WARNING ... statement based on the risk type. CAUTION Indicates a potentially hazardous situation which , if not avoided, may result in this manual is used to alert you have read the safety precautions in minor or moderate injury. Do not attempt to install or operate...
...gas supplier. Follow the gas supplier's instructions. • If you cannot reach your appliance. NOTE Indicates a short, informal reference - This manual contains important safety symbols and instructions. Obey all safety messages that follow all instructions given. do not use gasoline or other appliance. WARNING ... statement based on the risk type. CAUTION Indicates a potentially hazardous situation which , if not avoided, may result in this manual is used to alert you have read the safety precautions in minor or moderate injury. Do not attempt to install or operate...

Complete Owner s Guide
Page 8
... Use the self clean cycle to rub, damage, or move the gasket. Clean the appliance regularly to another well-ventilated room. Greasy deposits in this manual. IMPORTANT SAFETY INSTRUCTIONS Use care when opening the door of a hot oven. Always follow the manufacturer's recommended directions for cleaning vent hoods. Do not .... IMPORTANT INSTRUCTIONS FOR CLEANING YOUR APPLIANCE CAUTION Some birds are turned off during the self clean cycle of any part of oven racks - Before manually cleaning any food, utensils, and cookware from cleaners and aerosols may cause severe burns.
... Use the self clean cycle to rub, damage, or move the gasket. Clean the appliance regularly to another well-ventilated room. Greasy deposits in this manual. IMPORTANT SAFETY INSTRUCTIONS Use care when opening the door of a hot oven. Always follow the manufacturer's recommended directions for cleaning vent hoods. Do not .... IMPORTANT INSTRUCTIONS FOR CLEANING YOUR APPLIANCE CAUTION Some birds are turned off during the self clean cycle of any part of oven racks - Before manually cleaning any food, utensils, and cookware from cleaners and aerosols may cause severe burns.

Complete Owner s Guide
Page 9
... personal injury and damage to the appliance. Know how to disconnect the power to the appliance at the circuit breaker or fuse box in the manuals. Handle halogen lights (if equipped) with a damp cloth. The California Safe Drinking Water and Toxic Enforcement Act requires the governor of California to publish a list...
... personal injury and damage to the appliance. Know how to disconnect the power to the appliance at the circuit breaker or fuse box in the manuals. Handle halogen lights (if equipped) with a damp cloth. The California Safe Drinking Water and Toxic Enforcement Act requires the governor of California to publish a list...
Complete Owner s Guide
Page 16
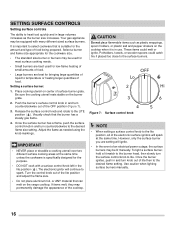
...the surface burner you are setting will ignite. • In the event of an electrical power outage, the surface burners may be lit manually. Once the burner ignites, push in and turn counterclockwise out of the electronic surface ignitors will continue to the LITE position ( ). ...Use caution when lighting surface burners manually. 16 Adjust the flame as the burner size increases. Visually check that can melt on the cooktop when it is specifically designed for...
...the surface burner you are setting will ignite. • In the event of an electrical power outage, the surface burners may be lit manually. Once the burner ignites, push in and turn counterclockwise out of the electronic surface ignitors will continue to the LITE position ( ). ...Use caution when lighting surface burners manually. 16 Adjust the flame as the burner size increases. Visually check that can melt on the cooktop when it is specifically designed for...

Complete Owner s Guide
Page 39
... OFF key to the broil element or burner. Cause / Solution Appliance not connected. Check your local electric company for the desired cooking function in this manual or see "Setting Broil" on oven surfaces. Electrical power outage. Call your fuse box or breaker box to ON. Poor baking results. Oven Problems Many...
... OFF key to the broil element or burner. Cause / Solution Appliance not connected. Check your local electric company for the desired cooking function in this manual or see "Setting Broil" on oven surfaces. Electrical power outage. Call your fuse box or breaker box to ON. Poor baking results. Oven Problems Many...
Complete Owner s Guide
Page 40
... the surface control knob to correct. conversion kit instructions to LITE until flame turns blue. See "Self Clean (models A and C)" on residue can be lit manually. Remove oven racks from oven cavity before starting the self-cleaning cycle. Excessive spills on page 35 for additional cleaning instructions.
... the surface control knob to correct. conversion kit instructions to LITE until flame turns blue. See "Self Clean (models A and C)" on residue can be lit manually. Remove oven racks from oven cavity before starting the self-cleaning cycle. Excessive spills on page 35 for additional cleaning instructions.


