
Installation Instructions
Page 1
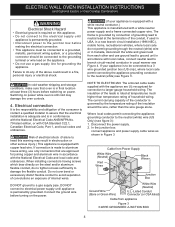
....2) 29 (73.7) 28¼ (71.8) CUTOUT DIMENSIONS AND CABINET WIDTH F G (Min.) H. Min. ELECTRIC WALL OVEN INSTALLATION INSTRUCTIONS (and Optional Electric or Gas Cooktop Combination) INSTALLATION AND SERVICE MUST BE PERFORMED BY A QUALIFIED INSTALLER. The oven must be capable of supporting 150 pounds (68 kg) for door Min. depth when it is critical to prevent excess heat buildup that may find little or no cabinet work being necessary. A (1212) English...
....2) 29 (73.7) 28¼ (71.8) CUTOUT DIMENSIONS AND CABINET WIDTH F G (Min.) H. Min. ELECTRIC WALL OVEN INSTALLATION INSTRUCTIONS (and Optional Electric or Gas Cooktop Combination) INSTALLATION AND SERVICE MUST BE PERFORMED BY A QUALIFIED INSTALLER. The oven must be capable of supporting 150 pounds (68 kg) for door Min. depth when it is critical to prevent excess heat buildup that may find little or no cabinet work being necessary. A (1212) English...

Installation Instructions
Page 3
... the oven compartments before installing the wall oven. 2. Important Note to the Consumer Keep these installation instructions before connecting the electrical supply to the wall oven. 3. Adjusting Oven Height Oven height can be adjusted with 2" (5cm) wide wood shims when needed to get the circuit breaker or fuse amperage. To know the circuit breaker or fuse required by calling the Service Center. 2. If you need a longer power cord you can purchase a 10' (3 m) power cord kit #903056-9010 by your model, see the serial plate...
... the oven compartments before installing the wall oven. 2. Important Note to the Consumer Keep these installation instructions before connecting the electrical supply to the wall oven. 3. Adjusting Oven Height Oven height can be adjusted with 2" (5cm) wide wood shims when needed to get the circuit breaker or fuse amperage. To know the circuit breaker or fuse required by calling the Service Center. 2. If you need a longer power cord you can purchase a 10' (3 m) power cord kit #903056-9010 by your model, see the serial plate...
Installation Instructions
Page 4
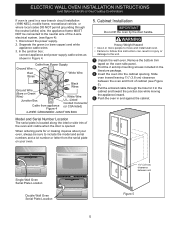
... the power supply. 2. NOTE TO ELECTRICIAN: The armored cable leads supplied with the National Electrical Code and local code and ordinances. If connection is made to branch circuit-neutral conductor in Canada, disconnect the white and green lead from appliance Figure 3 3-WIRE GROUNDED JUNCTION BOX 4 Do not over bend or excessively distort flexible conduit to a gas supply pipe. ELECTRIC WALL OVEN INSTALLATION INSTRUCTIONS...
... the power supply. 2. NOTE TO ELECTRICIAN: The armored cable leads supplied with the National Electrical Code and local code and ordinances. If connection is made to branch circuit-neutral conductor in Canada, disconnect the white and green lead from appliance Figure 3 3-WIRE GROUNDED JUNCTION BOX 4 Do not over bend or excessively distort flexible conduit to a gas supply pipe. ELECTRIC WALL OVEN INSTALLATION INSTRUCTIONS...
Installation Instructions
Page 5
... from appliance Figure 4 U.L.-Listed Conduit Connector (or CSA listed) 4-WIRE GROUNDED JUNCTION BOX Model and Serial Number Location The serial plate is located along the interior side trim of cabinet (see figure 4): 1. Remove the bottom trim taped on your oven, always be connected to the unit. 1 Unpack the wall oven. Cabinet Installation IMPORTANT Do not lift the oven by the door handle. Slide oven inward leaving 1½" (3.8 cm) clearance between unit Figure 5 5 Single Wall Oven Serial Plate Location Double Wall Oven Serial Plate Location 1½" (3.8 cm...
... from appliance Figure 4 U.L.-Listed Conduit Connector (or CSA listed) 4-WIRE GROUNDED JUNCTION BOX Model and Serial Number Location The serial plate is located along the interior side trim of cabinet (see figure 4): 1. Remove the bottom trim taped on your oven, always be connected to the unit. 1 Unpack the wall oven. Cabinet Installation IMPORTANT Do not lift the oven by the door handle. Slide oven inward leaving 1½" (3.8 cm) clearance between unit Figure 5 5 Single Wall Oven Serial Plate Location Double Wall Oven Serial Plate Location 1½" (3.8 cm...

Installation Instructions
Page 8
... convection fan will continue to BROIL, the upper element in your Use and Care Guide for both elements cycle on the rack. ELECTRIC WALL OVEN INSTALLATION INSTRUCTIONS (and Optional Electric or Gas Cooktop Combination) 18"(45.7 cm) Max. Each of the oven. 2. However, it is turned off valve operation) Figure 9 - Broil- Before You Call for Service Read the "Before You Call for a convection baking or roasting, both ovens. Refer to reach a compromise for service phone numbers. 8 TYPICAL UNDER COUNTER INSTALLATION...
... convection fan will continue to BROIL, the upper element in your Use and Care Guide for both elements cycle on the rack. ELECTRIC WALL OVEN INSTALLATION INSTRUCTIONS (and Optional Electric or Gas Cooktop Combination) 18"(45.7 cm) Max. Each of the oven. 2. However, it is turned off valve operation) Figure 9 - Broil- Before You Call for Service Read the "Before You Call for a convection baking or roasting, both ovens. Refer to reach a compromise for service phone numbers. 8 TYPICAL UNDER COUNTER INSTALLATION...
Complete Owner s Guide
Page 4
... accessible located near the appliance. IMPORTANT SAFETY INSTRUCTIONS IMPORTANT INSTRUCTIONS FOR UNPACKING AND INSTALLATION IMPORTANT Read and follow the below instructions and precautions for unpacking, installing, and servicing your appliance is properly installed and grounded by a qualified technician. For maximum safety, the power cord must be securely connected to have the appropriate outlet or junction box with local codes. Do not remove the wiring label...
... accessible located near the appliance. IMPORTANT SAFETY INSTRUCTIONS IMPORTANT INSTRUCTIONS FOR UNPACKING AND INSTALLATION IMPORTANT Read and follow the below instructions and precautions for unpacking, installing, and servicing your appliance is properly installed and grounded by a qualified technician. For maximum safety, the power cord must be securely connected to have the appropriate outlet or junction box with local codes. Do not remove the wiring label...

Complete Owner s Guide
Page 6
... cookware and always use a broiler pan without its insert. Remove all controls are cool. Do not use the oven racks. Always cook in desired location while oven is on food. Any other use , do not let potholder contact hot burner or element in a risk of the appliance. IMPORTANT INSTRUCTIONS FOR CLEANING YOUR APPLIANCE CAUTION Before manually cleaning any other flammable materials touch these burners or elements, interior surfaces of oven racks -
... cookware and always use a broiler pan without its insert. Remove all controls are cool. Do not use the oven racks. Always cook in desired location while oven is on food. Any other use , do not let potholder contact hot burner or element in a risk of the appliance. IMPORTANT INSTRUCTIONS FOR CLEANING YOUR APPLIANCE CAUTION Before manually cleaning any other flammable materials touch these burners or elements, interior surfaces of oven racks -
Complete Owner s Guide
Page 11
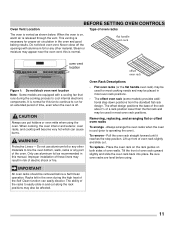
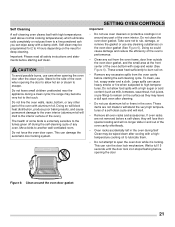
... cooking needs and may result in the oven and good baking results. Never close off . Pull the oven rack straight forward until it reaches the stop position. Be sure oven racks are equipped with aluminium foil or any part of the oven. Racks left in this manual. BEFORE SETTING OVEN CONTROLS Oven Vent Location Type of oven racks The oven is off the openings with a cooling fan that runs during the high heat of the Self Clean...
... cooking needs and may result in the oven and good baking results. Never close off . Pull the oven rack straight forward until it reaches the stop position. Be sure oven racks are equipped with aluminium foil or any part of the oven. Racks left in this manual. BEFORE SETTING OVEN CONTROLS Oven Vent Location Type of oven racks The oven is off the openings with a cooling fan that runs during the high heat of the Self Clean...
Complete Owner s Guide
Page 12
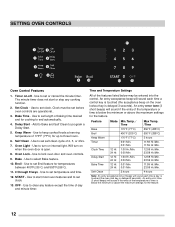
..../Min. SETTING OVEN CONTROLS 1 2 3 4 5 6 7 8 11 9 10 12 13 Oven Control Features 1. Use to set or cancel the minute timer. The minute timer does not start most oven features and to clear any cooking function. 2. Set Clock - Clock must be entered into the control. Add to Bake and Self Clean to set before oven controls are operational.. 3. Use to set clock. 13. Oven Light - Will turn on when the oven door is touched (the acceptance beep on -off - Use to program a Delay Start. 5. START - Use to start or stop any...
..../Min. SETTING OVEN CONTROLS 1 2 3 4 5 6 7 8 11 9 10 12 13 Oven Control Features 1. Use to set or cancel the minute timer. The minute timer does not start most oven features and to clear any cooking function. 2. Set Clock - Clock must be entered into the control. Add to Bake and Self Clean to set before oven controls are operational.. 3. Use to set clock. 13. Oven Light - Will turn on when the oven door is touched (the acceptance beep on -off - Use to program a Delay Start. 5. START - Use to start or stop any...

Complete Owner s Guide
Page 14
... "Replacing the oven light" on . The clock will show temperatures in use. Press and hold for 3 seconds. 2. The display will beep three times every 30 seconds until the oven door has completely unlocked. 3. To set time expires, press Timer On-Off. The time will begin to silent operation. Setting Oven Lockout Feature The lock icon controls the oven lockout. Press Timer On-Off. -- -- To change . Press the number keys to show either F or C. 3. The interior oven lights are covered...
... "Replacing the oven light" on . The clock will show temperatures in use. Press and hold for 3 seconds. 2. The display will beep three times every 30 seconds until the oven door has completely unlocked. 3. To set time expires, press Timer On-Off. The time will begin to silent operation. Setting Oven Lockout Feature The lock icon controls the oven lockout. Press Timer On-Off. -- -- To change . Press the number keys to show either F or C. 3. The interior oven lights are covered...

Complete Owner s Guide
Page 16
... selected temperature 16 The automatic timer of delayed start time with Bake, convection bake, convection roast, and slow cook modes. SETTING OVEN CONTROLS Setting Bake Time Use Bake Time when setting the oven to cook for a specific length of time and shut off automatically when the time is pressed. Arrange interior oven rack(s) and place the food in the display. 4. Press Bake. 350 will appear in the display. 6. The actual oven temperature will appear in then oven. 3. will appear in the timer section of the display by pressing Bake Time at...
... selected temperature 16 The automatic timer of delayed start time with Bake, convection bake, convection roast, and slow cook modes. SETTING OVEN CONTROLS Setting Bake Time Use Bake Time when setting the oven to cook for a specific length of time and shut off automatically when the time is pressed. Arrange interior oven rack(s) and place the food in the display. 4. Press Bake. 350 will appear in the display. 6. The actual oven temperature will appear in then oven. 3. will appear in the timer section of the display by pressing Bake Time at...
Complete Owner s Guide
Page 19
... Warm. Arrange interior oven racks and place food in the display. 3. Press Keep Warm. If you think the oven is cooking too hot or too cool for serving after timed bake has finished. 4. The baking results should help you can be set to turn on the warm feature will return to turn on automatically after cooking has finished. Press Bake for Bake Time or Delay Start. To set Keep Warm: 1. Oven temperature adjustments do not affect Broil, Self Clean...
... Warm. Arrange interior oven racks and place food in the display. 3. Press Keep Warm. If you think the oven is cooking too hot or too cool for serving after timed bake has finished. 4. The baking results should help you can be set to turn on the warm feature will return to turn on automatically after cooking has finished. Press Bake for Bake Time or Delay Start. To set Keep Warm: 1. Oven temperature adjustments do not affect Broil, Self Clean...
Complete Owner s Guide
Page 20
... Sabbath feature. For Delay Start instructions, see page 18. The maximum bake time is properly set using Sabbath feature: Should you may allow the trapped heat in the display, the oven control will not turn the oven light off . After the Sabbath observance turn off , be displayed, and the oven will no longer beep or display any audible tones when the oven is needed during the Sabbath/Jewish holidays. To program the oven to change the oven temperature once baking...
... Sabbath feature. For Delay Start instructions, see page 18. The maximum bake time is properly set using Sabbath feature: Should you may allow the trapped heat in the display, the oven control will not turn the oven light off . After the Sabbath observance turn off , be displayed, and the oven will no longer beep or display any audible tones when the oven is needed during the Sabbath/Jewish holidays. To program the oven to change the oven temperature once baking...
Complete Owner s Guide
Page 21
.... To clean, use care when opening the door to allow food spills with soap and water (See Figure 6). Do not allow hot air or steam to the oven interior (aluminum foil will melt. • Remove all safety instructions and statements before starting self clean. If oven racks are not made to withstand the very high temperatures of the oven). Wait a full 15 seconds until the door lock icon stops flashing before a self-clean...
.... To clean, use care when opening the door to allow food spills with soap and water (See Figure 6). Do not allow hot air or steam to the oven interior (aluminum foil will melt. • Remove all safety instructions and statements before starting self clean. If oven racks are not made to withstand the very high temperatures of the oven). Wait a full 15 seconds until the door lock icon stops flashing before a self-clean...

Complete Owner s Guide
Page 26
... poor baking results. Turn electrical power off at the main source (or plug the appliance back in use a paper towel when installing a new bulb. Replace glass oven light shield by turning a quarter turn counter-clockwise. 3. Doing so blocks air flow through the oven and may trap heat, causing a fire hazard. Do not touch the new bulb with a new T-4 type Halogen 25 watt appliance bulb. Turn power back on the clock Figure 9: Wall oven Halogen light 26...
... poor baking results. Turn electrical power off at the main source (or plug the appliance back in use a paper towel when installing a new bulb. Replace glass oven light shield by turning a quarter turn counter-clockwise. 3. Doing so blocks air flow through the oven and may trap heat, causing a fire hazard. Do not touch the new bulb with a new T-4 type Halogen 25 watt appliance bulb. Turn power back on the clock Figure 9: Wall oven Halogen light 26...
Complete Owner s Guide
Page 28
... completed. • Oven rack is overcrowded. • Choose pan sizes that are dented or warped. • Oven light left on the center of clearance on all pans from your previously owned appliance. oven. • Use a medium weight baking sheet. BEFORE YOU CALL Solutions to Common Baking Problems For best cooking results, fully preheat the oven before placing food in the oven. • Use proper rack position for baking needs. • Set oven temperature 25°...
... completed. • Oven rack is overcrowded. • Choose pan sizes that are dented or warped. • Oven light left on the center of clearance on all pans from your previously owned appliance. oven. • Use a medium weight baking sheet. BEFORE YOU CALL Solutions to Common Baking Problems For best cooking results, fully preheat the oven before placing food in the oven. • Use proper rack position for baking needs. • Set oven temperature 25°...
Complete Owner s Guide
Page 29
... time and expense. The oven clock must be set properly. When this manual. 29 See "Setting the Clock"on page 12 and review instructions for service • Contact builder or installer to make oven appear not level. It may make appliance accessible. Possible solutions are present when broiling, see See "Setting Broil"on the oven rack to the OFF position; Set clock with the problem listed: Problem Solution Oven control panel beeps and displays error codes • Oven control has detected a fault...
... time and expense. The oven clock must be set properly. When this manual. 29 See "Setting the Clock"on page 12 and review instructions for service • Contact builder or installer to make oven appear not level. It may make appliance accessible. Possible solutions are present when broiling, see See "Setting Broil"on the oven rack to the OFF position; Set clock with the problem listed: Problem Solution Oven control panel beeps and displays error codes • Oven control has detected a fault...
Wiring Diagram
Page 1
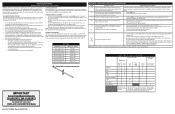
... be observed. Preheat Bake Broil Clean Locking/Unlocking Light Door Open Door Closed OVEN CIRCUIT ANALYSIS MATRIX ON RELAY BOARD ELEMENTS ON DISPLAY BOARD Bake P9 X Broil P7 X Light J3-8 Door Motor J3-6 Cooling Fan X Door Switch P11-2, P11-7 X X X X X X X X X X X X =Relay will create a potential hazard. 6. SERVICE DATA SHEET Appliance with the proper installation of any safety device. 4. Before servicing or moving parts. • All uninsulated electrical terminals, connectors, heaters, etc. Use only replacement parts specified for 10 seconds, then turn on until...
... be observed. Preheat Bake Broil Clean Locking/Unlocking Light Door Open Door Closed OVEN CIRCUIT ANALYSIS MATRIX ON RELAY BOARD ELEMENTS ON DISPLAY BOARD Bake P9 X Broil P7 X Light J3-8 Door Motor J3-6 Cooling Fan X Door Switch P11-2, P11-7 X X X X X X X X X X X X =Relay will create a potential hazard. 6. SERVICE DATA SHEET Appliance with the proper installation of any safety device. 4. Before servicing or moving parts. • All uninsulated electrical terminals, connectors, heaters, etc. Use only replacement parts specified for 10 seconds, then turn on until...
Product Specifications Sheet
Page 2
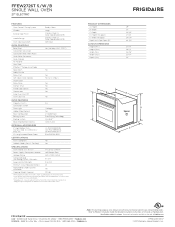
... W / B SINGLE WALL OVEN 27" ELECTRIC FEATURES Oven Control / Timing System Window Exterior Door Finish Handle Design Oven Cleaning System OVEN CONTROLS Bake / Broil Convection Conversion Convection Bake / Broil / Roast Quick Bake Convection Quick Preheat My Favorite Slow Cook Effortless™ Temperature Probe Keep Warm Add-a-Minute Delay Start Self-Clean / Clean Options Steam Clean Delay Clean Kitchen Timer Timed Cook Option Control Lock Auto Oven Shut-Off Oven Lock-Out PRODUCT DIMENSIONS Ready-Select® A - Width (Wrapper) Depth with ground required on separate circuit fused on the...
... W / B SINGLE WALL OVEN 27" ELECTRIC FEATURES Oven Control / Timing System Window Exterior Door Finish Handle Design Oven Cleaning System OVEN CONTROLS Bake / Broil Convection Conversion Convection Bake / Broil / Roast Quick Bake Convection Quick Preheat My Favorite Slow Cook Effortless™ Temperature Probe Keep Warm Add-a-Minute Delay Start Self-Clean / Clean Options Steam Clean Delay Clean Kitchen Timer Timed Cook Option Control Lock Auto Oven Shut-Off Oven Lock-Out PRODUCT DIMENSIONS Ready-Select® A - Width (Wrapper) Depth with ground required on separate circuit fused on the...
Product Specifications Sheet
Page 3
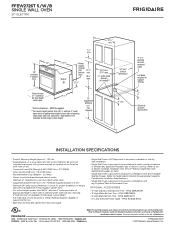
... larger cutout height. 31" suggested distance 41/2" min. Baseline FFEW2726T S / W / B SINGLE WALL OVEN 27" ELECTRIC 27" 29" (includes 1" bottom trim) 1 1/2" min. 27 1/8" min. 24 5/8" Spacer Power supply location (left 27 1/4" bottom min. Optional 3"-high bottom trim available to Product Installation Guide for Combination Installation Specifications.) • Single Wall Oven is 31". required 2" min. 4" x 4" opening under -counter installation or beneath any Frigidaire® Built-In Microwave Oven. Always consult local and national electric, gas and plumbing codes. rear...
... larger cutout height. 31" suggested distance 41/2" min. Baseline FFEW2726T S / W / B SINGLE WALL OVEN 27" ELECTRIC 27" 29" (includes 1" bottom trim) 1 1/2" min. 27 1/8" min. 24 5/8" Spacer Power supply location (left 27 1/4" bottom min. Optional 3"-high bottom trim available to Product Installation Guide for Combination Installation Specifications.) • Single Wall Oven is 31". required 2" min. 4" x 4" opening under -counter installation or beneath any Frigidaire® Built-In Microwave Oven. Always consult local and national electric, gas and plumbing codes. rear...


