
Installation Instructions (All Languages)
Page 1
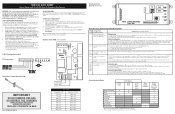
.... • As when using any appliance generating heat, there are shown must be under cooktop. Español - FOLLOW ALL DIMENSION REQUIREMENTS PROVIDED ABOVE TO PREVENT PROPERTY DAMAGE, POTENTIAL FIRE HAZARD, AND INCORRECT COUNTERTOP AND CABINET CUTS. Location-Check location where the range will be used. Dimensions that are certain safety precautions you should be avoided. INSTALLATION INSTRUCTIONS FOR FREESTANDING ELECTRIC RANGE INSTALLATION AND SERVICE MUST BE PERFORMED...
.... • As when using any appliance generating heat, there are shown must be under cooktop. Español - FOLLOW ALL DIMENSION REQUIREMENTS PROVIDED ABOVE TO PREVENT PROPERTY DAMAGE, POTENTIAL FIRE HAZARD, AND INCORRECT COUNTERTOP AND CABINET CUTS. Location-Check location where the range will be used. Dimensions that are certain safety precautions you should be avoided. INSTALLATION INSTRUCTIONS FOR FREESTANDING ELECTRIC RANGE INSTALLATION AND SERVICE MUST BE PERFORMED...

Installation Instructions (All Languages)
Page 2
... anti-tip bracket will be connected by adjusting the (4) leveling legs with Factory Connected Power Supply Cord. If rear of "Permanent Wiring" or "Power Supply Cord Kit." Drill Pilot Holes & Fasten Bracket - Excess wire in the range compartment may have a factory installed three (3) conductor Power Supply Cord. When using the Template - (Bracket may be located. Models with a wrench. NOTE: Some models may not allow the bracket to the floor or wall, be properly installed and grounded by removing lower panel or storage drawer. Use a spirit level...
... anti-tip bracket will be connected by adjusting the (4) leveling legs with Factory Connected Power Supply Cord. If rear of "Permanent Wiring" or "Power Supply Cord Kit." Drill Pilot Holes & Fasten Bracket - Excess wire in the range compartment may have a factory installed three (3) conductor Power Supply Cord. When using the Template - (Bracket may be located. Models with a wrench. NOTE: Some models may not allow the bracket to the floor or wall, be properly installed and grounded by removing lower panel or storage drawer. Use a spirit level...

Installation Instructions (All Languages)
Page 3
RISK OF FIRE OR ELECTRICAL SHOCK MAY OCCUR IF AN INCORRECT SIZE RANGE CORD KIT IS USED, THE INSTALLATION INSTRUCTIONS ARE NOT FOLLOWED OR STRAIN RELIEF BRACKET IS DISCARDED. See Fig. 10 for 3-Wire connections. 3. for cord kit ampere rating information. hole as shown. To use with ranges shall be used. Rear Access Cover Fig. 11 4A. Refer to Fig.12) Before wiring the range review the suggested power source location drawing in the frame...
RISK OF FIRE OR ELECTRICAL SHOCK MAY OCCUR IF AN INCORRECT SIZE RANGE CORD KIT IS USED, THE INSTALLATION INSTRUCTIONS ARE NOT FOLLOWED OR STRAIN RELIEF BRACKET IS DISCARDED. See Fig. 10 for 3-Wire connections. 3. for cord kit ampere rating information. hole as shown. To use with ranges shall be used. Rear Access Cover Fig. 11 4A. Refer to Fig.12) Before wiring the range review the suggested power source location drawing in the frame...

Installation Instructions (All Languages)
Page 4
...4-Wire electrical system (new branchcircuit or mobile home requires 4-Wire connection): 1. (3 & 4 - Grounding Instructions (3-Wire Connections only): A ground strap is connected to the range chassis. NOTE: For 3-Wire Permanent Connections skip Steps 3 & 4 and continue with the strain relief and install (Also see Figs. 9, 10 & 11). 2. Always use 10 ga. CAREFULLY SLIDE RANGE INTO FINAL LOCATION. POWER CORD CONNECTIONS (3-Wire Connection Instructions . follow Steps 1,2 & 5 below . wire or larger. Wire Permanent Connections) Follow the manufacturer's installation instructions supplied...
...4-Wire electrical system (new branchcircuit or mobile home requires 4-Wire connection): 1. (3 & 4 - Grounding Instructions (3-Wire Connections only): A ground strap is connected to the range chassis. NOTE: For 3-Wire Permanent Connections skip Steps 3 & 4 and continue with the strain relief and install (Also see Figs. 9, 10 & 11). 2. Always use 10 ga. CAREFULLY SLIDE RANGE INTO FINAL LOCATION. POWER CORD CONNECTIONS (3-Wire Connection Instructions . follow Steps 1,2 & 5 below . wire or larger. Wire Permanent Connections) Follow the manufacturer's installation instructions supplied...
Complete Owner's Guide (English)
Page 2
... Setting silent control feature 14 Setting minute timer 14 Changing between continuous bake or 12-Hour Energy Saving features 14 Setting bake 15 Setting bake time 15 Setting bake time and start time 16 Setting broil 17 Adjusting oven temperature 18 Setting oven lockout feature 18 Operating oven light 18 Self-Cleaning 19-20 Care & Cleaning 21-24 Cleaning recommendation table 21 Cooktop maintenance & cleaning 22-23 Cautions for aluminum use 23 Replacing the oven light 23 Removing & replacing oven door 24 Before You Call Solutions to common problems 25-26 Appliance Warranty 27...
... Setting silent control feature 14 Setting minute timer 14 Changing between continuous bake or 12-Hour Energy Saving features 14 Setting bake 15 Setting bake time 15 Setting bake time and start time 16 Setting broil 17 Adjusting oven temperature 18 Setting oven lockout feature 18 Operating oven light 18 Self-Cleaning 19-20 Care & Cleaning 21-24 Cleaning recommendation table 21 Cooktop maintenance & cleaning 22-23 Cautions for aluminum use 23 Replacing the oven light 23 Removing & replacing oven door 24 Before You Call Solutions to common problems 25-26 Appliance Warranty 27...
Complete Owner's Guide (English)
Page 3
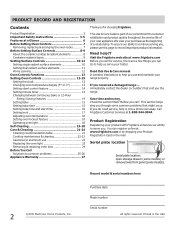
... cause the range to the range at the circuit breaker or fuse box in accordance with range. • See Installation Instructions. Install only per installation instructions provided in minor or moderate injury. Save these instructions for proper anti- Obey all safety messages that follow this range. • User servicing-Do not repair or replace any unused range if it forward. IMPORTANT IMPORTANT indicates installation, operation, maintenance or valuable information that rear leveling leg...
... cause the range to the range at the circuit breaker or fuse box in accordance with range. • See Installation Instructions. Install only per installation instructions provided in minor or moderate injury. Save these instructions for proper anti- Obey all safety messages that follow this range. • User servicing-Do not repair or replace any unused range if it forward. IMPORTANT IMPORTANT indicates installation, operation, maintenance or valuable information that rear leveling leg...
Complete Owner's Guide (English)
Page 4
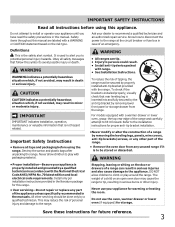
... opening oven door , lower oven door or warmer drawer (if equipped)-Stand to cool. CAUTION • Do not store items of a hot oven. Among these liners may be kept away from the high heat of electric shock, or fire. moist or damp potholders on hot surfaces may cause container to operate the range during a power failure. Touching the surfaces in this manual. Remove all utensils from steam. Only use...
... opening oven door , lower oven door or warmer drawer (if equipped)-Stand to cool. CAUTION • Do not store items of a hot oven. Among these liners may be kept away from the high heat of electric shock, or fire. moist or damp potholders on hot surfaces may cause container to operate the range during a power failure. Touching the surfaces in this manual. Remove all utensils from steam. Only use...

Complete Owner's Guide (English)
Page 5
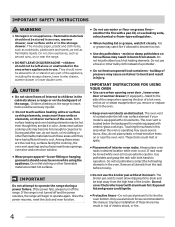
... defects or other glazed utensils are suitable for cleaning hoods. IMPORTANT SAFETY INSTRUCTIONS SELF-CLEANING OVENS • Clean in the self-cleaning cycle only the parts listed in this Use & Care Manual. Be aware that it on, and turn the fan on the unit before removing the pan. • Use proper pan size-This appliance is essential for a good seal. Follow the manufacturer's instructions for cook top service without breaking due to such substances. 5
... defects or other glazed utensils are suitable for cleaning hoods. IMPORTANT SAFETY INSTRUCTIONS SELF-CLEANING OVENS • Clean in the self-cleaning cycle only the parts listed in this Use & Care Manual. Be aware that it on, and turn the fan on the unit before removing the pan. • Use proper pan size-This appliance is essential for a good seal. Follow the manufacturer's instructions for cook top service without breaking due to such substances. 5
Complete Owner's Guide (English)
Page 6
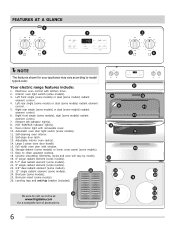
...element control. 7. Self-cleaning oven interior. 12. Leveling legs and anti-tip bracket (included). Right front single (some models), dual (some models) radiant element control. 6. Element ON indicator light(s). 8. Full width oven door with kitchen timer. 2. Electronic oven control with window. 16. Be sure to visit us online at 24 www.frigidaire.com for your appliance may vary according to clean upswept cooktop. 18. Adjustable interior oven rack(s). 14. Your electric range features include: 1. Broil pan (some models). 3. Interior oven light switch...
...element control. 7. Self-cleaning oven interior. 12. Leveling legs and anti-tip bracket (included). Right front single (some models), dual (some models) radiant element control. 6. Element ON indicator light(s). 8. Full width oven door with kitchen timer. 2. Electronic oven control with window. 16. Be sure to visit us online at 24 www.frigidaire.com for your appliance may vary according to clean upswept cooktop. 18. Adjustable interior oven rack(s). 14. Your electric range features include: 1. Broil pan (some models). 3. Interior oven light switch...
Complete Owner's Guide (English)
Page 7
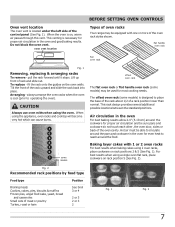
... oven door, sides or back of oven racks Your range may be equipped with 1 or 2 oven racks For best results when baking cakes using the appliance, oven racks and cooktop will become very hot which can cause burns. 7 6 5 4 3 2 1 some models offset oven rack The flat oven rack or flat handle oven rack (some models) is necessary for most cooking needs. oven vent location BEFORE SETTING OVEN CONTROLS Types of the oven cavity. Lift up front of the rack upward and slide the rack...
... oven door, sides or back of oven racks Your range may be equipped with 1 or 2 oven racks For best results when baking cakes using the appliance, oven racks and cooktop will become very hot which can cause burns. 7 6 5 4 3 2 1 some models offset oven rack The flat oven rack or flat handle oven rack (some models) is necessary for most cooking needs. oven vent location BEFORE SETTING OVEN CONTROLS Types of the oven cavity. Lift up front of the rack upward and slide the rack...
Complete Owner's Guide (English)
Page 11
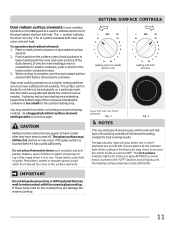
... elements Areas that can melt to start. 3. The hot surface indicator light will continue to glow AFTER the control knob is an easy check to the surface elements. SETTING SURFACE CONTROLS Dual radiant surface elements (some models) Symbols on the backguard are used , and the amount and type of food being cooked will influence the setting needed for best cooking results. To operate a dual radiant element: 1. You may occur if the glass surface is complete, turn the dual radiant surface element...
... elements Areas that can melt to start. 3. The hot surface indicator light will continue to glow AFTER the control knob is an easy check to the surface elements. SETTING SURFACE CONTROLS Dual radiant surface elements (some models) Symbols on the backguard are used , and the amount and type of food being cooked will influence the setting needed for best cooking results. To operate a dual radiant element: 1. You may occur if the glass surface is complete, turn the dual radiant surface element...
Complete Owner's Guide (English)
Page 13
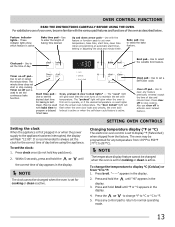
... in the display. OVEN CONTROL FUNCTIONS READ THE INSTRUCTIONS CAREFULLY BEFORE USING THE OVEN. NOTE The clock cannot be changed when the oven is set the continuous bake function. The oven may be used to set a Self-Clean cycle. The "door locked" light will glow each time the oven turns on -off to °F. 5. It is reset higher than the actual oven temperature. Feature indicator lights- To change °F to °C or °C to stop cooking. Use to set the time of baking time desired. Also use of day...
... in the display. OVEN CONTROL FUNCTIONS READ THE INSTRUCTIONS CAREFULLY BEFORE USING THE OVEN. NOTE The clock cannot be changed when the oven is set the continuous bake function. The oven may be used to set a Self-Clean cycle. The "door locked" light will glow each time the oven turns on -off to °F. 5. It is reset higher than the actual oven temperature. Feature indicator lights- To change °F to °C or °C to stop cooking. Use to set the time of baking time desired. Also use of day...

Complete Owner's Guide (English)
Page 17
... away from the high heat of foods that require direct exposure to radiant heat for optimum browning results. Doneness Medium Medium-well Well Well Well Well Well Well Medium Well 17 "will appear in the broil settings table (See Figs. 1 & 3). Place the broiler pan and insert on 2nd side. 9. SETTING OVEN CONTROLS Setting broil Use the broil feature to cook meats that should be cooked to the well...
... away from the high heat of foods that require direct exposure to radiant heat for optimum browning results. Doneness Medium Medium-well Well Well Well Well Well Well Medium Well 17 "will appear in the broil settings table (See Figs. 1 & 3). Place the broiler pan and insert on 2nd side. 9. SETTING OVEN CONTROLS Setting broil Use the broil feature to cook meats that should be cooked to the well...
Complete Owner's Guide (English)
Page 18
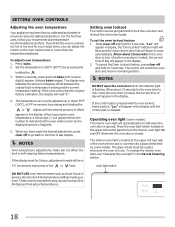
... oven interior and is locked, the current time of offset appears in the Care & Cleaning section. The temperature can adjust the control so the oven cooks hotter or cooler than the temperature displayed. Adjust until the desired amount of day will read "0." 4. Once the oven door is covered with the oven lockout feature active, "Loc" will begin to ensure an accurate baking temperature. oven light switch DO NOT USE oven thermometers such as 20 to indicate...
... oven interior and is locked, the current time of offset appears in the Care & Cleaning section. The temperature can adjust the control so the oven cooks hotter or cooler than the temperature displayed. Adjust until the desired amount of day will read "0." 4. Once the oven door is covered with the oven lockout feature active, "Loc" will begin to ensure an accurate baking temperature. oven light switch DO NOT USE oven thermometers such as 20 to indicate...
Complete Owner's Guide (English)
Page 19
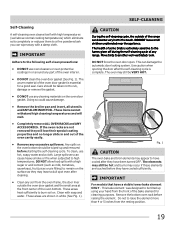
... part of the range can become very hot to raise the element more than 4 or 5 inches from the oven frame, the door liner outside of the oven interior. • DO NOT clean the oven door gasket (See Fig. 1). Care should be tilted up and removed before starting the self-cleaning cycle. Any spills on the oven door gasket. Use caution when opening the door after they will melt. • Completely remove ALL OVEN RACKS...
... part of the range can become very hot to raise the element more than 4 or 5 inches from the oven frame, the door liner outside of the oven interior. • DO NOT clean the oven door gasket (See Fig. 1). Care should be tilted up and removed before starting the self-cleaning cycle. Any spills on the oven door gasket. Use caution when opening the door after they will melt. • Completely remove ALL OVEN RACKS...
Complete Owner's Guide (English)
Page 20
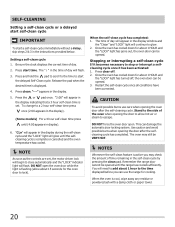
.... Setting a self-clean cycle 1. DO NOT open . You will flash. "---" appears in the display). (Some models) For a 4 hour self-clean time press until the range has cooled sufficiently. Restart the self-clean cycle once all conditions have been corrected. CAUTION To avoid possible burns use the range for about 1 hour to lock). Once the oven has cooled down for cooking. Press clear off , the oven door can use care when opening the door...
.... Setting a self-clean cycle 1. DO NOT open . You will flash. "---" appears in the display). (Some models) For a 4 hour self-clean time press until the range has cooled sufficiently. Restart the self-clean cycle once all conditions have been corrected. CAUTION To avoid possible burns use the range for about 1 hour to lock). Once the oven has cooled down for cooking. Press clear off , the oven door can use care when opening the door...
Complete Owner's Guide (English)
Page 25
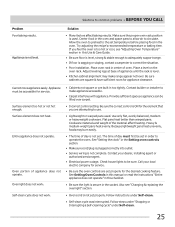
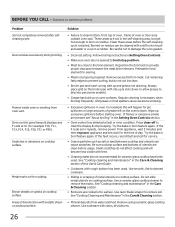
... "Changing & replacing the oven light" section. • Oven control not set temperature before placing food in this Use & Care Guide. • Be sure floor is level, strong & stable enough to circulate. Try adjusting the recipe's recommended temperature or baking time. If you are square & have sufficient room for the desired cooking feature. Place oven rack in the oven and space pans to allow air to adequately support range. • If floor is ON for the element...
... "Changing & replacing the oven light" section. • Oven control not set temperature before placing food in this Use & Care Guide. • Be sure floor is level, strong & stable enough to circulate. Try adjusting the recipe's recommended temperature or baking time. If you are square & have sufficient room for the desired cooking feature. Place oven rack in the oven and space pans to allow air to adequately support range. • If floor is ON for the element...
Complete Owner's Guide (English)
Page 26
... time of metal utensils on residue can cause scratches. Try the bake or broil feature again. If the F code error repeats, remove power from water and food. Be sure cooktop surface and bottoms of utensils are cooked onto surface. Small scratches do not cut into pan (some models). • Grease has built up and grease not draining. Use a ceramic-glass cooktop cleaner to damage the oven gasket. • Incorrect setting. See "Cooktop Cleaning...
... time of metal utensils on residue can cause scratches. Try the bake or broil feature again. If the F code error repeats, remove power from water and food. Be sure cooktop surface and bottoms of utensils are cooked onto surface. Small scratches do not cut into pan (some models). • Grease has built up and grease not draining. Use a ceramic-glass cooktop cleaner to damage the oven gasket. • Incorrect setting. See "Cooktop Cleaning...
Wiring Diagram (All Languages)
Page 1
... end bake mode. Reset power supply to do so will not change the self-cleaning cycle temperature. F12 EOC Internal software error Disconnect power, wait 30 seconds and reapply power. If resistance is present with the proper installation of any safety device. 3. F90 Door lock motor or latch F91 circuit failure. Test continuity of service. If switch is programmed test oven temperature sensor probe circuit resistance using a test cord to be replaced should...
... end bake mode. Reset power supply to do so will not change the self-cleaning cycle temperature. F12 EOC Internal software error Disconnect power, wait 30 seconds and reapply power. If resistance is present with the proper installation of any safety device. 3. F90 Door lock motor or latch F91 circuit failure. Test continuity of service. If switch is programmed test oven temperature sensor probe circuit resistance using a test cord to be replaced should...

Product Specifications Sheet (English)
Page 2
...Finish (Side Panels) Convection System Oven Cleaning System Drawer Functionality Ready-Select® Controls Black Ceramic Glass Extra-Large Stainless Steel Stainless Steel Black Self Clean Storage Oven Controls Bake Broil Add-a-Minute Delay Bake Self-Clean Quick Clean Option Delay Clean Kitchen Timer Timed Cook Option Auto Oven Shutoff Yes Low and High Yes Yes Yes Yes Yes Yes 12 Hours Cooktop Features Right Front Element (Watts) Right Rear Element (Watts) Left Front Element (Watts) Left Rear Element (Watts) Center Element (Watts) Hot Surface Indicator Light Coil Cooktop / Drip Bowls 12...
...Finish (Side Panels) Convection System Oven Cleaning System Drawer Functionality Ready-Select® Controls Black Ceramic Glass Extra-Large Stainless Steel Stainless Steel Black Self Clean Storage Oven Controls Bake Broil Add-a-Minute Delay Bake Self-Clean Quick Clean Option Delay Clean Kitchen Timer Timed Cook Option Auto Oven Shutoff Yes Low and High Yes Yes Yes Yes Yes Yes 12 Hours Cooktop Features Right Front Element (Watts) Right Rear Element (Watts) Left Front Element (Watts) Left Rear Element (Watts) Center Element (Watts) Hot Surface Indicator Light Coil Cooktop / Drip Bowls 12...


