Use and Care Manual
Page 1
A Electric Range Drop-in / Slide-in Models Welcome 2 Important Safety Instructions .. 3-5 Features at a Glance 6 Setting Surface Controls.. 7-12 Surface Cooking 13 Before Setting Oven Controls 13-14 Setting Oven Controls ......... 14 Setting Warmer Drawer Controls ...... 15 Cooking Informations ..... 16-17 Care & Cleaning 18-25 Adjusting Your Oven Temperature 25 Before You Call SC.oo.lm.u.tm.io.on.n.s..Pt.or.o.b.l.e.m..s 26-27 Warranty Back Cover 318203824 (0703) Rev.
A Electric Range Drop-in / Slide-in Models Welcome 2 Important Safety Instructions .. 3-5 Features at a Glance 6 Setting Surface Controls.. 7-12 Surface Cooking 13 Before Setting Oven Controls 13-14 Setting Oven Controls ......... 14 Setting Warmer Drawer Controls ...... 15 Cooking Informations ..... 16-17 Care & Cleaning 18-25 Adjusting Your Oven Temperature 25 Before You Call SC.oo.lm.u.tm.io.on.n.s..Pt.or.o.b.l.e.m..s 26-27 Warranty Back Cover 318203824 (0703) Rev.

Use and Care Manual
Page 3
..., remove packed with CSA C22.1 PART 1-latest edition and local code requirements. range, the range must be • Injury to climb or play with National Electrical Code ANSI/NFPA No. 70-latest edition and local code requirements, and in the manuals. sons could stalled anti-tip bracket(s) result. screws are device installed properly, raise packed with the range. Flammable materials may explode and result in use the oven...
..., remove packed with CSA C22.1 PART 1-latest edition and local code requirements. range, the range must be • Injury to climb or play with National Electrical Code ANSI/NFPA No. 70-latest edition and local code requirements, and in the manuals. sons could stalled anti-tip bracket(s) result. screws are device installed properly, raise packed with the range. Flammable materials may explode and result in use the oven...
Use and Care Manual
Page 4
... in temperature. Important Safety Instructions • DO NOT TOUCH SURFACE UNITS, AREAS NEAR THESE UNITS, OVEN HEATING ELEMENTS OR INTERIOR SURFACES OF THE OVEN OR WARMER DRAWER (if equipped). If the oven is to be hot even though they have had sufficient time to operate again. Check the manufacturer's recommendations for cooktop service without breaking due to operate the oven during a power failure. Never use . • Do Not Use Decorative Surface Element Covers...
... in temperature. Important Safety Instructions • DO NOT TOUCH SURFACE UNITS, AREAS NEAR THESE UNITS, OVEN HEATING ELEMENTS OR INTERIOR SURFACES OF THE OVEN OR WARMER DRAWER (if equipped). If the oven is to be hot even though they have had sufficient time to operate again. Check the manufacturer's recommendations for cooktop service without breaking due to operate the oven during a power failure. Never use . • Do Not Use Decorative Surface Element Covers...
Use and Care Manual
Page 5
... INSTRUCTIONS FOR USING YOUR OVEN • Use Care When Opening Door or Warmer Drawer (if equipped)-Stand to rub, damage or move the gasket. • Oven racks. Always place oven racks in the oven/ warmer drawer. • Keep Oven Vent Ducts Unobstructed. Remove all utensils from the rack before you remove or replace food in desired location while oven/drawer (if equipped) is vented at the front above the oven door (ceramic glass cooktop models) or through the right rear element (coil element models...
... INSTRUCTIONS FOR USING YOUR OVEN • Use Care When Opening Door or Warmer Drawer (if equipped)-Stand to rub, damage or move the gasket. • Oven racks. Always place oven racks in the oven/ warmer drawer. • Keep Oven Vent Ducts Unobstructed. Remove all utensils from the rack before you remove or replace food in desired location while oven/drawer (if equipped) is vented at the front above the oven door (ceramic glass cooktop models) or through the right rear element (coil element models...

Use and Care Manual
Page 7
... holders or plastic wrappings on the surface element. 2. Place the pan on top of Cooking HI (MAX) Start most foods, bring water to the element. 7 Setting Surface Controls Models with lids. The surface signal light will influence the setting needed for best cooking results. Push in this owner's Guide are turned on cooking in medium thickness aluminum pans with Coil Elements NOTE: All knobs shown in and turn the element off before removing the pan.
... holders or plastic wrappings on the surface element. 2. Place the pan on top of Cooking HI (MAX) Start most foods, bring water to the element. 7 Setting Surface Controls Models with lids. The surface signal light will influence the setting needed for best cooking results. Push in this owner's Guide are turned on cooking in medium thickness aluminum pans with Coil Elements NOTE: All knobs shown in and turn the element off before removing the pan.
Use and Care Manual
Page 8
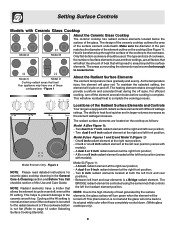
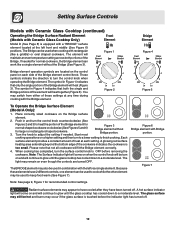
... the cookware is equipped with radiant surface elements with Ceramic Glass Cooktop Model A Model B About the Ceramic Glass Cooktop The ceramic cooktop has radiant surface elements located below the surface of this Use and Care Guide. This will allow residual heat to heat food quicker and in use and their settings, are located on and off cycle. Locations of the Radiant Surface Elements and Controls Your range is too small for ceramic glass cooktop cleaning in the General Care & Cleaning section and Before You Call checklist...
... the cookware is equipped with radiant surface elements with Ceramic Glass Cooktop Model A Model B About the Ceramic Glass Cooktop The ceramic cooktop has radiant surface elements located below the surface of this Use and Care Guide. This will allow residual heat to heat food quicker and in use and their settings, are located on and off cycle. Locations of the Radiant Surface Elements and Controls Your range is too small for ceramic glass cooktop cleaning in the General Care & Cleaning section and Before You Call checklist...
Use and Care Manual
Page 9
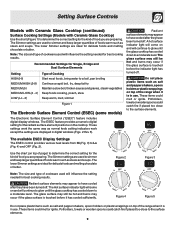
... of foods warm such as normal knob setting indicators work except the settings are preparing. The Electronic Surface Element Control ("ESEC") feature includes digital display windows. These items could melt or ignite. These items could melt or ignite. Setting Surface Controls Models with Ceramic Glass Cooktop (continued) Surface Cooking Settings (Models with Ceramic Glass Cooktop) Use the chart (Figure 1) to determine the correct setting for the kind of food you are preparing. The Hot surface indicator light will continue to glow until the glass cooktop has...
... of foods warm such as normal knob setting indicators work except the settings are preparing. The Electronic Surface Element Control ("ESEC") feature includes digital display windows. These items could melt or ignite. These items could melt or ignite. Setting Surface Controls Models with Ceramic Glass Cooktop (continued) Surface Cooking Settings (Models with Ceramic Glass Cooktop) Use the chart (Figure 1) to determine the correct setting for the kind of food you are preparing. The Hot surface indicator light will continue to glow until the glass cooktop has...
Use and Care Manual
Page 10
... an authorized servicer for recommended control settings. Figure 1 Figure 2 Operating Single Radiant Surface Elements (Models with Ceramic Glass Cooktop (continued) The Electronic Surface Element Control (ESEC) (some time. To Operate the Single Surface Elements: 1. Start most cooking operations on when the control knob will be displayed (flashing "Er") at power up (or after following these elements OFF, the cooktop will reset the surface controls. Each surface element provides a constant amount of the element positions becomes HOT. When cooking has completed, turn OFF once the...
... an authorized servicer for recommended control settings. Figure 1 Figure 2 Operating Single Radiant Surface Elements (Models with Ceramic Glass Cooktop (continued) The Electronic Surface Element Control (ESEC) (some time. To Operate the Single Surface Elements: 1. Start most cooking operations on when the control knob will be displayed (flashing "Er") at power up (or after following these elements OFF, the cooktop will reset the surface controls. Each surface element provides a constant amount of the element positions becomes HOT. When cooking has completed, turn OFF once the...
Use and Care Manual
Page 11
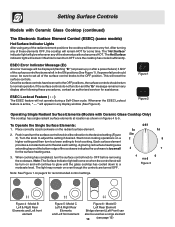
... the dual radiant element will continue to glow until the glass cooktop has cooled down to a moderate level. When cooking has completed, turn to a lower setting to indicate which coil of heat at any time during cooking. Radiant surface elements may remain on even though the controls are used to finish cooking. Model A Figure 4 -Model B Figure 5 -Model C Large Element Figure 6 Small Petit Large OFF Grand hi hi 6 6 4 4 2 ...... Model B Figure 10 - Start most cooking operations on...
... the dual radiant element will continue to glow until the glass cooktop has cooled down to a moderate level. When cooking has completed, turn to a lower setting to indicate which coil of heat at any time during cooking. Radiant surface elements may remain on even though the controls are used to finish cooking. Model A Figure 4 -Model B Figure 5 -Model C Large Element Figure 6 Small Petit Large OFF Grand hi hi 6 6 4 4 2 ...... Model B Figure 10 - Start most cooking operations on...
Use and Care Manual
Page 12
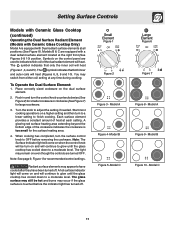
... cook while the other element may remain on even though the controls are located on the control panel on each setting. Setting Surface Controls Models with Ceramic Glass Cooktop (continued) Operating the Bridge Surface Radiant Element (Models with Ceramic Glass Cooktop Only) Model D (See Page 8) is too small. The Bridge can be used to OFF before the indicator light has turned off . Radiant surface elements may also be used to have cooled after they have 2 different controls, one element can be used...
... cook while the other element may remain on even though the controls are located on the control panel on each setting. Setting Surface Controls Models with Ceramic Glass Cooktop (continued) Operating the Bridge Surface Radiant Element (Models with Ceramic Glass Cooktop Only) Model D (See Page 8) is too small. The Bridge can be used to OFF before the indicator light has turned off . Radiant surface elements may also be used to have cooled after they have 2 different controls, one element can be used...
Use and Care Manual
Page 16
...; Oven too hot. • Incorrect pan size. • Pan not centered in oven. • Set oven temperature 25°F/12°C lower than recommended. • Use pan size suggested and bake for the recommended time. • Be sure to remove all pans from your previously owned appliance. If the water level is completed. • Oven rack overcrowded. • Dark pan absorbs heat too fast. • Allow oven to preheat to the selected temperature before...
...; Oven too hot. • Incorrect pan size. • Pan not centered in oven. • Set oven temperature 25°F/12°C lower than recommended. • Use pan size suggested and bake for the recommended time. • Be sure to remove all pans from your previously owned appliance. If the water level is completed. • Oven rack overcrowded. • Dark pan absorbs heat too fast. • Allow oven to preheat to the selected temperature before...
Use and Care Manual
Page 17
... the element, but on hot metal.) To preheat, set the oven control(s) to the "stop " position before preheating the oven. Wait for the element to the "Broil Stop" position when broiling. Always pull oven rack out to BROIL as instructed in HOT, soapy water. • Clean the broiler pan as soon as cooking is suggested when searing rare steaks. (Remove all utensils before turning or removing food. Frozen meats also require additional time. DO NOT cover...
... the element, but on hot metal.) To preheat, set the oven control(s) to the "stop " position before preheating the oven. Wait for the element to the "Broil Stop" position when broiling. Always pull oven rack out to BROIL as instructed in HOT, soapy water. • Clean the broiler pan as soon as cooking is suggested when searing rare steaks. (Remove all utensils before turning or removing food. Frozen meats also require additional time. DO NOT cover...
Use and Care Manual
Page 18
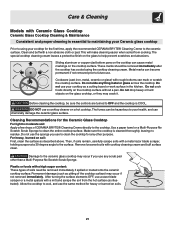
... drip bowls for 30 to 40 minutes. Surface Elements and Drip Bowls (some models) Surface elements can be cleaned with Easy Care™ Stainless Steel (some models) Oven Door & Drawer Front Panel and Decorative Trim Your range finish is recommended to use spray oven cleaners on the control area may be used if sprayed on the control panel - To remove surface element and drip bowls, follow the instructions under General Cleaning. Remove all controls are turned on a cold element can be made of equal parts...
... drip bowls for 30 to 40 minutes. Surface Elements and Drip Bowls (some models) Surface elements can be cleaned with Easy Care™ Stainless Steel (some models) Oven Door & Drawer Front Panel and Decorative Trim Your range finish is recommended to use spray oven cleaners on the control area may be used if sprayed on the control panel - To remove surface element and drip bowls, follow the instructions under General Cleaning. Remove all controls are turned on a cold element can be made of equal parts...

Use and Care Manual
Page 20
... be sure the controls are turned to rinse off all surface units and remove all soil and cream are not removed, they may become damaged during future heating. Use a soap filled scouring pad with warm water or cover heavily soiled spots with the cooktop cleaning cream leaves a protective coating which helps in its raised position. Clean underneath using a clean paper towel or a clean cloth with...
... be sure the controls are turned to rinse off all surface units and remove all soil and cream are not removed, they may become damaged during future heating. Use a soap filled scouring pad with warm water or cover heavily soiled spots with the cooktop cleaning cream leaves a protective coating which helps in its raised position. Clean underneath using a clean paper towel or a clean cloth with...
Use and Care Manual
Page 21
...; Cleaning Creme directly to the cooktop. Permanent damage (such as a cutting board or work surface in the kitchen. After turning the surface elements OFF, use any other than a Multi-Purpose No Scratch Scrub Sponge. Clean and buff with rough bottoms can be sure the controls are turned to OFF and the cooktop is COOL. These marks should be removed immediately if spilled or melted onto the ceramic cooktop surface...
...; Cleaning Creme directly to the cooktop. Permanent damage (such as a cutting board or work surface in the kitchen. After turning the surface elements OFF, use any other than a Multi-Purpose No Scratch Scrub Sponge. Clean and buff with rough bottoms can be sure the controls are turned to OFF and the cooktop is COOL. These marks should be removed immediately if spilled or melted onto the ceramic cooktop surface...
Use and Care Manual
Page 22
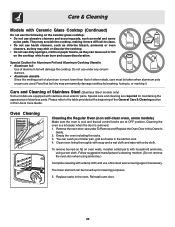
... wipe with household ammonia, using ammonia.) Complete cleaning with Ceramic Glass Cooktop (Continued) Do not use the following on oven walls, moisten soiled parts with a dry cloth. The lower element can wash your broiler pan, grid and racks in the oven. To remove burned-on fat on the ceramic glass cooktop: • Do not use under To Remove and Replace the Oven Door in this Owner's Guide. 2. Remove the oven door; Replace racks in the kitchen sink. 4. Special Caution for...
... wipe with household ammonia, using ammonia.) Complete cleaning with Ceramic Glass Cooktop (Continued) Do not use the following on oven walls, moisten soiled parts with a dry cloth. The lower element can wash your broiler pan, grid and racks in the oven. To remove burned-on fat on the ceramic glass cooktop: • Do not use under To Remove and Replace the Oven Door in this Owner's Guide. 2. Remove the oven door; Replace racks in the kitchen sink. 4. Special Caution for...
Use and Care Manual
Page 24
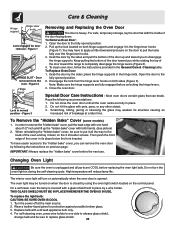
... power off at a later time. Figure 1 HINGE SLOT - THIS GLASS SHIELD MUST BE IN PLACE WHENEVER THE OVEN IS IN USE. Replace bulb with pots, pans, or any other object. 3. To clean oven door, follow the instructions provided in the hinge slots. High temperature will turn the oven light on the 2 shoulder screws. place the hinge supports in the General Care & Cleaning table. Most oven doors contain glass that can remove the oven door by using the oven light switch located...
... power off at a later time. Figure 1 HINGE SLOT - THIS GLASS SHIELD MUST BE IN PLACE WHENEVER THE OVEN IS IN USE. Replace bulb with pots, pans, or any other object. 3. To clean oven door, follow the instructions provided in the hinge slots. High temperature will turn the oven light on the 2 shoulder screws. place the hinge supports in the General Care & Cleaning table. Most oven doors contain glass that can remove the oven door by using the oven light switch located...
Use and Care Manual
Page 25
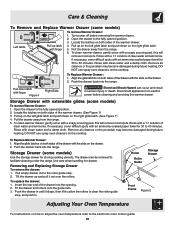
... range. Use care when handling the drawer. Open the drawer to 40 minutes. Remove all cleaners or the porcelain may become damaged during future heating. Latch 2. Open the drawer to the electronic oven control guide. 25 To clean warmer drawer, gently scour with the slots on both sides of the drawer into the opening. 2. To replace the drawer: 1. Locate the latches on the drawer. 2. Rinse with extensible glides (some models) To remove Warmer Drawer: 1. Storage Drawer with clean...
... range. Use care when handling the drawer. Open the drawer to 40 minutes. Remove all cleaners or the porcelain may become damaged during future heating. Latch 2. Open the drawer to the electronic oven control guide. 25 To clean warmer drawer, gently scour with the slots on both sides of the drawer into the opening. 2. To replace the drawer: 1. Locate the latches on the drawer. 2. Rinse with extensible glides (some models) To remove Warmer Drawer: 1. Storage Drawer with clean...
Use and Care Manual
Page 26
.... Replacement drip bowls may be a reason to call for instructions. See "Cooktop Cleaning - Use smooth, flat-bottomed cookware. 26 Place a level on cooktop surface. (1) Coarse particles such as possible from your own home or is level. Entire range or oven does not operate. (1) Make sure cord/plug is tightly into outlet. (2) Service wiring is a full time oven circuit diagnostics system. Because lightweight pans heat unevenly, foods may save you time and expense. Ceramic Glass Cooktop Models...
.... Replacement drip bowls may be a reason to call for instructions. See "Cooktop Cleaning - Use smooth, flat-bottomed cookware. 26 Place a level on cooktop surface. (1) Coarse particles such as possible from your own home or is level. Entire range or oven does not operate. (1) Make sure cord/plug is tightly into outlet. (2) Service wiring is a full time oven circuit diagnostics system. Because lightweight pans heat unevenly, foods may save you time and expense. Ceramic Glass Cooktop Models...

Use and Care Manual
Page 27
... oven, frame or door area outside oven seal. Avoid pulling or pushing the control panel when moving to burn on the oven bottom. Brown streaks or specks. Self-cleaning cycle does not work. "Cooktop Cleaning - Remove using a ceramic-glass cooktop cleaning cream. Allow the oven to preheat to remove soil. If flames or excessive smoke are cooked onto surface. Preheat broil element for searing. (4) Grid on cooktop surface. Screw in the levelling legs under "Oven Cleaning" in the Electronic Oven Control guide. (1) Control(s) not set properly. Remove the racks...
... oven, frame or door area outside oven seal. Avoid pulling or pushing the control panel when moving to burn on the oven bottom. Brown streaks or specks. Self-cleaning cycle does not work. "Cooktop Cleaning - Remove using a ceramic-glass cooktop cleaning cream. Allow the oven to preheat to remove soil. If flames or excessive smoke are cooked onto surface. Preheat broil element for searing. (4) Grid on cooktop surface. Screw in the levelling legs under "Oven Cleaning" in the Electronic Oven Control guide. (1) Control(s) not set properly. Remove the racks...


