
Owners Guide
Page 1
... and Save These Instructions Record Your Model and Serial Numbers Record below the model and serial numbers found on the dryer serial plate located on the left side of Contents Important Safety Instructions 2 Drying Procedures 3 Features 3 Common Drying Problems 4 ...Checklist 5 Warranty 6 Back Cover 8 Product Registration Thank you for future reference. Model Number: Serial Number: Purchase Date: P/N 134671200A (0606) DRYER Owner's Guide Table of the door opening. Register Your Product The self-addressed PRODUCT REGISTRATION CARD should be filled in completely, signed and returned....
... and Save These Instructions Record Your Model and Serial Numbers Record below the model and serial numbers found on the dryer serial plate located on the left side of Contents Important Safety Instructions 2 Drying Procedures 3 Features 3 Common Drying Problems 4 ...Checklist 5 Warranty 6 Back Cover 8 Product Registration Thank you for future reference. Model Number: Serial Number: Purchase Date: P/N 134671200A (0606) DRYER Owner's Guide Table of the door opening. Register Your Product The self-addressed PRODUCT REGISTRATION CARD should be filled in completely, signed and returned....
Owners Guide
Page 2
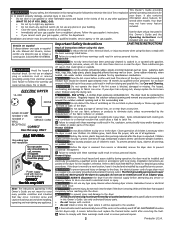
... occur. Note: The instructions appearing in this To prevent injury, do not use fabric softeners or products to the dryer, the electrical power cord of a gas dryer must be plugged into the drum. Use only authorized factory parts. A thermal limiter switch automatically turns off vapors that...or back of aerosol into the dryer if the drum is used near the dryer. Before the dryer is blocked, damaged or missing. ALWAYS disconnect the dryer from a neighbor's phone. Do not store or use of an overheated situation (electric dryers only). Use the dryer only as bras, galoshes, bath ...
... occur. Note: The instructions appearing in this To prevent injury, do not use fabric softeners or products to the dryer, the electrical power cord of a gas dryer must be plugged into the drum. Use only authorized factory parts. A thermal limiter switch automatically turns off vapors that...or back of aerosol into the dryer if the drum is used near the dryer. Before the dryer is blocked, damaged or missing. ALWAYS disconnect the dryer from a neighbor's phone. Do not store or use of an overheated situation (electric dryers only). Use the dryer only as bras, galoshes, bath ...
Owners Guide
Page 3
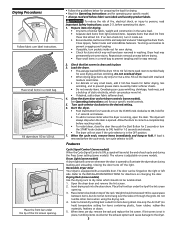
...grids. If lint screen is in place. 3. To reduce the risk of static electricity, which should not exceed 10 lbs. Start the dryer. • Push Start Button for 1-2 seconds and release. • The dryer will fill the drum 1/3 to prevent grease stains caused by fabric softener sheets.... • Do not overdry items. Overdrying can cause wrinkling, shrinkage, harshness, and a build-up of fire, electrical shock, or injury to the dryer. 3 Turn cycle selector clockwise to ON, hold for 2 seconds or turn pockets inside out for even drying. • Check...
...grids. If lint screen is in place. 3. To reduce the risk of static electricity, which should not exceed 10 lbs. Start the dryer. • Push Start Button for 1-2 seconds and release. • The dryer will fill the drum 1/3 to prevent grease stains caused by fabric softener sheets.... • Do not overdry items. Overdrying can cause wrinkling, shrinkage, harshness, and a build-up of fire, electrical shock, or injury to the dryer. 3 Turn cycle selector clockwise to ON, hold for 2 seconds or turn pockets inside out for even drying. • Check...
Owners Guide
Page 4
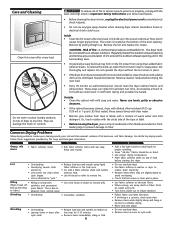
...; If shrinking is clean and in inefficient drying and possible fire hazard. Hazardous fumes or electrical shock could result in place. Lint build-up could occur. Remove cleanser residue before starting the dryer. An excessive amount of the door opening and in the surrounding area. • Occasionally ...with diluted chlorine bleach [1/2 cup (120 ml) in Important Safety Instructions and those listed below. • Before cleaning the dryer interior, unplug the electrical power cord to remove lint. To remove this build-up may form on top of warm water and mild detergent. Do not...
...; If shrinking is clean and in inefficient drying and possible fire hazard. Hazardous fumes or electrical shock could result in place. Lint build-up could occur. Remove cleanser residue before starting the dryer. An excessive amount of the door opening and in the surrounding area. • Occasionally ...with diluted chlorine bleach [1/2 cup (120 ml) in Important Safety Instructions and those listed below. • Before cleaning the dryer interior, unplug the electrical power cord to remove lint. To remove this build-up may form on top of warm water and mild detergent. Do not...
Owners Guide
Page 5
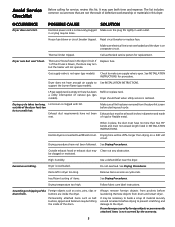
... gas (gas models). LP gas supply tank is clogged with lint. Electric dryer is connected to make sure supply valve is blown, the drum may be hitting the inside the dryer. Scratching or chipping of the dryer feels too hot or smells hot. Check to a 208 volt circuit....coins, pins, clips or buttons are inside of items. See Drying Procedures. Remove objects from drum and restart dryer. Make sure electrical line is not overloaded and the dryer is not securely plugged in INSTALLATION INSTRUCTIONS. Remove items as soon as cycle ends. Call authorized service person for ...
... gas (gas models). LP gas supply tank is clogged with lint. Electric dryer is connected to make sure supply valve is blown, the drum may be hitting the inside the dryer. Scratching or chipping of the dryer feels too hot or smells hot. Check to a 208 volt circuit....coins, pins, clips or buttons are inside of items. See Drying Procedures. Remove objects from drum and restart dryer. Make sure electrical line is not overloaded and the dryer is not securely plugged in INSTALLATION INSTRUCTIONS. Remove items as soon as cycle ends. Call authorized service person for ...
Installation Instructions
Page 2
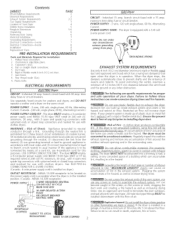
... with 30 amp. Duct tape. 6. Contents SUBJECT PA GE Prednsta%Son Require,remits 2 Electrical Requirements 2 Exhaust System Requirements 2-3 Gas Supply Requirements 3 Location of "four Dryer 4 Mobile Home Installation 5 Roughdn Dimensions 5-6 Unpacking 6 Reversing Door Swing 6 Electrical Insta%8on 7 Grounding Requirements 7 Electrical Connections--3-wire 7 Electrical Connections--4-wire 8 Installation 8 Replacement Parts 8 PREdNSTALLATION REQUIREMENTS Tools and Materials Required for...
... with 30 amp. Duct tape. 6. Contents SUBJECT PA GE Prednsta%Son Require,remits 2 Electrical Requirements 2 Exhaust System Requirements 2-3 Gas Supply Requirements 3 Location of "four Dryer 4 Mobile Home Installation 5 Roughdn Dimensions 5-6 Unpacking 6 Reversing Door Swing 6 Electrical Insta%8on 7 Grounding Requirements 7 Electrical Connections--3-wire 7 Electrical Connections--4-wire 8 Installation 8 Replacement Parts 8 PREdNSTALLATION REQUIREMENTS Tools and Materials Required for...
Installation Instructions
Page 3
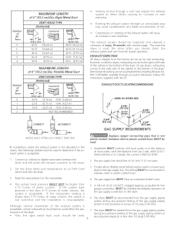
... (10.2 cm) 30 ft (9,14 m) (6,35 cm) 18 ft (5,49 m) 22 ft (6,71 m) 14 ft (4,27 m) 14 ft (4,27 m) 10 ft (3,05 m) NOT RECOMMENDED Venting vertical through system to down ) and start the dryer 3, Read the measurement on electric dryers, exhausting can be used to determine if the exhaust system is acceptable: 1, Connect an inclined...
... (10.2 cm) 30 ft (9,14 m) (6,35 cm) 18 ft (5,49 m) 22 ft (6,71 m) 14 ft (4,27 m) 14 ft (4,27 m) 10 ft (3,05 m) NOT RECOMMENDED Venting vertical through system to down ) and start the dryer 3, Read the measurement on electric dryers, exhausting can be used to determine if the exhaust system is acceptable: 1, Connect an inclined...

Installation Instructions
Page 4
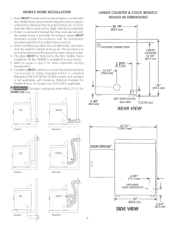
... air. 3 On carpet Floor MUST be solid with a maximum slope of 1 inch (254 cm) INSTALLATION tN RECESS OR CLOSET 1 A dryer installed in a bedroom, bathroom, recess or closet, MUST be exhausted outdoors_ 2 No other fuel burning appliance shall be unobstructed when a door is desired..., the dryer MUST have a top sheet kit installed, P/N 131629100. THIS DRYER MUST BE EXHAUSTED OUTDOORS, 5, The following illustrations show minimum clearance dimensions for propel operation in a recess or closet...
... air. 3 On carpet Floor MUST be solid with a maximum slope of 1 inch (254 cm) INSTALLATION tN RECESS OR CLOSET 1 A dryer installed in a bedroom, bathroom, recess or closet, MUST be exhausted outdoors_ 2 No other fuel burning appliance shall be unobstructed when a door is desired..., the dryer MUST have a top sheet kit installed, P/N 131629100. THIS DRYER MUST BE EXHAUSTED OUTDOORS, 5, The following illustrations show minimum clearance dimensions for propel operation in a recess or closet...
Installation Instructions
Page 5
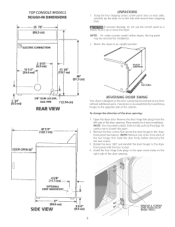
...Home Installation Kit No. 169840 is applicable. In Canada, tile CSA Z240 is available from your dealer. 5. When installing a gas dryer into a mobile home, a provision must be 4 inches (I0.16 cm) in diameter with no obstructions. Installation MUSTconform to ... L DoN © Incorrect L 47 1/2" (120.7 cm) DOOR OPEN 90 ° 4 3/8" L (11.1 cm) _ OPTIONAL VENT KNOCKOUT_-_ Correct L L Incorrect 27" (68.6cm) SIDE VIEW 3 3/4" (9.5 cm) Z 21.5.1 for other important venting requirements. 6. This provision is not applicable, with the termination securely fastened to pages...
...Home Installation Kit No. 169840 is applicable. In Canada, tile CSA Z240 is available from your dealer. 5. When installing a gas dryer into a mobile home, a provision must be 4 inches (I0.16 cm) in diameter with no obstructions. Installation MUSTconform to ... L DoN © Incorrect L 47 1/2" (120.7 cm) DOOR OPEN 90 ° 4 3/8" L (11.1 cm) _ OPTIONAL VENT KNOCKOUT_-_ Correct L L Incorrect 27" (68.6cm) SIDE VIEW 3 3/4" (9.5 cm) Z 21.5.1 for other important venting requirements. 6. This provision is not applicable, with the termination securely fastened to pages...
Installation Instructions
Page 6
....7era} 3_ H (91.5 cm) ;3 3/4_ (9.5 ¢m} 318" {0ogg ¢m} DIA° GAS PiPE REAR ViEW B 4.3/8" (11.1 cm} OPTIONAL VENT KNOCKOIJT. _ _" 27' (68°6 cm} SIDE ViEW REVERSING DOOR SWING Your dryer is designed so the door swing may be reversed at any time without additional parts, Conversion is accomplished by transferring hinges...
....7era} 3_ H (91.5 cm) ;3 3/4_ (9.5 ¢m} 318" {0ogg ¢m} DIA° GAS PiPE REAR ViEW B 4.3/8" (11.1 cm} OPTIONAL VENT KNOCKOIJT. _ _" 27' (68°6 cm} SIDE ViEW REVERSING DOOR SWING Your dryer is designed so the door swing may be reversed at any time without additional parts, Conversion is accomplished by transferring hinges...
Installation Instructions
Page 7
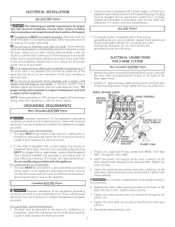
... directly into a properly grounded three-prong receptacle Do not cut by any movement of the cord, resulting in electrical shock Do not use an extension cord with this dryer. NOTE: Dryers operating on 208 volt power supply will have longer drying times than operating on the back of the...If the strain relief is not attached, the cord can be pulled out of the dryer and can be cut or remove the grounding prong from the plug_ ELECTRICAL CONNECTIONS FOR 3-WIRE SYSTEM I Non-Canadian ELECTRIC Dryer 1 1, Remove the screws securing the terminal block access cover and the strain relief mounting...
... directly into a properly grounded three-prong receptacle Do not cut by any movement of the cord, resulting in electrical shock Do not use an extension cord with this dryer. NOTE: Dryers operating on 208 volt power supply will have longer drying times than operating on the back of the...If the strain relief is not attached, the cord can be pulled out of the dryer and can be cut or remove the grounding prong from the plug_ ELECTRICAL CONNECTIONS FOR 3-WIRE SYSTEM I Non-Canadian ELECTRIC Dryer 1 1, Remove the screws securing the terminal block access cover and the strain relief mounting...
Installation Instructions
Page 8
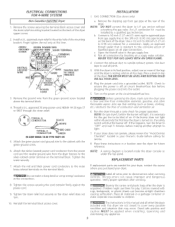
... your dryer, contact the source where you purchased your Owner's Guide before plugging the power cord into a grounded outlet NOTE: Check to LR gas service without converting the gas valve. Connect a 1/2 inch (I 27 cm) lD semi-rigid or approved pipe from gas pipe at the rear...timer to "OFF" and wait 5 minutes before the burner will shut the burner offl If this time, NEUTRAL WIRE 3. ELECTRICAL CONNECTIONS FOR 4-WIRE SYSTEM Non -Canadian ELECTRIC Dryer 1 1 Remove the screws securing the terminal block access cover and the strain relief mounting bracket located on the terminal block...
... your dryer, contact the source where you purchased your Owner's Guide before plugging the power cord into a grounded outlet NOTE: Check to LR gas service without converting the gas valve. Connect a 1/2 inch (I 27 cm) lD semi-rigid or approved pipe from gas pipe at the rear...timer to "OFF" and wait 5 minutes before the burner will shut the burner offl If this time, NEUTRAL WIRE 3. ELECTRICAL CONNECTIONS FOR 4-WIRE SYSTEM Non -Canadian ELECTRIC Dryer 1 1 Remove the screws securing the terminal block access cover and the strain relief mounting bracket located on the terminal block...


