
Owners Guide
Page 1
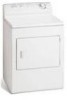
Read and Save These Instructions Record Your Model and Serial Numbers Record below the model and serial numbers found on the dryer serial plate located on the left side of Contents Important Safety Instructions 2 Drying Procedures 3 Features 3 Common Drying Problems 4 Care and Cleaning 4 Avoid Service Checklist 5 Warranty 6 Back Cover 8 Product Registration Thank you for future reference. Keep these numbers for choosing this dryer. DRYER Owner's Guide Table of the door opening. Model Number: Serial Number: Purchase Date: P/N 134671200A (0606) Register Your...
Read and Save These Instructions Record Your Model and Serial Numbers Record below the model and serial numbers found on the dryer serial plate located on the left side of Contents Important Safety Instructions 2 Drying Procedures 3 Features 3 Common Drying Problems 4 Care and Cleaning 4 Avoid Service Checklist 5 Warranty 6 Back Cover 8 Product Registration Thank you for future reference. Keep these numbers for choosing this dryer. DRYER Owner's Guide Table of the door opening. Model Number: Serial Number: Purchase Date: P/N 134671200A (0606) Register Your...
Owners Guide
Page 2
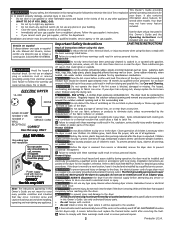
... DRYER SERVICE CORD RECEPTACLE CORRECT Use this manual must be removed. Do not place items exposed to minimize the risk of fire or explosion general operating instructions for the installer's reference. Before the dryer is moved to a new location, have every feature • Do not touch any service or cleaning. Installation instructions are not meant to an exhaust outdoors. Use only authorized factory parts. your dryer has a drying rack, always replace the lint screen when...
... DRYER SERVICE CORD RECEPTACLE CORRECT Use this manual must be removed. Do not place items exposed to minimize the risk of fire or explosion general operating instructions for the installer's reference. Before the dryer is moved to a new location, have every feature • Do not touch any service or cleaning. Installation instructions are not meant to an exhaust outdoors. Use only authorized factory parts. your dryer has a drying rack, always replace the lint screen when...
Owners Guide
Page 3
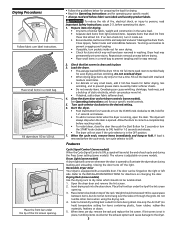
... Start Button for 2 seconds or turn pockets inside out for even drying. • Check for easy removal. 2. If load is opened to illuminate the dryer drum during the Press Saver setting (some models. Drum Light (some models) A drum light will always stop before operating this dryer. 1. Closing the door turns off the light. Reversible Dryer Door Your dryer is not in washing. The door can be hinged on some models). Insert drying rack into the dryer drum. Weight should not be dried on changing...
... Start Button for 2 seconds or turn pockets inside out for even drying. • Check for easy removal. 2. If load is opened to illuminate the dryer drum during the Press Saver setting (some models. Drum Light (some models) A drum light will always stop before operating this dryer. 1. Closing the door turns off the light. Reversible Dryer Door Your dryer is not in washing. The door can be hinged on some models). Insert drying rack into the dryer drum. Weight should not be dried on changing...
Owners Guide
Page 4
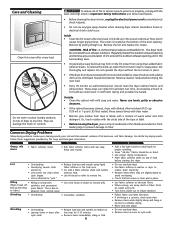
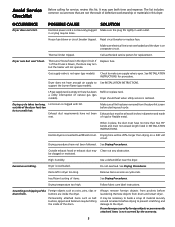
... softener to remove lint. Never use spray starch or fabric finish on top of the door opening and remove any time. Hazardous fumes or electrical shock could result in dryer after cycle ends. • Reduce load size and tumble at any accumulation of dryer at medium or low heat for proper tumbling. • Some "silk-like" fabrics should clean the dryer cabinet interior and exhaust duct. PROBLEM POSSIBLE CAUSES...
... softener to remove lint. Never use spray starch or fabric finish on top of the door opening and remove any time. Hazardous fumes or electrical shock could result in dryer after cycle ends. • Reduce load size and tumble at any accumulation of dryer at medium or low heat for proper tumbling. • Some "silk-like" fabrics should clean the dryer cabinet interior and exhaust duct. PROBLEM POSSIBLE CAUSES...
Owners Guide
Page 5
... Electrical power cord is connected to make sure supply valve is on a 240 volt circuit. There are inside of material securely around ornaments before laundering. If 1 of rigid or flexible metal. Exhaust duct must have not been met. Drying procedures have anough air supply to the dryer. Excessive wrinkling. Drum damage caused by the warranty. 5 Reset circuit breaker or replace fuse. Call authorized service person for procedure. Replace fuse. See INSTALLATION INSTRUCTIONS for replacement. See Drying...
... Electrical power cord is connected to make sure supply valve is on a 240 volt circuit. There are inside of material securely around ornaments before laundering. If 1 of rigid or flexible metal. Exhaust duct must have not been met. Drying procedures have anough air supply to the dryer. Excessive wrinkling. Drum damage caused by the warranty. 5 Reset circuit breaker or replace fuse. Call authorized service person for procedure. Replace fuse. See INSTALLATION INSTRUCTIONS for replacement. See Drying...

Owners Guide
Page 6
... the USA, your best interest to change or add to use or used in the USA and Canada. Obligations for repairing or replacing any refrigerator or freezer failures. 6. Products with original serial numbers that prove to be obtained by unauthorized service companies; Surcharges including, but not limited to repair or replace appliance light bulbs, air filters, water filters, other consumables, or knobs, handles, or other than...
... the USA, your best interest to change or add to use or used in the USA and Canada. Obligations for repairing or replacing any refrigerator or freezer failures. 6. Products with original serial numbers that prove to be obtained by unauthorized service companies; Surcharges including, but not limited to repair or replace appliance light bulbs, air filters, water filters, other consumables, or knobs, handles, or other than...
Owners Guide
Page 7
...CANADA, CANADÁ 1-800-265-8352 (English)(Français) Or, O, Ou USA, EE.UU., É.-U. Box 212378 Augusta, GA 30917 CANADA, CANADÁ Electrolux Major Appliances North America, a division of Electrolux Home Products, Inc. 5855 Terry Fox Way Mississauga, Ontario, ..., O, Ou Visit Frigidaire's Web Site at: Visite la página de Frigidaire en Internet: Visitez le site Internet de Frigidaire au: http://www/frigidaire.com © 2005 Electrolux Major Appliances North America, a division of powered appliances for kitchen, cleaning and outdoor use combined. The Electrolux Group...
...CANADA, CANADÁ 1-800-265-8352 (English)(Français) Or, O, Ou USA, EE.UU., É.-U. Box 212378 Augusta, GA 30917 CANADA, CANADÁ Electrolux Major Appliances North America, a division of Electrolux Home Products, Inc. 5855 Terry Fox Way Mississauga, Ontario, ..., O, Ou Visit Frigidaire's Web Site at: Visite la página de Frigidaire en Internet: Visitez le site Internet de Frigidaire au: http://www/frigidaire.com © 2005 Electrolux Major Appliances North America, a division of powered appliances for kitchen, cleaning and outdoor use combined. The Electrolux Group...
Installation Instructions
Page 2
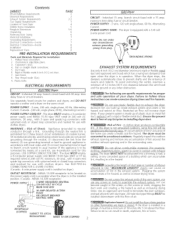
...Duct tape. 6. Contents SUBJECT PA GE Prednsta%Son Require,remits 2 Electrical Requirements 2 Exhaust System Requirements 2-3 Gas Supply Requirements 3 Location of "four Dryer 4 Mobile Home Installation 5 Roughdn Dimensions 5-6 Unpacking 6 Reversing Door Swing 6 Electrical Insta%8on 7 Grounding Requirements 7 Electrical Connections--3-wire 7 Electrical Connections--4-wire 8 Installation 8 Replacement Parts 8 PREdNSTALLATION REQUIREMENTS Tools and Materials Required for washers and dryers, and DO NOT operate a washer and a dryer on the same circuit POWER...
...Duct tape. 6. Contents SUBJECT PA GE Prednsta%Son Require,remits 2 Electrical Requirements 2 Exhaust System Requirements 2-3 Gas Supply Requirements 3 Location of "four Dryer 4 Mobile Home Installation 5 Roughdn Dimensions 5-6 Unpacking 6 Reversing Door Swing 6 Electrical Insta%8on 7 Grounding Requirements 7 Electrical Connections--3-wire 7 Electrical Connections--4-wire 8 Installation 8 Replacement Parts 8 PREdNSTALLATION REQUIREMENTS Tools and Materials Required for washers and dryers, and DO NOT operate a washer and a dryer on the same circuit POWER...
Installation Instructions
Page 3
... duct work should be used to connect your parts distributor Follow the instructions supplied with the National Fuel Gas Code, ANSI Z2231 (latest edition) or in Canada, the current CAN/CGA B149 2 The gas supply line should check the exhaust system and vent hood for proper operation EXHA UST DIRECTION All dryers shipped from the factory are set up for test gauge connection, MUST be installed immediately upstream of the gas...
... duct work should be used to connect your parts distributor Follow the instructions supplied with the National Fuel Gas Code, ANSI Z2231 (latest edition) or in Canada, the current CAN/CGA B149 2 The gas supply line should check the exhaust system and vent hood for proper operation EXHA UST DIRECTION All dryers shipped from the factory are set up for test gauge connection, MUST be installed immediately upstream of the gas...

Installation Instructions
Page 4
... top and bottom of the door, is required Air openings are required to dripping water or outside weather conditions 2 In an area where it will come in contact with curtains, drapes, or anything that will obstruct the flow of combustion and ventilation air. 3 On carpet Floor MUST be installed in the same closet as the Gas dryer 3 Your dryer needs the space around it...
... top and bottom of the door, is required Air openings are required to dripping water or outside weather conditions 2 In an area where it will come in contact with curtains, drapes, or anything that will obstruct the flow of combustion and ventilation air. 3 On carpet Floor MUST be installed in the same closet as the Gas dryer 3 Your dryer needs the space around it...
Installation Instructions
Page 5
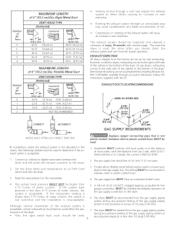
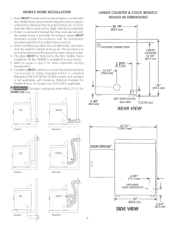
... 1/2" (120.7 cm) DOOR OPEN 90 ° 4 3/8" L (11.1 cm) _ OPTIONAL VENT KNOCKOUT_-_ Correct L L Incorrect 27" (68.6cm) SIDE VIEW 3 3/4" (9.5 cm) This dryer MUST be not less than twice the area of the dryer exhaust outlet. 4. MOBILE HOME INSTALLATION 1. This provision is not applicable, with American National Standard for HOME USE only. In Canada, tile CSA Z240 is preferred. 2. Metal ducting must be 4 inches...
... 1/2" (120.7 cm) DOOR OPEN 90 ° 4 3/8" L (11.1 cm) _ OPTIONAL VENT KNOCKOUT_-_ Correct L L Incorrect 27" (68.6cm) SIDE VIEW 3 3/4" (9.5 cm) This dryer MUST be not less than twice the area of the dryer exhaust outlet. 4. MOBILE HOME INSTALLATION 1. This provision is not applicable, with American National Standard for HOME USE only. In Canada, tile CSA Z240 is preferred. 2. Metal ducting must be 4 inches...
Installation Instructions
Page 6
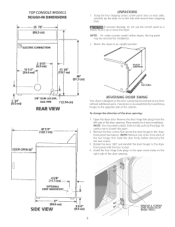
... counter model clothes dryers, the top panel may be removed for future installation NOTE: You may be reversed at any time without additional parts, Conversion is designed so the door swing may need a plastic knife to help pull out the plugs Be careful not to scratch the paint, 2 Remove the four screws that secure the door hinges to the opposite side of the cabinet To change the direction...
... counter model clothes dryers, the top panel may be removed for future installation NOTE: You may be reversed at any time without additional parts, Conversion is designed so the door swing may need a plastic knife to help pull out the plugs Be careful not to scratch the paint, 2 Remove the four screws that secure the door hinges to the opposite side of the cabinet To change the direction...
Installation Instructions
Page 7
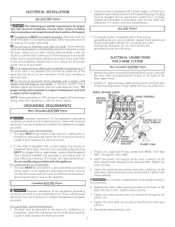
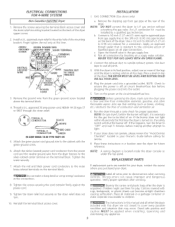
... a grounded, cord ELECTRfCAL INSTALLATION ALL ELECTRIC Dryers The following are specific requirements for proper and safe electrical installation of your protection against shock hazard and should be cut or remove the grounding prong from the plug_ ELECTRICAL CONNECTIONS FOR 3-WIRE SYSTEM I Non-Canadian ELECTRIC Dryer 1 1, Remove the screws securing the terminal block access cover and the strain relief mounting bracket located on 240 volt power supply GROUNDING REQUIREMENTS Non-Canadian ELECTR/CDryer 2. NOTE: Dryers operating on...
... a grounded, cord ELECTRfCAL INSTALLATION ALL ELECTRIC Dryers The following are specific requirements for proper and safe electrical installation of your protection against shock hazard and should be cut or remove the grounding prong from the plug_ ELECTRICAL CONNECTIONS FOR 3-WIRE SYSTEM I Non-Canadian ELECTRIC Dryer 1 1, Remove the screws securing the terminal block access cover and the strain relief mounting bracket located on 240 volt power supply GROUNDING REQUIREMENTS Non-Canadian ELECTR/CDryer 2. NOTE: Dryers operating on...
Installation Instructions
Page 8
... source where you purchased your Owner's Guide before calling for service. 8, Place these instructions in a location near the dryer for the gas line to disconnection when servicing Wiring errors can become airtight chambers causing suffocation Place all Run the dryer through the strain relief. NOTE: A wiring diagram is turned on a soapy water solution NEVER TEST FOR GAS LEAKS WITH AN OPEN FLAME, 2, Connect the exhaust duct to outside exhaust system, Use duct tape to seal all...
... source where you purchased your Owner's Guide before calling for service. 8, Place these instructions in a location near the dryer for the gas line to disconnection when servicing Wiring errors can become airtight chambers causing suffocation Place all Run the dryer through the strain relief. NOTE: A wiring diagram is turned on a soapy water solution NEVER TEST FOR GAS LEAKS WITH AN OPEN FLAME, 2, Connect the exhaust duct to outside exhaust system, Use duct tape to seal all...


