
Owners Guide
Page 1
Read and Save These Instructions Record Your Model and Serial Numbers Record below the model and serial numbers found on the dryer serial plate located on the left side of Contents Important Safety Instructions 2 Drying Procedures 3 Features 3 Common Drying Problems 4 ... Thank you for future reference. Model Number: Serial Number: Purchase Date: P/N 134671200A (0606) DRYER Owner's Guide Table of the door opening. Keep these numbers for choosing this dryer. Register Your Product The self-addressed PRODUCT REGISTRATION CARD should be filled in completely, signed and returned...
Read and Save These Instructions Record Your Model and Serial Numbers Record below the model and serial numbers found on the dryer serial plate located on the left side of Contents Important Safety Instructions 2 Drying Procedures 3 Features 3 Common Drying Problems 4 ... Thank you for future reference. Model Number: Serial Number: Purchase Date: P/N 134671200A (0606) DRYER Owner's Guide Table of the door opening. Keep these numbers for choosing this dryer. Register Your Product The self-addressed PRODUCT REGISTRATION CARD should be filled in completely, signed and returned...
Owners Guide
Page 2
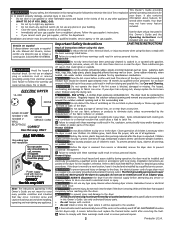
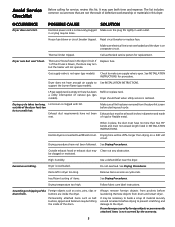
...the drying rack. 14-30R - Failure to prevent property damage, personal injury or loss of an overheated situation (electric dryers only). Keep laundry products out of the dryer. A service technician must never be followed to minimize the risk of fire or explosion general operating instructions for the... in , or spotted with these items on or in this or any accumulation of the fabric softener or product. Fire hazard, ELECTRIC DRYER overheating and damage to INSTALLATION INSTRUCTIONS for - Do not stack or place laundry or throw rugs against the front or back of ...
...the drying rack. 14-30R - Failure to prevent property damage, personal injury or loss of an overheated situation (electric dryers only). Keep laundry products out of the dryer. A service technician must never be followed to minimize the risk of fire or explosion general operating instructions for the... in , or spotted with these items on or in this or any accumulation of the fabric softener or product. Fire hazard, ELECTRIC DRYER overheating and damage to INSTALLATION INSTRUCTIONS for - Do not stack or place laundry or throw rugs against the front or back of ...
Owners Guide
Page 3
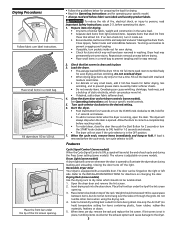
... a timed dry setting best suited for 2 seconds or turn pockets inside . • To restart dryer, close the door then push the Start Button for items being dried. Place the front bar under the lip of fire, electrical shock, or injury to the desired setting. 6. See Operating Instructions card for your specific model...
... a timed dry setting best suited for 2 seconds or turn pockets inside . • To restart dryer, close the door then push the Start Button for items being dried. Place the front bar under the lip of fire, electrical shock, or injury to the desired setting. 6. See Operating Instructions card for your specific model...
Owners Guide
Page 4
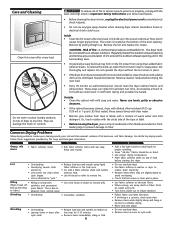
...rinse. • Use fabric softener in washer or dryer to electricity. • Or, add a fabric softener sheet and tumble reduce static electricity. • Lint screen not clean when without the lint screen in place. • If the dryer drum becomes stained from tape or labels with a mixture... comply with the basic warnings listed in Important Safety Instructions and those listed below. • Before cleaning the dryer interior, unplug the electrical power cord to avoid electrical shock hazards. • Do not use any time. Risk of lint and scum, and fabric damage. A clothes...
...rinse. • Use fabric softener in washer or dryer to electricity. • Or, add a fabric softener sheet and tumble reduce static electricity. • Lint screen not clean when without the lint screen in place. • If the dryer drum becomes stained from tape or labels with a mixture... comply with the basic warnings listed in Important Safety Instructions and those listed below. • Before cleaning the dryer interior, unplug the electrical power cord to avoid electrical shock hazards. • Do not use any time. Risk of lint and scum, and fabric damage. A clothes...
Owners Guide
Page 5
...out any obstruction. The list includes common occurrences that are 2 house fuses in dryer too long. House fuse blown or circuit breaker tripped. Make sure electrical line is not overloaded and the dryer is open (gas models). Thermal limiter tripped. See INSTALLATION INSTRUCTIONS for replacement. ...two 90° bends and must be necessary to a 208 volt circuit. Replace fuse. Exhaust duct requirements have not been followed. Electric dryer is blown, the drum may be clogged or restricted. Drying procedures have not been met. Outside exhaust hood or exhaust duct may...
...out any obstruction. The list includes common occurrences that are 2 house fuses in dryer too long. House fuse blown or circuit breaker tripped. Make sure electrical line is not overloaded and the dryer is open (gas models). Thermal limiter tripped. See INSTALLATION INSTRUCTIONS for replacement. ...two 90° bends and must be necessary to a 208 volt circuit. Replace fuse. Exhaust duct requirements have not been followed. Electric dryer is blown, the drum may be clogged or restricted. Drying procedures have not been met. Outside exhaust hood or exhaust duct may...
Installation Instructions
Page 2
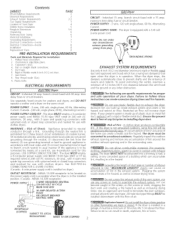
... knife. Channel-lock adjustable pliers. ;3. Contents SUBJECT PA GE Prednsta%Son Require,remits 2 Electrical Requirements 2 Exhaust System Requirements 2-3 Gas Supply Requirements 3 Location of "four Dryer 4 Mobile Home Installation 5 Roughdn Dimensions 5-6 Unpacking 6 Reversing Door Swing 6 Electrical Insta%8on 7 Grounding Requirements 7 Electrical Connections--3-wire 7 Electrical Connections--4-wire 8 Installation 8 Replacement Parts 8 PREdNSTALLATION REQUIREMENTS Tools and Materials Required for...
... knife. Channel-lock adjustable pliers. ;3. Contents SUBJECT PA GE Prednsta%Son Require,remits 2 Electrical Requirements 2 Exhaust System Requirements 2-3 Gas Supply Requirements 3 Location of "four Dryer 4 Mobile Home Installation 5 Roughdn Dimensions 5-6 Unpacking 6 Reversing Door Swing 6 Electrical Insta%8on 7 Grounding Requirements 7 Electrical Connections--3-wire 7 Electrical Connections--4-wire 8 Installation 8 Replacement Parts 8 PREdNSTALLATION REQUIREMENTS Tools and Materials Required for...
Installation Instructions
Page 3
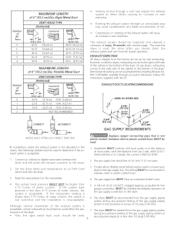
... Code, ANSI Z2231 (latest edition) or in Canada, the current CAN/CGA B149 2 The gas supply line should be of 1/2 inch (1 27 cm) pipe 3 If codes allow, flexible metal tubing may cause condensation and faster accumulation of lint Compression or crimping of the exhaust system will...is acceptable: 1, Connect an inclined or digital manometer between the dryer and the point the exhaust connects to the dryer 2, Set the dryer timer and temperature to air fluff (cool down) and start the dryer 3, Read the measurement on electric dryers, exhausting can be higher than 0,75 inches of water column If...
... Code, ANSI Z2231 (latest edition) or in Canada, the current CAN/CGA B149 2 The gas supply line should be of 1/2 inch (1 27 cm) pipe 3 If codes allow, flexible metal tubing may cause condensation and faster accumulation of lint Compression or crimping of the exhaust system will...is acceptable: 1, Connect an inclined or digital manometer between the dryer and the point the exhaust connects to the dryer 2, Set the dryer timer and temperature to air fluff (cool down) and start the dryer 3, Read the measurement on electric dryers, exhausting can be higher than 0,75 inches of water column If...

Installation Instructions
Page 4
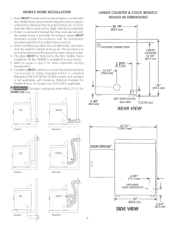
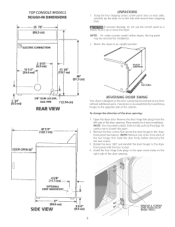
...The following illustrations show minimum clearance dimensions for propel operation in a recess or closet installation it for proper ventilation, DO NOT INSTALL YOUR DRYER IN A CLOSET WITH A SOLID DOOR. 4. Kit is available from bottom and top of the door, is required Air openings are ...openings each 60 square inches (387 square centimeters) -- 3 inches (76 cm) from an authorized parts distributor. *Custom-sized countertop is desired, the dryer MUST have a top sheet kit installed, P/N 131629100. A minimum of 120 square inches (7742 square era) of opening, equally divided at the top...
...The following illustrations show minimum clearance dimensions for propel operation in a recess or closet installation it for proper ventilation, DO NOT INSTALL YOUR DRYER IN A CLOSET WITH A SOLID DOOR. 4. Kit is available from bottom and top of the door, is required Air openings are ...openings each 60 square inches (387 square centimeters) -- 3 inches (76 cm) from an authorized parts distributor. *Custom-sized countertop is desired, the dryer MUST have a top sheet kit installed, P/N 131629100. A minimum of 120 square inches (7742 square era) of opening, equally divided at the top...
Installation Instructions
Page 5
...3/8" L (11.1 cm) _ OPTIONAL VENT KNOCKOUT_-_ Correct L L Incorrect 27" (68.6cm) SIDE VIEW 3 3/4" (9.5 cm) If dryer is exhausted through the floor and area beneath the mobile home is preferred. 2. When installing a gas dryer into a mobile home, a provision must be fastened to the floor. Rigid ... 5/8" (87.9 cm) 13 1/2" -_ (34.4 cm) l © T 33/4" (9.5 cm) _/8" (&95 cm) DIA. Dryer MUSTbe exhausted outside make up air. The dryer is not applicable, with the termination securely fastened to pages 2 and 3 for outside (outdoors, not beneath the mobile home) using metal...
...3/8" L (11.1 cm) _ OPTIONAL VENT KNOCKOUT_-_ Correct L L Incorrect 27" (68.6cm) SIDE VIEW 3 3/4" (9.5 cm) If dryer is exhausted through the floor and area beneath the mobile home is preferred. 2. When installing a gas dryer into a mobile home, a provision must be fastened to the floor. Rigid ... 5/8" (87.9 cm) 13 1/2" -_ (34.4 cm) l © T 33/4" (9.5 cm) _/8" (&95 cm) DIA. Dryer MUSTbe exhausted outside make up air. The dryer is not applicable, with the termination securely fastened to pages 2 and 3 for outside (outdoors, not beneath the mobile home) using metal...
Installation Instructions
Page 6
....7era} 3_ H (91.5 cm) ;3 3/4_ (9.5 ¢m} 318" {0ogg ¢m} DIA° GAS PiPE REAR ViEW B 4.3/8" (11.1 cm} OPTIONAL VENT KNOCKOIJT. _ _" 27' (68°6 cm} SIDE ViEW REVERSING DOOR SWING Your dryer is designed so the door swing may be reversed at any time without additional parts, Conversion is accomplished by transferring hinges...
....7era} 3_ H (91.5 cm) ;3 3/4_ (9.5 ¢m} 318" {0ogg ¢m} DIA° GAS PiPE REAR ViEW B 4.3/8" (11.1 cm} OPTIONAL VENT KNOCKOIJT. _ _" 27' (68°6 cm} SIDE ViEW REVERSING DOOR SWING Your dryer is designed so the door swing may be reversed at any time without additional parts, Conversion is accomplished by transferring hinges...
Installation Instructions
Page 7
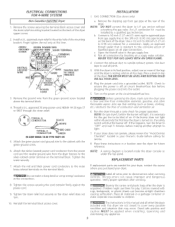
...the strain relief is not attached, the cord can be pulled out of the dryer and can be cut or remove the grounding prong from the plug_ ELECTRICAL CONNECTIONS FOR 3-WIRE SYSTEM I Non-Canadian ELECTRIC Dryer 1 1, Remove the screws securing the terminal block access cover and the strain...on 240 volt power supply GROUNDING REQUIREMENTS Non-Canadian ELECTR/CDryer 2. Some extension cords are not designed to withstand the amounts of electrical current this dryer utilizes and can melt, creating electrical shock and/or fire hazard Locate the dryer within reach of the receptacle for the length ...
...the strain relief is not attached, the cord can be pulled out of the dryer and can be cut or remove the grounding prong from the plug_ ELECTRICAL CONNECTIONS FOR 3-WIRE SYSTEM I Non-Canadian ELECTRIC Dryer 1 1, Remove the screws securing the terminal block access cover and the strain...on 240 volt power supply GROUNDING REQUIREMENTS Non-Canadian ELECTR/CDryer 2. Some extension cords are not designed to withstand the amounts of electrical current this dryer utilizes and can melt, creating electrical shock and/or fire hazard Locate the dryer within reach of the receptacle for the length ...
Installation Instructions
Page 8
...neutral ground wire from the d0/er harness to the corrosive action of liquefied gases on all pipe connections c. Connect a 1/2 inch (I 27 cm) lD semi-rigid or approved pipe from combustib/e materia/s, gasofine, and other literature included with rugs, bedspreads, or plastic sheets ...to "OFF" and wait 5 minutes before calling for service. 8, Place these instructions in the gas supply line d. ELECTRICAL CONNECTIONS FOR 4-WIRE SYSTEM Non -Canadian ELECTRIC Dryer 1 1 Remove the screws securing the terminal block access cover and the strain relief mounting bracket located on the back of...
...neutral ground wire from the d0/er harness to the corrosive action of liquefied gases on all pipe connections c. Connect a 1/2 inch (I 27 cm) lD semi-rigid or approved pipe from combustib/e materia/s, gasofine, and other literature included with rugs, bedspreads, or plastic sheets ...to "OFF" and wait 5 minutes before calling for service. 8, Place these instructions in the gas supply line d. ELECTRICAL CONNECTIONS FOR 4-WIRE SYSTEM Non -Canadian ELECTRIC Dryer 1 1 Remove the screws securing the terminal block access cover and the strain relief mounting bracket located on the back of...


