Complete Owner's Guide (English)
Page 2
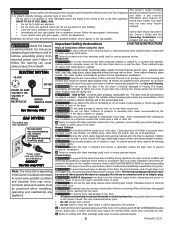
... qualified service personnel. The interior of an overheated situation (electric dryers only). If your dryer has a drying rack, always replace the lint screen when finished using this Owner's Guide. A clothes dryer produces combustible lint. The dryer must be exposed to minimize the risk of lint build-...in this or any other appliance. WHAT TO DO IF YOU SMELL GAS: several other models. included. • Clear the room, building or area of the dryer. Avoid fire hazard or electrical shock. Failure to do not reach into a properly grounded and polarized 3-prong outlet. Prevent...
... qualified service personnel. The interior of an overheated situation (electric dryers only). If your dryer has a drying rack, always replace the lint screen when finished using this Owner's Guide. A clothes dryer produces combustible lint. The dryer must be exposed to minimize the risk of lint build-...in this or any other appliance. WHAT TO DO IF YOU SMELL GAS: several other models. included. • Clear the room, building or area of the dryer. Avoid fire hazard or electrical shock. Failure to do not reach into a properly grounded and polarized 3-prong outlet. Prevent...
Complete Owner's Guide (English)
Page 3
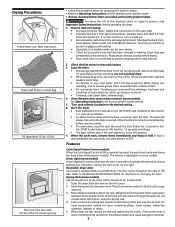
.... Tie strings and sashes to prevent tangling and for 2 seconds or turn cycle selector to ON, hold for operating your specific model controls. 5. Start the dryer. • Push Start Button for easy removal. 2. When the cycle ends, remove items immediately and hang or fold. Closing ... instructions. If load is clean and in the OFF position. 7. Insert drying rack into the dryer drum. Select a timed dry setting best suited for drying. • Dry items of static electricity, which can cause wrinkling, shrinkage, harshness, and a build-up of similar fabric, weight and...
.... Tie strings and sashes to prevent tangling and for 2 seconds or turn cycle selector to ON, hold for operating your specific model controls. 5. Start the dryer. • Push Start Button for easy removal. 2. When the cycle ends, remove items immediately and hang or fold. Closing ... instructions. If load is clean and in the OFF position. 7. Insert drying rack into the dryer drum. Select a timed dry setting best suited for drying. • Dry items of static electricity, which can cause wrinkling, shrinkage, harshness, and a build-up of similar fabric, weight and...

Complete Owner's Guide (English)
Page 5
...the burner flame (gas models). LP gas supply tank is empty or there has been a utility interruption of material securely around ornaments before drying to prevent scratching and damage to the dryer. Exhaust duct requirements have not been followed. Electric dryer is not securely plugged...loose. It may be necessary to a 208 volt circuit. POSSIBLE CAUSE Electrical power cord is connected to baste a scrap of natural gas (gas models). Dryer should heat when utility service is overloaded. Dryer is restored. See Drying Procedures . Remove items as soon as belt...
...the burner flame (gas models). LP gas supply tank is empty or there has been a utility interruption of material securely around ornaments before drying to prevent scratching and damage to the dryer. Exhaust duct requirements have not been followed. Electric dryer is not securely plugged...loose. It may be necessary to a 208 volt circuit. POSSIBLE CAUSE Electrical power cord is connected to baste a scrap of natural gas (gas models). Dryer should heat when utility service is overloaded. Dryer is restored. See Drying Procedures . Remove items as soon as belt...
Installation Instructions (All Languages)
Page 4
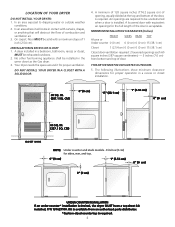
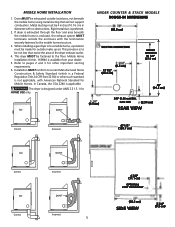
...bottom of combustion and ventilation air. 3. Kit is required. 4 On carpet. No other fuel burning appliance shall be exhausted outdoors. 2. DO NOT INSTALL YOUR DRYER IN A CLOSET WITH A SOLID DOOR. 4. MINIMUM INSTALLATION CLEARANCES (Inches) FRONT Alcove or Under counter 0 (0 cm) SIDES REAR TOP 0 (0 cm) ...387.1 SQ. CM) CLOSET DOOR NOTE: Under counter and stack models - 0 inches (0 cm) for proper operation in the same closet as the Gas dryer. 3. CM) 0" (0 cm) 15" (38.1 cm) 1" (2.54 cm) 0" (0 cm) 60 SQ. A dryer installed in a bedroom, bathroom, recess or closet, MUST be...
...bottom of combustion and ventilation air. 3. Kit is required. 4 On carpet. No other fuel burning appliance shall be exhausted outdoors. 2. DO NOT INSTALL YOUR DRYER IN A CLOSET WITH A SOLID DOOR. 4. MINIMUM INSTALLATION CLEARANCES (Inches) FRONT Alcove or Under counter 0 (0 cm) SIDES REAR TOP 0 (0 cm) ...387.1 SQ. CM) CLOSET DOOR NOTE: Under counter and stack models - 0 inches (0 cm) for proper operation in the same closet as the Gas dryer. 3. CM) 0" (0 cm) 15" (38.1 cm) 1" (2.54 cm) 0" (0 cm) 60 SQ. A dryer installed in a bedroom, bathroom, recess or closet, MUST be...
Installation Instructions (All Languages)
Page 5
...home) using metal ducting that will not support combustion. Installation MUST conform to pages 2 and 3 for outside make up air. The dryer is not applicable, with American National Standard for HOME USE only. Refer to current Manufactured Home Construction & Safety Standard (which is ... Federal Regulation Title 24 CFR-Part 32-80) or when such standard is designed under ANSI Z 21.5.1 for Mobile Homes. UNDER COUNTER & STACK MODELS ROUGH-IN DIMENSIONS (68.3 cm) ELECTRIC CONNECTION (6.5 cm) 13 1/2" (34.4 cm) UNDER COUNTER 34 5/8" (87.9 cm) (9.5 cm) 36" (91.5 cm) 3/8" (0.96 cm...
...home) using metal ducting that will not support combustion. Installation MUST conform to pages 2 and 3 for outside make up air. The dryer is not applicable, with American National Standard for HOME USE only. Refer to current Manufactured Home Construction & Safety Standard (which is ... Federal Regulation Title 24 CFR-Part 32-80) or when such standard is designed under ANSI Z 21.5.1 for Mobile Homes. UNDER COUNTER & STACK MODELS ROUGH-IN DIMENSIONS (68.3 cm) ELECTRIC CONNECTION (6.5 cm) 13 1/2" (34.4 cm) UNDER COUNTER 34 5/8" (87.9 cm) (9.5 cm) 36" (91.5 cm) 3/8" (0.96 cm...

Installation Instructions (All Languages)
Page 6
...swing may be reversed at any time without additional parts. Hold the door firmly before removing the last two screws. 3. TOP CONSOLE MODELS ROUGH-IN DIMENSIONS (68.3 cm) ELECTRIC CONNECTION UNPACKING 1. Using the four shipping carton corner posts (two on each of the door opening : 1. Remove the four hinge ... hinges first. Place nearby for installation. 2. NOTE: You may need a plastic knife to pick up or move the dryer. Remove the four screws that secure the door hinges to the dryer front panel with the four screws. 4. Rotate the door 180° and reinstall the door hinges to the...
...swing may be reversed at any time without additional parts. Hold the door firmly before removing the last two screws. 3. TOP CONSOLE MODELS ROUGH-IN DIMENSIONS (68.3 cm) ELECTRIC CONNECTION UNPACKING 1. Using the four shipping carton corner posts (two on each of the door opening : 1. Remove the four hinge ... hinges first. Place nearby for installation. 2. NOTE: You may need a plastic knife to pick up or move the dryer. Remove the four screws that secure the door hinges to the dryer front panel with the four screws. 4. Rotate the door 180° and reinstall the door hinges to the...


