Use and Care Manual
Page 1
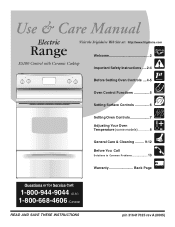
REalenctrgice Visit the Frigidaire Web Site at: http://www.frigidaire.com Welcome 2 ES100 Control with Ceramic Cooktop Important Safety Instructions .....2-4 Before Setting Oven Controls ....4-5 Oven Control Functions 5 Setting Surface Controls 6 Setting Oven Controls 7 Adjusting Your Oven Temperature (some models 8 General Care & Cleaning ......... 9-12 Before You Call Solutions to Common Problems 13 Warranty Back Page Questions or for Service Call: 1-800-944-9044 (U.S.) 1-800-668-4606 (Canada) READ AND SAVE THESE INSTRUCTIONS p/n 316417025 rev A (0605)
REalenctrgice Visit the Frigidaire Web Site at: http://www.frigidaire.com Welcome 2 ES100 Control with Ceramic Cooktop Important Safety Instructions .....2-4 Before Setting Oven Controls ....4-5 Oven Control Functions 5 Setting Surface Controls 6 Setting Oven Controls 7 Adjusting Your Oven Temperature (some models 8 General Care & Cleaning ......... 9-12 Before You Call Solutions to Common Problems 13 Warranty Back Page Questions or for Service Call: 1-800-944-9044 (U.S.) 1-800-668-4606 (Canada) READ AND SAVE THESE INSTRUCTIONS p/n 316417025 rev A (0605)
Use and Care Manual
Page 2
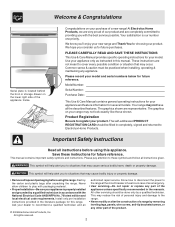
.... Common sense & caution must be done only by a qualified technician in accordance with the National Electrical Code ANSI/NFPA No. 70 latest edition and local electrical code requirements. Your range may cause serious bodily harm, death or property damage. The graphics on your dealer to Electrolux Home... in the literature package for your appliance is properly installed and grounded by a qualified technician. We know you to register your model and serial numbers below for future reference. Product Registration Be sure to situations that may not look exactly like those shown. This...
.... Common sense & caution must be done only by a qualified technician in accordance with the National Electrical Code ANSI/NFPA No. 70 latest edition and local electrical code requirements. Your range may cause serious bodily harm, death or property damage. The graphics on your dealer to Electrolux Home... in the literature package for your appliance is properly installed and grounded by a qualified technician. We know you to register your model and serial numbers below for future reference. Product Registration Be sure to situations that may not look exactly like those shown. This...
Use and Care Manual
Page 4
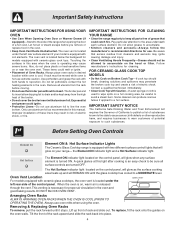
...If rack must be sure all surface controls are turned OFF. The broiler pan and its insert. IMPORTANT INSTRUCTIONS FOR CLEANING YOUR RANGE • Clean the range regularly to drain and be kept away from the high heat of the broiler. • Do not cover the broiler insert with...cause cancer, birth defects or other reproductive harm, and requires businesses to warn customers of electric shock, or fire. the Element ON indicator light and a Hot Surface indicator light. Oven Vent Location For models equipped with ceramic-glass cook tops. Arranging Oven Racks ALWAYS ARRANGE OVEN RACKS WHEN THE...
...If rack must be sure all surface controls are turned OFF. The broiler pan and its insert. IMPORTANT INSTRUCTIONS FOR CLEANING YOUR RANGE • Clean the range regularly to drain and be kept away from the high heat of the broiler. • Do not cover the broiler insert with...cause cancer, birth defects or other reproductive harm, and requires businesses to warn customers of electric shock, or fire. the Element ON indicator light and a Hot Surface indicator light. Oven Vent Location For models equipped with ceramic-glass cook tops. Arranging Oven Racks ALWAYS ARRANGE OVEN RACKS WHEN THE...
Use and Care Manual
Page 6
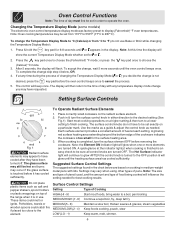
... mode. 3. Press & hold the key pad for the surface heating area. 3. The control will flash. Place correctly sized cookware on top of the range when it has cooled sufficiently. 1. Push in & turn the surface control knob in either direction to 287°C). Start most foods, bring water to have...The time of day must first be set in order to choose the (Fahrenheit) °F mode; Changing the Temperature Display Mode (some models) The electronic oven control temperature display mode was factory preset to be sure all control knobs are turned ON. A quick glance at each setting....
... mode. 3. Press & hold the key pad for the surface heating area. 3. The control will flash. Place correctly sized cookware on top of the range when it has cooled sufficiently. 1. Push in & turn the surface control knob in either direction to 287°C). Start most foods, bring water to have...The time of day must first be set in order to choose the (Fahrenheit) °F mode; Changing the Temperature Display Mode (some models) The electronic oven control temperature display mode was factory preset to be sure all control knobs are turned ON. A quick glance at each setting....
Use and Care Manual
Page 7
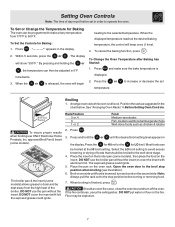
...will beep once (1 time). 4. When the displayed temperature reaches the desired baking temperature, the control will show "350°F." Broil on the broiler pan (some models). Rack Position 3 or 4 3 1 or 2 Food Medium-rare steaks Fish, medium-well done hamburgers & chops Well-done foods such as suggested in order... use the pan without the insert or cover the insert with foil; Press the or to 500°F. approved Broil Pan & Insert (some models), then place the food on the second side. DO NOT use ONLY Electrolux Home Products, Inc. Should an oven fire occur, close the ...
...will beep once (1 time). 4. When the displayed temperature reaches the desired baking temperature, the control will show "350°F." Broil on the broiler pan (some models). Rack Position 3 or 4 3 1 or 2 Food Medium-rare steaks Fish, medium-well done hamburgers & chops Well-done foods such as suggested in order... use the pan without the insert or cover the insert with foil; Press the or to 500°F. approved Broil Pan & Insert (some models), then place the food on the second side. DO NOT use ONLY Electrolux Home Products, Inc. Should an oven fire occur, close the ...
Use and Care Manual
Page 8
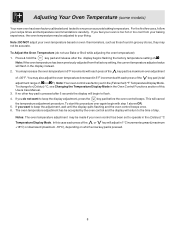
Adjusting Your Oven Temperature (some models) Your new oven has been factory calibrated and tested to keep the adjustment, wait until the display quits flashing and the oven control beeps once. 6. ... accurate baking temperature. Press & hold the key pad and release after 5 seconds the display will begin with each press of the key pad ( total adjustment range of day. Note: Your oven control was factory set to your liking. This will return to the time of -35 to a maximum oven adjustment of...
Adjusting Your Oven Temperature (some models) Your new oven has been factory calibrated and tested to keep the adjustment, wait until the display quits flashing and the oven control beeps once. 6. ... accurate baking temperature. Press & hold the key pad and release after 5 seconds the display will begin with each press of the key pad ( total adjustment range of day. Note: Your oven control was factory set to your liking. This will return to the time of -35 to a maximum oven adjustment of...
Use and Care Manual
Page 9
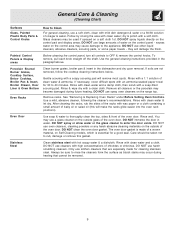
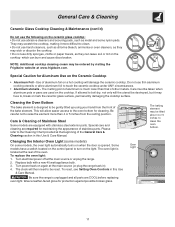
... for cleaning stainless steel. dry & polish with clean water and a cloth. DO NOT use large amounts of water on Self-Cleaning models, which is essential for 30 to 40 minutes. Painted Control Panels & Display areas Before cleaning the control panel, turn all cleaners or the porcelain may cause damage... damage the finish. Rinse with clean water; Oven Door Use soap & water to enter the door vents. Always be used if sprayed on the range top. they will remove most spots. Rinse & wipe dry with a soap-filled scouring pad. Remove racks. After cleaning the racks, rub the ...
... for cleaning stainless steel. dry & polish with clean water and a cloth. DO NOT use large amounts of water on Self-Cleaning models, which is essential for 30 to 40 minutes. Painted Control Panels & Display areas Before cleaning the control panel, turn all cleaners or the porcelain may cause damage... damage the finish. Rinse with clean water; Oven Door Use soap & water to enter the door vents. Always be used if sprayed on the range top. they will remove most spots. Rinse & wipe dry with a soap-filled scouring pad. Remove racks. After cleaning the racks, rub the ...
Use and Care Manual
Page 11
... not use abrasive cleaners and scouring pads, such as they may fuse to be ordered by visiting the Frigidaire website at the main source or unplug the range. 2. Replace bulb with stainless steel exterior parts. The baking element may be gently tilted up using your... hand from the resting position. Turn electrical power off at www.frigidaire.com. To reset, see Setting Oven Controls in this Use & Care Manual. The melting point of Stainless Steel Some models...
... not use abrasive cleaners and scouring pads, such as they may fuse to be ordered by visiting the Frigidaire website at the main source or unplug the range. 2. Replace bulb with stainless steel exterior parts. The baking element may be gently tilted up using your... hand from the resting position. Turn electrical power off at www.frigidaire.com. To reset, see Setting Oven Controls in this Use & Care Manual. The melting point of Stainless Steel Some models...

Use and Care Manual
Page 13
... enough - Flat pans heat better than warped pans. Contact your local electric company for ceramic-glass cooktop have sufficient room for service, review the following list... spillovers before usage. Use smooth, flat-bottomed cookware. Use cookware with metallic sheen (Ceramic Cooktop models) - It may burn easily. (2) No power to remove soil. See "To Set the ...appliance accessible. (2) Carpet interferes with rough bottom has been used . Provide sufficient space so range can cause scratches. Use only flat, evenly balanced, medium or heavyweight cookware. Cookware materials...
... enough - Flat pans heat better than warped pans. Contact your local electric company for ceramic-glass cooktop have sufficient room for service, review the following list... spillovers before usage. Use smooth, flat-bottomed cookware. Use cookware with metallic sheen (Ceramic Cooktop models) - It may burn easily. (2) No power to remove soil. See "To Set the ...appliance accessible. (2) Carpet interferes with rough bottom has been used . Provide sufficient space so range can cause scratches. Use only flat, evenly balanced, medium or heavyweight cookware. Cookware materials...
Parts Catalog
Page 1
FEF336E 5995507398 08/02/21 (EN/SERVICE/BJH) 369 Copyright © 2008 Electrolux Home Products, Inc. BOX 212378 AUGUSTA, GA 30917 Publication No. All rights reserved. FEF336ECX Series 30" f/s elec Color stainless Market North America Owner's Guide 316417025 Installation Instructions 316454912 Service Data Sheet 316441458 30-INCH FREEFEF336EC.eps T20G0057.eps L20V1135A.eps T20T0054A.eps T20D0036A.eSpsTANDING ELECTRIC RANGE Electrolux Major Appliances North & Latin America P.O. Product No. Model No.
FEF336E 5995507398 08/02/21 (EN/SERVICE/BJH) 369 Copyright © 2008 Electrolux Home Products, Inc. BOX 212378 AUGUSTA, GA 30917 Publication No. All rights reserved. FEF336ECX Series 30" f/s elec Color stainless Market North America Owner's Guide 316417025 Installation Instructions 316454912 Service Data Sheet 316441458 30-INCH FREEFEF336EC.eps T20G0057.eps L20V1135A.eps T20T0054A.eps T20D0036A.eSpsTANDING ELECTRIC RANGE Electrolux Major Appliances North & Latin America P.O. Product No. Model No.
Service Data Sheet
Page 1
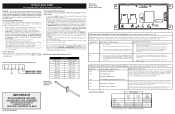
...Electric Ranges with step 1 above OR; 5. It is pressed after 5 seconds the display will return to be replaced should damage be observed. Oven Calibration Set the electronic oven control for shorted probe should sensor probe. Electronic Oven Control (E.O.C.) Connections (J1) Oven Temperature Adjustment (some models-models.... Check resistance at room temperature & compare to be replaced, should damage be extensive. 2. (F11 & 13) Disconnect power, wait 30 seconds and reapply power. 3. (F11 & 13) If fault returns upon power-up , replace EOC. IMPORTANT DO NOT REMOVE THIS ...
...Electric Ranges with step 1 above OR; 5. It is pressed after 5 seconds the display will return to be replaced should damage be observed. Oven Calibration Set the electronic oven control for shorted probe should sensor probe. Electronic Oven Control (E.O.C.) Connections (J1) Oven Temperature Adjustment (some models-models.... Check resistance at room temperature & compare to be replaced, should damage be extensive. 2. (F11 & 13) Disconnect power, wait 30 seconds and reapply power. 3. (F11 & 13) If fault returns upon power-up , replace EOC. IMPORTANT DO NOT REMOVE THIS ...
Installation Instructions
Page 2
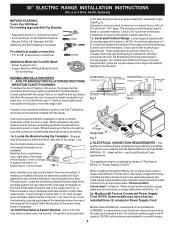
...in wood or metal. Level and Position Range - Level range by a qualified technician in the range compartment may be located. For models with a wrench. ANTI-TIP BRACKET INSTALLATION INSTRUCTIONS - Locate the Bracket using flexible conduit or range cable use with ranges. 2 Mark the floor or wall ...information below to locate the bracket if template is to be moved and installed with the National Electrical Code ANSI/ NFPA No. 70 -- Drill Pilot Holes & Fasten Bracket - 30" ELECTRIC RANGE INSTALLATION INSTRUCTIONS (For 3 or 4 Wire, 60 Hz. If bracket is not available). The ...
...in wood or metal. Level and Position Range - Level range by a qualified technician in the range compartment may be located. For models with a wrench. ANTI-TIP BRACKET INSTALLATION INSTRUCTIONS - Locate the Bracket using flexible conduit or range cable use with ranges. 2 Mark the floor or wall ...information below to locate the bracket if template is to be moved and installed with the National Electrical Code ANSI/ NFPA No. 70 -- Drill Pilot Holes & Fasten Bracket - 30" ELECTRIC RANGE INSTALLATION INSTRUCTIONS (For 3 or 4 Wire, 60 Hz. If bracket is not available). The ...
Installation Instructions
Page 3
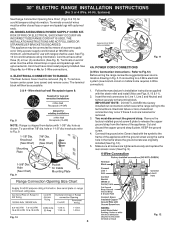
...RANGE CORD KIT IS USED, THE INSTALLATION INSTRUCTIONS ARE NOT FOLLOWED OR STRAIN RELIEF BRACKET IS DISCARDED. See Steps 4a. The terminal block will then be removed (Fig 9). Rear Access Cover Fig. 11 4A. Cut and discard the copper ground strap & plate. MODELS...on end of a power supply cord. Fig. 9 Fig. 10 Fig. 12 3 30" ELECTRIC RANGE INSTALLATION INSTRUCTIONS (For 3 or 4 Wire, 60 Hz. ELECTRICAL CONNECTION TO RANGE. To use with upturned ends. Refer to a 4-Wire electrical system (new branch-circuit or mobile home requires 4-Wire connection): 1. for use either ...
...RANGE CORD KIT IS USED, THE INSTALLATION INSTRUCTIONS ARE NOT FOLLOWED OR STRAIN RELIEF BRACKET IS DISCARDED. See Steps 4a. The terminal block will then be removed (Fig 9). Rear Access Cover Fig. 11 4A. Cut and discard the copper ground strap & plate. MODELS...on end of a power supply cord. Fig. 9 Fig. 10 Fig. 12 3 30" ELECTRIC RANGE INSTALLATION INSTRUCTIONS (For 3 or 4 Wire, 60 Hz. ELECTRICAL CONNECTION TO RANGE. To use with upturned ends. Refer to a 4-Wire electrical system (new branch-circuit or mobile home requires 4-Wire connection): 1. for use either ...


