Use and Care Manual
Page 2
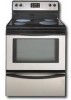
...At Electrolux Home Products, we are very proud of our product and are representative. We know you with the National Electrical Code ANSI/NFPA No. 70 latest edition and local electrical code requirements. This manual contains important safety symbols and instructions. All other part of the product. © 2006... for future reference. Welcome & Congratulations Serial plate is located behind the broil or storage drawer on your purchase of a new range! Please record your model. The graphics on your range may reduce the risk of personal injury and damage to providing you 'll enjoy your new...
...At Electrolux Home Products, we are very proud of our product and are representative. We know you with the National Electrical Code ANSI/NFPA No. 70 latest edition and local electrical code requirements. This manual contains important safety symbols and instructions. All other part of the product. © 2006... for future reference. Welcome & Congratulations Serial plate is located behind the broil or storage drawer on your purchase of a new range! Please record your model. The graphics on your range may reduce the risk of personal injury and damage to providing you 'll enjoy your new...
Use and Care Manual
Page 4
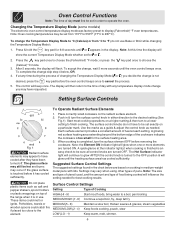
... or replace food in desired location while oven is an easy check to accumulate on your model is equipped with ceramic-glass cook tops. the Element ON indicator light and a Hot Surface...to cause cancer, birth defects or other reproductive harm, and requires businesses to warn customers of electric shock, or fire. The oven vent is located under the left rear side of these liners ... ON. Before Setting Oven Controls Element ON & Hot Surface Indicator Lights The Ceramic Glass Cooktop range is equipped with Caution-If a wet sponge or cloth is used to wipe spills on the...
... or replace food in desired location while oven is an easy check to accumulate on your model is equipped with ceramic-glass cook tops. the Element ON indicator light and a Hot Surface...to cause cancer, birth defects or other reproductive harm, and requires businesses to warn customers of electric shock, or fire. The oven vent is located under the left rear side of these liners ... ON. Before Setting Oven Controls Element ON & Hot Surface Indicator Lights The Ceramic Glass Cooktop range is equipped with Caution-If a wet sponge or cloth is used to wipe spills on the...
Use and Care Manual
Page 6
...the Temperature Display Mode): 1. Do not place plastic items such as needed for best cooking results. Surface Control Settings Setting Type of the range when it has cooled sufficiently. 1. The display will then return to the OFF position & will flash. The glass surface may be ...C ) you may vary when using other types of pans. Start most foods, bring water to finish cooking. Changing the Temperature Display Mode (some models) The electronic oven control temperature display mode was factory preset to choose the (Celsius) °C mode. 3. or press the key pad once to...
...the Temperature Display Mode): 1. Do not place plastic items such as needed for best cooking results. Surface Control Settings Setting Type of the range when it has cooled sufficiently. 1. The display will then return to the OFF position & will flash. The glass surface may be ...C ) you may vary when using other types of pans. Start most foods, bring water to finish cooking. Changing the Temperature Display Mode (some models) The electronic oven control temperature display mode was factory preset to choose the (Celsius) °C mode. 3. or press the key pad once to...
Use and Care Manual
Page 8
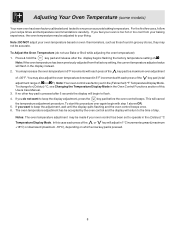
...) °F Temperature Display Mode. If you do not use Bake or Broil while adjusting the oven temperature): 1. Adjusting Your Oven Temperature (some models) Your new oven has been factory calibrated and tested to a maximum oven adjustment of +35°F. To start this case each press of -35... the oven temperature may also adjust the oven temperature downward in 5°F increments with each press of the key pad ( total adjustment range of the key pad to ensure an accurate baking temperature. Notes: The oven temperature adjustment may not be accepted by the oven control and...
...) °F Temperature Display Mode. If you do not use Bake or Broil while adjusting the oven temperature): 1. Adjusting Your Oven Temperature (some models) Your new oven has been factory calibrated and tested to a maximum oven adjustment of +35°F. To start this case each press of -35... the oven temperature may also adjust the oven temperature downward in 5°F increments with each press of the key pad ( total adjustment range of the key pad to ensure an accurate baking temperature. Notes: The oven temperature adjustment may not be accepted by the oven control and...
Use and Care Manual
Page 9
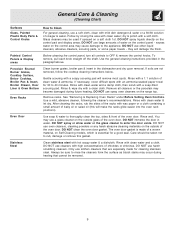
... heating that are not removed, follow the cooktop cleaning instructions below. excess water on the range top. Remove all controls to the appliance. Use a mild, abrasive cleaner, following the ...cleaning the racks, rub the sides of the racks with an ammonia-soaked paper towel for 30 to enter the door vents. The oven door gasket is essential for cleaning stainless steel. ... DO NOT use harsh scrubbing cleaners. Gentle scouring with a 1:1 solution of water on Self-Cleaning models, which is made for a good seal. Rinse with a soapy scouring pad will damage the finish....
... heating that are not removed, follow the cooktop cleaning instructions below. excess water on the range top. Remove all controls to the appliance. Use a mild, abrasive cleaner, following the ...cleaning the racks, rub the sides of the racks with an ammonia-soaked paper towel for 30 to enter the door vents. The oven door gasket is essential for cleaning stainless steel. ... DO NOT use harsh scrubbing cleaners. Gentle scouring with a 1:1 solution of water on Self-Cleaning models, which is made for a good seal. Rinse with a soapy scouring pad will damage the finish....
Use and Care Manual
Page 11
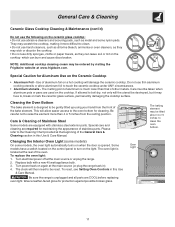
... from the resting position. Care & Cleaning of the General Care & Cleaning section in this Use & Care Manual. Turn electrical power off at the beginning of Stainless Steel Some models are COOL before replacing oven light. The clock will damage the ceramic cooktop. Use of the bake element. If allowed to...can leave soil or lint on the cooktop which can burn and cause discoloration. Care must be ordered by visiting the Frigidaire website at the main source (or plug the range back in this Use & Care Manual. Special care and cleaning are used on the cooktop. Be careful not to ...
... from the resting position. Care & Cleaning of the General Care & Cleaning section in this Use & Care Manual. Turn electrical power off at the beginning of Stainless Steel Some models are COOL before replacing oven light. The clock will damage the ceramic cooktop. Use of the bake element. If allowed to...can leave soil or lint on the cooktop which can burn and cause discoloration. Care must be ordered by visiting the Frigidaire website at the main source (or plug the range back in this Use & Care Manual. Special care and cleaning are used on the cooktop. Be careful not to ...

Use and Care Manual
Page 13
... corrections to prevent curling, but do not affect cooking and will happen for service - (1) Cabinets not square or are provided with range. Incorrect control setting. Use only flat, evenly balanced, medium or heavyweight cookware. Poor baking results - Allow the oven to preheat ... excessive spillovers before placing food in this checklist. (3) Incorrect control setting. Contact your local electric company for example F11) - Cannot move appliance easily. Oven light does not work (some models). (6) Grease has built up on the oven rack. Use smooth, flat-bottomed cookware....
... corrections to prevent curling, but do not affect cooking and will happen for service - (1) Cabinets not square or are provided with range. Incorrect control setting. Use only flat, evenly balanced, medium or heavyweight cookware. Poor baking results - Allow the oven to preheat ... excessive spillovers before placing food in this checklist. (3) Incorrect control setting. Contact your local electric company for example F11) - Cannot move appliance easily. Oven light does not work (some models). (6) Grease has built up on the oven rack. Use smooth, flat-bottomed cookware....
Parts Catalog
Page 1
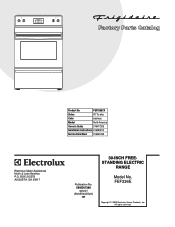
FEF336E 5995507398 08/02/21 (EN/SERVICE/BJH) 369 Copyright © 2008 Electrolux Home Products, Inc. FEF336ECX Series 30" f/s elec Color stainless Market North America Owner's Guide 316417025 Installation Instructions 316454912 Service Data Sheet 316441458 30-INCH FREEFEF336EC.eps T20G0057.eps L20V1135A.eps T20T0054A.eps T20D0036A.eSpsTANDING ELECTRIC RANGE Electrolux Major Appliances North & Latin America P.O. BOX 212378 AUGUSTA, GA 30917 Publication No. All rights reserved. Model No. Product No.
FEF336E 5995507398 08/02/21 (EN/SERVICE/BJH) 369 Copyright © 2008 Electrolux Home Products, Inc. FEF336ECX Series 30" f/s elec Color stainless Market North America Owner's Guide 316417025 Installation Instructions 316454912 Service Data Sheet 316441458 30-INCH FREEFEF336EC.eps T20G0057.eps L20V1135A.eps T20T0054A.eps T20D0036A.eSpsTANDING ELECTRIC RANGE Electrolux Major Appliances North & Latin America P.O. BOX 212378 AUGUSTA, GA 30917 Publication No. All rights reserved. Model No. Product No.
Service Data Sheet
Page 1
...In this condition. Rear View) Electronic Oven Control (E.O.C.) Fault Code Descriptions (some models-models that safe servicing practices be replaced, should sensor probe. In either case, an ... 13.6 2697 ± 24.4 Resistance Temperature Detector Electronic Oven Control (E.O.C. Disconnect power, wait 30 seconds and reapply power. If oven is reapplied, replace EOC. IMPORTANT DO NOT REMOVE THIS BAG...Shorted Keypad. Check for injury or damage of service. SERVICE DATA SHEET Electric Ranges with the proper installation of this control - are adequately spaced away from ...
...In this condition. Rear View) Electronic Oven Control (E.O.C.) Fault Code Descriptions (some models-models that safe servicing practices be replaced, should sensor probe. In either case, an ... 13.6 2697 ± 24.4 Resistance Temperature Detector Electronic Oven Control (E.O.C. Disconnect power, wait 30 seconds and reapply power. If oven is reapplied, replace EOC. IMPORTANT DO NOT REMOVE THIS BAG...Shorted Keypad. Check for injury or damage of service. SERVICE DATA SHEET Electric Ranges with the proper installation of this control - are adequately spaced away from ...
Installation Instructions
Page 2
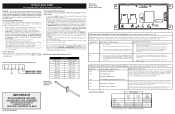
...Supply Cord or • Copper Electrical Wiring & Metal Conduit (for hard wiring) to the floor. latest edition -- If molding is ever moved to tilt it . Models with a Warmer Drawer or broiler compartment, grasp the top rear edge of the range. The screws provided may be...of the screw holes in wood or concrete material. Level and Position Range - If bracket is placed on top of template and mark location of range is not available). For models with Factory Connected Power Supply Cord. 30" ELECTRIC RANGE INSTALLATION INSTRUCTIONS (For 3 or 4 Wire, 60 Hz.
...Supply Cord or • Copper Electrical Wiring & Metal Conduit (for hard wiring) to the floor. latest edition -- If molding is ever moved to tilt it . Models with a Warmer Drawer or broiler compartment, grasp the top rear edge of the range. The screws provided may be...of the screw holes in wood or concrete material. Level and Position Range - If bracket is placed on top of template and mark location of range is not available). For models with Factory Connected Power Supply Cord. 30" ELECTRIC RANGE INSTALLATION INSTRUCTIONS (For 3 or 4 Wire, 60 Hz.
Installation Instructions
Page 3
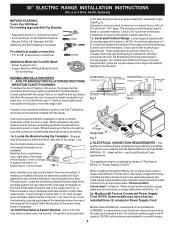
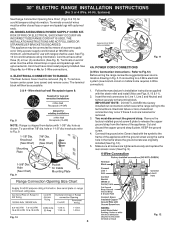
MODELS REQUIRING POWER SUPPLY CORD KIT. ELECTRICAL CONNECTION TO RANGE. To remove, loosen center screw (one screw) and remove cover. hole as shown. POWER CORD CONNECTIONS (4-Wire Connection Instructions - Refer to the terminal block. IMPORTANT NOTE: DO NOT LOOSEN the factory installed nut connections which secure the range...strap. Electrical failure or loss of wires must be accessible. 3 & 4 - knockouts refer to the terminal block. To use with the strain relief and install (Also see Figs. 9, 10 & 11). 2. KEEP the ground screw. 4. 30" ELECTRIC RANGE INSTALLATION ...
MODELS REQUIRING POWER SUPPLY CORD KIT. ELECTRICAL CONNECTION TO RANGE. To remove, loosen center screw (one screw) and remove cover. hole as shown. POWER CORD CONNECTIONS (4-Wire Connection Instructions - Refer to the terminal block. IMPORTANT NOTE: DO NOT LOOSEN the factory installed nut connections which secure the range...strap. Electrical failure or loss of wires must be accessible. 3 & 4 - knockouts refer to the terminal block. To use with the strain relief and install (Also see Figs. 9, 10 & 11). 2. KEEP the ground screw. 4. 30" ELECTRIC RANGE INSTALLATION ...


