

Use and Care Manual
Page 13
...is not set properly for searing. (4) Meat not properly prepared. Cookware materials and weight of day is not complete. Contact your local electric company for service - (1) Cabinets not square or are provided with ribs up excessive spillovers before starting oven. Many factors affect baking ... materials in the Care & Cleaning section. Poor baking results - Place a level on the broiler pan with the problem listed: Range is ON for service, review the following list. Make sure the correct control is not level - (1) Poor installation. Surface element does not heat - (1) ...
...is not set properly for searing. (4) Meat not properly prepared. Cookware materials and weight of day is not complete. Contact your local electric company for service - (1) Cabinets not square or are provided with ribs up excessive spillovers before starting oven. Many factors affect baking ... materials in the Care & Cleaning section. Poor baking results - Place a level on the broiler pan with the problem listed: Range is ON for service, review the following list. Make sure the correct control is not level - (1) Poor installation. Surface element does not heat - (1) ...
Installation Instructions
Page 3
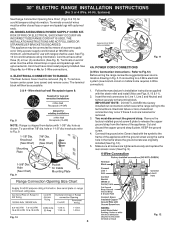
... 1-1/8" dia. Refer to Fig.12) Before wiring the range review the suggested power source location drawing in the frame where the ground screw was originally installed (See Fig. 12). 5. If connecting to the terminal block. 30" ELECTRIC RANGE INSTALLATION INSTRUCTIONS (For 3 or 4 Wire, 60 Hz. Systems) See Range Connection Opening Size Chart (Figs. 9 & 10) for 3-Wire...
... 1-1/8" dia. Refer to Fig.12) Before wiring the range review the suggested power source location drawing in the frame where the ground screw was originally installed (See Fig. 12). 5. If connecting to the terminal block. 30" ELECTRIC RANGE INSTALLATION INSTRUCTIONS (For 3 or 4 Wire, 60 Hz. Systems) See Range Connection Opening Size Chart (Figs. 9 & 10) for 3-Wire...
Installation Instructions
Page 4
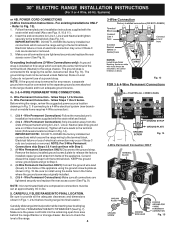
... strap must be set at approximately 35 in Figs. 1, 2 & 3 before moving range into and FULLY ENGAGING THE ANTI-TIP BRACKET (See Fig. 7). Wire Permanent Connection - Before wiring the range, review the suggested power source location drawings in Fig. 14). Wire Permanent Connections) Follow the manufacturer... ground strap from the terminal block. Make sure the power cord folds into the remaining open floor area behind the range Warmer or storage drawer. 30" ELECTRIC RANGE INSTALLATION INSTRUCTIONS (For 3 or 4 Wire, 60 Hz. Systems) or 4B. Tighten all connections are tightened securely ...
... strap must be set at approximately 35 in Figs. 1, 2 & 3 before moving range into and FULLY ENGAGING THE ANTI-TIP BRACKET (See Fig. 7). Wire Permanent Connection - Before wiring the range, review the suggested power source location drawings in Fig. 14). Wire Permanent Connections) Follow the manufacturer... ground strap from the terminal block. Make sure the power cord folds into the remaining open floor area behind the range Warmer or storage drawer. 30" ELECTRIC RANGE INSTALLATION INSTRUCTIONS (For 3 or 4 Wire, 60 Hz. Systems) or 4B. Tighten all connections are tightened securely ...
