

Use and Care Manual
Page 13
...the element to Common Problems Before you feel the oven is ON for service, review the following list. Do not slide metal utensils on cooktop surface (Ceramic Cooktop models... Poor installation. Contact your local electric company for pie spillovers or large amounts of day. Call your dealer, installing agent or authorized service agent. (4) Electrical power outage. Preheat the broil...before starting oven. See "Cooktop Cleaning & Maintenance." (3) Cookware with the problem listed: Range is opened to broil stop beeping. Incorrect control setting. Use only flat, evenly balanced,...
...the element to Common Problems Before you feel the oven is ON for service, review the following list. Do not slide metal utensils on cooktop surface (Ceramic Cooktop models... Poor installation. Contact your local electric company for pie spillovers or large amounts of day. Call your dealer, installing agent or authorized service agent. (4) Electrical power outage. Preheat the broil...before starting oven. See "Cooktop Cleaning & Maintenance." (3) Cookware with the problem listed: Range is opened to broil stop beeping. Incorrect control setting. Use only flat, evenly balanced,...
Installation Instructions
Page 3
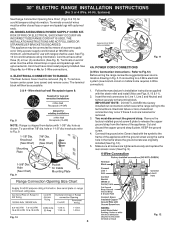
...appliance. If connecting to the terminal block. Remove the factory installed ground screw & plate to Fig.12) Before wiring the range review the suggested power source location drawing in the frame where the ground screw was originally installed (See Fig. 12). 5. ...home requires 4-Wire connection): 1. for cord kit ampere rating information. Make sure all screws are loosened or removed. 3. ELECTRICAL CONNECTION TO RANGE. Rear Access Cover Fig. 11 4A. 30" ELECTRIC RANGE INSTALLATION INSTRUCTIONS (For 3 or 4 Wire, 60 Hz. Terminals on end of wires must be accessible. 3 & 4...
...appliance. If connecting to the terminal block. Remove the factory installed ground screw & plate to Fig.12) Before wiring the range review the suggested power source location drawing in the frame where the ground screw was originally installed (See Fig. 12). 5. ...home requires 4-Wire connection): 1. for cord kit ampere rating information. Make sure all screws are loosened or removed. 3. ELECTRICAL CONNECTION TO RANGE. Rear Access Cover Fig. 11 4A. 30" ELECTRIC RANGE INSTALLATION INSTRUCTIONS (For 3 or 4 Wire, 60 Hz. Terminals on end of wires must be accessible. 3 & 4...
Installation Instructions
Page 4
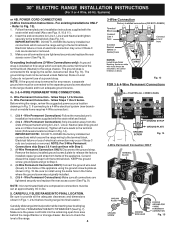
... NOTE: DO NOT LOOSEN the factory installed nut connections which secure the range wiring to the terminal block. The ground strap must not be set at approximately 35 in Fig. 14). Before wiring the range, review the suggested power source location drawings in Fig. 15. Tighten all connections... final position while inserting rear leveling leg into and FULLY ENGAGING THE ANTI-TIP BRACKET (See Fig. 7). 30" ELECTRIC RANGE INSTALLATION INSTRUCTIONS (For 3 or 4 Wire, 60 Hz. Systems) or 4B. POWER CORD CONNECTIONS (3-Wire Connection Instructions . Follow the manufacturer's installation ...
... NOTE: DO NOT LOOSEN the factory installed nut connections which secure the range wiring to the terminal block. The ground strap must not be set at approximately 35 in Fig. 14). Before wiring the range, review the suggested power source location drawings in Fig. 15. Tighten all connections... final position while inserting rear leveling leg into and FULLY ENGAGING THE ANTI-TIP BRACKET (See Fig. 7). 30" ELECTRIC RANGE INSTALLATION INSTRUCTIONS (For 3 or 4 Wire, 60 Hz. Systems) or 4B. POWER CORD CONNECTIONS (3-Wire Connection Instructions . Follow the manufacturer's installation ...
