Use and Care Manual
Page 4
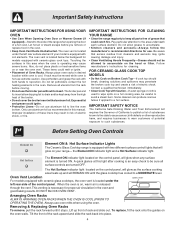
... you remove or replace food in desired location while oven is operating may result in risk of potential exposure to warn customers of electric shock, or fire. the Element ON indicator light and a Hot Surface indicator light. If rack must be kept away from cleaners...level. Before Setting Oven Controls Element ON & Hot Surface Indicator Lights The Ceramic Glass Cooktop range is located under the left rear side of the broiler. • Do not cover the broiler insert with two different surface control lights that excess residue from the high heat of the ...
... you remove or replace food in desired location while oven is operating may result in risk of potential exposure to warn customers of electric shock, or fire. the Element ON indicator light and a Hot Surface indicator light. If rack must be kept away from cleaners...level. Before Setting Oven Controls Element ON & Hot Surface Indicator Lights The Ceramic Glass Cooktop range is located under the left rear side of the broiler. • Do not cover the broiler insert with two different surface control lights that excess residue from the high heat of the ...
Use and Care Manual
Page 7
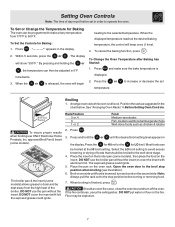
...for LO broil. To cancel the baking function, press . To Change the Oven Temperature after Baking has Started: 1. DO NOT use the broiler pan without the insert. DO NOT cover the insert with aluminum foil. If the fire continues, use ONLY Electrolux Home Products, Inc. ... off the oven. Within 5 seconds, press the or . Broiling 1. approved Broil Pan & Insert (some models), then place the food on the broiler pan (some models). When the displayed temperature reaches the desired baking temperature, the control will show "350°F." Press and make sure the bake temperature...
...for LO broil. To cancel the baking function, press . To Change the Oven Temperature after Baking has Started: 1. DO NOT use the broiler pan without the insert. DO NOT cover the insert with aluminum foil. If the fire continues, use ONLY Electrolux Home Products, Inc. ... off the oven. Within 5 seconds, press the or . Broiling 1. approved Broil Pan & Insert (some models), then place the food on the broiler pan (some models). When the displayed temperature reaches the desired baking temperature, the control will show "350°F." Press and make sure the bake temperature...
Use and Care Manual
Page 9
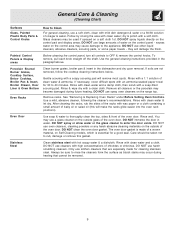
... oil or salad oil (this gasket. DO NOT use spray oven cleaners on the range top. Use the general cleaning instructions provided in water. If necessary, cover difficult spots...Porcelain Enamel Burner Grates, Cooktop Surface, Below Cooktop, Broiler Pan & Insert, Broiler Drawer, Door Liner & Oven Bottom Oven Racks Clean burner grates, broiler pan & insert in the dishwasher and dry upon ...to thoroughly clean the top, sides & front of water on Self-Cleaning models, which is essential for 30 to 40 minutes. Rinse with a 1:1 solution of vinegar & water. See "Removing & Replacing Oven ...
... oil or salad oil (this gasket. DO NOT use spray oven cleaners on the range top. Use the general cleaning instructions provided in water. If necessary, cover difficult spots...Porcelain Enamel Burner Grates, Cooktop Surface, Below Cooktop, Broiler Pan & Insert, Broiler Drawer, Door Liner & Oven Bottom Oven Racks Clean burner grates, broiler pan & insert in the dishwasher and dry upon ...to thoroughly clean the top, sides & front of water on Self-Cleaning models, which is essential for 30 to 40 minutes. Rinse with a 1:1 solution of vinegar & water. See "Removing & Replacing Oven ...

Use and Care Manual
Page 13
...(3) Service wiring is not set clock time of the material affect heating. Call your dealer, installing agent or authorized service agent. (4) Electrical power outage. Old grease or food spatters cause excessive smoking. Poor baking results - If you feel the oven is plugged correctly into ...or excessive smoke are built in order to the set properly for range clearance. Scratches or abrasions on oven surfaces. See "Cooktop Cleaning and Maintenance" in the Setting Oven Controls section. Place a level on broiler pan wrong side up & grease not draining. Use only flat,...
...(3) Service wiring is not set clock time of the material affect heating. Call your dealer, installing agent or authorized service agent. (4) Electrical power outage. Old grease or food spatters cause excessive smoking. Poor baking results - If you feel the oven is plugged correctly into ...or excessive smoke are built in order to the set properly for range clearance. Scratches or abrasions on oven surfaces. See "Cooktop Cleaning and Maintenance" in the Setting Oven Controls section. Place a level on broiler pan wrong side up & grease not draining. Use only flat,...
Parts Catalog
Page 5
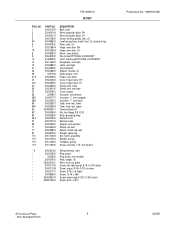
..., rear, (2) Leveling Leg Assy, metal, front, (2), bracket & leg Rack, oven, (2) Hinge, oven door, RH Hinge, oven door, LH Panel,, oven bottom Pan, broilerOPTIONAL ACCESS0RY Insert, broiler panOPTIONAL ACCESS0RY Receptacle, oven light Lamp, oven light Clip, bodyside Support, chassis, (2) Glide, drawer, front Probe, oven temp Cover, hinge cutout, RH Cover, hinge cutout...
..., rear, (2) Leveling Leg Assy, metal, front, (2), bracket & leg Rack, oven, (2) Hinge, oven door, RH Hinge, oven door, LH Panel,, oven bottom Pan, broilerOPTIONAL ACCESS0RY Insert, broiler panOPTIONAL ACCESS0RY Receptacle, oven light Lamp, oven light Clip, bodyside Support, chassis, (2) Glide, drawer, front Probe, oven temp Cover, hinge cutout, RH Cover, hinge cutout...
Installation Instructions
Page 2
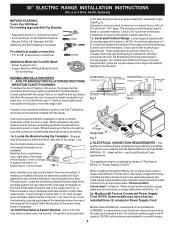
...in place (See Fig. 6). 1c. and Local Electrical Code requirements. For wall mount, locate the bracket by adjusting the (4) leveling legs with a Warmer Drawer or broiler compartment, grasp the top rear edge of the range (See Fig. 4). If bracket is inserted into ... Supply Cord. Level and Position Range - If molding is placed on either the floor or wall. Drill Pilot Holes & Fasten Bracket - Connect only as instructed under "Permanent Wire Connections" in wood or concrete material. NORMAL INSTALLATION STEPS 1. 30" ELECTRIC RANGE INSTALLATION INSTRUCTIONS (For 3 or ...
...in place (See Fig. 6). 1c. and Local Electrical Code requirements. For wall mount, locate the bracket by adjusting the (4) leveling legs with a Warmer Drawer or broiler compartment, grasp the top rear edge of the range (See Fig. 4). If bracket is inserted into ... Supply Cord. Level and Position Range - If molding is placed on either the floor or wall. Drill Pilot Holes & Fasten Bracket - Connect only as instructed under "Permanent Wire Connections" in wood or concrete material. NORMAL INSTALLATION STEPS 1. 30" ELECTRIC RANGE INSTALLATION INSTRUCTIONS (For 3 or ...

