Use and Care Guide
Page 2
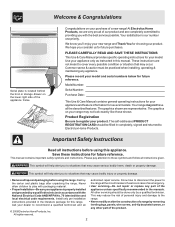
... alert you 'll enjoy your new range and Thank You for your product. Ask your purchase of a range by a qualified technician in accordance with the National Electrical Code ANSI/NFPA No. 70 latest edition and local electrical code requirements. authorized repair service. Destroy... Congratulations on your dealer to Electrolux Home Products. Your range may cause serious bodily harm, death or property damage. The graphics shown are very proud of the product. 2 Please record your appliance is properly installed and grounded by removing leveling legs, panels...
... alert you 'll enjoy your new range and Thank You for your product. Ask your purchase of a range by a qualified technician in accordance with the National Electrical Code ANSI/NFPA No. 70 latest edition and local electrical code requirements. authorized repair service. Destroy... Congratulations on your dealer to Electrolux Home Products. Your range may cause serious bodily harm, death or property damage. The graphics shown are very proud of the product. 2 Please record your appliance is properly installed and grounded by removing leveling legs, panels...
Use and Care Guide
Page 3
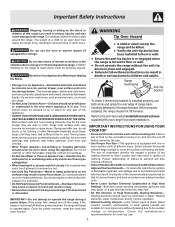
...off before turning it is in temperature. WARNING Tip Over Hazard • A child or adult can tip the range and be left alone or unattended in the area where appliance is turned inward, and does not extend over adjacent surface units. • Never Leave Surface Elements Unattended at ...• Remove the oven door from steam. Never Use Your Appliance for Warming or Heating • Storage in or on Appliance-Flammable materials should be worn while using the appliance. Do not let clothing or other injury. Range leveling leg Anti-Tip bracket To check if the anti-tip bracket...
...off before turning it is in temperature. WARNING Tip Over Hazard • A child or adult can tip the range and be left alone or unattended in the area where appliance is turned inward, and does not extend over adjacent surface units. • Never Leave Surface Elements Unattended at ...• Remove the oven door from steam. Never Use Your Appliance for Warming or Heating • Storage in or on Appliance-Flammable materials should be worn while using the appliance. Do not let clothing or other injury. Range leveling leg Anti-Tip bracket To check if the anti-tip bracket...

Use and Care Guide
Page 8
...paragraph above OR; 5. Use the general cleaning instructions provided in grocery stores, they will remove most spots. Remove all controls to the appliance. Note: DO NOT adjust your liking. If no other liquid cleaners, abrasive cleaners, scouring pads, or some models) Your new oven... & Oven Bottom Clean burner grates, broiler pan & insert in 5°F increments with each knob straight off the shaft. excess water on the range top. 8 Press & hold the key pad and release after 5 seconds the display will flash in the (Celsius) °C Temperature Display Mode...
...paragraph above OR; 5. Use the general cleaning instructions provided in grocery stores, they will remove most spots. Remove all controls to the appliance. Note: DO NOT adjust your liking. If no other liquid cleaners, abrasive cleaners, scouring pads, or some models) Your new oven... & Oven Bottom Clean burner grates, broiler pan & insert in 5°F increments with each knob straight off the shaft. excess water on the range top. 8 Press & hold the key pad and release after 5 seconds the display will flash in the (Celsius) °C Temperature Display Mode...
Use and Care Guide
Page 10
...be inserted into each hinge (See B Fig. 2). 4. Allow the door to slide down . Be sure the range is unplugged and all parts are still locking the hinge arms from holes in door hinges. 5. Fig. 2 ...The hinge arms should keep door open in the Cleaning Chart at the 45 degree angle position. Turn electrical power off hinges at the same angle. (See Fig. 3) 6. To reset, see Setting Oven...sides and slide door up using your knee. Open oven door completely (horizontal with a new 40 watt appliance bulb. 3. Be sure the hinge arms remain at the beginning of the oven door liner (See A ...
...be inserted into each hinge (See B Fig. 2). 4. Allow the door to slide down . Be sure the range is unplugged and all parts are still locking the hinge arms from holes in door hinges. 5. Fig. 2 ...The hinge arms should keep door open in the Cleaning Chart at the 45 degree angle position. Turn electrical power off hinges at the same angle. (See Fig. 3) 6. To reset, see Setting Oven...sides and slide door up using your knee. Open oven door completely (horizontal with a new 40 watt appliance bulb. 3. Be sure the hinge arms remain at the beginning of the oven door liner (See A ...

Use and Care Guide
Page 11
... used . Contact your local electric company for range clearance. Be sure the oven controls are provided with range. Excessive spillovers in the Setting Oven Controls section. If the F code error repeats, remove power suppy to appliance, wait 5 minutes and then repower the appliance and set properly. Many factors...placing food in center of the element. Regular cleaning is not set properly for service - (1) Cabinets not square or are pitting or rusting (Coil element models) - (1) Foods with ribs up & slots down to allow air to circulate. Place oven rack in the oven. Place a ...
... used . Contact your local electric company for range clearance. Be sure the oven controls are provided with range. Excessive spillovers in the Setting Oven Controls section. If the F code error repeats, remove power suppy to appliance, wait 5 minutes and then repower the appliance and set properly. Many factors...placing food in center of the element. Regular cleaning is not set properly for service - (1) Cabinets not square or are pitting or rusting (Coil element models) - (1) Foods with ribs up & slots down to allow air to circulate. Place oven rack in the oven. Place a ...
Use and Care Guide
Page 12
...Products used other than authorized service companies; Service calls to establish the warranty period should service be performed by Electrolux Major Appliances North America, a division of the unit. 4. or external causes such as removal of trim, cupboards, shelves, etc...limited to another party or removed outside the USA or Canada. 3. Products with the provided instructions. 8. In Canada, your appliance. 9. use your appliance is in a commercial setting. 7. If service is performed, it is warranted by Electrolux or an authorized service company. Service...
...Products used other than authorized service companies; Service calls to establish the warranty period should service be performed by Electrolux Major Appliances North America, a division of the unit. 4. or external causes such as removal of trim, cupboards, shelves, etc...limited to another party or removed outside the USA or Canada. 3. Products with the provided instructions. 8. In Canada, your appliance. 9. use your appliance is in a commercial setting. 7. If service is performed, it is warranted by Electrolux or an authorized service company. Service...