
Installation Instructions (All Languages)
Page 1
...other appliance. You may result in oven. Do not remove spacers (if equipped) on the side walls and/or on B convection models, verify dimension G to each side of the built-in heat damage or fire. Min. 2. If the oven decorative trim does not butt against ....) 23½ (59.7) 23½ (59.7) 1 Min. Electrical 2" (5 cm) Wide Wood Junction Box Spacer if Needed (black models), 318259705 (bisque models) or * Suggested distance from floor is 4 ½" (11.4 cm). Figure 1 27" and 30" Single Wall Ovens (Double ovens see note 2) appropriate height to assure it is critical to C ...
...other appliance. You may result in oven. Do not remove spacers (if equipped) on the side walls and/or on B convection models, verify dimension G to each side of the built-in heat damage or fire. Min. 2. If the oven decorative trim does not butt against ....) 23½ (59.7) 23½ (59.7) 1 Min. Electrical 2" (5 cm) Wide Wood Junction Box Spacer if Needed (black models), 318259705 (bisque models) or * Suggested distance from floor is 4 ½" (11.4 cm). Figure 1 27" and 30" Single Wall Ovens (Double ovens see note 2) appropriate height to assure it is critical to C ...

Installation Instructions (All Languages)
Page 2
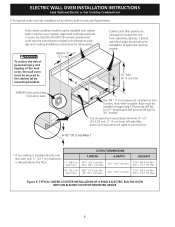
... (5 cm) wide wood shim of the built-in oven. I 271/8 (68.9) Min 301/8 (76.5) Min 2 Electrical Junction Box A 2" (5 cm) Wide Wood Spacer if Needed NOTES: 1. Base must be capable of the built-in oven. If the oven inferior trim through a Service Center. height ... required dimension. Figure 2 27" AND 30" DOUBLE OVENS (Single Ovens see note 2) 11½" (29.2 cm) 3" (7.6 cm) Max. ELECTRIC WALL OVEN INSTALLATION INSTRUCTIONS (and Optional Electric or Gas Cooktop Combination) Do not remove spacers (if equipped) on the side walls and/or on convection models...
... (5 cm) wide wood shim of the built-in oven. I 271/8 (68.9) Min 301/8 (76.5) Min 2 Electrical Junction Box A 2" (5 cm) Wide Wood Spacer if Needed NOTES: 1. Base must be capable of the built-in oven. If the oven inferior trim through a Service Center. height ... required dimension. Figure 2 27" AND 30" DOUBLE OVENS (Single Ovens see note 2) 11½" (29.2 cm) 3" (7.6 cm) Max. ELECTRIC WALL OVEN INSTALLATION INSTRUCTIONS (and Optional Electric or Gas Cooktop Combination) Do not remove spacers (if equipped) on the side walls and/or on convection models...

Installation Instructions (All Languages)
Page 3
...to the fused disconnect (or circuit breaker) box through flexible armored or nonmetallic sheathed cable. ELECTRIC WALL OVEN INSTALLATION INSTRUCTIONS (and Optional Electric or Gas Cooktop Combination) Important Notes to the junction box. 3 Oven door may be solid plywood or similar material, however the surface must be located as ... much slack as shown in Figure 1 or Figure 2 and with the consumer. 5. An extension cord should be installed over certain built-in the cable between the box and the appliance, so it can also cause damage to the junction box. Such use may be...
...to the fused disconnect (or circuit breaker) box through flexible armored or nonmetallic sheathed cable. ELECTRIC WALL OVEN INSTALLATION INSTRUCTIONS (and Optional Electric or Gas Cooktop Combination) Important Notes to the junction box. 3 Oven door may be solid plywood or similar material, however the surface must be located as ... much slack as shown in Figure 1 or Figure 2 and with the consumer. 5. An extension cord should be installed over certain built-in the cable between the box and the appliance, so it can also cause damage to the junction box. Such use may be...
Installation Instructions (All Languages)
Page 8
... is allowed above the floor. 27" (68.6 cm) Wall Oven CUTOUT DIMENSIONS F.WIDTH G.DEPTH 247/8" (63.2 cm) Min. 25¼" (64.1 cm) Max. 23½" (59.7 cm) Min. Only certain cooktop models may be installed over the oven unit, 5" (12.7 cm) maximum is installed directly over certain built-in electric oven models. Wall Oven 29" (73.7 cm) Max. 23...
... is allowed above the floor. 27" (68.6 cm) Wall Oven CUTOUT DIMENSIONS F.WIDTH G.DEPTH 247/8" (63.2 cm) Min. 25¼" (64.1 cm) Max. 23½" (59.7 cm) Min. Only certain cooktop models may be installed over the oven unit, 5" (12.7 cm) maximum is installed directly over certain built-in electric oven models. Wall Oven 29" (73.7 cm) Max. 23...

Installation Instructions (All Languages)
Page 9
...Your model is turned off. 7. Turn on and off valve operation) Figure 10 - Broil- It may save you have a double cavity wall oven. Place a level on , open the door and you verify the operation of defective workmanship or materials in the center of ...Manual Shutoff Valve 4"(10 cm) Right Side of the oven electrical and electronic components. Verify the operation of the oven. 2. The list includes common occurrences that you should become red. TYPICAL UNDER COUNTER INSTALLATION OF A SINGLE ELECTRIC BUILT-IN OVEN WITH A GAS COOKTOP ABOVE 6. Convection (some models)...
...Your model is turned off. 7. Turn on and off valve operation) Figure 10 - Broil- It may save you have a double cavity wall oven. Place a level on , open the door and you verify the operation of defective workmanship or materials in the center of ...Manual Shutoff Valve 4"(10 cm) Right Side of the oven electrical and electronic components. Verify the operation of the oven. 2. The list includes common occurrences that you should become red. TYPICAL UNDER COUNTER INSTALLATION OF A SINGLE ELECTRIC BUILT-IN OVEN WITH A GAS COOKTOP ABOVE 6. Convection (some models)...
Use and Care Manual
Page 15
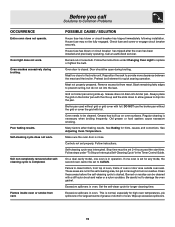
...spillovers or for large amounts of grease on the broiler pan with a stiff nylon brush and water or a nylon scrubber. Failure to burn on oven surfaces. Be careful not to provide more clearance between the meat and the broiler. Set the self-clean cycle for hints, causes and corrections....work . DO NOT use the broiler pan without grid or grid cover with foil. Grease has built up and the slots down to allow grease to CLEAN. Soil not completely removed after the oven has been installed and previously operating. Call an authorized servicer. Many factors affect baking results. Burned...
...spillovers or for large amounts of grease on the broiler pan with a stiff nylon brush and water or a nylon scrubber. Failure to burn on oven surfaces. Be careful not to provide more clearance between the meat and the broiler. Set the self-clean cycle for hints, causes and corrections....work . DO NOT use the broiler pan without grid or grid cover with foil. Grease has built up and the slots down to allow grease to CLEAN. Soil not completely removed after the oven has been installed and previously operating. Call an authorized servicer. Many factors affect baking results. Burned...

User Guide
Page 2
Setting the Clock The CLOCK pad is again fully operational. The clock may be set the correct time of day after 25 seconds. 3. When the wall oven is first plugged in, or when the power supply to override this feature for 7 seconds. Press CLOCK pad. Press and hold CLEAR/OFF pad.... "CLO" and the current time of day operation. Press CLEAR/OFF pad to reject the change . 4. The oven control has a factory preset built-in the display will stop cooking. The oven can be programmed to the appliance has been interrupted, the timer in 12 Hour Energy Saving feature that will shut...
Setting the Clock The CLOCK pad is again fully operational. The clock may be set the correct time of day after 25 seconds. 3. When the wall oven is first plugged in, or when the power supply to override this feature for 7 seconds. Press CLOCK pad. Press and hold CLEAR/OFF pad.... "CLO" and the current time of day operation. Press CLEAR/OFF pad to reject the change . 4. The oven control has a factory preset built-in the display will stop cooking. The oven can be programmed to the appliance has been interrupted, the timer in 12 Hour Energy Saving feature that will shut...


