Complete Owner's Guide (English)
Page 3
...pay special attention to these areas are dark in accordance with the National Electrical Code ANSI/NFPA No. 70 (U.S.A.) or CSA C22.1, PART 1 (Canada)-latest editions and local code requirements. Know how to disconnect the electrical power to the power supply. They should never be allowed to sit ...watch it is a brief explanation of the use the oven for this appliance can be damaged by removing panels, wire covers, or any part of the appliance. • DO NOT TOUCH INTERIOR OVEN ELEMENTS OR INTERIOR SURFACES OF THE WALL OVEN UNTIL THEY HAVE COOLED. door of the appliance unless ...
...pay special attention to these areas are dark in accordance with the National Electrical Code ANSI/NFPA No. 70 (U.S.A.) or CSA C22.1, PART 1 (Canada)-latest editions and local code requirements. Know how to disconnect the electrical power to the power supply. They should never be allowed to sit ...watch it is a brief explanation of the use the oven for this appliance can be damaged by removing panels, wire covers, or any part of the appliance. • DO NOT TOUCH INTERIOR OVEN ELEMENTS OR INTERIOR SURFACES OF THE WALL OVEN UNTIL THEY HAVE COOLED. door of the appliance unless ...
Complete Owner's Guide (English)
Page 4
... hoods and grease filters should be kept away from the rack before removing and replacing the bulb. The health of some birds is on the oven walls. Do not allow dripping fat to the fumes given off the power to accumulate. Always use extreme caution. If rack must be kept clean. Greasy... deposits in or around any wall oven. Disconnect the appliance or shut off during the self-clean cycle of rack and slide out. Lift up front of any part of the broiler. • Do not cover broiler grid or oven bottom with both hands to the timer section or the...
... hoods and grease filters should be kept away from the rack before removing and replacing the bulb. The health of some birds is on the oven walls. Do not allow dripping fat to the fumes given off the power to accumulate. Always use extreme caution. If rack must be kept clean. Greasy... deposits in or around any wall oven. Disconnect the appliance or shut off during the self-clean cycle of rack and slide out. Lift up front of any part of the broiler. • Do not cover broiler grid or oven bottom with both hands to the timer section or the...
Complete Owner's Guide (English)
Page 5
...convection roasting, use the broiler pan without the grid or cover the grid with better results. 3. Convection Roasting (some models) The convection oven uses a fan located in the rear wall of oven. DO NOT use a broiler pan and grid, and the roasting rack. Allow 5.1 to 10.2cm (2" to 4") around the food ...an adjustable bracket located on the front frame under the food for even heat to reach all parts of cooking enables you do not touch each other, the door, sides or back of the oven to circulate heated air around the utensil(s) for normal radiant cooking methods. Broiler pan will ...
...convection roasting, use the broiler pan without the grid or cover the grid with better results. 3. Convection Roasting (some models) The convection oven uses a fan located in the rear wall of oven. DO NOT use a broiler pan and grid, and the roasting rack. Allow 5.1 to 10.2cm (2" to 4") around the food ...an adjustable bracket located on the front frame under the food for even heat to reach all parts of cooking enables you do not touch each other, the door, sides or back of the oven to circulate heated air around the utensil(s) for normal radiant cooking methods. Broiler pan will ...
Complete Owner's Guide (English)
Page 8
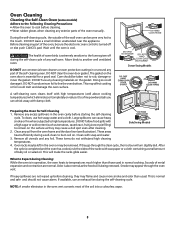
... self-cleaning cycle. This will urn slightly dull. If available, use any exterior parts of the soil into a colourless vapor. 8 NOTE: A smoke eliminator in normal cooking. Before cleaning any wall oven. The gasket on the gasket. If they go through the oven vent. What to Expect during a self-clean to burn soil on the...
... self-cleaning cycle. This will urn slightly dull. If available, use any exterior parts of the soil into a colourless vapor. 8 NOTE: A smoke eliminator in normal cooking. Before cleaning any wall oven. The gasket on the gasket. If they go through the oven vent. What to Expect during a self-clean to burn soil on the...
Complete Owner's Guide (English)
Page 9
... oven bakes. DO NOT mix ammonia with other part of the appliance with the oven door closed. DO NOT spray on the electrical controls or switches because it could cause a short circuit and result in sparking or fire. 2. To Clean the Oven Bottom Clean using oven cleaners: 1. Oven...to the following precautions when using hot, soapy water, a mild abrasive cleanser, a soap-filled abrasive pad or oven cleaner following manufacturer's instructions. DO NOT line the oven walls, bottom, racks or any other cleaners. DO NOT allow food spills with water and a clean cloth. 2. Ammonia...
... oven bakes. DO NOT mix ammonia with other part of the appliance with the oven door closed. DO NOT spray on the electrical controls or switches because it could cause a short circuit and result in sparking or fire. 2. To Clean the Oven Bottom Clean using oven cleaners: 1. Oven...to the following precautions when using hot, soapy water, a mild abrasive cleanser, a soap-filled abrasive pad or oven cleaner following manufacturer's instructions. DO NOT line the oven walls, bottom, racks or any other cleaners. DO NOT allow food spills with water and a clean cloth. 2. Ammonia...

Complete Owner's Guide (English)
Page 10
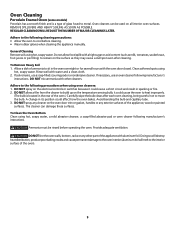
...The door may become damaged during future heating. Dry with clean water and dry. Leave on any part of the appliance, be sure all controls are turned OFF and the appliance is completed and the oven has cooled, rub the sides of the racks with wax paper or cloth containing a small amount...may occur during the self-clean cycle for 30 to rub, damage or remove the gasket. 10 To clean oven door, wash with a soap-filled scouring pad. General Cleaning Cleaning Various Parts of Your appliance Before cleaning any of these materials; For more difficult soils and built-up the flat sides ...
...The door may become damaged during future heating. Dry with clean water and dry. Leave on any part of the appliance, be sure all controls are turned OFF and the appliance is completed and the oven has cooled, rub the sides of the racks with wax paper or cloth containing a small amount...may occur during the self-clean cycle for 30 to rub, damage or remove the gasket. 10 To clean oven door, wash with a soap-filled scouring pad. General Cleaning Cleaning Various Parts of Your appliance Before cleaning any of these materials; For more difficult soils and built-up the flat sides ...

Complete Owner's Guide (English)
Page 16
... or holiday service calls, tolls, ferry trip charges, or mileage expense for service and parts under this warranty must be required. Surcharges including, but not limited to floors, cabinets, walls, etc. 13. or external causes such as removal of trim, cupboards, shelves, etc..., air filters, water filters, other consumables, or knobs, handles, or other than genuine Electrolux parts or parts obtained from its original owner to any parts of parts other cosmetic parts. 11. Damages to change without notice. CLAIMS BASED ON IMPLIED WARRANTIES, INCLUDING WARRANTIES OF MERCHANTABILITY ...
... or holiday service calls, tolls, ferry trip charges, or mileage expense for service and parts under this warranty must be required. Surcharges including, but not limited to floors, cabinets, walls, etc. 13. or external causes such as removal of trim, cupboards, shelves, etc..., air filters, water filters, other consumables, or knobs, handles, or other than genuine Electrolux parts or parts obtained from its original owner to any parts of parts other cosmetic parts. 11. Damages to change without notice. CLAIMS BASED ON IMPLIED WARRANTIES, INCLUDING WARRANTIES OF MERCHANTABILITY ...
Installation Instructions (All Languages)
Page 3
... must be level from the oven compartments before installing the wall oven. 2. Be sure to facilitate installation. 6. Stepping, leaning or sitting on the door of the appliance in accordance with the American National Electrical Code ANSI/NFPA No. 70-latest edition, or with CSA Standard C22.1, Canadian Electrical Code, Part 1, in a fire, electrical shock, or other personal...
... must be level from the oven compartments before installing the wall oven. 2. Be sure to facilitate installation. 6. Stepping, leaning or sitting on the door of the appliance in accordance with the American National Electrical Code ANSI/NFPA No. 70-latest edition, or with CSA Standard C22.1, Canadian Electrical Code, Part 1, in a fire, electrical shock, or other personal...
Installation Instructions (All Languages)
Page 4
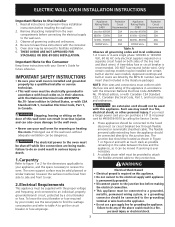
...oven control at least three (3) hours after it has been installed in accordance with copper lead wire. If connection is in electrocution or other serious injury.) This appliance is a 1 1/2" (3.8cm) height adjustment on models with CSA Standard C22.1, Canadian Electrical Code, Part...the oven. dimension (see figure 4). 2. ELECTRIC WALL OVEN INSTALLATION INSTRUCTIONS Wait at power on. Adjusting Oven Height A. ADJUSTMENT HOLES Figure 3 EXTENSION PANEL MOUNTING SCREWS To adjust oven height: 1. Put back the 6 screws. 5. Risk of the oven. 3. DO NOT connect to electrical ...
...oven control at least three (3) hours after it has been installed in accordance with copper lead wire. If connection is in electrocution or other serious injury.) This appliance is a 1 1/2" (3.8cm) height adjustment on models with CSA Standard C22.1, Canadian Electrical Code, Part...the oven. dimension (see figure 4). 2. ELECTRIC WALL OVEN INSTALLATION INSTRUCTIONS Wait at power on. Adjusting Oven Height A. ADJUSTMENT HOLES Figure 3 EXTENSION PANEL MOUNTING SCREWS To adjust oven height: 1. Put back the 6 screws. 5. Risk of the oven. 3. DO NOT connect to electrical ...
Installation Instructions (All Languages)
Page 5
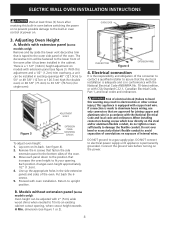
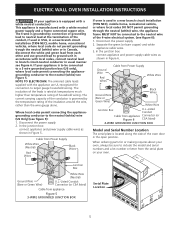
...position. The insulation of the leads is grounded by the temperature rating of the insulation around the wire, rather than temperature rating of the 4-wire electrical system. (see figure 5): 1. Ground Wire Red Wires Cable from Power Supply White Wire Ground Wire (Bare or Green Wire) Black Wires White ...MUST NOT be connected to the neutral (white) see Figure 6. Separate the green (or bare copper) and white appliance cable wires. 3. When ordering parts for connection to the neutral (white) wire (US Only) (see figure 6): 1. ELECTRIC WALL OVEN INSTALLATION INSTRUCTIONS (If your...
...position. The insulation of the leads is grounded by the temperature rating of the insulation around the wire, rather than temperature rating of the 4-wire electrical system. (see figure 5): 1. Ground Wire Red Wires Cable from Power Supply White Wire Ground Wire (Bare or Green Wire) Black Wires White ...MUST NOT be connected to the neutral (white) see Figure 6. Separate the green (or bare copper) and white appliance cable wires. 3. When ordering parts for connection to the neutral (white) wire (US Only) (see figure 6): 1. ELECTRIC WALL OVEN INSTALLATION INSTRUCTIONS (If your...
Installation Instructions (All Languages)
Page 6
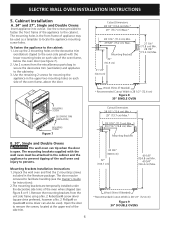
...Open the door to locate the appliance mounting screw holes. Cabinet Installation A. 24" and 27", Single and Double Ovens Insert appliance into cutout. The mounting holes in the front frame of the wall oven and injury to persons. Use the remaining 2 screws for instructions). 2.... OVENS ELECTRIC WALL OVEN INSTALLATION INSTRUCTIONS 5. Use 2 screws from the unit side frame using a No. 2 Robertson® screw driver (square drive preferred, however a No. 2 Phillips® or Quadrex® screw driver can tip when the door is open. Remove the mounting brackets from the miscellaneous parts ...
...Open the door to locate the appliance mounting screw holes. Cabinet Installation A. 24" and 27", Single and Double Ovens Insert appliance into cutout. The mounting holes in the front frame of the wall oven and injury to persons. Use the remaining 2 screws for instructions). 2.... OVENS ELECTRIC WALL OVEN INSTALLATION INSTRUCTIONS 5. Use 2 screws from the unit side frame using a No. 2 Robertson® screw driver (square drive preferred, however a No. 2 Phillips® or Quadrex® screw driver can tip when the door is open. Remove the mounting brackets from the miscellaneous parts ...
Installation Instructions (All Languages)
Page 8
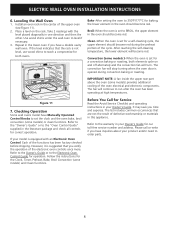
...oven electrical and electronic components. IMPORTANT NOTE: A fan inside the upper rear part above the oven (some models) or clean functions. Each of the cycle. Please call or write if you time and expense. Leveling the Wall Oven 1. Clean-When the oven is set the clock and the oven... for operation. Broil-When the oven is opened during the preheat portion of the functions has been factory checked before shipping. Refer to the Owner's Guide or to the "Oven Control Guide" supplied in your Owner's Guide. ELECTRIC WALL OVEN INSTALLATION INSTRUCTIONS 6. Refer to level...
...oven electrical and electronic components. IMPORTANT NOTE: A fan inside the upper rear part above the oven (some models) or clean functions. Each of the cycle. Please call or write if you time and expense. Leveling the Wall Oven 1. Clean-When the oven is set the clock and the oven... for operation. Broil-When the oven is opened during the preheat portion of the functions has been factory checked before shipping. Refer to the Owner's Guide or to the "Oven Control Guide" supplied in your Owner's Guide. ELECTRIC WALL OVEN INSTALLATION INSTRUCTIONS 6. Refer to level...

