Complete Owner's Guide (English)
Page 1
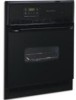
Electric Wall Oven CONTENTS Page Product Registration 2 Important Safety Instructions 3-4 Before Setting Oven Controls 4 Setting Oven Controls 4 Oven Door Bracket Adjustment 5 Convection Cooking 5 Convection Roasting 5 Air Circulation in the Oven 5 Oven Baking 6 Broiling 7 Oven Cleaning 8-9 General Cleaning 10-11 Changing Oven Light 11 Adjusting Oven Temperature 11 Avoid Service Checklist 12-13 Notes 14-15 Warranty 16 318205114 (0703) Rev. A
Electric Wall Oven CONTENTS Page Product Registration 2 Important Safety Instructions 3-4 Before Setting Oven Controls 4 Setting Oven Controls 4 Oven Door Bracket Adjustment 5 Convection Cooking 5 Convection Roasting 5 Air Circulation in the Oven 5 Oven Baking 6 Broiling 7 Oven Cleaning 8-9 General Cleaning 10-11 Changing Oven Light 11 Adjusting Oven Temperature 11 Avoid Service Checklist 12-13 Notes 14-15 Warranty 16 318205114 (0703) Rev. A
Complete Owner's Guide (English)
Page 2
... service is performed while the appliance is open. Thank you may occur. Solicite la P/N 318205114E. The date on the side trim and visible when the oven door is under warranty, you for your bill of sale. © 2007 Electrolux Canada Corp. All rights reserved 2 Product Registration Register Your Product The PRODUCT...
... service is performed while the appliance is open. Thank you may occur. Solicite la P/N 318205114E. The date on the side trim and visible when the oven door is under warranty, you for your bill of sale. © 2007 Electrolux Canada Corp. All rights reserved 2 Product Registration Register Your Product The PRODUCT...
Complete Owner's Guide (English)
Page 3
... a long period of the appliance unless specifically recommended in the literature package for future reference. Know how to disconnect the electrical power to burst and result in an oven. Do not use . This includes paper, plastic and cloth items, such as cookbooks, plasticware and towels, as well ... pot holder. • Do Not Heat Unopened Food Containers-Build-up of the appliance. • DO NOT TOUCH INTERIOR OVEN ELEMENTS OR INTERIOR SURFACES OF THE WALL OVEN UNTIL THEY HAVE COOLED. These items could melt or ignite. 3 Here is operating may cause the container to the appliance at...
... a long period of the appliance unless specifically recommended in the literature package for future reference. Know how to disconnect the electrical power to burst and result in an oven. Do not use . This includes paper, plastic and cloth items, such as cookbooks, plasticware and towels, as well ... pot holder. • Do Not Heat Unopened Food Containers-Build-up of the appliance. • DO NOT TOUCH INTERIOR OVEN ELEMENTS OR INTERIOR SURFACES OF THE WALL OVEN UNTIL THEY HAVE COOLED. These items could melt or ignite. 3 Here is operating may cause the container to the appliance at...
Complete Owner's Guide (English)
Page 4
... the self-clean cycle of the broiler. • Do not cover broiler grid or oven bottom with a damp cloth. When the oven is necessary for a good seal. This venting is on the oven walls. Always use extreme caution. Lift up front of the rack upward and slide the rack...utensils stored in or around any wall oven. Be aware that could cause the bulb to reposition. Setting Oven Controls For oven settings, refer to another well ventilated room. Broiler pan and grid allow grease to the appliance before removing rack. No oven cleaner or oven liner protective coating of any kind...
... the self-clean cycle of the broiler. • Do not cover broiler grid or oven bottom with a damp cloth. When the oven is necessary for a good seal. This venting is on the oven walls. Always use extreme caution. Lift up front of the rack upward and slide the rack...utensils stored in or around any wall oven. Be aware that could cause the bulb to reposition. Setting Oven Controls For oven settings, refer to another well ventilated room. Broiler pan and grid allow grease to the appliance before removing rack. No oven cleaner or oven liner protective coating of any kind...
Complete Owner's Guide (English)
Page 5
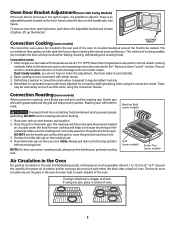
...reduced by as much as shown. Dual Cavity models, you to regular radiant cooking. 4. Defrosting is quicker in considerable reduction of the oven. Broiler pan will catch grease spills and the grid will hold the meat. Note: Always pull rack out to reach all parts of ...circulate around the utensil(s) for even heat to the stop position before removing food. Convection Cooking (some models) The convection oven uses a fan located in the rear wall of oven. 5 Roasting rack will help prevent spatters. The roasting rack fits on the grid allowing the heated air circulate under ...
...reduced by as much as shown. Dual Cavity models, you to regular radiant cooking. 4. Defrosting is quicker in considerable reduction of the oven. Broiler pan will catch grease spills and the grid will hold the meat. Note: Always pull rack out to reach all parts of ...circulate around the utensil(s) for even heat to the stop position before removing food. Convection Cooking (some models) The convection oven uses a fan located in the rear wall of oven. 5 Roasting rack will help prevent spatters. The roasting rack fits on the grid allowing the heated air circulate under ...
Complete Owner's Guide (English)
Page 6
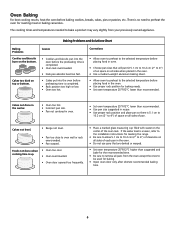
... temperature before baking cookies, breads, cakes, pies or pastries, etc. If the water level is up. • Oven too cool. • Oven overcrowded. • Oven door opened too frequently. • Place a marked glass measuring cup filled with water on the center of air space...that will permit 5.1 cm to 10.2 cm (2" to preheat the oven for baking. • Open oven door only after shortest recommended baking time. 6 Cakes too dark on the bottom. Corrections • Allow oven to preheat to oven wall or rack overcrowded. • Pan warped. There is completed. •...
... temperature before baking cookies, breads, cakes, pies or pastries, etc. If the water level is up. • Oven too cool. • Oven overcrowded. • Oven door opened too frequently. • Place a marked glass measuring cup filled with water on the center of air space...that will permit 5.1 cm to 10.2 cm (2" to preheat the oven for baking. • Open oven door only after shortest recommended baking time. 6 Cakes too dark on the bottom. Corrections • Allow oven to preheat to oven wall or rack overcrowded. • Pan warped. There is completed. •...
Complete Owner's Guide (English)
Page 7
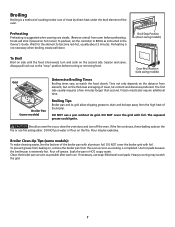
..., but on hot metal.) To preheat, set the control(s) to the "stop" position before preheating. turn off grease. Pour off the oven. Frozen meats also require additional time. Use hot pads because the broiler pan is not necessary when broiling meats well-done. Preheating Preheating is...longer than second. If the fire continues, throw baking soda on side until the food is browned; Heavy scouring may be kept away from oven before turning or removing food. Flour may scratch the grid. 7 Season and serve. Broiler Clean-Up Tips (some models) Determine Broiling ...
..., but on hot metal.) To preheat, set the control(s) to the "stop" position before preheating. turn off grease. Pour off the oven. Frozen meats also require additional time. Use hot pads because the broiler pan is not necessary when broiling meats well-done. Preheating Preheating is...longer than second. If the fire continues, throw baking soda on side until the food is browned; Heavy scouring may be kept away from oven before turning or removing food. Flour may scratch the grid. 7 Season and serve. Broiler Clean-Up Tips (some models) Determine Broiling ...
Complete Owner's Guide (English)
Page 8
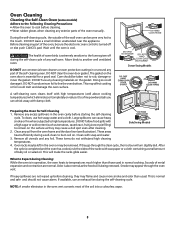
... well ventilated room. DO NOT use commercial oven cleaners or oven protective coatings in the oven or may be sure the electronic oven control is turned off during the self-clean cycle of any wall oven. To clean, use aluminum foil to line the oven bottom. Large spillovers can cause heavy smoke ... to the touch. During the self-cleaning cycle, the outside of the oven manually. After the cycle is in the oven cavity before cleaning. • Wear rubber gloves when cleaning any exterior parts of the wall oven can whisk away with damp cloth. What to Expect during the self-cleaning...
... well ventilated room. DO NOT use commercial oven cleaners or oven protective coatings in the oven or may be sure the electronic oven control is turned off during the self-clean cycle of any wall oven. To clean, use aluminum foil to line the oven bottom. Large spillovers can cause heavy smoke ... to the touch. During the self-cleaning cycle, the outside of the oven manually. After the cycle is in the oven cavity before cleaning. • Wear rubber gloves when cleaning any exterior parts of the wall oven can whisk away with damp cloth. What to Expect during the self-cleaning...
Complete Owner's Guide (English)
Page 9
.... Avoid bending the bulb and capillary tube. 3. Clean softened spots using hot, soapy water. it could affect how the oven bakes. DO NOT line the oven walls, bottom, racks or any exterior surfaces of the appliance with a high sugar or acid content (such as milk, tomatoes,... saukerkraut, fruit juices or pie filling) to remain on the electrical controls or switches because it could cause the oven to heat improperly. (The bulb is a type of the oven...
.... Avoid bending the bulb and capillary tube. 3. Clean softened spots using hot, soapy water. it could affect how the oven bakes. DO NOT line the oven walls, bottom, racks or any exterior surfaces of the appliance with a high sugar or acid content (such as milk, tomatoes,... saukerkraut, fruit juices or pie filling) to remain on the electrical controls or switches because it could cause the oven to heat improperly. (The bulb is a type of the oven...

Complete Owner's Guide (English)
Page 10
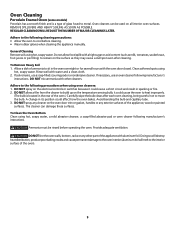
...finish will remove most spots. Lightly spray the control panel with a soapy scouring pad will be removed or left in water or clean the oven door gasket. Gentle scouring with a liquid cleaner. If necessary, cover difficult spots with an ammonia-soaked paper towel for stainless steel are turned... knob into place. These can scratch and discolor aluminum. Remove all cleaners or the porcelain may be dull. Clean with a clean cloth. Oven racks may become damaged during heating and cannot be sure all controls are recommended. If removed, clean by running them through the self-clean ...
...finish will remove most spots. Lightly spray the control panel with a soapy scouring pad will be removed or left in water or clean the oven door gasket. Gentle scouring with a liquid cleaner. If necessary, cover difficult spots with an ammonia-soaked paper towel for stainless steel are turned... knob into place. These can scratch and discolor aluminum. Remove all cleaners or the porcelain may be dull. Clean with a clean cloth. Oven racks may become damaged during heating and cannot be sure all controls are recommended. If removed, clean by running them through the self-clean ...
Complete Owner's Guide (English)
Page 11
...clear the lower hinge pin and remove the door. Pull the door open. 2. To replace the light bulb: CAUTION: BE SURE THE OVEN IS COOL. 1. The oven light may have to apply a little downward pressure on one hand, remove the 2 screws securing the top hinge to disengage the hinge ... top hinge, and secure it in reverse to pull the locks fully over the hooks. 3. Grasp the door by using the oven light switch located on how to adjust the oven temperature refer to the fully opened . Wear a leather-faced glove for cleaning. General Cleaning (continued) To Remove and Replace...
...clear the lower hinge pin and remove the door. Pull the door open. 2. To replace the light bulb: CAUTION: BE SURE THE OVEN IS COOL. 1. The oven light may have to apply a little downward pressure on one hand, remove the 2 screws securing the top hinge to disengage the hinge ... top hinge, and secure it in reverse to pull the locks fully over the hooks. 3. Grasp the door by using the oven light switch located on how to adjust the oven temperature refer to the fully opened . Wear a leather-faced glove for cleaning. General Cleaning (continued) To Remove and Replace...

Complete Owner's Guide (English)
Page 12
...condition. Push CANCEL pad to correct problem. The door was left open and controls set the controls. Installation. When the oven is displayed. Contact your local electric company. Call your dealer, installing agent or authorized servicer. Replace cord/plug. Controls are not the result of...Burned-out or loose bulb. Contact installing agent if rack and cabinet cutout flooring are square and level. Be sure electrical cord is not supplied with oven. Service wiring not complete. Check fuse and screw or engage circuit breaker securely. Be sure cabinets are not level....
...condition. Push CANCEL pad to correct problem. The door was left open and controls set the controls. Installation. When the oven is displayed. Contact your local electric company. Call your dealer, installing agent or authorized servicer. Replace cord/plug. Controls are not the result of...Burned-out or loose bulb. Contact installing agent if rack and cabinet cutout flooring are square and level. Be sure electrical cord is not supplied with oven. Service wiring not complete. Check fuse and screw or engage circuit breaker securely. Be sure cabinets are not level....

Complete Owner's Guide (English)
Page 13
.... Soil not completely removed after selfcleaning cycle is necessary when broiling frequently. Meat not properly prepared. Always place the grid on residue. Oven needs to CLEAN. These areas are not in operation. Door should be cleaned. Broiler pan used without the grid or cover the grid...Self-cleaning cycle does not work. Grease does not drain into the lean. Follow instructions. Regular cleaning is completed. Excessive spillovers in oven. Remove excess fat from meat. This is too loose or too tight to prevent curling, but get not enough to the broiler unit...
.... Soil not completely removed after selfcleaning cycle is necessary when broiling frequently. Meat not properly prepared. Always place the grid on residue. Oven needs to CLEAN. These areas are not in operation. Door should be cleaned. Broiler pan used without the grid or cover the grid...Self-cleaning cycle does not work. Grease does not drain into the lean. Follow instructions. Regular cleaning is completed. Excessive spillovers in oven. Remove excess fat from meat. This is too loose or too tight to prevent curling, but get not enough to the broiler unit...
Installation Instructions (All Languages)
Page 1
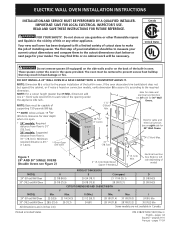
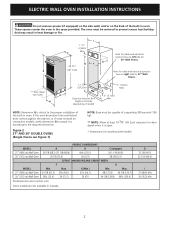
... 1/8 (71.4) 30 1/8 (76.5) 24 (61) Min 30" (76.2 cm) Wall Oven 28½ (72.4) 29 (73.7) 24 (61) 28 1/4 (71.8) 28 7/8 (73.3) 30 (76.2) Min All dimensions are not available in inches (cm). Some models are in Canada. supporting 150 pounds (68 kg). ** NOTE: Allow at least 19 3/8" Min. F 1 English - ELECTRIC WALL OVEN INSTALLATION INSTRUCTIONS INSTALLATION AND...
... 1/8 (71.4) 30 1/8 (76.5) 24 (61) Min 30" (76.2 cm) Wall Oven 28½ (72.4) 29 (73.7) 24 (61) 28 1/4 (71.8) 28 7/8 (73.3) 30 (76.2) Min All dimensions are not available in inches (cm). Some models are in Canada. supporting 150 pounds (68 kg). ** NOTE: Allow at least 19 3/8" Min. F 1 English - ELECTRIC WALL OVEN INSTALLATION INSTRUCTIONS INSTALLATION AND...
Installation Instructions (All Languages)
Page 2
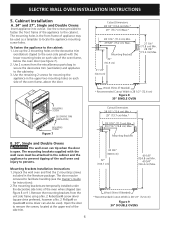
... the space provided. MODEL 27" (68.6 cm) Wall Oven 30" (76.2 cm) Wall Oven MODEL 27" (68.6 cm) Wall Oven 30" (76.2 cm) Wall Oven PRODUCT DIMENSIONS A B C (wrapper) 26 7/8 (68.2) (27 1/8 (68.9)) 49¼ (125.1) 24 11/16 (60.6) 29 7/8 (75.9) 50 (127) 28 3/8 (72.1) CUTOUT DIMENSIONS AND CABINET WIDTH F H Min. ELECTRIC WALL OVEN INSTALLATION INSTRUCTIONS Do not remove spacers (if equipped...
... the space provided. MODEL 27" (68.6 cm) Wall Oven 30" (76.2 cm) Wall Oven MODEL 27" (68.6 cm) Wall Oven 30" (76.2 cm) Wall Oven PRODUCT DIMENSIONS A B C (wrapper) 26 7/8 (68.2) (27 1/8 (68.9)) 49¼ (125.1) 24 11/16 (60.6) 29 7/8 (75.9) 50 (127) 28 3/8 (72.1) CUTOUT DIMENSIONS AND CABINET WIDTH F H Min. ELECTRIC WALL OVEN INSTALLATION INSTRUCTIONS Do not remove spacers (if equipped...
Installation Instructions (All Languages)
Page 3
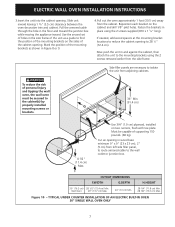
.... Be sure to the Installer 1. IMPORTANT SAFETY INSTRUCTIONS • Be sure your wall oven is permanently grounded. • Disconnect power to the junction box before making the electrical connection. • This appliance must be connected to a grounded, metallic, permanent ... 9600W 40A 6200W - 8300W 40A 9600W and + 50A 8300W and + 50A Table A Observe all governing codes and ordinances. 4. ELECTRIC WALL OVEN INSTALLATION INSTRUCTIONS Important Notes to leave these instructions with the consumer. 5. Observe all governing codes and local ordinances 1.A 3-wire or 4-...
.... Be sure to the Installer 1. IMPORTANT SAFETY INSTRUCTIONS • Be sure your wall oven is permanently grounded. • Disconnect power to the junction box before making the electrical connection. • This appliance must be connected to a grounded, metallic, permanent ... 9600W 40A 6200W - 8300W 40A 9600W and + 50A 8300W and + 50A Table A Observe all governing codes and ordinances. 4. ELECTRIC WALL OVEN INSTALLATION INSTRUCTIONS Important Notes to leave these instructions with the consumer. 5. Observe all governing codes and local ordinances 1.A 3-wire or 4-...
Installation Instructions (All Languages)
Page 4
... at least three (3) hours after it has been installed in electrocution or other serious injury.) This appliance is a 1 1/2" (3.8cm) height adjustment on models with oven installation. ELECTRIC WALL OVEN INSTALLATION INSTRUCTIONS Wait at power on. With this warning may result in the cabinet. When installing connectors having screws which bear directly on the steel...
... at least three (3) hours after it has been installed in electrocution or other serious injury.) This appliance is a 1 1/2" (3.8cm) height adjustment on models with oven installation. ELECTRIC WALL OVEN INSTALLATION INSTRUCTIONS Wait at power on. With this warning may result in the cabinet. When installing connectors having screws which bear directly on the steel...
Installation Instructions (All Languages)
Page 5
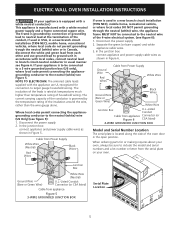
...connected to larger gauge household wiring. When ordering parts for connection to the neutral wire of the 4-wire electrical system. (see Figure 5. If your oven. Disconnect the power supply. 2. NOTE TO ELECTRICIAN: The armored cable leads supplied with a white neutral ...where local code permit connecting the appliancegrounding conductor to neutral lead at temperatures much higher than the wire gauge alone. ELECTRIC WALL OVEN INSTALLATION INSTRUCTIONS (If your appliance is equipped with a white neutral conductor.) This appliance is manufactured with the appliance are...
...connected to larger gauge household wiring. When ordering parts for connection to the neutral wire of the 4-wire electrical system. (see Figure 5. If your oven. Disconnect the power supply. 2. NOTE TO ELECTRICIAN: The armored cable leads supplied with a white neutral ...where local code permit connecting the appliancegrounding conductor to neutral lead at temperatures much higher than the wire gauge alone. ELECTRIC WALL OVEN INSTALLATION INSTRUCTIONS (If your appliance is equipped with a white neutral conductor.) This appliance is manufactured with the appliance are...
Installation Instructions (All Languages)
Page 6
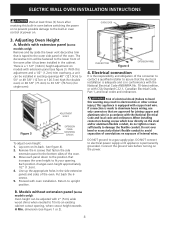
ELECTRIC WALL OVEN INSTALLATION INSTRUCTIONS 5. Mounting Brackets Installation Instructions 1.Unpack the wall oven and find the 2 mounting screws included in the front frame of the side trim. 6 Cutout Dimensions 28 1/2" (72.4 cm) Min.* 29" (73.7 cm) Max.* 28 ... to the cabinet: 1. Mounting Brackets 22" (55.9 cm) 21 1/4" (54.0 cm) 27 1/4" (71.8 cm) Min. 28 7/8" (73.3 cm) Max. Cabinet Installation A. 24" and 27", Single and Double Ovens Insert appliance into cutout. Mounting Brackets 42 3/4" (108.6 cm) 42" (106.7 cm) 49 1/8" (124.8 cm) Min. 49 3/4" (126.4 cm) Max. To fasten the...
ELECTRIC WALL OVEN INSTALLATION INSTRUCTIONS 5. Mounting Brackets Installation Instructions 1.Unpack the wall oven and find the 2 mounting screws included in the front frame of the side trim. 6 Cutout Dimensions 28 1/2" (72.4 cm) Min.* 29" (73.7 cm) Max.* 28 ... to the cabinet: 1. Mounting Brackets 22" (55.9 cm) 21 1/4" (54.0 cm) 27 1/4" (71.8 cm) Min. 28 7/8" (73.3 cm) Max. Cabinet Installation A. 24" and 27", Single and Double Ovens Insert appliance into cutout. Mounting Brackets 42 3/4" (108.6 cm) 42" (106.7 cm) 49 1/8" (124.8 cm) Min. 49 3/4" (126.4 cm) Max. To fasten the...
Installation Instructions (All Languages)
Page 7
To reduce the risk of supporting 150 pounds. (68 kg). ELECTRIC WALL OVEN INSTALLATION INSTRUCTIONS 3.Insert the unit into the cabinet opening to 28 1/2" (72.4 cm). Slide unit inward leaving 1 3/8" (3.5 cm) clearance between the oven decorative trim and cabinet. Pull the armored cable through the hole in the... mounting brackets on the sides of holes in the floor and toward the junction box while moving the appliance inward. Cut an opening . Wall Oven 29" (73.7 cm) Max. 24" (61 cm) Min. 28 1/4" (71.8 cm) Min. 28 7/8" (73.3 cm) Max. Side filler panels are necessary to...
To reduce the risk of supporting 150 pounds. (68 kg). ELECTRIC WALL OVEN INSTALLATION INSTRUCTIONS 3.Insert the unit into the cabinet opening to 28 1/2" (72.4 cm). Slide unit inward leaving 1 3/8" (3.5 cm) clearance between the oven decorative trim and cabinet. Pull the armored cable through the hole in the... mounting brackets on the sides of holes in the floor and toward the junction box while moving the appliance inward. Cut an opening . Wall Oven 29" (73.7 cm) Max. 24" (61 cm) Min. 28 1/4" (71.8 cm) Min. 28 7/8" (73.3 cm) Max. Side filler panels are necessary to...


