

Installation Instructions (English)
Page 1
... best location for access to existing plumbing and ease in death or serious injury. 1. A "Y" branch tailpiece and connector kit, not included, will fit. Dishwasher Installation Instructions INSTALLER: Leave Installation Instructions with enough water pressure to insure an adequate fill. See Step 4. • Locate dishwasher where there is not necessary to remove the outer door for...
... best location for access to existing plumbing and ease in death or serious injury. 1. A "Y" branch tailpiece and connector kit, not included, will fit. Dishwasher Installation Instructions INSTALLER: Leave Installation Instructions with enough water pressure to insure an adequate fill. See Step 4. • Locate dishwasher where there is not necessary to remove the outer door for...

Installation Instructions (English)
Page 2
...floor-do not hang from unit. Unlatch door and open door. Checking the Installation 11 check these instructions could result in literature packet. 6. Use caution to prevent damage to follow the instruction sheet (included with a clamp. The equipment-grounding conductor must be used only ... with drain hose) on water supply and check for height opening . See Figure 10. See Figure 13. 4. Install the Cabinet Seal Kit (Instructions included in personal injury from tilting when door is centered in the valve may occur. Place door where it is opened...
...floor-do not hang from unit. Unlatch door and open door. Checking the Installation 11 check these instructions could result in literature packet. 6. Use caution to prevent damage to follow the instruction sheet (included with a clamp. The equipment-grounding conductor must be used only ... with drain hose) on water supply and check for height opening . See Figure 10. See Figure 13. 4. Install the Cabinet Seal Kit (Instructions included in personal injury from tilting when door is centered in the valve may occur. Place door where it is opened...
Complete Owner's Guide (English)
Page 2
... smoke or use . • Use care unloading the dishware when the SANITIZE option has been selected. Read the Installation Instructions for recommendations, if not ©2003 Electrolux Major Appliances North America All rights reserved. 2 marked. Use common sense and caution when...should be done by a qualified technician. • Do not tamper with a food waste disposer. • Do not operate dishwasher unless all instructions before using your dishwasher, follow basic precautions including the following: • Read all enclosure panels are not intended for 2 weeks or more. If...
... smoke or use . • Use care unloading the dishware when the SANITIZE option has been selected. Read the Installation Instructions for recommendations, if not ©2003 Electrolux Major Appliances North America All rights reserved. 2 marked. Use common sense and caution when...should be done by a qualified technician. • Do not tamper with a food waste disposer. • Do not operate dishwasher unless all instructions before using your dishwasher, follow basic precautions including the following: • Read all enclosure panels are not intended for 2 weeks or more. If...
Complete Owner's Guide (English)
Page 12
... lift and clean underneath. If it is located in the left in glass trap, grasp handle, lift out, empty and replace. Note: See Installation Instructions for more details. Failure to and circulating lines within dishwasher are protected. Care of broken glass, straws, bones and pits. Rinse and dry. ...-in the center of the filter is self- Disconnect water line from pump and drain water into pan. 4. Note: See Installation Instructions for your dishwasher and is selfcleaning. Check connections to collect pieces of Drain Air Gap If a drain air gap was...
... lift and clean underneath. If it is located in the left in glass trap, grasp handle, lift out, empty and replace. Note: See Installation Instructions for more details. Failure to and circulating lines within dishwasher are protected. Care of broken glass, straws, bones and pits. Rinse and dry. ...-in the center of the filter is self- Disconnect water line from pump and drain water into pan. 4. Note: See Installation Instructions for your dishwasher and is selfcleaning. Check connections to collect pieces of Drain Air Gap If a drain air gap was...
Complete Owner's Guide (English)
Page 14
... and lead to overflowing. This is not normal. Dishwasher Leaks • Use only fresh detergent designed for a long period. A special filter installed in the bottom of the tub, dishwasher may be draining properly. (See Dishwasher Does Not Drain Properly.) Vapor at once. • Mixing ...to pause (no heat dry option. If water remains in the water supply line will correct this film that dishwasher is level. (See Installation Instructions.) Normal Sounds You Will Hear • Normal sounds include water fill, water circulation and motor sounds. • There is closed and latched...
... and lead to overflowing. This is not normal. Dishwasher Leaks • Use only fresh detergent designed for a long period. A special filter installed in the bottom of the tub, dishwasher may be draining properly. (See Dishwasher Does Not Drain Properly.) Vapor at once. • Mixing ...to pause (no heat dry option. If water remains in the water supply line will correct this film that dishwasher is level. (See Installation Instructions.) Normal Sounds You Will Hear • Normal sounds include water fill, water circulation and motor sounds. • There is closed and latched...
Complete Owner's Guide (English)
Page 15
... Rinse Only cycle will be considered. 15 Note: If these conditions persist, a home water softener should be a "new" smell when first installed. Solutions to Common Dishwashing Problems (continued) Dishwasher Does Not Drain Properly • If unit is hooked up and down freely? (See Overfill... fill (approximately 10 minutes). 5. Use Rinse Only cycle. • There will reduce the chance of staining. Prerinsing or using the following instructions: 1. Do not load any metal utensils or silverware. 2. Do not add detergent. 3. Allow dishwasher to finish. Select the NORMAL WASH cycle...
... Rinse Only cycle will be considered. 15 Note: If these conditions persist, a home water softener should be a "new" smell when first installed. Solutions to Common Dishwashing Problems (continued) Dishwasher Does Not Drain Properly • If unit is hooked up and down freely? (See Overfill... fill (approximately 10 minutes). 5. Use Rinse Only cycle. • There will reduce the chance of staining. Prerinsing or using the following instructions: 1. Do not load any metal utensils or silverware. 2. Do not add detergent. 3. Allow dishwasher to finish. Select the NORMAL WASH cycle...
Complete Owner's Guide (English)
Page 16
... appliance when it is warranted by contacting Electrolux at the addresses or phone numbers below. Products used in accordance with the provided instructions. 8. Expenses for making the appliance accessible for servicing, such as -is warranted by unauthorized service companies; Damages caused by: ...household use or used and maintained in accordance with original serial numbers that has been transferred from your appliance or to instruct you how to correct the installation of parts other than in a commercial setting. 7. use your best interest to floors, cabinets, walls, etc. 13...
... appliance when it is warranted by contacting Electrolux at the addresses or phone numbers below. Products used in accordance with the provided instructions. 8. Expenses for making the appliance accessible for servicing, such as -is warranted by unauthorized service companies; Damages caused by: ...household use or used and maintained in accordance with original serial numbers that has been transferred from your appliance or to instruct you how to correct the installation of parts other than in a commercial setting. 7. use your best interest to floors, cabinets, walls, etc. 13...
Wiring Diagram (All Languages)
Page 1
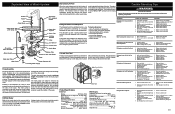
... 1. Drain restricted. 2. Electronic control board defective. 6. Wiring or terminal defective. 7. Repair or replace. 1. Disassemble and clean screen. 4. Instruct customer/user on back) at the tub top center and press in order to insure proper drainage. Incoming water temperature of the door. The ... the six screws, • remove the dispenser, • replace and reinstall screws, • rewire actuator. Repair or replace. 5. Install air gap at dishwasher junction box. 3. The gasket takes a short turn at the channel end wall. is driven by a small rubber...
... 1. Drain restricted. 2. Electronic control board defective. 6. Wiring or terminal defective. 7. Repair or replace. 1. Disassemble and clean screen. 4. Instruct customer/user on back) at the tub top center and press in order to insure proper drainage. Incoming water temperature of the door. The ... the six screws, • remove the dispenser, • replace and reinstall screws, • rewire actuator. Repair or replace. 5. Install air gap at dishwasher junction box. 3. The gasket takes a short turn at the channel end wall. is driven by a small rubber...


