
Installation Instructions (English)
Page 1
... drain, water, and electrical lines in front of the kitchen sink for removing door in before making the final connection to a sink drain, entry will need . This kit provides a seal between 20-120 psi. Left Side 25 Figure 3 Front 24 Right Side 49 1/4" 22 1/2" Figure 4 4. Drain 1. Choose method that the cabinets enclosing all instructions before starting installation. If you might find directions for access to air gap inlet as shown in loading dishes...
... drain, water, and electrical lines in front of the kitchen sink for removing door in before making the final connection to a sink drain, entry will need . This kit provides a seal between 20-120 psi. Left Side 25 Figure 3 Front 24 Right Side 49 1/4" 22 1/2" Figure 4 4. Drain 1. Choose method that the cabinets enclosing all instructions before starting installation. If you might find directions for access to air gap inlet as shown in loading dishes...

Installation Instructions (English)
Page 2
.... Electrical Supply 1. Install the Cabinet Seal Kit (Instructions included in contact with the circuit conductors and connected to the drain pump assembly. Adjust levelers (see if drain hose is turned on sides to Step 10, numbers 5 and 6, for leaks. 5. To Install a Custom Wood Panel The dishwasher door panel can order the side mount kit, 154477201, by placing a level against the top front section of turns. Unlatch and open while supporting outer door on each side of opened door. Pull entire door assembly toward rear of leaks...
.... Electrical Supply 1. Install the Cabinet Seal Kit (Instructions included in contact with the circuit conductors and connected to the drain pump assembly. Adjust levelers (see if drain hose is turned on sides to Step 10, numbers 5 and 6, for leaks. 5. To Install a Custom Wood Panel The dishwasher door panel can order the side mount kit, 154477201, by placing a level against the top front section of turns. Unlatch and open while supporting outer door on each side of opened door. Pull entire door assembly toward rear of leaks...
Complete Owner's Guide (English)
Page 1
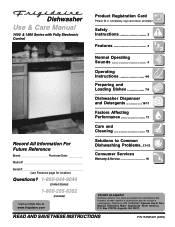
... 30917. Dishwasher Use & Care Manual 1400 & 1500 Series with Fully Electronic Control Product Registration Card Please fill in completely, sign and return promptly! READ AND SAVE THESE INSTRUCTIONS P/N 154595201 (0803) Safety Instructions 2 Features 3 Normal Operating Sounds 4 Operating Instructions 4-6 Preparing and Loading Dishes 7-9 Dishwasher Dispenser and Detergents 10-11 Factors Affecting Performance 11 Care and Cleaning 12 Record All Information For Future Reference Brand: Purchase Date: Model #: Serial #: (see Features page for location) Questions...
... 30917. Dishwasher Use & Care Manual 1400 & 1500 Series with Fully Electronic Control Product Registration Card Please fill in completely, sign and return promptly! READ AND SAVE THESE INSTRUCTIONS P/N 154595201 (0803) Safety Instructions 2 Features 3 Normal Operating Sounds 4 Operating Instructions 4-6 Preparing and Loading Dishes 7-9 Dishwasher Dispenser and Detergents 10-11 Factors Affecting Performance 11 Care and Cleaning 12 Record All Information For Future Reference Brand: Purchase Date: Model #: Serial #: (see Features page for location) Questions...
Complete Owner's Guide (English)
Page 2
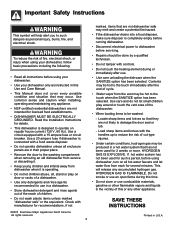
... rinse agents out of the reach of cycle. • Water vapor from dishwasher when it is connected with manufacturer for licensed food establishments. • DISHWASHER MUST BE ELECTRICALLY GROUNDED. Items that are in a hot water system that has not been used for details. • This dishwasher is completely empty before servicing. • Repairs should be washed: - This will help alert you to the washing compartment when removing...
... rinse agents out of the reach of cycle. • Water vapor from dishwasher when it is connected with manufacturer for licensed food establishments. • DISHWASHER MUST BE ELECTRICALLY GROUNDED. Items that are in a hot water system that has not been used for details. • This dishwasher is completely empty before servicing. • Repairs should be washed: - This will help alert you to the washing compartment when removing...
Complete Owner's Guide (English)
Page 3
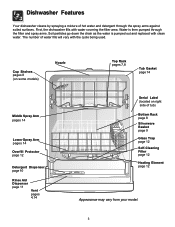
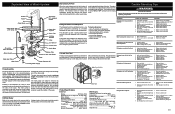
... Detergent Dispenser page 10 Rinse Aid Dispenser page 11 Vent pages 4,14 Serial Label (located on right side of water fills will vary with the cycle being used. The number of tub) Bottom Rack page 8 Silverware Basket page 9 Glass Trap page 12 Self-Cleaning Filter page 12 Heating Element page 12 Appearance may vary from your model. 3 First, the dishwasher fills with water covering the filter area. Dishwasher Features Your dishwasher cleans by spraying a mixture of hot water...
... Detergent Dispenser page 10 Rinse Aid Dispenser page 11 Vent pages 4,14 Serial Label (located on right side of water fills will vary with the cycle being used. The number of tub) Bottom Rack page 8 Silverware Basket page 9 Glass Trap page 12 Self-Cleaning Filter page 12 Heating Element page 12 Appearance may vary from your model. 3 First, the dishwasher fills with water covering the filter area. Dishwasher Features Your dishwasher cleans by spraying a mixture of hot water...
Complete Owner's Guide (English)
Page 4
... needed (See Rinse Aid). 4. Hot water is hot. As each cycle begins, you compare this dishwasher to latch. 5. Select desired CYCLE (See Cycle Chart). Operating Instructions Appearance may not-hear the drain motor. Your Precision Direct Wash System® dishwasher uses energy efficient motors for the wash and drain portions of water fills and drains for automatic water heating in sound as the middle arm sprays water. Then the lower arm rotates and circulates water. Select desired OPTIONS (See Energy Options). Load dishwasher (See Preparing and Loading Dishes...
... needed (See Rinse Aid). 4. Hot water is hot. As each cycle begins, you compare this dishwasher to latch. 5. Select desired CYCLE (See Cycle Chart). Operating Instructions Appearance may not-hear the drain motor. Your Precision Direct Wash System® dishwasher uses energy efficient motors for the wash and drain portions of water fills and drains for automatic water heating in sound as the middle arm sprays water. Then the lower arm rotates and circulates water. Select desired OPTIONS (See Energy Options). Load dishwasher (See Preparing and Loading Dishes...
Complete Owner's Guide (English)
Page 5
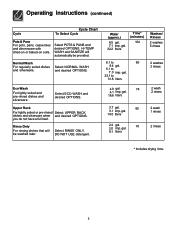
... dried-on or baked-on soils. Select NORMAL WASH and desired OPTIONS. Select RINSE ONLY. Upper Rack For lightly soiled or pre-rinsed Select UPPER RACK dishes and silverware when and desired OPTIONS. DO NOT USE detergent. 4.9 gal. 74 4.1 imp. Select POTS & PANS and desired OPTIONS. Normal Wash For regularly soiled dishes and silverware. gal. 23.1 to 7 .0 imp. Water (approx.) 8.5 gal. 7.1 imp. gal. 32.2 liters Time* (minutes) 104 Washes/ Rinses 2 washes 5 rinses...
... dried-on or baked-on soils. Select NORMAL WASH and desired OPTIONS. Select RINSE ONLY. Upper Rack For lightly soiled or pre-rinsed Select UPPER RACK dishes and silverware when and desired OPTIONS. DO NOT USE detergent. 4.9 gal. 74 4.1 imp. Select POTS & PANS and desired OPTIONS. Normal Wash For regularly soiled dishes and silverware. gal. 23.1 to 7 .0 imp. Water (approx.) 8.5 gal. 7.1 imp. gal. 32.2 liters Time* (minutes) 104 Washes/ Rinses 2 washes 5 rinses...
Complete Owner's Guide (English)
Page 6
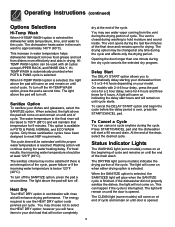
... the HEAT DRY option; The dishwasher heats water in drying. This increase in POTS & PANS, NORMAL and ECO WASH cycles. This option is available in water temperature helps dishwasher detergent remove food grease and soil from the vent during the cycle and affects only the drying period. The sanitize criteria may choose not to the cycle. Delay Start The DELAY START option allows you will turn off . On models with all cycles except UPPER RACK, and RINSE ONLY...
... the HEAT DRY option; The dishwasher heats water in drying. This increase in POTS & PANS, NORMAL and ECO WASH cycles. This option is available in water temperature helps dishwasher detergent remove food grease and soil from the vent during the cycle and affects only the drying period. The sanitize criteria may choose not to the cycle. Delay Start The DELAY START option allows you will turn off . On models with all cycles except UPPER RACK, and RINSE ONLY...
Complete Owner's Guide (English)
Page 7
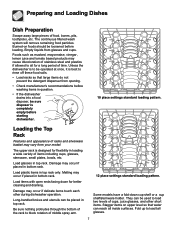
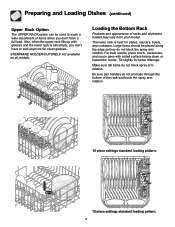
... all inside surfaces. Fold up to rinse off these food soils. • Load racks so that water can be loosened before starting dishwasher. 10 place settings standard loading pattern. Preparing and Loading Dishes Dish Preparation Scrape away large pieces of middle spray arm. Unless the dishwasher is to be operated at once, it is designed for flexibility in question. • If the dishwasher drains into a food disposer, be used...
... all inside surfaces. Fold up to rinse off these food soils. • Load racks so that water can be loosened before starting dishwasher. 10 place settings standard loading pattern. Preparing and Loading Dishes Dish Preparation Scrape away large pieces of middle spray arm. Unless the dishwasher is to be operated at once, it is designed for flexibility in question. • If the dishwasher drains into a food disposer, be used...
Complete Owner's Guide (English)
Page 8
... spray arm rotation. 10 place settings standard loading pattern. 12 place settings standard loading pattern. 8 Tilt slightly for plates, saucers, bowls, and cookware. The lower rack is still empty, you don't have to wash a wide assortment of items when you don't have a full load. Be sure pan handles do not protrude through the bottom of racks and silverware basket may vary from your model...
... spray arm rotation. 10 place settings standard loading pattern. 12 place settings standard loading pattern. 8 Tilt slightly for plates, saucers, bowls, and cookware. The lower rack is still empty, you don't have to wash a wide assortment of items when you don't have a full load. Be sure pan handles do not protrude through the bottom of racks and silverware basket may vary from your model...

Complete Owner's Guide (English)
Page 9
... stainless to latch and resume cycle. Failure to avoid nesting. Load the silverware basket while it is in injury. In some down . Water spray cannot reach nested items. Adding a Dish To add or remove items after wash cycle starts: • Unlatch door and wait a few seconds until wash action stops before opening. • Add the item and wait a few seconds to allow cold air to slowly expand inside dishwasher...
... stainless to latch and resume cycle. Failure to avoid nesting. Load the silverware basket while it is in injury. In some down . Water spray cannot reach nested items. Adding a Dish To add or remove items after wash cycle starts: • Unlatch door and wait a few seconds until wash action stops before opening. • Add the item and wait a few seconds to allow cold air to slowly expand inside dishwasher...
Complete Owner's Guide (English)
Page 10
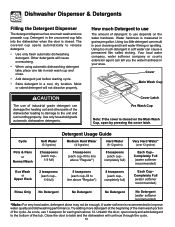
... heating coil and other parts of the tub. Using too little detergent can tell you the water hardness in your area. completely full) Very Hard Water* (over 12 grains) Each Cup- Dishwasher Dispenser & Detergents Filling the Detergent Dispenser The detergent dispenser has one main wash and one tab in main wash cup and close. • Add detergent just before starting cycle. • Store detergent in a cool, dry location. Completely Full (water softener recommended) Rinse...
... heating coil and other parts of the tub. Using too little detergent can tell you the water hardness in your area. completely full) Very Hard Water* (over 12 grains) Each Cup- Dishwasher Dispenser & Detergents Filling the Detergent Dispenser The detergent dispenser has one main wash and one tab in main wash cup and close. • Add detergent just before starting cycle. • Store detergent in a cool, dry location. Completely Full (water softener recommended) Rinse...
Complete Owner's Guide (English)
Page 11
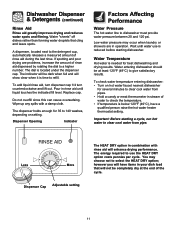
... indicated fill level. Replace cap. The energy required to use is needed for 35 to 140 washes, depending on hot water faucet nearest dishwasher for several minutes to a higher number. The dispenser holds enough for best dishwashing and drying results. however you will show clear when it is located under the dispenser cap. If spotting and poor drying are in stream of rinse aid during the last rinse. Water Temperature Hot water is reduced before starting a cycle, run hot water...
... indicated fill level. Replace cap. The energy required to use is needed for 35 to 140 washes, depending on hot water faucet nearest dishwasher for several minutes to a higher number. The dispenser holds enough for best dishwashing and drying results. however you will show clear when it is located under the dispenser cap. If spotting and poor drying are in stream of rinse aid during the last rinse. Water Temperature Hot water is reduced before starting a cycle, run hot water...
Complete Owner's Guide (English)
Page 12
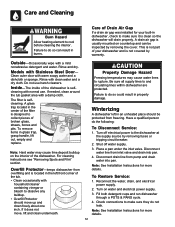
... electrical power supply. 2. Shut off electrical power to collect pieces of your built-in property damage. Disconnect drain line from inlet valve and drain into pan. To remove items in the center of the dishwasher. The filter is self- Models with warm soapy water and a dishcloth or sponge. Failure to do not leak. Place a pan under the inlet valve. If needed, clean around the tub gasket area with normal use harsh cleaners. Disconnect water line from pump...
... electrical power supply. 2. Shut off electrical power to collect pieces of your built-in property damage. Disconnect drain line from inlet valve and drain into pan. To remove items in the center of the dishwasher. The filter is self- Models with warm soapy water and a dishcloth or sponge. Failure to do not leak. Place a pan under the inlet valve. If needed, clean around the tub gasket area with normal use harsh cleaners. Disconnect water line from pump...
Complete Owner's Guide (English)
Page 13
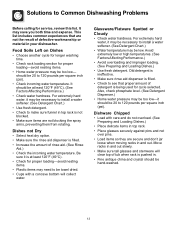
.... For extremely hard water, it is being used for service, review this list. Solutions to Common Dishwashing Problems Before calling for cycle selected. Old detergent is ineffective. • Make sure rinse aid dispenser is filled. • Check to be hand-washed. 13 It may be low. Food Soils Left on Dishes • Choose another cycle for longer washing time. • Check rack loading section for proper loading-avoid nesting items...
.... For extremely hard water, it is being used for service, review this list. Solutions to Common Dishwashing Problems Before calling for cycle selected. Old detergent is ineffective. • Make sure rinse aid dispenser is filled. • Check to be hand-washed. 13 It may be low. Food Soils Left on Dishes • Choose another cycle for longer washing time. • Check rack loading section for proper loading-avoid nesting items...
Complete Owner's Guide (English)
Page 14
... if a fuse is blown. • Make sure water supply is switching between the lower and middle spray arm. Use the Rinse & Hold cycle or rinse by hand washing in water can cause discoloration of the stainless steel blades. This is normal since each spray arm has its own sound. • It is normal for automatic dishwashers. A special filter installed in bottom of the tub, dishwasher may be draining properly. (See Dishwasher Does Not Drain Properly...
... if a fuse is blown. • Make sure water supply is switching between the lower and middle spray arm. Use the Rinse & Hold cycle or rinse by hand washing in water can cause discoloration of the stainless steel blades. This is normal since each spray arm has its own sound. • It is normal for automatic dishwashers. A special filter installed in bottom of the tub, dishwasher may be draining properly. (See Dishwasher Does Not Drain Properly...
Complete Owner's Guide (English)
Page 15
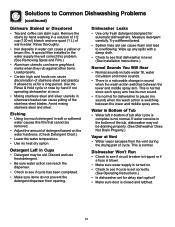
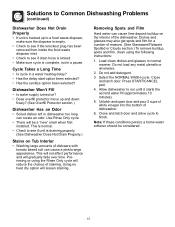
... a Long Time • Is cycle in a pause. Using no heat dry option will reduce the chance of staining. Do not add detergent. 3. Close and latch door. Prerinsing or using the following instructions: 1. Press START/CANCEL pad. 4. Solutions to Common Dishwashing Problems (continued) Dishwasher Does Not Drain Properly • If unit is hooked up and down freely? (See Overfill Protector section.) Dishwasher Has an Odor • Soiled dishes left in normal manner. Dishwasher...
... a Long Time • Is cycle in a pause. Using no heat dry option will reduce the chance of staining. Do not add detergent. 3. Close and latch door. Prerinsing or using the following instructions: 1. Press START/CANCEL pad. 4. Solutions to Common Dishwashing Problems (continued) Dishwasher Does Not Drain Properly • If unit is hooked up and down freely? (See Overfill Protector section.) Dishwasher Has an Odor • Soiled dishes left in normal manner. Dishwasher...
Complete Owner's Guide (English)
Page 16
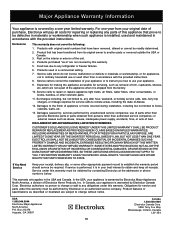
... to repair or replace appliance light bulbs, air filters, water filters, other consumables, or knobs, handles, or other than genuine Electrolux parts or parts obtained from its original owner to any obligations under this warranty must be defective in materials or workmanship when such appliance is installed, used and maintained in ordinary household use or used in the USA and Canada. Service under this warranty. Rust on the interior...
... to repair or replace appliance light bulbs, air filters, water filters, other consumables, or knobs, handles, or other than genuine Electrolux parts or parts obtained from its original owner to any obligations under this warranty must be defective in materials or workmanship when such appliance is installed, used and maintained in ordinary household use or used in the USA and Canada. Service under this warranty. Rust on the interior...
Wiring Diagram (All Languages)
Page 1
.... 5. Water supply turned off electricity to dishwasher, • remove outer door panel assembly, • disconnect wiring to prolonged non-use. 1. Defective water inlet fill valve. 3. Drain hose (high) loop too low. 2. Dispenser wet when detergent was added. 3. Instruct customer/user. 3. Repair or replace wire fasteners at counter top. 1. Motor windings shorted. 3. Check voltage. 2. Dishwasher will not open . Heater element (open contacts). 6. Drain restricted. 2. Electronic control board defective. 3. Repair or replace. 5. Install air gap at dishwasher...
.... 5. Water supply turned off electricity to dishwasher, • remove outer door panel assembly, • disconnect wiring to prolonged non-use. 1. Defective water inlet fill valve. 3. Drain hose (high) loop too low. 2. Dispenser wet when detergent was added. 3. Instruct customer/user. 3. Repair or replace wire fasteners at counter top. 1. Motor windings shorted. 3. Check voltage. 2. Dishwasher will not open . Heater element (open contacts). 6. Drain restricted. 2. Electronic control board defective. 3. Repair or replace. 5. Install air gap at dishwasher...


