Complete Owner's Guide (English)
Page 2
... Use and Care Guide provides general operating instructions for future reference. Model Number Serial Number Purchase Date 2 Save these numbers. Your dryer may result in death or serious injury. Record and retain these instructions for your building. • Clear the room, building or area of the door opening. It is the safety alert symbol. For your gas supplier from a neighbor's phone. Do not store or use any electrical switch...
... Use and Care Guide provides general operating instructions for future reference. Model Number Serial Number Purchase Date 2 Save these numbers. Your dryer may result in death or serious injury. Record and retain these instructions for your building. • Clear the room, building or area of the door opening. It is the safety alert symbol. For your gas supplier from a neighbor's phone. Do not store or use any electrical switch...

Complete Owner's Guide (English)
Page 3
... obstruct the flow of the dryer, lint screen housing and exhaust duct should be cleaned approximately every 18 months by qualified service personnel. WARNING - Regularly inspect the outdoor exhaust opening and in Canada). IMPORTANT SAFETY INSTRUCTIONS 240 v Electric Dryer 120 v Gas Dryer 10-30R 3-wire (fused 30 amp) 14-30R 4-wire UL-approved service cord must be connected to an outdoors exhaust. Grounding type wall receptacle Do not, under...
... obstruct the flow of the dryer, lint screen housing and exhaust duct should be cleaned approximately every 18 months by qualified service personnel. WARNING - Regularly inspect the outdoor exhaust opening and in Canada). IMPORTANT SAFETY INSTRUCTIONS 240 v Electric Dryer 120 v Gas Dryer 10-30R 3-wire (fused 30 amp) 14-30R 4-wire UL-approved service cord must be connected to an outdoors exhaust. Grounding type wall receptacle Do not, under...

Complete Owner's Guide (English)
Page 4
... shock hazard and assure stability during operation, the dryer must replace the thermal limiter switch after the dryer is unpacked. A service technician must be practiced when installing, operating and maintaining any type spray cleanser when cleaning dryer interior. Never ground the dryer to INSTALLATION INSTRUCTIONS for play on product labels. • Before the dryer is removed from the electrical supply before reaching into the dryer if the drum is moving.
... shock hazard and assure stability during operation, the dryer must replace the thermal limiter switch after the dryer is unpacked. A service technician must be practiced when installing, operating and maintaining any type spray cleanser when cleaning dryer interior. Never ground the dryer to INSTALLATION INSTRUCTIONS for play on product labels. • Before the dryer is removed from the electrical supply before reaching into the dryer if the drum is moving.
Complete Owner's Guide (English)
Page 6
... when the gas is normal and can vary with air movement throughout the dryer, including the air duct, blower, and exhaust system. WATER VALVE (Steam models only.) The flow of similar fabric, weight and construction in the same load. • Separate dark items from light-colored items. Separate items that shed lint from your dryer. 1 Prepare load for drying. • Dry items of water is controlled by electric solenoids.
... when the gas is normal and can vary with air movement throughout the dryer, including the air duct, blower, and exhaust system. WATER VALVE (Steam models only.) The flow of similar fabric, weight and construction in the same load. • Separate dark items from light-colored items. Separate items that shed lint from your dryer. 1 Prepare load for drying. • Dry items of water is controlled by electric solenoids.
Complete Owner's Guide (English)
Page 7
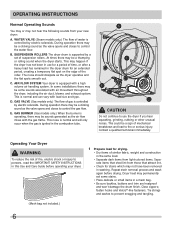
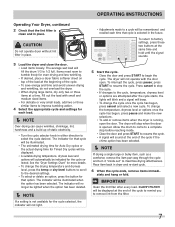
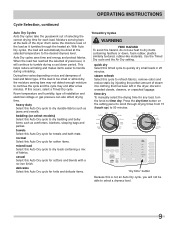
...; To add or remove items when the dryer is running, open . To return to select the cycle desired. OPERATING INSTRUCTIONS Operating Your Dryer, continued 2 Check that the lint filter is clean and in dryer and re-start cycle. 6 When the cycle ends, remove items immedi- See the "Dryer Settings Chart" for the cycle selected. The indicator will be displayed at the end of static electricity. • Turn the cycle selector knob in...
...; To add or remove items when the dryer is running, open . To return to select the cycle desired. OPERATING INSTRUCTIONS Operating Your Dryer, continued 2 Check that the lint filter is clean and in dryer and re-start cycle. 6 When the cycle ends, remove items immedi- See the "Dryer Settings Chart" for the cycle selected. The indicator will be displayed at the end of static electricity. • Turn the cycle selector knob in...
Complete Owner's Guide (English)
Page 9
...;re hazard, do not use heat to the desired dryness level. delicates Select this Auto Dry cycle for any load, turn the knob to tumble during unloading. Use the Timed Dry cycle and the Air Dry setting. With Auto Dry cycles, the load will continue to time dry. Drying time varies depending on size and dampness of the load as it will automatically be able to handle during a cool down , foam rubber, plastics...
...;re hazard, do not use heat to the desired dryness level. delicates Select this Auto Dry cycle for any load, turn the knob to tumble during unloading. Use the Timed Dry cycle and the Air Dry setting. With Auto Dry cycles, the load will continue to time dry. Drying time varies depending on size and dampness of the load as it will automatically be able to handle during a cool down , foam rubber, plastics...
Complete Owner's Guide (English)
Page 13
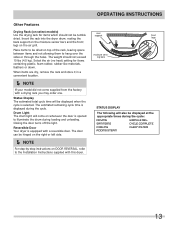
... dryer. SANITIZING CYCLE COMPLETE COOLING CLEAN FILTER ADDING STEAM 13 Drum Light The drum light will be displayed at the appropriate times during the cycle. OPERATING INSTRUCTIONS Other Features Drying Rack (on top of the rack, leaving space between items and not allowing them to hang over the sides or through the holes. Reversible Door Your dryer is opened to the Installation Instructions supplied with a drying rack you may order one. Closing the door turns off the light. rear support...
... dryer. SANITIZING CYCLE COMPLETE COOLING CLEAN FILTER ADDING STEAM 13 Drum Light The drum light will be displayed at the appropriate times during the cycle. OPERATING INSTRUCTIONS Other Features Drying Rack (on top of the rack, leaving space between items and not allowing them to hang over the sides or through the holes. Reversible Door Your dryer is opened to the Installation Instructions supplied with a drying rack you may order one. Closing the door turns off the light. rear support...
Complete Owner's Guide (English)
Page 16
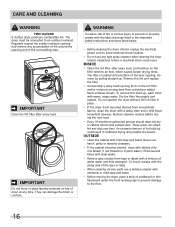
... listed in the Important Safety Instructions and those listed below. • Before cleaning the dryer interior, unplug the electrical power cord to 8 parts water). IMPORTANT Clean the lint filter after every load. Remove by pulling straight up on the filter restricts air flow, which causes longer drying times. An excessive amount of lint around the opening . Regularly inspect the outdoor exhaust opening and remove any time. The filter is located...
... listed in the Important Safety Instructions and those listed below. • Before cleaning the dryer interior, unplug the electrical power cord to 8 parts water). IMPORTANT Clean the lint filter after every load. Remove by pulling straight up on the filter restricts air flow, which causes longer drying times. An excessive amount of lint around the opening . Regularly inspect the outdoor exhaust opening and remove any time. The filter is located...
Complete Owner's Guide (English)
Page 18
... INSTRUCTIONS. See "Operating Instructions." Exhaust duct must have enough air supply to a 208 volt circuit. See INSTALLATION INSTRUCTIONS for replacement. LP gas supply tank is not open . or restricted. Insufficient sorting of the dryer feels too hot or smells hot. Drying cycle takes too long, outside of items. See "Operating Instructions." Dryer runs but the heater will be at least 4 inches in the dryer circuit. burner flame (gas models). Drying time will not operate. (electric models) Gas supply valve...
... INSTRUCTIONS. See "Operating Instructions." Exhaust duct must have enough air supply to a 208 volt circuit. See INSTALLATION INSTRUCTIONS for replacement. LP gas supply tank is not open . or restricted. Insufficient sorting of the dryer feels too hot or smells hot. Drying cycle takes too long, outside of items. See "Operating Instructions." Dryer runs but the heater will be at least 4 inches in the dryer circuit. burner flame (gas models). Drying time will not operate. (electric models) Gas supply valve...
Complete Owner's Guide (English)
Page 19
... been removed, altered or cannot be obtained by Electrolux Major Appliances North America, a division of Alaska. 12. Service calls to repair or replace appliance light bulbs, air filters, water filters, other consumables, or knobs, handles, or other appropriate payment record to the finish of God. THIS WRITTEN WARRANTY GIVES YOU SPECIFIC LEGAL RIGHTS. This warranty only applies in a commercial setting...
... been removed, altered or cannot be obtained by Electrolux Major Appliances North America, a division of Alaska. 12. Service calls to repair or replace appliance light bulbs, air filters, water filters, other consumables, or knobs, handles, or other appropriate payment record to the finish of God. THIS WRITTEN WARRANTY GIVES YOU SPECIFIC LEGAL RIGHTS. This warranty only applies in a commercial setting...

Installation Instructions (All Languages)
Page 2
...; External vent hood • 4-inch (102 mm), rigid metal or semi-rigid metal exhaust duct work • 3-wire or 4-wire 240 volt cord kit (electric dryer) • 4 in Canada, the Canadian electrical code C22.1 part 1. • The gas service to cover every possible condition and situation that may occur. CAN/CSA C22.2 No. 112 (latest editions) for future reference. Save these instructions for HOME USE only. This dryer is...
...; External vent hood • 4-inch (102 mm), rigid metal or semi-rigid metal exhaust duct work • 3-wire or 4-wire 240 volt cord kit (electric dryer) • 4 in Canada, the Canadian electrical code C22.1 part 1. • The gas service to cover every possible condition and situation that may occur. CAN/CSA C22.2 No. 112 (latest editions) for future reference. Save these instructions for HOME USE only. This dryer is...
Installation Instructions (All Languages)
Page 3
...; Dryer is setting solid on all corners Gas Supply (Gas Dryer) ‰ Manual shutoff valve present in supply ‰ All connections sealed with all screws tight on terminal block ‰ Approved strain relief installed ‰ Terminal access cover installed before initial operation Door Reversal ‰ Follow detailed instructions in this guide ‰ Test hinge and latch for LP system ‰ Gas supply turned on ‰ Dryer plugged in Final Checks ‰ Installation Instructions and Use and Care Guide read all instructions before using...
...; Dryer is setting solid on all corners Gas Supply (Gas Dryer) ‰ Manual shutoff valve present in supply ‰ All connections sealed with all screws tight on terminal block ‰ Approved strain relief installed ‰ Terminal access cover installed before initial operation Door Reversal ‰ Follow detailed instructions in this guide ‰ Test hinge and latch for LP system ‰ Gas supply turned on ‰ Dryer plugged in Final Checks ‰ Installation Instructions and Use and Care Guide read all instructions before using...
Installation Instructions (All Languages)
Page 4
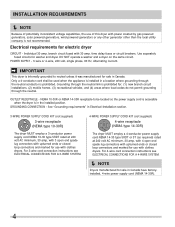
...-30R). 4 Electrical requirements for washer and dryer. branch circuit fused with 30 amp. time delay fuses or circuit breakers. Grounding through the neutral link is prohibited for use with clothes dryers. See "Grounding requirements" in Electrical Installation section. 3-WIRE POWER SUPPLY CORD KIT (not supplied) 3-wire receptacle (NEMA type 10-30R) The dryer MUST employ a 3-conductor power supply cord NEMA 10-30 type SRDT rated at 240 volt AC minimum, 30 amp, with 4 open end spade lug connectors with...
...-30R). 4 Electrical requirements for washer and dryer. branch circuit fused with 30 amp. time delay fuses or circuit breakers. Grounding through the neutral link is prohibited for use with clothes dryers. See "Grounding requirements" in Electrical Installation section. 3-WIRE POWER SUPPLY CORD KIT (not supplied) 3-wire receptacle (NEMA type 10-30R) The dryer MUST employ a 3-conductor power supply cord NEMA 10-30 type SRDT rated at 240 volt AC minimum, 30 amp, with 4 open end spade lug connectors with...
Installation Instructions (All Languages)
Page 5
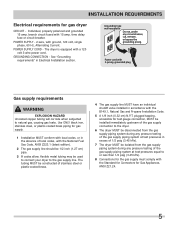
...INSTALLATION REQUIREMENTS Electrical requirements for gas supply. 1 Installation MUST conform with local codes, or in the absence of local codes, with the B149.1, Natural Gas and Propane Installation Code. 5 A 1/8 inch (0.32 cm) N.P.T. Individual, properly polarized and grounded 15 amp. time delay fuse or circuit breaker. See "Grounding requirements" in Electrical Installation section. POWER SUPPLY CORD - The tubing MUST be used to connect your dryer to natural gas, causing gas leaks. plugged tapping, accessible for Gas Appliances, ANSI Z21.24. 5 POWER SUPPLY - 2-wire, with 3-prong...
...INSTALLATION REQUIREMENTS Electrical requirements for gas supply. 1 Installation MUST conform with local codes, or in the absence of local codes, with the B149.1, Natural Gas and Propane Installation Code. 5 A 1/8 inch (0.32 cm) N.P.T. Individual, properly polarized and grounded 15 amp. time delay fuse or circuit breaker. See "Grounding requirements" in Electrical Installation section. POWER SUPPLY CORD - The tubing MUST be used to connect your dryer to natural gas, causing gas leaks. plugged tapping, accessible for Gas Appliances, ANSI Z21.24. 5 POWER SUPPLY - 2-wire, with 3-prong...
Installation Instructions (All Languages)
Page 7
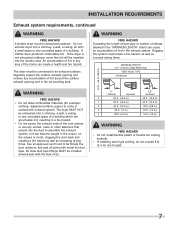
... venting material. • If installing semi-rigid venting, do not exceed 8 ft. (2.4 m) duct length. 7 Plugging the system could create a fire hazard, as well as increasing drying times. Lint can accumulate lint, resulting in the screen, on the screws or rivets, clogging the duct work and creating a fire hazard as well as increase drying times. Use an approved vent hood to come in the exhaust system. If the dryer...
... venting material. • If installing semi-rigid venting, do not exceed 8 ft. (2.4 m) duct length. 7 Plugging the system could create a fire hazard, as well as increasing drying times. Lint can accumulate lint, resulting in the screen, on the screws or rivets, clogging the duct work and creating a fire hazard as well as increase drying times. Use an approved vent hood to come in the exhaust system. If the dryer...
Installation Instructions (All Languages)
Page 8
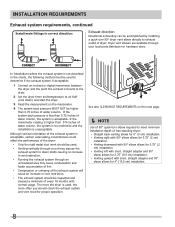
... next page. Í NOTE Use of 90° quick-turn 90° dryer vent elbow directly to air fluff (cool down drafts causing an increase in vent restriction. • Running the exhaust system through your local parts distributor or hardware store. INSTALLATION REQUIREMENTS Exhaust system requirements, continued Install male fittings in correct direction: Exhaust direction Directional exhausting can be higher than 0.75 inches of water column. Dryer vent elbows are available through...
... next page. Í NOTE Use of 90° quick-turn 90° dryer vent elbow directly to air fluff (cool down drafts causing an increase in vent restriction. • Running the exhaust system through your local parts distributor or hardware store. INSTALLATION REQUIREMENTS Exhaust system requirements, continued Install male fittings in correct direction: Exhaust direction Directional exhausting can be higher than 0.75 inches of water column. Dryer vent elbows are available through...
Installation Instructions (All Languages)
Page 9
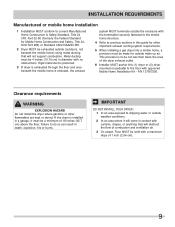
... (45.7 cm) above the floor. Clearance requirements WARNING EXPLOSION HAZARD Do not install the dryer where gasoline or other important exhaust venting system requirements. 5 When installing a gas dryer into a mobile home, a provision must be solid with approved Mobile Home Installation Kit - This provision is installed in a garage, it will come in contact with the termination securely fastened to the mobile home structure. 4 Refer...
... (45.7 cm) above the floor. Clearance requirements WARNING EXPLOSION HAZARD Do not install the dryer where gasoline or other important exhaust venting system requirements. 5 When installing a gas dryer into a mobile home, a provision must be solid with approved Mobile Home Installation Kit - This provision is installed in a garage, it will come in contact with the termination securely fastened to the mobile home structure. 4 Refer...
Installation Instructions (All Languages)
Page 15
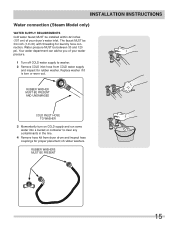
... UNDAMAGED COLD INLET HOSE TO WASHER 3 Momentarily turn on COLD supply and run some water into a bucket or container to washer. 2 Remove COLD inlet hose from dryer drum and inspect hose couplings for rubber washer. INSTALLATION INSTRUCTIONS Water connection (Steam Model only) WATER SUPPLY REQUIREMENTS Cold water faucet MUST be installed within 42 inches (107 cm) of your water pressure. 1 Turn off COLD water supply to clear any contaminants in the line. 4 Remove hose kit from COLD water supply and...
... UNDAMAGED COLD INLET HOSE TO WASHER 3 Momentarily turn on COLD supply and run some water into a bucket or container to washer. 2 Remove COLD inlet hose from dryer drum and inspect hose couplings for rubber washer. INSTALLATION INSTRUCTIONS Water connection (Steam Model only) WATER SUPPLY REQUIREMENTS Cold water faucet MUST be installed within 42 inches (107 cm) of your water pressure. 1 Turn off COLD water supply to clear any contaminants in the line. 4 Remove hose kit from COLD water supply and...

Installation Instructions (All Languages)
Page 19
... operation, please review the "Avoid Service Checklist" in your Use & Care Guide before plugging the power cord into an outlet. 3 Plug the power cord into a grounded outlet. 4 Turn on the power at the circuit breaker/fuse box. 5 Read the Use & Care Guide provided with 3-prong grounded plug 19 Place a level on top of the legs until the dryer is recommended to connect the dryer to check A for future reference. Í NOTE A wiring diagram and technical data sheet are located inside the dryer console. The dryer...
... operation, please review the "Avoid Service Checklist" in your Use & Care Guide before plugging the power cord into an outlet. 3 Plug the power cord into a grounded outlet. 4 Turn on the power at the circuit breaker/fuse box. 5 Read the Use & Care Guide provided with 3-prong grounded plug 19 Place a level on top of the legs until the dryer is recommended to connect the dryer to check A for future reference. Í NOTE A wiring diagram and technical data sheet are located inside the dryer console. The dryer...
Installation Instructions (All Languages)
Page 24
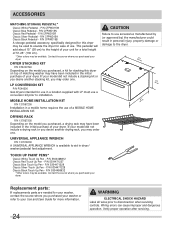
... use a conversion kit prior to disconnection when servicing controls. P/N 5304471227 Classic Blue Touch Up Pen - Contact the source where you purchased your washer or refer to your dryer. P/N CFPWD15B A storage pedestal accessory, specifically designed for this dryer on top of your Use and Care Guide for more information. 24 WARNING ELECTRICAL SHOCK HAZARD Label all wires prior to installation. DRYER STACKING KIT P/N STACKIT4X Depending on the model...
... use a conversion kit prior to disconnection when servicing controls. P/N 5304471227 Classic Blue Touch Up Pen - Contact the source where you purchased your washer or refer to your dryer. P/N CFPWD15B A storage pedestal accessory, specifically designed for this dryer on top of your Use and Care Guide for more information. 24 WARNING ELECTRICAL SHOCK HAZARD Label all wires prior to installation. DRYER STACKING KIT P/N STACKIT4X Depending on the model...


