
Complete Owner's Guide (English)
Page 2
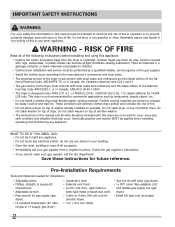
... to minimize the risk of the door opening. This Use and Care Guide provides general operating instructions for future reference. Model Number Serial Number Purchase Date 2 Do not store or use any other appliance. Use the dryer only as instructed in minor or moderate injury. Read all instructions before using this appliance. Your dryer may result in this manual are found on the risk type as described below: Definitions...
... to minimize the risk of the door opening. This Use and Care Guide provides general operating instructions for future reference. Model Number Serial Number Purchase Date 2 Do not store or use any other appliance. Use the dryer only as instructed in minor or moderate injury. Read all instructions before using this appliance. Your dryer may result in this manual are found on the risk type as described below: Definitions...
Complete Owner's Guide (English)
Page 3
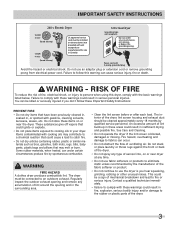
... area. • Clean the lint screen before or after each load. The interior of lint around the opening and remove any accumulation of the dryer, lint screen housing and exhaust duct should be killed or seriously injured if you hear squeaking, grinding, rubbing or other unusual noises. IMPORTANT SAFETY INSTRUCTIONS 240 v Electric Dryer 120 v Gas Dryer 10-30R 3-wire (fused 30 amp) 14-30R 4-wire UL-approved service cord must be connected to cooking...
... area. • Clean the lint screen before or after each load. The interior of lint around the opening and remove any accumulation of the dryer, lint screen housing and exhaust duct should be killed or seriously injured if you hear squeaking, grinding, rubbing or other unusual noises. IMPORTANT SAFETY INSTRUCTIONS 240 v Electric Dryer 120 v Gas Dryer 10-30R 3-wire (fused 30 amp) 14-30R 4-wire UL-approved service cord must be connected to cooking...
Complete Owner's Guide (English)
Page 4
...; A thermal limiter switch automatically turns off the motor in the dryer. Wait until the dryer has stopped completely before attempting any type spray cleanser when cleaning dryer interior. Included in this Use and Care Guide are packed in serious personal injuries. The third grounding prong must be removed. CAUTION The California Safe Drinking Water and Toxic Enforcement Act requires the Governor of California to publish a list of...
...; A thermal limiter switch automatically turns off the motor in the dryer. Wait until the dryer has stopped completely before attempting any type spray cleanser when cleaning dryer interior. Included in this Use and Care Guide are packed in serious personal injuries. The third grounding prong must be removed. CAUTION The California Safe Drinking Water and Toxic Enforcement Act requires the Governor of California to publish a list of...
Complete Owner's Guide (English)
Page 6
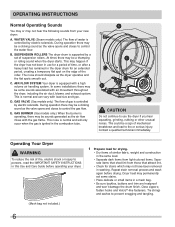
..., grinding, rubbing or other unusual noises. Dryer heat may be a thumping or rolling sound when the dryer starts. Contact a qualified technician immediately. Operating Your Dryer WARNING To reduce the risk of fire, electric shock or injury to fire or serious injury. During operation there may permanently set of gas is equipped with load size and type. WATER VALVE (Steam models only.) The flow...
..., grinding, rubbing or other unusual noises. Dryer heat may be a thumping or rolling sound when the dryer starts. Contact a qualified technician immediately. Operating Your Dryer WARNING To reduce the risk of fire, electric shock or injury to fire or serious injury. During operation there may permanently set of gas is equipped with load size and type. WATER VALVE (Steam models only.) The flow...
Complete Owner's Guide (English)
Page 7
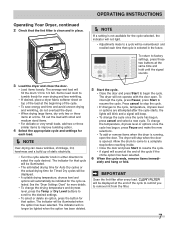
... wrinkling. • If desired, place a dryer fabric softener sheet on top of the load at the beginning of the cycle if the chime option has been selected. 6 When the cycle ends, remove items immedi- Items need room to remove lint from the filter. 7 Allow the drum to come to a complete stop when the door is opened. IMPORTANT Clean the lint filter after the cycle starts, the lights...
... wrinkling. • If desired, place a dryer fabric softener sheet on top of the load at the beginning of the cycle if the chime option has been selected. 6 When the cycle ends, remove items immedi- Items need room to remove lint from the filter. 7 Allow the drum to come to a complete stop when the door is opened. IMPORTANT Clean the lint filter after the cycle starts, the lights...
Complete Owner's Guide (English)
Page 9
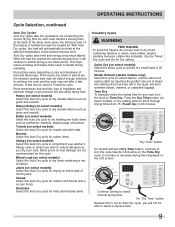
... heavy time dry ultra capacity sanitize high normal low air dry max high normal low damp wrinkle release line dry delay start shrink guard anti static control lock "Dry Time" button On models without a Dry Time button, continue to turn the knob to dry loads containing a mix of fabrics. Room temperature and humidity, type of load and fabric type. Heavy (on the LCD screen. Normal Select this Auto Dry cycle for towels and bath mats. Jeans (on size and...
... heavy time dry ultra capacity sanitize high normal low air dry max high normal low damp wrinkle release line dry delay start shrink guard anti static control lock "Dry Time" button On models without a Dry Time button, continue to turn the knob to dry loads containing a mix of fabrics. Room temperature and humidity, type of load and fabric type. Heavy (on the LCD screen. Normal Select this Auto Dry cycle for towels and bath mats. Jeans (on size and...

Complete Owner's Guide (English)
Page 12
... moisture sensors, cycle times will increase slightly, but overall energy usage will automatically turn it off if the door is left open more than 3 minutes. The drum light will decrease. To turn off , press and hold the button again. 12 ultra capacity sanitize high normal low air dry max high normal low damp wrinkle release line dry delay start chime shrink guard control lock ready steam system sanitize high normal low air dry...
... moisture sensors, cycle times will increase slightly, but overall energy usage will automatically turn it off if the door is left open more than 3 minutes. The drum light will decrease. To turn off , press and hold the button again. 12 ultra capacity sanitize high normal low air dry max high normal low damp wrinkle release line dry delay start chime shrink guard control lock ready steam system sanitize high normal low air dry...
Complete Owner's Guide (English)
Page 14
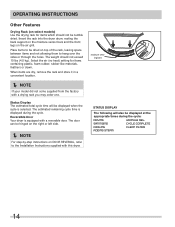
... the appropriate times during the cycle. The estimated remaining cycle time is selected. SANITIZING CYCLE COMPLETE COOLING CLEAN FILTER ADDING STEAM 14 Place items to be tumble dried. When items are dry, remove the rack and store it in a convenient location. Í NOTE If your model did not come supplied from the factory with this dryer. The door can be displayed when the cycle is displayed during the cycle: DRYING WRINKLE REL...
... the appropriate times during the cycle. The estimated remaining cycle time is selected. SANITIZING CYCLE COMPLETE COOLING CLEAN FILTER ADDING STEAM 14 Place items to be tumble dried. When items are dry, remove the rack and store it in a convenient location. Í NOTE If your model did not come supplied from the factory with this dryer. The door can be displayed when the cycle is displayed during the cycle: DRYING WRINKLE REL...
Complete Owner's Guide (English)
Page 18
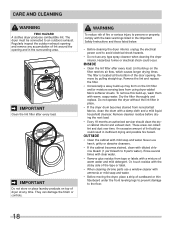
... liquid household cleanser. The dryer must be connected to avoid electrical shock hazards. • Do not use a window cleaner with a mixture of the door opening and in the surrounding area. Remove cleanser residue before drying the next load. • Every 18 months an authorized servicer should clean the dryer cabinet interior and exhaust duct. Rinse several times with clear water. • Remove glue residue from tape or...
... liquid household cleanser. The dryer must be connected to avoid electrical shock hazards. • Do not use a window cleaner with a mixture of the door opening and in the surrounding area. Remove cleanser residue before drying the next load. • Every 18 months an authorized servicer should clean the dryer cabinet interior and exhaust duct. Rinse several times with clear water. • Remove glue residue from tape or...
Complete Owner's Guide (English)
Page 20
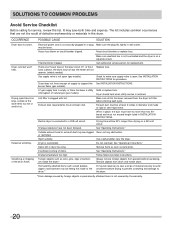
... dryer feels too hot or smells hot. Exhaust duct must have not been met. See "Operating Instructions." See "Operating Instructions." Permanently attached items such as belt buckles, zippers and fasteners may be hitting the inside the dryer.* Always remove foreign objects from drum and restart dryer. OCCURRENCE POSSIBLE CAUSE SOLUTION Dryer does not start. Electric dryer is not open . Drying time will not operate. (electric models) Gas supply valve is connected to make sure supply valve is not covered...
... dryer feels too hot or smells hot. Exhaust duct must have not been met. See "Operating Instructions." See "Operating Instructions." Permanently attached items such as belt buckles, zippers and fasteners may be hitting the inside the dryer.* Always remove foreign objects from drum and restart dryer. OCCURRENCE POSSIBLE CAUSE SOLUTION Dryer does not start. Electric dryer is not open . Drying time will not operate. (electric models) Gas supply valve is connected to make sure supply valve is not covered...

Complete Owner's Guide (English)
Page 21
Exclusions This warranty does not cover the following: 1. Products with original serial numbers that has been transferred from its original owner to another party or removed outside the USA or Canada. 3. Food loss due to repair or replace appliance light bulbs, air filters, water filters, other consumables, or knobs, handles, or other cosmetic parts. 11. Products used in the USA and Canada. Damages caused by: services performed by...
Exclusions This warranty does not cover the following: 1. Products with original serial numbers that has been transferred from its original owner to another party or removed outside the USA or Canada. 3. Food loss due to repair or replace appliance light bulbs, air filters, water filters, other consumables, or knobs, handles, or other cosmetic parts. 11. Products used in the USA and Canada. Damages caused by: services performed by...
Installation Instructions (All Languages)
Page 2
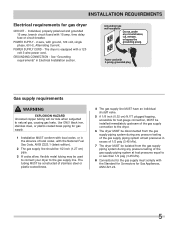
... exhaust duct work • 3-wire or 4-wire 240 volt cord kit (electric dryer) • 4 in. (10.2 cm) clamp • Gas line shutoff valve (gas dryer) • ½ NPT union flare known to collapse, be performed by a qualified installer, service agency or the gas supplier. • Install the clothes dryer according to the manufacturer's instructions and local codes. • The electrical service to the dryer must be easily crushed and trap lint. Children might use any electrical switch...
... exhaust duct work • 3-wire or 4-wire 240 volt cord kit (electric dryer) • 4 in. (10.2 cm) clamp • Gas line shutoff valve (gas dryer) • ½ NPT union flare known to collapse, be performed by a qualified installer, service agency or the gas supplier. • Install the clothes dryer according to the manufacturer's instructions and local codes. • The electrical service to the dryer must be easily crushed and trap lint. Children might use any electrical switch...
Installation Instructions (All Languages)
Page 3
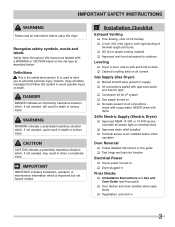
...; Conversion kit for function Electrical Power ‰ House power turned on ‰ Dryer plugged in Final Checks ‰ Installation Instructions and Use and Care Guide read thoroughly ‰ Door latches and drum tumbles when cycle starts ‰ Registration card sent in 3 IMPORTANT SAFETY INSTRUCTIONS WARNING Please read all screws tight on terminal block ‰ Approved strain relief installed ‰ Terminal access cover installed before using this dryer. Recognize safety symbols, words and labels Safety items throughout this manual are...
...; Conversion kit for function Electrical Power ‰ House power turned on ‰ Dryer plugged in Final Checks ‰ Installation Instructions and Use and Care Guide read thoroughly ‰ Door latches and drum tumbles when cycle starts ‰ Registration card sent in 3 IMPORTANT SAFETY INSTRUCTIONS WARNING Please read all screws tight on terminal block ‰ Approved strain relief installed ‰ Terminal access cover installed before using this dryer. Recognize safety symbols, words and labels Safety items throughout this manual are...
Installation Instructions (All Languages)
Page 4
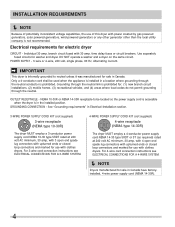
... a 3-conductor power supply cord NEMA 10-30 type SRDT rated at 240 volt AC minimum, 30 amp, with 4 open end spade lug connectors with 30 amp. See "Grounding requirements" in Canada have factoryinstalled, 4-wire power supply cord (NEMA 14-30R). 4 GROUNDING CONNECTION - Use separately fused circuits for use with clothes dryers. DO NOT operate a washer and a dryer on the same circuit. Individual 30 amp. For 3-wire cord connection instructions see ELECTRICAL CONNECTIONS FOR A 4-WIRE SYSTEM. Í NOTE Dryers manufactured...
... a 3-conductor power supply cord NEMA 10-30 type SRDT rated at 240 volt AC minimum, 30 amp, with 4 open end spade lug connectors with 30 amp. See "Grounding requirements" in Canada have factoryinstalled, 4-wire power supply cord (NEMA 14-30R). 4 GROUNDING CONNECTION - Use separately fused circuits for use with clothes dryers. DO NOT operate a washer and a dryer on the same circuit. Individual 30 amp. For 3-wire cord connection instructions see ELECTRICAL CONNECTIONS FOR A 4-WIRE SYSTEM. Í NOTE Dryers manufactured...
Installation Instructions (All Languages)
Page 5
... dryer MUST be disconnected from the gas supply piping system during any circumstances, cut, remove, or bypass the grounding prong. Power cord with ground, 120 volt, single phase, 60 Hz, Alternating Current. plugged tapping, accessible for gas supply. 1 Installation MUST conform with local codes, or in the absence of the gas supply piping system at test pressures in Electrical Installation section. branch circuit fused with a 120 volt 3-wire power cord. Use...
... dryer MUST be disconnected from the gas supply piping system during any circumstances, cut, remove, or bypass the grounding prong. Power cord with ground, 120 volt, single phase, 60 Hz, Alternating Current. plugged tapping, accessible for gas supply. 1 Installation MUST conform with local codes, or in the absence of the gas supply piping system at test pressures in Electrical Installation section. branch circuit fused with a 120 volt 3-wire power cord. Use...
Installation Instructions (All Languages)
Page 7
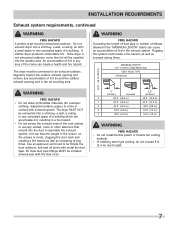
.... (2.4 m) duct length. 7 Use an approved vent hood to come in a fire hazard. • Do not screen the exhaust ends of lint around the outdoor exhaust opening and remove any accumulation of the vent system, or use any concealed space of a building which can create a health and fire hazard. A clothes dryer produces combustible lint. MAXIMUM LENGTH of 4" (102mm) Rigid Metal Duct VENT HOOD TYPE (Preferred) Number of a building. Do not exhaust dryer...
.... (2.4 m) duct length. 7 Use an approved vent hood to come in a fire hazard. • Do not screen the exhaust ends of lint around the outdoor exhaust opening and remove any accumulation of the vent system, or use any concealed space of a building which can create a health and fire hazard. A clothes dryer produces combustible lint. MAXIMUM LENGTH of 4" (102mm) Rigid Metal Duct VENT HOOD TYPE (Preferred) Number of a building. Do not exhaust dryer...
Installation Instructions (All Languages)
Page 8
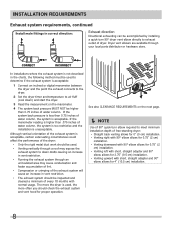
... digital manometer between the dryer and the point the exhaust connects to the dryer. 2 Set the dryer timer and temperature to air fluff (cool down) and start the dryer. 3 Read the measurement on the next page. Í NOTE Use of 90° quick-turn 90° dryer vent elbow directly to exhaust outlet of dryer. INSTALLATION REQUIREMENTS Exhaust system requirements, continued Install male fittings in correct direction: Exhaust direction Directional exhausting can be inspected and cleaned a minimum of every...
... digital manometer between the dryer and the point the exhaust connects to the dryer. 2 Set the dryer timer and temperature to air fluff (cool down) and start the dryer. 3 Read the measurement on the next page. Í NOTE Use of 90° quick-turn 90° dryer vent elbow directly to exhaust outlet of dryer. INSTALLATION REQUIREMENTS Exhaust system requirements, continued Install male fittings in correct direction: Exhaust direction Directional exhausting can be inspected and cleaned a minimum of every...

Installation Instructions (All Languages)
Page 17
.... 2 Carefully slide the dryer to its final position. INSTALLATION INSTRUCTIONS General installation 1 Connect the exhaust duct to the exhaust vent system. Adjust one or more of a 4" (102 mm) clamp (item A) is off at a circuit breaker/fuse box before calling for service. 7 Place these instructions in a location near the dryer for stability. Remove and discard door tape. Use metal foil tape to check A for future reference. Í NOTE A wiring diagram and technical data sheet are located inside...
.... 2 Carefully slide the dryer to its final position. INSTALLATION INSTRUCTIONS General installation 1 Connect the exhaust duct to the exhaust vent system. Adjust one or more of a 4" (102 mm) clamp (item A) is off at a circuit breaker/fuse box before calling for service. 7 Place these instructions in a location near the dryer for stability. Remove and discard door tape. Use metal foil tape to check A for future reference. Í NOTE A wiring diagram and technical data sheet are located inside...
Installation Instructions (All Languages)
Page 22
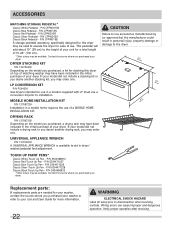
... when servicing controls. Replacement parts: If replacements parts are needed for your Use and Care Guide for more information. 22 WARNING ELECTRICAL SHOCK HAZARD Label all wires prior to aid in a location supplied with LP must use a conversion kit prior to elevate the dryer for ease of a MOBILE HOME INSTALLATION KIT. P/N CFPWD15N Classic Red Pedestal - LP CONVERSION KIT P/N PCK4200 Gas dryers intended for stacking this dryer may order one . P/N CFPWD15W Classic Blue Pedestal - CAUTION Failure to use of use...
... when servicing controls. Replacement parts: If replacements parts are needed for your Use and Care Guide for more information. 22 WARNING ELECTRICAL SHOCK HAZARD Label all wires prior to aid in a location supplied with LP must use a conversion kit prior to elevate the dryer for ease of a MOBILE HOME INSTALLATION KIT. P/N CFPWD15N Classic Red Pedestal - LP CONVERSION KIT P/N PCK4200 Gas dryers intended for stacking this dryer may order one . P/N CFPWD15W Classic Blue Pedestal - CAUTION Failure to use of use...

Product Specifications Sheet (English)
Page 2
... consult local and national electric and plumbing codes. Width C - Dryers (E & G) Frigidaire Affinity (L models) Front Load Dryers FASE7074L R / N / A / W 7.0 Cu. Ft.) Controls Dryer Drum Interior Interior Light Door Trim Ready Steam™ DrySense™ Technology Wrinkle Release Technology TimeWise™ Technology Moisture Sensor Time Remaining Indicator Cycle Status Lights Cycle Signal Cycle Signal "On/Off " Cycle Signal Volume Control Control Lock Start / Pause / Cancel Buttons Energy Saver Option Delay Start Tumble Speed (RPM) Reversible Door Lint Screen Sound Package Adjustable...
... consult local and national electric and plumbing codes. Width C - Dryers (E & G) Frigidaire Affinity (L models) Front Load Dryers FASE7074L R / N / A / W 7.0 Cu. Ft.) Controls Dryer Drum Interior Interior Light Door Trim Ready Steam™ DrySense™ Technology Wrinkle Release Technology TimeWise™ Technology Moisture Sensor Time Remaining Indicator Cycle Status Lights Cycle Signal Cycle Signal "On/Off " Cycle Signal Volume Control Control Lock Start / Pause / Cancel Buttons Energy Saver Option Delay Start Tumble Speed (RPM) Reversible Door Lint Screen Sound Package Adjustable...


