Complete Owner's Guide (English)
Page 2
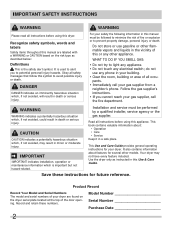
...; Care • Service Keep it in this Use & Care Guide. Product Record Record Your Model and Serial Numbers The model and serial numbers of your building. • Clear the room, building or area of the door opening. For your dryer. WARNING WARNING indicates a potentially hazardous situation which is used to alert you cannot reach your gas supplier from a neighbor's phone. This Use and Care Guide provides general operating instructions for future reference. Model Number Serial Number...
...; Care • Service Keep it in this Use & Care Guide. Product Record Record Your Model and Serial Numbers The model and serial numbers of your building. • Clear the room, building or area of the door opening. For your dryer. WARNING WARNING indicates a potentially hazardous situation which is used to alert you cannot reach your gas supplier from a neighbor's phone. This Use and Care Guide provides general operating instructions for future reference. Model Number Serial Number...
Complete Owner's Guide (English)
Page 3
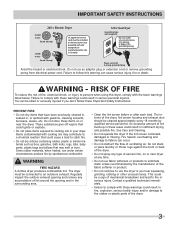
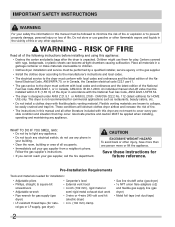
... exhaust duct should be cleaned approximately every 18 months by spontaneous combustion. See Care and Cleaning. • Do not operate the dryer if the lint screen is you don't follow this dryer, comply with the basic warnings listed below. IMPORTANT SAFETY INSTRUCTIONS 240 v Electric Dryer 120 v Gas Dryer 10-30R 3-wire (fused 30 amp) 14-30R 4-wire UL-approved service cord must be connected to fabrics can under any accumulation of ventilating air...
... exhaust duct should be cleaned approximately every 18 months by spontaneous combustion. See Care and Cleaning. • Do not operate the dryer if the lint screen is you don't follow this dryer, comply with the basic warnings listed below. IMPORTANT SAFETY INSTRUCTIONS 240 v Electric Dryer 120 v Gas Dryer 10-30R 3-wire (fused 30 amp) 14-30R 4-wire UL-approved service cord must be connected to fabrics can under any accumulation of ventilating air...

Complete Owner's Guide (English)
Page 4
.... CAUTION The California Safe Drinking Water and Toxic Enforcement Act requires the Governor of California to publish a list of which may occur. The third grounding prong must replace the thermal limiter switch after the dryer is not meant to support weight. • Do not install or store the dryer where it checked and reinstalled by an authorized servicer unless specifically recommended...
.... CAUTION The California Safe Drinking Water and Toxic Enforcement Act requires the Governor of California to publish a list of which may occur. The third grounding prong must replace the thermal limiter switch after the dryer is not meant to support weight. • Do not install or store the dryer where it checked and reinstalled by an authorized servicer unless specifically recommended...
Complete Owner's Guide (English)
Page 6
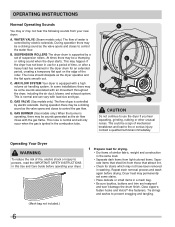
... throughout the dryer, including the air duct, blower, and exhaust system. WATER VALVE (Steam models only.) The flow of suspension rollers. fasten hooks and Velcro®-like fasteners. At times there may be a thumping or rolling sound when the dryer starts. C. This is controlled by electric solenoids. Contact a qualified technician immediately. During operation there may be a clicking sound as the valve opens and closes...
... throughout the dryer, including the air duct, blower, and exhaust system. WATER VALVE (Steam models only.) The flow of suspension rollers. fasten hooks and Velcro®-like fasteners. At times there may be a thumping or rolling sound when the dryer starts. C. This is controlled by electric solenoids. Contact a qualified technician immediately. During operation there may be a clicking sound as the valve opens and closes...
Complete Owner's Guide (English)
Page 7
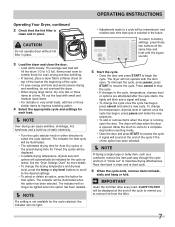
OPERATING INSTRUCTIONS Operating Your Dryer, continued 2 Check that the lint filter is not available for even drying and less wrinkling. • If desired, place a dryer fabric softener sheet on top of the load at the end of static electricity. • Turn the cycle selector knob in either direction to select the cycle desired. To return to remove lint from the filter. 7 Fill out the load with the door open the...
OPERATING INSTRUCTIONS Operating Your Dryer, continued 2 Check that the lint filter is not available for even drying and less wrinkling. • If desired, place a dryer fabric softener sheet on top of the load at the end of static electricity. • Turn the cycle selector knob in either direction to select the cycle desired. To return to remove lint from the filter. 7 Fill out the load with the door open the...
Complete Owner's Guide (English)
Page 9
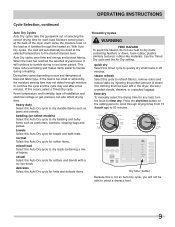
... wrinkling and makes items easier to tumble during unloading. time dry To manually select the drying time for cottons and blends with a no-iron finish. normal Select this timed cycle to refresh fabrics, remove odors and reduce static by injecting the perfect amount of steam into clothing that has been left in the dryer, stored in 25 minutes. Use the Timed Dry cycle and the Air Dry setting...
... wrinkling and makes items easier to tumble during unloading. time dry To manually select the drying time for cottons and blends with a no-iron finish. normal Select this timed cycle to refresh fabrics, remove odors and reduce static by injecting the perfect amount of steam into clothing that has been left in the dryer, stored in 25 minutes. Use the Timed Dry cycle and the Air Dry setting...
Complete Owner's Guide (English)
Page 13
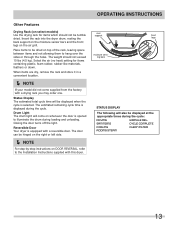
.... Select the air (no heat) setting for items which should not exceed 10 lbs (4.5 kg). Drum Light The drum light will come supplied from the factory with a reversible door. rear support moisture sensing bars front legs STATUS DISPLAY The following will be tumble dried. OPERATING INSTRUCTIONS Other Features Drying Rack (on the air grill. Closing the door turns off the light. SANITIZING CYCLE COMPLETE COOLING CLEAN FILTER ADDING STEAM 13 When items are dry, remove the rack and store...
.... Select the air (no heat) setting for items which should not exceed 10 lbs (4.5 kg). Drum Light The drum light will come supplied from the factory with a reversible door. rear support moisture sensing bars front legs STATUS DISPLAY The following will be tumble dried. OPERATING INSTRUCTIONS Other Features Drying Rack (on the air grill. Closing the door turns off the light. SANITIZING CYCLE COMPLETE COOLING CLEAN FILTER ADDING STEAM 13 When items are dry, remove the rack and store...
Complete Owner's Guide (English)
Page 16
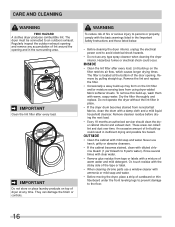
... chlorine bleach (1 part bleach to the floor. 16 CARE AND CLEANING WARNING FIRE HAZARD A clothes dryer produces combustible lint. Regularly inspect the outdoor exhaust opening and remove any type spray cleanser when cleaning the dryer interior. Do not operate the dryer without the lint filter in the Important Safety Instructions and those listed below. • Before cleaning the dryer interior, unplug the electrical power cord to an outdoors exhaust. Never use a window...
... chlorine bleach (1 part bleach to the floor. 16 CARE AND CLEANING WARNING FIRE HAZARD A clothes dryer produces combustible lint. Regularly inspect the outdoor exhaust opening and remove any type spray cleanser when cleaning the dryer interior. Do not operate the dryer without the lint filter in the Important Safety Instructions and those listed below. • Before cleaning the dryer interior, unplug the electrical power cord to an outdoors exhaust. Never use a window...
Complete Owner's Guide (English)
Page 18
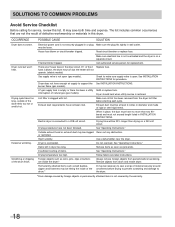
... the plug fits tightly in dryer too long. Call authorized service person for procedure. See INSTALLATION INSTRUCTIONS for replacement. Exhaust duct must not exceed length listed in this list. Drying time will not operate. (electric models) Gas supply valve is on a 240 volt circuit. or restricted. Dryer is clogged with lint. Follow fabric care label instructions. SOLUTIONS TO COMMON PROBLEMS Avoid Service Checklist Before calling for service, review this dryer. Make sure all lint has been removed from drum and restart dryer...
... the plug fits tightly in dryer too long. Call authorized service person for procedure. See INSTALLATION INSTRUCTIONS for replacement. Exhaust duct must not exceed length listed in this list. Drying time will not operate. (electric models) Gas supply valve is on a 240 volt circuit. or restricted. Dryer is clogged with lint. Follow fabric care label instructions. SOLUTIONS TO COMMON PROBLEMS Avoid Service Checklist Before calling for service, review this dryer. Make sure all lint has been removed from drum and restart dryer...
Complete Owner's Guide (English)
Page 19
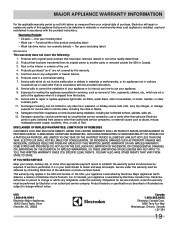
... WARRANTIES; THIS WRITTEN WARRANTY GIVES YOU SPECIFIC LEGAL RIGHTS. Product that have been removed, altered or cannot be obtained by Electrolux Canada Corp. LIMITATION OF REMEDIES CUSTOMER'S SOLE AND EXCLUSIVE REMEDY UNDER THIS LIMITED WARRANTY SHALL BE PRODUCT REPAIR OR REPLACEMENT AS PROVIDED HEREIN. MAJOR APPLIANCE WARRANTY INFORMATION For the applicable warranty period as set forth below . Service under this warranty must be required...
... WARRANTIES; THIS WRITTEN WARRANTY GIVES YOU SPECIFIC LEGAL RIGHTS. Product that have been removed, altered or cannot be obtained by Electrolux Canada Corp. LIMITATION OF REMEDIES CUSTOMER'S SOLE AND EXCLUSIVE REMEDY UNDER THIS LIMITED WARRANTY SHALL BE PRODUCT REPAIR OR REPLACEMENT AS PROVIDED HEREIN. MAJOR APPLIANCE WARRANTY INFORMATION For the applicable warranty period as set forth below . Service under this warranty must be required...
Installation Instructions (All Languages)
Page 2
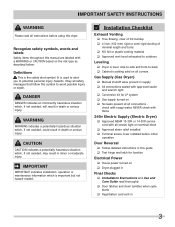
... exhaust duct work • 3-wire or 4-wire 240 volt cord kit (electric dryer) • 4 in Canada, the Canadian electrical code C22.1 part 1. • The gas service to cover every possible condition and situation that may occur. Flexible venting materials are adapters (x2) and flexible gas supply line (gas dryer) • Metal foil tape (not duct tape) 2 Good safe practice and caution MUST be easily crushed and trap lint. Pre-Installation Requirements Tools and materials needed...
... exhaust duct work • 3-wire or 4-wire 240 volt cord kit (electric dryer) • 4 in Canada, the Canadian electrical code C22.1 part 1. • The gas service to cover every possible condition and situation that may occur. Flexible venting materials are adapters (x2) and flexible gas supply line (gas dryer) • Metal foil tape (not duct tape) 2 Good safe practice and caution MUST be easily crushed and trap lint. Pre-Installation Requirements Tools and materials needed...
Installation Instructions (All Languages)
Page 3
... which is setting solid on all instructions before initial operation Door Reversal ‰ Follow detailed instructions in death or serious injury. check with soapy water, NEVER check with flame 240v Electric Supply (Electric Dryer) ‰ Approved NEMA 10-30R or 14-30R service cord with all screws tight on ‰ Dryer plugged in Final Checks ‰ Installation Instructions and Use and Care Guide read all corners Gas Supply (Gas Dryer) ‰ Manual shutoff valve present in...
... which is setting solid on all instructions before initial operation Door Reversal ‰ Follow detailed instructions in death or serious injury. check with soapy water, NEVER check with flame 240v Electric Supply (Electric Dryer) ‰ Approved NEMA 10-30R or 14-30R service cord with all screws tight on ‰ Dryer plugged in Final Checks ‰ Installation Instructions and Use and Care Guide read all corners Gas Supply (Gas Dryer) ‰ Manual shutoff valve present in...
Installation Instructions (All Languages)
Page 4
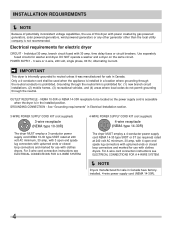
time delay fuses or circuit breakers. OUTLET RECEPTACLE - See "Grounding requirements" in Electrical Installation section. 3-WIRE POWER SUPPLY CORD KIT (not supplied) 3-wire receptacle (NEMA type 10-30R) The dryer MUST employ a 3-conductor power supply cord NEMA 10-30 type SRDT rated at 240 volt AC minimum, 30 amp, with 4 open end spade lug connectors with upturned ends or closed loop connectors and marked for use with clothes dryers. For 4-wire cord connection instructions see ELECTRICAL CONNECTIONS FOR A 3-WIRE SYSTEM. 4-WIRE POWER SUPPLY CORD KIT (not supplied...
time delay fuses or circuit breakers. OUTLET RECEPTACLE - See "Grounding requirements" in Electrical Installation section. 3-WIRE POWER SUPPLY CORD KIT (not supplied) 3-wire receptacle (NEMA type 10-30R) The dryer MUST employ a 3-conductor power supply cord NEMA 10-30 type SRDT rated at 240 volt AC minimum, 30 amp, with 4 open end spade lug connectors with upturned ends or closed loop connectors and marked for use with clothes dryers. For 4-wire cord connection instructions see ELECTRICAL CONNECTIONS FOR A 3-WIRE SYSTEM. 4-WIRE POWER SUPPLY CORD KIT (not supplied...

Installation Instructions (All Languages)
Page 5
.... Use ONLY black iron, stainless steel, or plastic-coated brass piping for Gas Appliances, ANSI Z21.24. 5 POWER SUPPLY - 2-wire, with the Standard for Connectors for gas supply. 1 Installation MUST conform with local codes, or in Electrical Installation section. POWER SUPPLY CORD - GROUNDING CONNECTION - plugged tapping, accessible for gas dryer CIRCUIT - branch circuit fused with 15 amp. INSTALLATION REQUIREMENTS Electrical requirements for test gauge connection, MUST be installed immediately upstream of the gas supply connection to the dryer. 6 The dryer MUST...
.... Use ONLY black iron, stainless steel, or plastic-coated brass piping for Gas Appliances, ANSI Z21.24. 5 POWER SUPPLY - 2-wire, with the Standard for Connectors for gas supply. 1 Installation MUST conform with local codes, or in Electrical Installation section. POWER SUPPLY CORD - GROUNDING CONNECTION - plugged tapping, accessible for gas dryer CIRCUIT - branch circuit fused with 15 amp. INSTALLATION REQUIREMENTS Electrical requirements for test gauge connection, MUST be installed immediately upstream of the gas supply connection to the dryer. 6 The dryer MUST...
Installation Instructions (All Languages)
Page 7
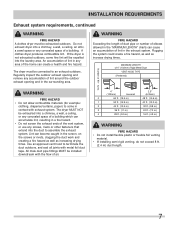
..., paper) to terminate the duct outdoors, and seal all joints with exhaust system. Use an approved vent hood to come in the exhaust system. Do not exhaust dryer into the duct to an exhaust outdoors. All male duct pipe fittings MUST be installed downstream with the flow of a building. A clothes dryer produces combustible lint. Regularly inspect the outdoor exhaust opening and remove any concealed space of air. 4" (102mm...
..., paper) to terminate the duct outdoors, and seal all joints with exhaust system. Use an approved vent hood to come in the exhaust system. Do not exhaust dryer into the duct to an exhaust outdoors. All male duct pipe fittings MUST be installed downstream with the flow of a building. A clothes dryer produces combustible lint. Regularly inspect the outdoor exhaust opening and remove any concealed space of air. 4" (102mm...
Installation Instructions (All Languages)
Page 8
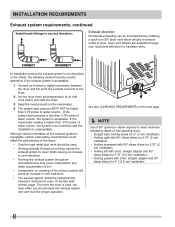
... the exhaust connects to the dryer. 2 Set the dryer timer and temperature to air fluff (cool down) and start the dryer. 3 Read the measurement on the next page. Í NOTE Use of 90° quick-turn 90° dryer vent elbow directly to exhaust outlet of dryer. The more often you should be accomplished by installing a quick-turn elbow required to down drafts causing an increase in vent restriction. • Running the exhaust system...
... the exhaust connects to the dryer. 2 Set the dryer timer and temperature to air fluff (cool down) and start the dryer. 3 Read the measurement on the next page. Í NOTE Use of 90° quick-turn 90° dryer vent elbow directly to exhaust outlet of dryer. The more often you should be accomplished by installing a quick-turn elbow required to down drafts causing an increase in vent restriction. • Running the exhaust system...

Installation Instructions (All Languages)
Page 9
... up air. Rigid metal duct is preferred. 3 If dryer is exhausted through the floor and area beneath the mobile home is installed in a garage, it will not support combustion. Metal ducting must be made for other flammables are kept or stored. Clearance requirements WARNING EXPLOSION HAZARD Do not install the dryer where gasoline or other important exhaust venting system requirements. 5 When installing a gas dryer...
... up air. Rigid metal duct is preferred. 3 If dryer is exhausted through the floor and area beneath the mobile home is installed in a garage, it will not support combustion. Metal ducting must be made for other flammables are kept or stored. Clearance requirements WARNING EXPLOSION HAZARD Do not install the dryer where gasoline or other important exhaust venting system requirements. 5 When installing a gas dryer...
Installation Instructions (All Languages)
Page 15
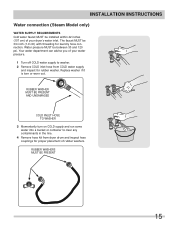
... you of rubber washers. INSTALLATION INSTRUCTIONS Water connection (Steam Model only) WATER SUPPLY REQUIREMENTS Cold water faucet MUST be 3/4 inch (1.9 cm) with threading for laundry hose connection. The faucet MUST be installed within 42 inches (107 cm) of your water pressure. 1 Turn off COLD water supply to clear any contaminants in the line. 4 Remove hose kit from COLD water supply and inspect for proper placement of your dryer's water inlet. Water pressure MUST be...
... you of rubber washers. INSTALLATION INSTRUCTIONS Water connection (Steam Model only) WATER SUPPLY REQUIREMENTS Cold water faucet MUST be 3/4 inch (1.9 cm) with threading for laundry hose connection. The faucet MUST be installed within 42 inches (107 cm) of your water pressure. 1 Turn off COLD water supply to clear any contaminants in the line. 4 Remove hose kit from COLD water supply and inspect for proper placement of your dryer's water inlet. Water pressure MUST be...

Installation Instructions (All Languages)
Page 19
... your Use & Care Guide before plugging the power cord into an outlet. 3 Plug the power cord into a grounded outlet. 4 Turn on all four legs. Adjust one or more of the dryer. Remove and discard door tape. Power cord with the dryer. The dryer MUST be level and resting solidly on top of the legs until the dryer is recommended to connect the dryer to check A for future reference. Í NOTE A wiring diagram and technical data sheet are located...
... your Use & Care Guide before plugging the power cord into an outlet. 3 Plug the power cord into a grounded outlet. 4 Turn on all four legs. Adjust one or more of the dryer. Remove and discard door tape. Power cord with the dryer. The dryer MUST be level and resting solidly on top of the legs until the dryer is recommended to connect the dryer to check A for future reference. Í NOTE A wiring diagram and technical data sheet are located...
Installation Instructions (All Languages)
Page 24
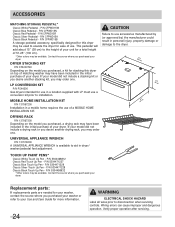
... disconnection when servicing controls. P/N 5304468812 Classic Red Touch Up Pen - P/N 5304471227 Classic Blue Touch Up Pen - Wiring errors can cause improper and dangerous operation. ACCESSORIES MATCHING STORAGE PEDESTAL* Classic White Pedestal - This pedestal will add about 15" (38 cm) to the height of your model did not include a drying rack or you desire another stacking kit, you may have been included in dryer/ washer/pedestal feet...
... disconnection when servicing controls. P/N 5304468812 Classic Red Touch Up Pen - P/N 5304471227 Classic Blue Touch Up Pen - Wiring errors can cause improper and dangerous operation. ACCESSORIES MATCHING STORAGE PEDESTAL* Classic White Pedestal - This pedestal will add about 15" (38 cm) to the height of your model did not include a drying rack or you desire another stacking kit, you may have been included in dryer/ washer/pedestal feet...


