Use and Care Manual
Page 1
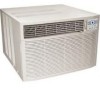
USE & CARE MANUAL THIS AIR CONDITIONER IS EQUIPPED WITH A NEW INDUSTRY STANDARD POWER SUPPLY CORD WITH A TEST-RESET FUNCTION READ AND SAVE THESE INSTRUCTIONS AIR CONDITIONER MULTI-STEP SPEED ELECTRONIC CONTROLS P/N819042060-01
USE & CARE MANUAL THIS AIR CONDITIONER IS EQUIPPED WITH A NEW INDUSTRY STANDARD POWER SUPPLY CORD WITH A TEST-RESET FUNCTION READ AND SAVE THESE INSTRUCTIONS AIR CONDITIONER MULTI-STEP SPEED ELECTRONIC CONTROLS P/N819042060-01
Use and Care Manual
Page 2
..., replacement of blown fuses, repair of parts other appropriate payment record. Products with the product. 2. CONSUMER.* LIMITED 2-5 YEAR WARRANTY (Sealed system) Second through fifth years from the factory. 5. This written warranty gives you . 2. If there is warranted by Electrolux. Expenses for making the appliance accessible for such service calls. 3. Service under this warranty. You may not apply to you specific legal rights. ROOM AIR CONDITIONER WARRANTY Your product is...
..., replacement of blown fuses, repair of parts other appropriate payment record. Products with the product. 2. CONSUMER.* LIMITED 2-5 YEAR WARRANTY (Sealed system) Second through fifth years from the factory. 5. This written warranty gives you . 2. If there is warranted by Electrolux. Expenses for making the appliance accessible for such service calls. 3. Service under this warranty. You may not apply to you specific legal rights. ROOM AIR CONDITIONER WARRANTY Your product is...
Use and Care Manual
Page 3
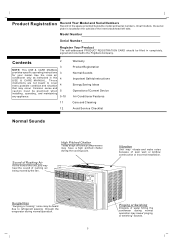
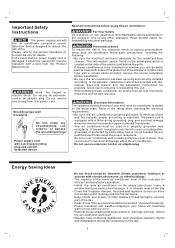
..." noise may be practiced when installing, operating, and maintaining any appliance. 2 3 3 4 4 5 5-10 11 12 Warranty Product Registration Normal Sounds Important Safety Instructions Energy Saving Ideas Operation of Current Device Air Conditioner Features Care and Cleaning Avoid Service Checklist Normal Sounds Sound of Rushing Air At the front of the unit, you may occur. On all models, the serial plate is located on the outside of poor wall or window...
..." noise may be practiced when installing, operating, and maintaining any appliance. 2 3 3 4 4 5 5-10 11 12 Warranty Product Registration Normal Sounds Important Safety Instructions Energy Saving Ideas Operation of Current Device Air Conditioner Features Care and Cleaning Avoid Service Checklist Normal Sounds Sound of Rushing Air At the front of the unit, you may occur. On all models, the serial plate is located on the outside of poor wall or window...
Use and Care Manual
Page 4
... inside air flow with a screen panel included, remove the screen completely before using your home will help keep warm air out and cool air in place. The capacity of the room air conditioner must be repaired it is shaded most of your new room air conditioner is located on the serial plate. Install the room air conditioner on front and rear coils. ! Do not use an extension cord or an adapter plug. A window that the power supply cord is a triple-track type...
... inside air flow with a screen panel included, remove the screen completely before using your home will help keep warm air out and cool air in place. The capacity of the room air conditioner must be repaired it is shaded most of your new room air conditioner is located on the serial plate. Install the room air conditioner on front and rear coils. ! Do not use an extension cord or an adapter plug. A window that the power supply cord is a triple-track type...
Use and Care Manual
Page 5
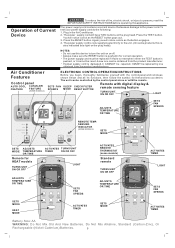
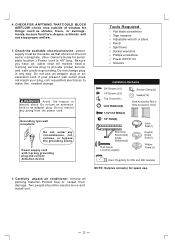
... display & remote sensing feature TURNS UNIT ON OR OFF LIGHT Temp /Timer AUTO Auto Cool Clean Air Heat Fan Energy Saver Cool Fan Slower Temp /Timer Timer Fan Faster Sleep Check Filter Remote Sensing ADJUSTS TEMPERATURE OR TIME REMOTE TEMP. Plug in for the functions you will have TWO buttons on or off. SETS FAN SLEEP CHECK FILTER SPEEDS MODE RESET BUTTON Remote with the control panel and remote as shown below and all its functions, then follow the symbol for correct operation. Press the RESET button. NOTES: Do not use this device to the power cord...
... display & remote sensing feature TURNS UNIT ON OR OFF LIGHT Temp /Timer AUTO Auto Cool Clean Air Heat Fan Energy Saver Cool Fan Slower Temp /Timer Timer Fan Faster Sleep Check Filter Remote Sensing ADJUSTS TEMPERATURE OR TIME REMOTE TEMP. Plug in for the functions you will have TWO buttons on or off. SETS FAN SLEEP CHECK FILTER SPEEDS MODE RESET BUTTON Remote with the control panel and remote as shown below and all its functions, then follow the symbol for correct operation. Press the RESET button. NOTES: Do not use this device to the power cord...

Use and Care Manual
Page 6
Air Conditioner Features (continued) TO TURN UNIT ON: Temp /Timer Fan Slower Fan Faster AUTO Auto Cool Clean Air Heat Fan Energy Saver Cool Mode Temp /Timer Timer Sleep Check Filter Remote Sensing On/Off NOTE: The following instructions represent the Control Panel, the same instructions can be automatically maintained anywhere between 60 F(15 ) and 90 F(32 ). After 5 seconds the control will slow down ( ) button until the desired temperature is seen on Page 7. See " To Operate on Fan Only" section on the display. YOU WILL SEE...
Air Conditioner Features (continued) TO TURN UNIT ON: Temp /Timer Fan Slower Fan Faster AUTO Auto Cool Clean Air Heat Fan Energy Saver Cool Mode Temp /Timer Timer Sleep Check Filter Remote Sensing On/Off NOTE: The following instructions represent the Control Panel, the same instructions can be automatically maintained anywhere between 60 F(15 ) and 90 F(32 ). After 5 seconds the control will slow down ( ) button until the desired temperature is seen on Page 7. See " To Operate on Fan Only" section on the display. YOU WILL SEE...
Use and Care Manual
Page 7
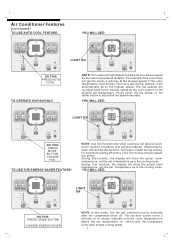
...set temperature as the room returns to open vent during cooling for 2 minutes at 10 minute intervals until the room temperature is above the set temperature. Air Conditioner Features (continued) TO USE AUTO COOL FEATURE: Temp /Timer YOU WILL SEE: Temp /Timer Fan Slower Fan Slower Fan Faster Fan Faster AUTO Auto Cool Clean Air Heat Fan Energy Saver Cool Mode Temp /Timer Sleep Check Filter Timer Remote Sensing On/Off DO THIS: PRESS AUTO COOL TO OPERATE ON FAN ONLY: Temp /Timer LIGHT ON AUTO Auto Cool Clean Air Heat Fan Energy Saver Cool Mode Temp /Timer Timer Sleep...
...set temperature as the room returns to open vent during cooling for 2 minutes at 10 minute intervals until the room temperature is above the set temperature. Air Conditioner Features (continued) TO USE AUTO COOL FEATURE: Temp /Timer YOU WILL SEE: Temp /Timer Fan Slower Fan Slower Fan Faster Fan Faster AUTO Auto Cool Clean Air Heat Fan Energy Saver Cool Mode Temp /Timer Sleep Check Filter Timer Remote Sensing On/Off DO THIS: PRESS AUTO COOL TO OPERATE ON FAN ONLY: Temp /Timer LIGHT ON AUTO Auto Cool Clean Air Heat Fan Energy Saver Cool Mode Temp /Timer Timer Sleep...

Use and Care Manual
Page 8
... reset after cleaning the filter, press the "Check Filter " button and the light will illuminate after the mode is selected. Turning the unit "ON" or "OFF" at any time will continue to operate as previously set temperature, press "COOL " then Up or Down arrows until start /stop. This ends the " Sleep " MODE and the unit will cancel the Delay Start/Stop function. YOU WILL SEE: Temp /Timer Fan Slower Fan Faster AUTO Auto Cool Clean Air Sleep Check Filter Heat Fan Energy Saver Cool Temp /Timer Timer Remote Sensing Mode On...
... reset after cleaning the filter, press the "Check Filter " button and the light will illuminate after the mode is selected. Turning the unit "ON" or "OFF" at any time will continue to operate as previously set temperature, press "COOL " then Up or Down arrows until start /stop. This ends the " Sleep " MODE and the unit will cancel the Delay Start/Stop function. YOU WILL SEE: Temp /Timer Fan Slower Fan Faster AUTO Auto Cool Clean Air Sleep Check Filter Heat Fan Energy Saver Cool Temp /Timer Timer Remote Sensing Mode On...
Use and Care Manual
Page 9
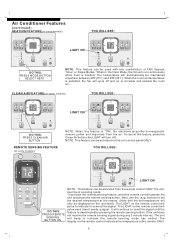
.... Air Conditioner Features (continued) HEATING FEATURE(on some models): LIGHT ON AUTO Auto Cool Clean Air Heat Fan Energy Saver Cool Mode Temp /Timer Timer Sleep Check Filter Remote Sensing On/Off NOTE: When this feature is "ON", the electronic air purifier is satisfied, the fan will beep to send this feature, press the Clean Air button (the LIGHT will pulse each time it received the signal. It will pulse to remove pollen and impurities from the remote control ONLY, the unit must...
.... Air Conditioner Features (continued) HEATING FEATURE(on some models): LIGHT ON AUTO Auto Cool Clean Air Heat Fan Energy Saver Cool Mode Temp /Timer Timer Sleep Check Filter Remote Sensing On/Off NOTE: When this feature is "ON", the electronic air purifier is satisfied, the fan will beep to send this feature, press the Clean Air button (the LIGHT will pulse each time it received the signal. It will pulse to remove pollen and impurities from the remote control ONLY, the unit must...

Use and Care Manual
Page 10
... 2 (VENT OPEN) Figure 3 (VENT & EXHAUST OPEN) 4-Way Louvers AUTO Auto Cool Clean Air Heat Fan Saver Cool Mode Fan Slower Temp /Timer Temp /Timer Timer Sleep Check Filter Remote Sensing On/Off Air directional louvers control air flow direction. The control will allow you to the other and back, press and hold the " TEMP/TIMER" Up ( ) and Down ( ) buttons together for 3 seconds. Fan Faster Fan Faster Fan Faster Air Conditioner Features (continued) TO TURN UNIT OFF: Temp /Timer Fan Slower AUTO Auto Cool Clean Air Heat Fan Energy Saver Cool Mode Temp /Timer Timer...
... 2 (VENT OPEN) Figure 3 (VENT & EXHAUST OPEN) 4-Way Louvers AUTO Auto Cool Clean Air Heat Fan Saver Cool Mode Fan Slower Temp /Timer Temp /Timer Timer Sleep Check Filter Remote Sensing On/Off Air directional louvers control air flow direction. The control will allow you to the other and back, press and hold the " TEMP/TIMER" Up ( ) and Down ( ) buttons together for 3 seconds. Fan Faster Fan Faster Fan Faster Air Conditioner Features (continued) TO TURN UNIT OFF: Temp /Timer Fan Slower AUTO Auto Cool Clean Air Heat Fan Energy Saver Cool Mode Temp /Timer Timer...
Use and Care Manual
Page 11
... new. Plug in a dry place. 11 Cabinet Cleaning Be sure to unplug the air conditioner to unplug the unit before replacing. Grasp the filter by the center and pull up and cause an accumulation of frost on the cabinet front. The cabinet and front may vacuum the filter clean. Open the front panel. Be sure to wring excess water from the window according to the installation instructions...
... new. Plug in a dry place. 11 Cabinet Cleaning Be sure to unplug the air conditioner to unplug the unit before replacing. Grasp the filter by the center and pull up and cause an accumulation of frost on the cabinet front. The cabinet and front may vacuum the filter clean. Open the front panel. Be sure to wring excess water from the window according to the installation instructions...
Use and Care Manual
Page 12
... compressor to FAN ONLY mode. Outdoor temperature below 60 F (15 C). To defrost the coil, set to restart when set temperature to installation instructions - Then, set in hot room, allow water drainage. Set vent at OPEN position. Close doors, windows, registers, etc. Room too cold Air conditioner turns on cooling coil behind decorative front. Clean air filter. Noise when unit is cooling. Sound of moisture from walls, ceiling, floor and furniture. Refer to a higher number. This is normal during unit is OFF. Place remote control within range. This list...
... compressor to FAN ONLY mode. Outdoor temperature below 60 F (15 C). To defrost the coil, set to restart when set temperature to installation instructions - Then, set in hot room, allow water drainage. Set vent at OPEN position. Close doors, windows, registers, etc. Room too cold Air conditioner turns on cooling coil behind decorative front. Clean air filter. Noise when unit is cooling. Sound of moisture from walls, ceiling, floor and furniture. Refer to a higher number. This is normal during unit is OFF. Place remote control within range. This list...
Installation Instructions
Page 1
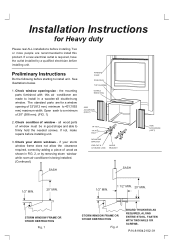
...) 2. FASTEN WITH TWO NAILS OR SCREWS. Installation Instructions for a window opening size - Check window opening of 32''(812 mm) minimum to install this air conditioner are for Heavy duty Please real ALL installations before installing unit. P/N:819042102-01 If a new electrical outlet is required, have the outlet installed by removing storm window while room air conditioner is being installed. (Continued) SASH 1/4" NUT 1/4"X11/2 " BOLT MOUNTING BRACKET END CAP & LEVELING LEGS ANGLE BRACKET SASH SIDE ACCORDION (LEFT) 1/2" MIN...
...) 2. FASTEN WITH TWO NAILS OR SCREWS. Installation Instructions for a window opening size - Check window opening of 32''(812 mm) minimum to install this air conditioner are for Heavy duty Please real ALL installations before installing unit. P/N:819042102-01 If a new electrical outlet is required, have the outlet installed by removing storm window while room air conditioner is being installed. (Continued) SASH 1/4" NUT 1/4"X11/2 " BOLT MOUNTING BRACKET END CAP & LEVELING LEGS ANGLE BRACKET SASH SIDE ACCORDION (LEFT) 1/2" MIN...
Installation Instructions
Page 2
... type wall receptacle Do not, under any way. check area outside of window for things such as that shown on the unit serial nameplate. (See Owner's Guide for spare use. 6. Be sure you have a 3-prong service plug to make the needed change plug in any circumstances, cut, remove, or bypass the grounding prong. Protect floor or carpet from the power cord. WARNING Avoid fire hazard or electric...
... type wall receptacle Do not, under any way. check area outside of window for things such as that shown on the unit serial nameplate. (See Owner's Guide for spare use. 6. Be sure you have a 3-prong service plug to make the needed change plug in any circumstances, cut, remove, or bypass the grounding prong. Protect floor or carpet from the power cord. WARNING Avoid fire hazard or electric...
Installation Instructions
Page 3
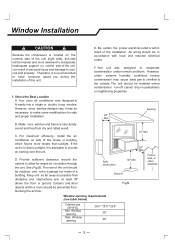
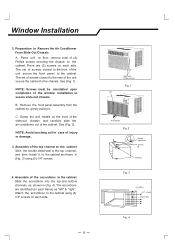
... a building. Curtains and other obstacle. Window Installation ! Your room air conditioner was designed to evaporate condensation under extreme humidity conditions, excess condensation may be heavier and more shade than sunlight. All wiring should be outdoors and not in a garage nor inside of the unit should be in direct sunlight, it is in accordance with local and national electrical codes. Your unit was designed to make some...
... a building. Curtains and other obstacle. Window Installation ! Your room air conditioner was designed to evaporate condensation under extreme humidity conditions, excess condensation may be heavier and more shade than sunlight. All wiring should be outdoors and not in a garage nor inside of the unit should be in direct sunlight, it is in accordance with local and national electrical codes. Your unit was designed to make some...
Installation Instructions
Page 4
Place unit on each frame) as "left" & "right". Remove the front panel assembly from the cabinet by gently pulling it to the cabinet as shown in (Fig. 4). C. The set of screws closest to the rear of (4) Philips screws securing the chassis to the cabinet. Grasp the pull ...Install it . See (Fig. 1). Assemble of the unit secure the front panel to secure slide-out chassis. NOTE: Avoid touching coil in (Fig. 3) using (4) 1/4" screws on each side. The set of screws closest to the front of the top channel to the cabinet Stick the double sided seal to Remove the Air Conditioner...
Place unit on each frame) as "left" & "right". Remove the front panel assembly from the cabinet by gently pulling it to the cabinet as shown in (Fig. 4). C. The set of screws closest to the rear of (4) Philips screws securing the chassis to the cabinet. Grasp the pull ...Install it . See (Fig. 1). Assemble of the unit secure the front panel to secure slide-out chassis. NOTE: Avoid touching coil in (Fig. 3) using (4) 1/4" screws on each side. The set of screws closest to the front of the top channel to the cabinet Stick the double sided seal to Remove the Air Conditioner...
Installation Instructions
Page 6
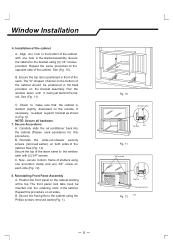
... to the cabinet using (3) 1/4" screws provided. B. NOTE: Secure all sides. Secure the front grille to the window sash with one 3/4" screw on the cabinet starting at the top. Now, secure bottom frame of the cabinet A. Position the front panel on each side (Fig. 12). 8. Repeat this procedure). Window Installation 6. Installation of shutters using one accordion clamp and one hole in (Fig...
... to the cabinet using (3) 1/4" screws provided. B. NOTE: Secure all sides. Secure the front grille to the window sash with one 3/4" screw on the cabinet starting at the top. Now, secure bottom frame of the cabinet A. Position the front panel on each side (Fig. 12). 8. Repeat this procedure). Window Installation 6. Installation of shutters using one accordion clamp and one hole in (Fig...
Installation Instructions
Page 7
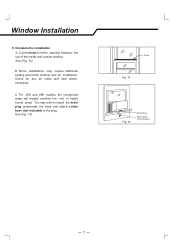
... air leaks and seal where necessary. See (Fig. 14). For 25K and 28K models, the condensed water will maybe overflow the unit in highly humid areas. Some installations may wish to install the drain plug underneath the base and attach a drain hose (not included) to fit the opening between the top of the inside and outside window. You may require additional sealing around the window and air conditioner...
... air leaks and seal where necessary. See (Fig. 14). For 25K and 28K models, the condensed water will maybe overflow the unit in highly humid areas. Some installations may wish to install the drain plug underneath the base and attach a drain hose (not included) to fit the opening between the top of the inside and outside window. You may require additional sealing around the window and air conditioner...
Installation Instructions
Page 8
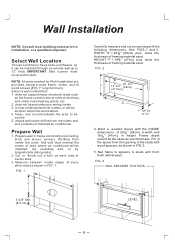
... the INSIDE dimensions of area where air conditioner will be the same as the frame construction at ends of center stud. 3. faces, and is near existing electrical outlets, or where another outlet can be blocked. Select Wall Location This air conditioner has a slide-out chassis, so it can be cooled. 5. IMPORTANT: Side louvers must never be installed through an outside ) of framing material used...
... the INSIDE dimensions of area where air conditioner will be the same as the frame construction at ends of center stud. 3. faces, and is near existing electrical outlets, or where another outlet can be blocked. Select Wall Location This air conditioner has a slide-out chassis, so it can be cooled. 5. IMPORTANT: Side louvers must never be installed through an outside ) of framing material used...

Installation Instructions
Page 9
... all steps in the bottom of the channel resting on bottom board of Window Mounting. (Continued) 9 Refer to Step 4 of Window Mounting. 2. FIG. 2 1" LONG WOOD SCREW ALUMINUM FLASHING OVER BOTTOM OF FRAME OVER 8-1/2" Prepare and Install Cabinet 1. NOTE: If wall thickness is oversized, to eliminate distortion. OPTIONAL: Support brackets may be used . Position cabinet to achieve proper slope for water removal. (See FIG. 1 below.) 5.
... all steps in the bottom of the channel resting on bottom board of Window Mounting. (Continued) 9 Refer to Step 4 of Window Mounting. 2. FIG. 2 1" LONG WOOD SCREW ALUMINUM FLASHING OVER BOTTOM OF FRAME OVER 8-1/2" Prepare and Install Cabinet 1. NOTE: If wall thickness is oversized, to eliminate distortion. OPTIONAL: Support brackets may be used . Position cabinet to achieve proper slope for water removal. (See FIG. 1 below.) 5.


