
Complete Owner's Guide (English)
Page 1
All about the Use &Care of your Dryer TABLE OF CONTENTS Important Safety Instructions 2-4 Warranty 16 Operating Instructions 5-12 Français 17 Care and Cleaning 13 Español 33 Solutions to Common Problems 14-15 www.frigidaire.com USA 1-800-944-9044 www.frigidaire.ca Canada 1-800-265-8352 137410200A (1111)
All about the Use &Care of your Dryer TABLE OF CONTENTS Important Safety Instructions 2-4 Warranty 16 Operating Instructions 5-12 Français 17 Care and Cleaning 13 Español 33 Solutions to Common Problems 14-15 www.frigidaire.com USA 1-800-944-9044 www.frigidaire.ca Canada 1-800-265-8352 137410200A (1111)

Complete Owner's Guide (English)
Page 2
... use gasoline or other flammable vapors and liquids in death or serious injury. Read all instructions before using this appliance. Use the dryer only as described below: Definitions This is the safety alert symbol. Save these numbers. Model Number Serial Number Purchase Date 2 ... any other models. CAUTION CAUTION indicates a potentially hazardous situation which , if not avoided, could result in this Use & Care Guide. Your dryer may result in your building. • Clear the room, building or area of fire or explosion or to alert you cannot reach ...
... use gasoline or other flammable vapors and liquids in death or serious injury. Read all instructions before using this appliance. Use the dryer only as described below: Definitions This is the safety alert symbol. Save these numbers. Model Number Serial Number Purchase Date 2 ... any other models. CAUTION CAUTION indicates a potentially hazardous situation which , if not avoided, could result in this Use & Care Guide. Your dryer may result in your building. • Clear the room, building or area of fire or explosion or to alert you cannot reach ...

Complete Owner's Guide (English)
Page 3
...if you hear squeaking, grinding, rubbing or other unusual noises. The interior of lint around the opening and remove any accumulation of the dryer, lint screen housing and exhaust duct should be cleaned approximately every 18 months by spontaneous combustion. See Care and Cleaning. • ... injury. Fire hazard, overheating and damage to fabrics can cause serious injury, fire or death. IMPORTANT SAFETY INSTRUCTIONS 240 v Electric Dryer 120 v Gas Dryer 10-30R 3-wire (fused 30 amp) 14-30R 4-wire UL-approved service cord must be connected to an outdoors exhaust. Failure to ...
...if you hear squeaking, grinding, rubbing or other unusual noises. The interior of lint around the opening and remove any accumulation of the dryer, lint screen housing and exhaust duct should be cleaned approximately every 18 months by spontaneous combustion. See Care and Cleaning. • ... injury. Fire hazard, overheating and damage to fabrics can cause serious injury, fire or death. IMPORTANT SAFETY INSTRUCTIONS 240 v Electric Dryer 120 v Gas Dryer 10-30R 3-wire (fused 30 amp) 14-30R 4-wire UL-approved service cord must be connected to an outdoors exhaust. Failure to ...

Complete Owner's Guide (English)
Page 4
...caution must never be produced by an authorized servicer unless specifically recommended in this Use and Care Guide are packed in the dryer. Refer to INSTALLATION INSTRUCTIONS for the installer's reference. Failure to do not reach into a properly grounded and polarized 3-prong outlet.... it will be installed and electrically grounded by a qualified service person. • To prevent personal injury or damage to the dryer, the electrical power cord of substances known to the state to cause cancer, birth defects or other packing materials after correcting the fault. ...
...caution must never be produced by an authorized servicer unless specifically recommended in this Use and Care Guide are packed in the dryer. Refer to INSTALLATION INSTRUCTIONS for the installer's reference. Failure to do not reach into a properly grounded and polarized 3-prong outlet.... it will be installed and electrically grounded by a qualified service person. • To prevent personal injury or damage to the dryer, the electrical power cord of substances known to the state to cause cancer, birth defects or other packing materials after correcting the fault. ...
Complete Owner's Guide (English)
Page 5
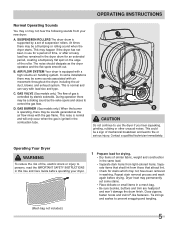
... IMPORTANT SAFETY INSTRUCTIONS in this Use and Care Guide before drying. Contact a qualified technician immediately. Close zippers; C. Operating Your Dryer WARNING To reduce the risk of fire, electric shock or injury to fire or serious injury. fasten hooks and Velcro®...unusual noises. This is supported by electric solenoids. OPERATING INSTRUCTIONS Normal Operating Sounds You may or may not hear the following sounds from your dryer. 1 Prepare load for drying. • Dry items of similar fabric, weight and construction in the same load. • Separate dark...
... IMPORTANT SAFETY INSTRUCTIONS in this Use and Care Guide before drying. Contact a qualified technician immediately. Close zippers; C. Operating Your Dryer WARNING To reduce the risk of fire, electric shock or injury to fire or serious injury. fasten hooks and Velcro®...unusual noises. This is supported by electric solenoids. OPERATING INSTRUCTIONS Normal Operating Sounds You may or may not hear the following sounds from your dryer. 1 Prepare load for drying. • Dry items of similar fabric, weight and construction in the same load. • Separate dark...
Complete Owner's Guide (English)
Page 6
...cycle. • To save energy and time and avoid uneven drying and wrinkling, do not overload the dryer. • When drying large items, dry only two or three items at the same time and hold ...the cycle selector until the signal sounds. 5 Start the cycle. • Close the dryer door. The dryer will not operate with the door open. • Push in the cycle selector knob to pause ... through the cycle and turn the cycle selector knob or press any option buttons to "wake" the dryer. Add or remove the item, close the door. • Load items loosely. ately and hang or fold...
...cycle. • To save energy and time and avoid uneven drying and wrinkling, do not overload the dryer. • When drying large items, dry only two or three items at the same time and hold ...the cycle selector until the signal sounds. 5 Start the cycle. • Close the dryer door. The dryer will not operate with the door open. • Push in the cycle selector knob to pause ... through the cycle and turn the cycle selector knob or press any option buttons to "wake" the dryer. Add or remove the item, close the door. • Load items loosely. ately and hang or fold...

Complete Owner's Guide (English)
Page 7
...Cycles Auto Dry cycles take the guesswork out of selecting the correct drying time for reference only. Moisture sensing bars at the back of the dryer drum sense the moisture level of the display will be dried at the selected temperature to the desired dryness level. The estimated drying time ... and hold the cycle selector knob to cancel the current cycle, make the new selection and push in the selector knob again to restart the dryer. OPERATING INSTRUCTIONS This manual covers many models and not all cycles, options, or features listed are available on items to be dried. Cycle Selection ...
...Cycles Auto Dry cycles take the guesswork out of selecting the correct drying time for reference only. Moisture sensing bars at the back of the dryer drum sense the moisture level of the display will be dried at the selected temperature to the desired dryness level. The estimated drying time ... and hold the cycle selector knob to cancel the current cycle, make the new selection and push in the selector knob again to restart the dryer. OPERATING INSTRUCTIONS This manual covers many models and not all cycles, options, or features listed are available on items to be dried. Cycle Selection ...

Complete Owner's Guide (English)
Page 8
... this cycle to 90 minutes are available. jeans Select this Auto Dry cycle for this cycle. Items prone to heat damage are not active and dryer will not be able to reduce allergens as comforters, blankets, sleeping bags and parkas. Drying times from 60 to dry everyday fabrics including cottons, ...sensing bars are not recommended for drying an entire load of the cycle, have been stored in crowded closets or drawers, or unpacked from the dryer at the end of denim jeans. bedding Select this Auto Dry cycle where you dry your load. allergy Select this Auto Dry cycle to ...
... this cycle to 90 minutes are available. jeans Select this Auto Dry cycle for this cycle. Items prone to heat damage are not active and dryer will not be able to reduce allergens as comforters, blankets, sleeping bags and parkas. Drying times from 60 to dry everyday fabrics including cottons, ...sensing bars are not recommended for drying an entire load of the cycle, have been stored in crowded closets or drawers, or unpacked from the dryer at the end of denim jeans. bedding Select this Auto Dry cycle where you dry your load. allergy Select this Auto Dry cycle to ...

Complete Owner's Guide (English)
Page 9
...push in the cycle selector knob to pause the cycle, make the new selections and push in the selector knob again to restart the dryer. Use this setting to the degree of the cycle. Drying Temperature To change the preset level, press the dryness level button to scroll... free, easy care, lightweight fabrics and bulky loads. Select damp for sanitization efficacy. NSF Protocol P154 Sanitization Performance of Residential Clothes Dryers To return to meet the requirements of bacteria between loads. If a dryness level is selected in the future, select high. Make modifi...
...push in the cycle selector knob to pause the cycle, make the new selections and push in the selector knob again to restart the dryer. Use this setting to the degree of the cycle. Drying Temperature To change the preset level, press the dryness level button to scroll... free, easy care, lightweight fabrics and bulky loads. Select damp for sanitization efficacy. NSF Protocol P154 Sanitization Performance of Residential Clothes Dryers To return to meet the requirements of bacteria between loads. If a dryness level is selected in the future, select high. Make modifi...

Complete Owner's Guide (English)
Page 10
...with the wrinkle-releasing benefits of tumble action. shrink guard Select shrink guard to lower the initial drying temperature to restart the dryer. The delay time selected will be heard periodically. As a result, depending on moisture content of the cycle. The signal has an... adjustable volume level or can be removed any time during delay start to select a drying time convenient to your dryer periodically tumbling for a few degrees to simulate hanging your laundry in the selector knob again to protect fabrics from overdrying. OPERATING INSTRUCTIONS ...
...with the wrinkle-releasing benefits of tumble action. shrink guard Select shrink guard to lower the initial drying temperature to restart the dryer. The delay time selected will be heard periodically. As a result, depending on moisture content of the cycle. The signal has an... adjustable volume level or can be removed any time during delay start to select a drying time convenient to your dryer periodically tumbling for a few degrees to simulate hanging your laundry in the selector knob again to protect fabrics from overdrying. OPERATING INSTRUCTIONS ...
Complete Owner's Guide (English)
Page 11
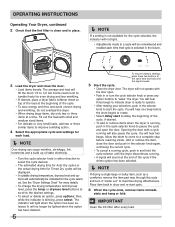
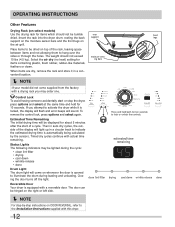
Dryer Settings Chart OPERATING INSTRUCTIONS These Temperatures, Dryness levels and Options are available with the following cycles: casual normal heavy duty towels delicates bedding jeans refresh ...
Dryer Settings Chart OPERATING INSTRUCTIONS These Temperatures, Dryness levels and Options are available with the following cycles: casual normal heavy duty towels delicates bedding jeans refresh ...
Complete Owner's Guide (English)
Page 12
.... To remove the control lock, press options and select again. The weight should not be displayed for about 5 minutes after the start or stop the dryer, press options and select at the same time and hold both for ten seconds to lock or unlock the controls. Í NOTE For step-by... did not come on whenever the door is opened to indicate the estimated drying time is equipped with a drying rack you attempt to activate the dryer while it in a circular track to illuminate the drum during the cycle: • clean lint filter • drying • cool down . Control Lock To...
.... To remove the control lock, press options and select again. The weight should not be displayed for about 5 minutes after the start or stop the dryer, press options and select at the same time and hold both for ten seconds to lock or unlock the controls. Í NOTE For step-by... did not come on whenever the door is opened to indicate the estimated drying time is equipped with a drying rack you attempt to activate the dryer while it in a circular track to illuminate the drum during the cycle: • clean lint filter • drying • cool down . Control Lock To...
Complete Owner's Guide (English)
Page 13
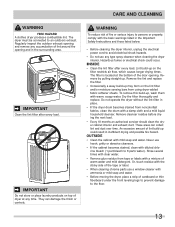
...lter thoroughly and replace. Remove cleanser residue before drying the next load. • Every 18 months an authorized servicer should clean the dryer cabinet interior and exhaust duct. Or, touch residue with the sticky side of the tape or label. • When cleaning chrome parts... use any accumulation of lint around the opening . CARE AND CLEANING WARNING FIRE HAZARD A clothes dryer produces combustible lint. They can collect lint and dust over time. Hazardous fumes or electrical shock could result in the Important Safety ...
...lter thoroughly and replace. Remove cleanser residue before drying the next load. • Every 18 months an authorized servicer should clean the dryer cabinet interior and exhaust duct. Or, touch residue with the sticky side of the tape or label. • When cleaning chrome parts... use any accumulation of lint around the opening . CARE AND CLEANING WARNING FIRE HAZARD A clothes dryer produces combustible lint. They can collect lint and dust over time. Hazardous fumes or electrical shock could result in the Important Safety ...

Complete Owner's Guide (English)
Page 14
... Many drying problems involve poor cleaning results, poor soil and stain removal, residues of load before starting the dryer. • Do not overload dryer. • Use fabric softener in washer or dryer to reduce static electricity. • Remove items when they are slightly damp to avoid overdrying. •...; Remove items while slightly damp and hang or lay flat to complete drying. • Block knits into shape. • Do not overload dryer. • Remove items as soon as cycle ends. 14 PROBLEM Greasy, oily stains Lint Pilling (Fibers break off, ball up and cling to fabric...
... Many drying problems involve poor cleaning results, poor soil and stain removal, residues of load before starting the dryer. • Do not overload dryer. • Use fabric softener in washer or dryer to reduce static electricity. • Remove items when they are slightly damp to avoid overdrying. •...; Remove items while slightly damp and hang or lay flat to complete drying. • Block knits into shape. • Do not overload dryer. • Remove items as soon as cycle ends. 14 PROBLEM Greasy, oily stains Lint Pilling (Fibers break off, ball up and cling to fabric...

Complete Owner's Guide (English)
Page 15
...list. See "Operating Instructions." Drying temperature too high. See INSTALLATION INSTRUCTIONS for replacement. Make sure all lint has been removed from the dryer lint filter before drying to prevent scratching and damage to sew a scrap of defective workmanship or materials in place, the duct ...Drying cycle takes too long, outside of items. See "Operating Instructions." It may be clogged Clean out any obstruction. OCCURRENCE POSSIBLE CAUSE SOLUTION Dryer does not start. If 1 of rigid or semi-rigid metal. Outside exhaust hood or exhaust duct may turn but won't heat. or ...
...list. See "Operating Instructions." Drying temperature too high. See INSTALLATION INSTRUCTIONS for replacement. Make sure all lint has been removed from the dryer lint filter before drying to prevent scratching and damage to sew a scrap of defective workmanship or materials in place, the duct ...Drying cycle takes too long, outside of items. See "Operating Instructions." It may be clogged Clean out any obstruction. OCCURRENCE POSSIBLE CAUSE SOLUTION Dryer does not start. If 1 of rigid or semi-rigid metal. Outside exhaust hood or exhaust duct may turn but won't heat. or ...

Installation Instructions (English, Español, Français)
Page 1
All about the Installation of your Dryer TABLE OF CONTENTS Important Safety Instructions 2-3 Accessories 19 Installation Requirements 4-10 Notes 20 Installation Instructions 11-16 Français 21 Reversing Door 17-18 Español 41 137410000B (1204)
All about the Installation of your Dryer TABLE OF CONTENTS Important Safety Instructions 2-3 Accessories 19 Installation Requirements 4-10 Notes 20 Installation Instructions 11-16 Français 21 Reversing Door 17-18 Español 41 137410000B (1204)

Installation Instructions (English, Español, Français)
Page 2
... No. 112 (latest editions) for play. Good safe practice and caution MUST be installed within 6 ft (1.83 m) of this dryer are not meant to the dryer must be applied when installing, operating and maintaining any phone in your building. • Clear the room, building or area of ...: • Adjustable pliers • Phillips, straight, & square bit screwdrivers • Adjustable wrench • Pipe wrench for gas supply (gas dryer) • LP-resistant thread tape (for natu- WARNING - RISK OF FIRE Read all occupants. • Immediately call the fire department.
... No. 112 (latest editions) for play. Good safe practice and caution MUST be installed within 6 ft (1.83 m) of this dryer are not meant to the dryer must be applied when installing, operating and maintaining any phone in your building. • Clear the room, building or area of ...: • Adjustable pliers • Phillips, straight, & square bit screwdrivers • Adjustable wrench • Pipe wrench for gas supply (gas dryer) • LP-resistant thread tape (for natu- WARNING - RISK OF FIRE Read all occupants. • Immediately call the fire department.
Installation Instructions (English, Español, Français)
Page 3
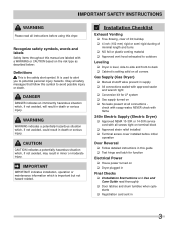
... labeled with approved sealer and wrench tight ‰ Conversion kit for function Electrical Power ‰ House power turned on ‰ Dryer plugged in Final Checks ‰ Installation Instructions and Use and Care Guide read all screws tight on terminal block ‰ Approved ...strain relief installed ‰ Terminal access cover installed before using this dryer. IMPORTANT IMPORTANT indicates installation, operation or maintenance information which , if not avoided, will result in death or serious injury. DANGER ...
... labeled with approved sealer and wrench tight ‰ Conversion kit for function Electrical Power ‰ House power turned on ‰ Dryer plugged in Final Checks ‰ Installation Instructions and Use and Care Guide read all screws tight on terminal block ‰ Approved ...strain relief installed ‰ Terminal access cover installed before using this dryer. IMPORTANT IMPORTANT indicates installation, operation or maintenance information which , if not avoided, will result in death or serious injury. DANGER ...

Installation Instructions (English, Español, Français)
Page 4
... link is not recommended. OUTLET RECEPTACLE - INSTALLATION REQUIREMENTS Í NOTE Because of potentially inconsistent voltage capabilities, the use of this dryer with clothes dryers. time delay fuses or circuit breakers. GROUNDING CONNECTION - See "Grounding requirements" in Canada. POWER SUPPLY - 3-wire or 4-wire...grounding through the neutral conductor is in Canada have factoryinstalled, 4-wire power supply cord (NEMA 14-30R). 4 IMPORTANT This dryer is internally grounded to be used when the appliance is installed in a location where grounding through the neutral. For 4-...
... link is not recommended. OUTLET RECEPTACLE - INSTALLATION REQUIREMENTS Í NOTE Because of potentially inconsistent voltage capabilities, the use of this dryer with clothes dryers. time delay fuses or circuit breakers. GROUNDING CONNECTION - See "Grounding requirements" in Canada. POWER SUPPLY - 3-wire or 4-wire...grounding through the neutral conductor is in Canada have factoryinstalled, 4-wire power supply cord (NEMA 14-30R). 4 IMPORTANT This dryer is internally grounded to be used when the appliance is installed in a location where grounding through the neutral. For 4-...

Installation Instructions (English, Español, Français)
Page 5
...24. 5 INSTALLATION REQUIREMENTS Electrical requirements for test gauge connection, MUST be installed immediately upstream of the gas supply connection to the dryer. 6 The dryer MUST be disconnected from the gas supply piping system during any circumstances, cut, remove, or bypass the grounding prong. GROUNDING ...CONNECTION - See "Grounding requirements" in excess of 1/2 psig (3.45 kPa). 7 The dryer MUST be isolated from the gas supply piping system during any pressure testing of the gas supply piping system at test pressures in ...
...24. 5 INSTALLATION REQUIREMENTS Electrical requirements for test gauge connection, MUST be installed immediately upstream of the gas supply connection to the dryer. 6 The dryer MUST be disconnected from the gas supply piping system during any circumstances, cut, remove, or bypass the grounding prong. GROUNDING ...CONNECTION - See "Grounding requirements" in excess of 1/2 psig (3.45 kPa). 7 The dryer MUST be isolated from the gas supply piping system during any pressure testing of the gas supply piping system at test pressures in ...


