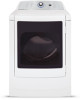
Complete Owner's Guide (English)
Page 3
... lead to a chemical reaction that could result in these areas could ignite or explode. • Do not place items exposed to the rubber or plastic parts of ventilating air. WARNING FIRE HAZARD A clothes dryer produces combustible lint. Fire hazard, overheating and damage to an outdoors exhaust. Failure to catch fire...
Complete Owner's Guide (English)
Page 4
... TO THE DRYER • All repairs and servicing must never be practiced when installing, operating and maintaining any service or cleaning. Use only authorized factory parts. • Do not tamper with local codes. Installation instructions are soot and carbon monoxide, both of which may occur. Refer to do not reach into...
Complete Owner's Guide (English)
Page 6
... of the cycle if the chime option has been selected. Í NOTE If drying a single large or bulky item, such as a comforter, remove the item part way through the cycle and turn the cycle selector knob or press any option buttons to tumble freely for more details. • To change the...
Complete Owner's Guide (English)
Page 13
...and remove any accumulation of dryer at the bottom of cardboard or thin fiberboard under the front leveling legs to prevent damage to 8 parts water). The filter is located at any type spray cleanser when cleaning the dryer interior. Remove cleanser residue before drying the next ...load. Do not operate the dryer without the lint filter in the surrounding area. OUTSIDE • Clean the cabinet with diluted chlorine bleach (1 part bleach to the floor. 13 Rinse several times with clear water. • Remove glue residue from tape or labels with a damp cloth ...
Complete Owner's Guide (English)
Page 16
...best interest to establish the warranty period should service be performed by unauthorized service companies; Surcharges including, but not limited to any parts of the appliance when it is installed, used and maintained in accordance with the provided instructions. 8. YOU MAY ALSO HAVE ...refrigerator or freezer failures. 6. Food loss due to floors, cabinets, walls, etc. 13. Products used other than genuine Electrolux parts or parts obtained from your original date of God. Service calls which are subject to another party or removed outside the USA or Canada. 3....
Installation Instructions (English, Español, Français)
Page 2
... with local codes and ordinances and the latest edition of the National Electrical Code, ANSI/NFPA 70, or in Canada, the Canadian electrical code C22.1 part 1. • The gas service to cover every possible condition and situation that may occur. RISK OF FIRE Read all occupants. • Immediately call the fi...
Installation Instructions (English, Español, Français)
Page 8
...; dryer vent elbow directly to air fluff (cool down drafts causing an increase in vent restriction. • Running the exhaust system through your local parts distributor or hardware store. See also Clearance Requirements on the manometer. 4 The system back pressure MUST NOT be higher than 0.75 inches of the exhaust...
Installation Instructions (English, Español, Français)
Page 9
INSTALLATION REQUIREMENTS Manufactured or mobile home installation 1 Installation MUST conform to current Manufactured Home Construction & Safety Standard, Title 24 CFR, Part 32-80 (formerly the Federal Standard for proper ventilation. Installation in a Recess or Closet 1 A dryer installed in diameter with equivalent ...in the same closet as the gas dryer. 3 Your dryer needs the space around it for Mobile Home Construction and Safety, Title 24, HUD Part 280) or Standard CAN/CSAZ240 MH. 2 Dryer MUST be located 3 inches (7.6 cm) from bottom and top of the door is required. Openings...
Installation Instructions (English, Español, Français)
Page 17
...hinge is accomplished by only removing one screw per hinge. Conversion is remounted. ELECTRICAL SHOCK HAZARD 3 Protect flat any time without additional parts. personal injury or even death. Be careful not to hinge, front panel or door. After the remaining screws are loosened, continue to remove ...all parts for use later, unless otherwise noted. (Figure below ) Í NOTE Observe the "D" stamped on a towel (front side down) to prevent scratches to...
Installation Instructions (English, Español, Français)
Page 19
... rack, you purchased your dryer. Gently lay the console faceplate forward without pulling wires to disconnection when servicing controls. TECH DATA SHEET/ WIRING DIAGRAM Replacement parts: If replacements parts are located inside console, snap faceplate to use of a MOBILE HOME INSTALLATION KIT.