Wiring Diagram (All Languages)
Page 1
...control. If meter reads zero, remove power from control thermistor. NOTE: During normal operation, the display may show: "LOC" - Dryer Tech Data Sheet This information is stuck Fault closed (active). CAUTION: DISCONNECT ELECTRICAL CURRENT BEFORE SERVICING Please Return This Sheet to its wiring...cycle selector to NORMAL, temperature selector to exit test modes. Check for 6 seconds to HIGH HEAT and touch START. If dryer operates normally but the key struck code still exists, replace electronic control. Position cycle selector to NORMAL, temperature selector to determine...
...control. If meter reads zero, remove power from control thermistor. NOTE: During normal operation, the display may show: "LOC" - Dryer Tech Data Sheet This information is stuck Fault closed (active). CAUTION: DISCONNECT ELECTRICAL CURRENT BEFORE SERVICING Please Return This Sheet to its wiring...cycle selector to NORMAL, temperature selector to exit test modes. Check for 6 seconds to HIGH HEAT and touch START. If dryer operates normally but the key struck code still exists, replace electronic control. Position cycle selector to NORMAL, temperature selector to determine...
Wiring Diagram (All Languages)
Page 2
... status LEDs should light. d. When the Start/Pause key is pressed, all the temperature LEDs should light. 5 turns: Drive motor runs; Dryer will flash. 1 turn: Drive motor runs; After entering the test mode, the cycle selector knob can now be reset for two seconds. heat... make the numbers decrease. FUNCTION TEST SEQUENCE 1. Turn knob to select the following tests: Rotate the cycle selector knob clockwise from dryer. Immediately press and hold the Select and Cancel buttons simultaneously for six seconds. Drying and Cool Down LEDs are lit and numbers appear...
... status LEDs should light. d. When the Start/Pause key is pressed, all the temperature LEDs should light. 5 turns: Drive motor runs; Dryer will flash. 1 turn: Drive motor runs; After entering the test mode, the cycle selector knob can now be reset for two seconds. heat... make the numbers decrease. FUNCTION TEST SEQUENCE 1. Turn knob to select the following tests: Rotate the cycle selector knob clockwise from dryer. Immediately press and hold the Select and Cancel buttons simultaneously for six seconds. Drying and Cool Down LEDs are lit and numbers appear...

Complete Owner's Guide (English)
Page 1
All about the Use &Care of your Dryer TABLE OF CONTENTS Important Safety Instructions 2-4 Solutions to Common Problems 16-17 Features 5 Warranty 18 Operating Instructions 6-11 Español 19 Dryer Settings Chart 12-14 Care and Cleaning 15 www.frigidaire.com USA 1-800-944-9044 www.frigidaire.ca Canada 1-800-265-8352 137337100A (1004)
All about the Use &Care of your Dryer TABLE OF CONTENTS Important Safety Instructions 2-4 Solutions to Common Problems 16-17 Features 5 Warranty 18 Operating Instructions 6-11 Español 19 Dryer Settings Chart 12-14 Care and Cleaning 15 www.frigidaire.com USA 1-800-944-9044 www.frigidaire.ca Canada 1-800-265-8352 137337100A (1004)
Complete Owner's Guide (English)
Page 2
... in the vicinity of all safety messages that follow this appliance. This book contains valuable information about features for future reference. Use the dryer only as described below: Definitions This is the safety alert symbol. Follow the gas supplier's instructions. • If you...opening. It also contains information about : • Operation • Care • Service Keep it in this Use & Care Guide. Your dryer may result in this manual must be followed to prevent property damage, personal injury or death. Product Record Record Your Model and Serial Numbers ...
... in the vicinity of all safety messages that follow this appliance. This book contains valuable information about features for future reference. Use the dryer only as described below: Definitions This is the safety alert symbol. Follow the gas supplier's instructions. • If you...opening. It also contains information about : • Operation • Care • Service Keep it in this Use & Care Guide. Your dryer may result in this manual must be followed to prevent property damage, personal injury or death. Product Record Record Your Model and Serial Numbers ...
Complete Owner's Guide (English)
Page 3
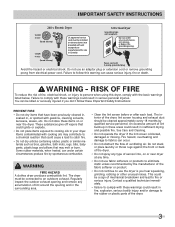
... fire. Contact a qualified technician immediately. • Failure to eliminate static unless recommended by the manufacturer of the dryer, lint screen housing and exhaust duct should be killed or seriously injured if you hear squeaking, grinding, rubbing or other unusual noises.... below. Fire hazard, overheating and damage to fabrics can cause serious injury, fire or death. WARNING FIRE HAZARD A clothes dryer produces combustible lint. RISK OF FIRE To reduce the risk of ventilating air. Failure to persons when using this warning can occur. ...
... fire. Contact a qualified technician immediately. • Failure to eliminate static unless recommended by the manufacturer of the dryer, lint screen housing and exhaust duct should be killed or seriously injured if you hear squeaking, grinding, rubbing or other unusual noises.... below. Fire hazard, overheating and damage to fabrics can cause serious injury, fire or death. WARNING FIRE HAZARD A clothes dryer produces combustible lint. RISK OF FIRE To reduce the risk of ventilating air. Failure to persons when using this warning can occur. ...
Complete Owner's Guide (English)
Page 4
...to warn customer of potential exposure to INSTALLATION INSTRUCTIONS for detailed grounding procedures. Refer to such substances. Failure to do not reach into the dryer if the drum is moved to a new location, have it will be performed by a qualified service person in this Owner's ... defects or other packing materials after correcting the fault. • Failure to comply with controls. • Do not install or store the dryer where it checked and reinstalled by the use any service or cleaning. Close supervision of this product. Í NOTE The instructions appearing in ...
...to warn customer of potential exposure to INSTALLATION INSTRUCTIONS for detailed grounding procedures. Refer to such substances. Failure to do not reach into the dryer if the drum is moved to a new location, have it will be performed by a qualified service person in this Owner's ... defects or other packing materials after correcting the fault. • Failure to comply with controls. • Do not install or store the dryer where it checked and reinstalled by the use any service or cleaning. Close supervision of this product. Í NOTE The instructions appearing in ...
Complete Owner's Guide (English)
Page 6
...similar fabric, weight and construction in the same load. • Separate dark items from light-colored items. Separate items that shed lint from your dryer. 1 Prepare load for drying. • Dry items of suspension rollers. B. D. fasten hooks and Velcro®-like fasteners. The noise should ...dissipate as the air flow mixes with air movement throughout the dryer, including the air duct, blower, and exhaust system. This noise is normal and will only occur when the gas is equipped with load...
...similar fabric, weight and construction in the same load. • Separate dark items from light-colored items. Separate items that shed lint from your dryer. 1 Prepare load for drying. • Dry items of suspension rollers. B. D. fasten hooks and Velcro®-like fasteners. The noise should ...dissipate as the air flow mixes with air movement throughout the dryer, including the air duct, blower, and exhaust system. This noise is normal and will only occur when the gas is equipped with load...
Complete Owner's Guide (English)
Page 7
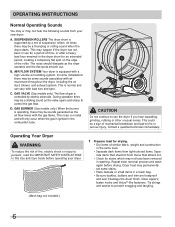
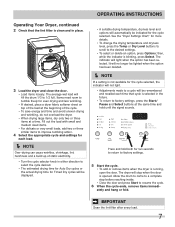
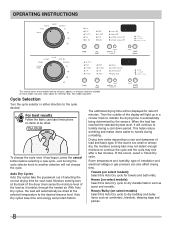
... and hang or fold. IMPORTANT Clean the lint filter after every load. 7 OPERATING INSTRUCTIONS Operating Your Dryer, continued 2 Check that cycle is selected in the future. • To return to resume the cycle. ... • To save energy and time and avoid uneven drying and wrinkling, do not overload the dryer. • When drying large items, dry only two or three items at the same time and ...return to factory settings. 5 Start the cycle. • To add or remove items when the dryer is blinking, press Select. The average wet load will stop before reaching inside. • Close ...
... and hang or fold. IMPORTANT Clean the lint filter after every load. 7 OPERATING INSTRUCTIONS Operating Your Dryer, continued 2 Check that cycle is selected in the future. • To return to resume the cycle. ... • To save energy and time and avoid uneven drying and wrinkling, do not overload the dryer. • When drying large items, dry only two or three items at the same time and ...return to factory settings. 5 Start the cycle. • To add or remove items when the dryer is blinking, press Select. The average wet load will stop before reaching inside. • Close ...
Complete Owner's Guide (English)
Page 8
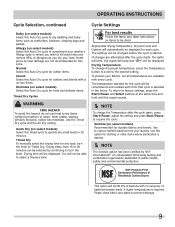
Your model may end after a few minutes. With Auto Dry cycles, the load will automatically be dried at the back of the dryer drum sense the moisture level of the load as jeans and overalls. Then the outside of load and fabric type. If the load is automatically ...
Your model may end after a few minutes. With Auto Dry cycles, the load will automatically be dried at the back of the dryer drum sense the moisture level of the load as jeans and overalls. Then the outside of load and fabric type. If the load is automatically ...
Complete Owner's Guide (English)
Page 9
... other items where sanitization is required. Use this Auto Dry cycle for any load, turn the knob. NSF Protolcol P154 Sanitization Performance of Residential Clothes Dryers This option will be changed before the cycle is selected in 25 minutes. If changes are not recommended for each time that cycle is started...
... other items where sanitization is required. Use this Auto Dry cycle for any load, turn the knob. NSF Protolcol P154 Sanitization Performance of Residential Clothes Dryers This option will be changed before the cycle is selected in 25 minutes. If changes are not recommended for each time that cycle is started...
Complete Owner's Guide (English)
Page 11
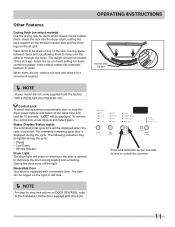
... leaving space between items and not allowing them to the Installation Instructions supplied with a drying rack you may be displayed. Reversible Door Your dryer is displayed during the cycle: • Drying • Cool Down • Wrinkle Release Drum Light The drum light will come supplied ...Lights The estimated total cycle time will be lighted during the cycle. Control Lock To avoid having someone accidentally start or stop the dryer, press Options and Select at the same time and hold both for 10 seconds. OPERATING INSTRUCTIONS Other Features Drying Rack (on select...
... leaving space between items and not allowing them to the Installation Instructions supplied with a drying rack you may be displayed. Reversible Door Your dryer is displayed during the cycle: • Drying • Cool Down • Wrinkle Release Drum Light The drum light will come supplied ...Lights The estimated total cycle time will be lighted during the cycle. Control Lock To avoid having someone accidentally start or stop the dryer, press Options and Select at the same time and hold both for 10 seconds. OPERATING INSTRUCTIONS Other Features Drying Rack (on select...
Complete Owner's Guide (English)
Page 12
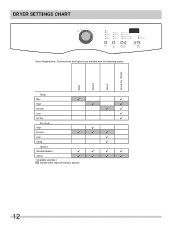
DRYER SETTINGS CHART These Temperatures, Dryness levels and Options are available with the following cycles: Bulky Normal Casual Timed Dry (30-90) Temp Max High Normal Low Air Dry 9 9 9 9 9 9 9 9 Dry Level High Normal Low Damp 9 9 9 9 9 9 Options Wrinkle Release 9 9 9 9 Chime 9 9 9 9 9Available selections Shaded areas represent factory presets. 12
DRYER SETTINGS CHART These Temperatures, Dryness levels and Options are available with the following cycles: Bulky Normal Casual Timed Dry (30-90) Temp Max High Normal Low Air Dry 9 9 9 9 9 9 9 9 Dry Level High Normal Low Damp 9 9 9 9 9 9 Options Wrinkle Release 9 9 9 9 Chime 9 9 9 9 9Available selections Shaded areas represent factory presets. 12
Complete Owner's Guide (English)
Page 13
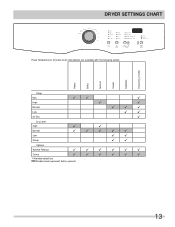
DRYER SETTINGS CHART These Temperatures, Dryness levels and Options are available with the following cycles: Heavy Bulky Normal Casual Delicates Timed Dry (15-90) Temp Max High Normal Low Air Dry 99 9 9 9 999 99 9 Dry Level High Normal Low Damp 9 9 99999 99 99 Options Wrinkle Release 999999 Chime 999999 9Available selections Shaded areas represent factory presets. 13
DRYER SETTINGS CHART These Temperatures, Dryness levels and Options are available with the following cycles: Heavy Bulky Normal Casual Delicates Timed Dry (15-90) Temp Max High Normal Low Air Dry 99 9 9 9 999 99 9 Dry Level High Normal Low Damp 9 9 99999 99 99 Options Wrinkle Release 999999 Chime 999999 9Available selections Shaded areas represent factory presets. 13
Complete Owner's Guide (English)
Page 14
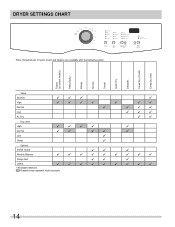
DRYER SETTINGS CHART These Temperatures, Dryness levels and Options are available with the following cycles: Towels (on select models) Heavy/Bulky Allergy Normal Casual Quick Dry Delicates Timed Dry (15-60) Timed Dry (90) Temp Sanitize High Normal Low Air Dry 999 9 9999 9 99 9 999 999 99 Dry Level High Normal Low Damp 9999 9 99 99 9 9 9 Options Shrink Guard 99 9 Wrinkle Release 999999999 Damp Alert 99 9 Chime 999999999 9Available selections Shaded areas represent factory presets. 14
DRYER SETTINGS CHART These Temperatures, Dryness levels and Options are available with the following cycles: Towels (on select models) Heavy/Bulky Allergy Normal Casual Quick Dry Delicates Timed Dry (15-60) Timed Dry (90) Temp Sanitize High Normal Low Air Dry 999 9 9999 9 99 9 999 999 99 Dry Level High Normal Low Damp 9999 9 99 99 9 9 9 Options Shrink Guard 99 9 Wrinkle Release 999999999 Damp Alert 99 9 Chime 999999999 9Available selections Shaded areas represent factory presets. 14
Complete Owner's Guide (English)
Page 15
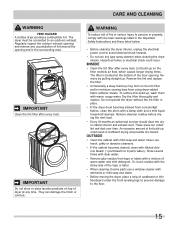
...in the surrounding area. Remove by pulling straight up on top of lint around the opening and remove any type spray cleanser when cleaning the dryer interior. OUTSIDE • Clean the cabinet with diluted chlorine bleach (1 part bleach to an outdoors exhaust. IMPORTANT Clean the lint fi...the tape or label. • When cleaning chrome parts use a window cleaner with ammonia or mild soap and water. • Before moving the dryer, place a strip of cardboard or thin fiberboard under the front leveling legs to prevent damage to avoid electrical shock hazards. • Do ...
...in the surrounding area. Remove by pulling straight up on top of lint around the opening and remove any type spray cleanser when cleaning the dryer interior. OUTSIDE • Clean the cabinet with diluted chlorine bleach (1 part bleach to an outdoors exhaust. IMPORTANT Clean the lint fi...the tape or label. • When cleaning chrome parts use a window cleaner with ammonia or mild soap and water. • Before moving the dryer, place a strip of cardboard or thin fiberboard under the front leveling legs to prevent damage to avoid electrical shock hazards. • Do ...
Complete Owner's Guide (English)
Page 16
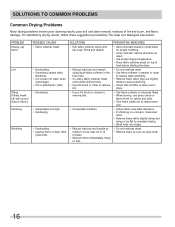
... finish on collars and cuffs. • Turn items inside out to complete drying. • Block knits into shape. • Do not overload dryer. • Remove items as soon as cycle ends. 16 sion. • Follow fabric care label directions. • If shrinking is a concern, check... drying problems involve poor cleaning results, poor soil and stain removal, residues of load before starting the dryer. • Do not overload dryer. • Use fabric softener in washer or dryer to reduce static electricity. • Remove items when they are slightly damp to avoid overdrying. •...
... finish on collars and cuffs. • Turn items inside out to complete drying. • Block knits into shape. • Do not overload dryer. • Remove items as soon as cycle ends. 16 sion. • Follow fabric care label directions. • If shrinking is a concern, check... drying problems involve poor cleaning results, poor soil and stain removal, residues of load before starting the dryer. • Do not overload dryer. • Use fabric softener in washer or dryer to reduce static electricity. • Remove items when they are slightly damp to avoid overdrying. •...
Complete Owner's Guide (English)
Page 17
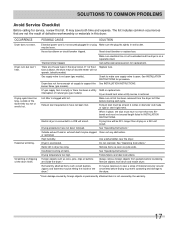
... the duct must have enough air supply to support the See INSTALLATION INSTRUCTIONS. Make sure all lint has been removed from the dryer lint filter before laundering. High humidity. See "Operating Instructions." Remove items as soon as coins, pins, clips or buttons... Lint filter is open (gas models). Exhaust duct must not exceed length listed in INSTALLATION INSTRUCTIONS. Electric dryer is overloaded. Dryer is connected to the dryer. *Drum damage caused by the warranty. 17 Insufficient sorting of material securely around ornaments before drying to...
... the duct must have enough air supply to support the See INSTALLATION INSTRUCTIONS. Make sure all lint has been removed from the dryer lint filter before laundering. High humidity. See "Operating Instructions." Remove items as soon as coins, pins, clips or buttons... Lint filter is open (gas models). Exhaust duct must not exceed length listed in INSTALLATION INSTRUCTIONS. Electric dryer is overloaded. Dryer is connected to the dryer. *Drum damage caused by the warranty. 17 Insufficient sorting of material securely around ornaments before drying to...
Product Specifications Sheet (English)
Page 1
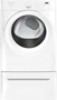
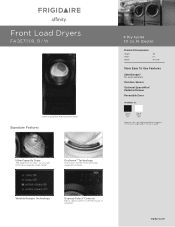
...B / W Optional SpaceWise® Pedestal Drawer Shown Signature Features 6 Dry Cycles 7.0 Cu. std. 60456 4th Edition for quiet operation. frigidaire.com Ultra-Capacity Dryer The largest in width. Ft. Wrinkle Release Technology Express-Select® Controls Easily select options with the touch of a button. Moisture Sensor...laundry, even faster. Electric Product Dimensions Height Width Depth 36" 27" 30-5/16" More Easy To Use Features SilentDesign™ for dryers 37" or less in height and 27" or less in its class1, so you can finish more precisely, reducing wrinkles.
...B / W Optional SpaceWise® Pedestal Drawer Shown Signature Features 6 Dry Cycles 7.0 Cu. std. 60456 4th Edition for quiet operation. frigidaire.com Ultra-Capacity Dryer The largest in width. Ft. Wrinkle Release Technology Express-Select® Controls Easily select options with the touch of a button. Moisture Sensor...laundry, even faster. Electric Product Dimensions Height Width Depth 36" 27" 30-5/16" More Easy To Use Features SilentDesign™ for dryers 37" or less in height and 27" or less in its class1, so you can finish more precisely, reducing wrinkles.
Product Specifications Sheet (English)
Page 2
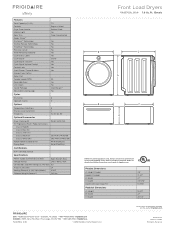
Dryers (E & G) Frigidaire Affinity (L models) Front Load Dryers FAQE7001L B / W 7.0 Cu. Ft.) Controls Dryer Drum Interior Interior Light Door Trim Ready Steam™ DrySense™ Technology Wrinkle Release Technology TimeWise™ ...8482; Yes Cycles Dry Cycles 6 Specialty Cycles 0 Options Temperature Selections Dryness Level Selections Timed Dry 5 4 15, 30, 60, 90 Optional Accessories Dryer Stacking Kit 15" Frigidaire Affinity® Pedestal Drawers Classic Red (R) Classic Blue (N) Classic Silver (A) Classic Black (B) Classic White (W) Mobile Home Installation Kit Drying Rack PN...
Dryers (E & G) Frigidaire Affinity (L models) Front Load Dryers FAQE7001L B / W 7.0 Cu. Ft.) Controls Dryer Drum Interior Interior Light Door Trim Ready Steam™ DrySense™ Technology Wrinkle Release Technology TimeWise™ ...8482; Yes Cycles Dry Cycles 6 Specialty Cycles 0 Options Temperature Selections Dryness Level Selections Timed Dry 5 4 15, 30, 60, 90 Optional Accessories Dryer Stacking Kit 15" Frigidaire Affinity® Pedestal Drawers Classic Red (R) Classic Blue (N) Classic Silver (A) Classic Black (B) Classic White (W) Mobile Home Installation Kit Drying Rack PN...


